Share your knowledge & learn from experts
Because prepping and community go hand in hand
Armed citizens defend their neighborhoods against extreme civil unrest and looting in South Africa
This is what I fear reaching the UK and UK from SA.
Read MoreSmelling Scepter container, safe for water?
Good morning!
I bought a couple of brand new scepter water containers for water storage. My plan is to cycle them every 6 months. However, I’m still a bit concerned about filling them since they have that strong plastic smell. I already washed them out once and have them sitting there open for a couple of days but it still smells. Now I’m wondering if I can still use the container or if I should wait until the smell is gone. I haven’t used bleach for disinfecting yet so I could still wash it out again. I’m just not sure if the smell will affect the taste or even has an impact on the water quality.
Any ideas? Thanks!
Read MoreWhich Go Bag backpack(s) do you like and why?
A couple months ago, I bought myself a 5.11 RUSH72 so that I could get started on my GB. I had spent a couple hours looking through the recommendations in the 45-55L premium section of this article, but gave up after feeling overwhelmed by a combination of the lack of reviews, the prices, and the lack of off-the-shelf internal organization compared to the RUSH72.
Although an OK stop-gap, the RUSH72 doesn’t seem like the right fit for me. I went on a 9 mile hike yesterday, and my back/shoulders were killing me. I originally had attachments set up like in the photo below, and then my partner advised me to move these to the sides of the backpack which was a big help!
However, even after that, I couldn’t get the back to fit right. I think a big part of this is that I cant cinch the waist straps down tightly enough; I’ve got a ~35″ waist, and the tightest these straps went still left some room. Somewhat relatedly, my buddy has the same pack, and the buckle broke just from tightening it! Also, the straps are notably less smooth than my Osprey Atmos AG.
The Best bug out bag survival backpack article isn’t quite as sharply opinionated as others on this site in terms of *exactly* which options people prefer and for what reasons, so I’m opening it up to y’all: Which Go Bag backpack(s) do like and why?
,
Read More ,
,
How do I prepare while off at college?
I just got accepted to a college out of state to study marine biology and this will be my first time living on my own. Well, with whatever roommates the college sets me up with. I will be living in the dorms this first year which brings with it a mandatory meal plan, which has it’s pros and cons.
I don’t want to just rely on the college to feed me though. Even though they probably won’t leave us starving, I know that things can happen and want to be prepared. Hence why I am here.
I also won’t have much room to store things like a generator or gas cans, but I am dedicating the area under my bed as my emergency supply stash. The beds are nice though and can be raised two feet in the air for plenty of space.
Any other advice for someone going out into the world for the first time? I am pretty nervous…, but excited
-Tim
Read More‘Ten Acres Enough’ – A book on self sufficiency
I was just recently recalling this book, which was much touted in Small Farmer’s Journal a few decades ago. The full title is Ten Acres Enough, A Practical Experience Showing How A Very Small Farm May Be Made To Keep A Very Large Family.
It was published in 1866.
I found the book for free on Google Books. It’s also been reprinted in this century. I used to have a copy of it. All I can remember of the book is how exceedingly intense the work seemed to be, but it was quite a slice of reality.
I thought it might be interesting reading for those striving to become self sufficient.
Just go to Google Books and enter Ten Acres Enough to read it for free. I’m going back for a read with much older and wiser eyes.
Read MoreIntro article for types of injections
https://www.medicalnewstoday.com/articles/types-of-injections#intraosseous
Good morning,
Above link is a good intro to injections. Ideal for some preppers to have some familiarity.
Ref para 1; They’re also known as “jabs” – at least in Hong Kong and UK. A non-health care person can also administer vaccines in some circumstances. It’s been done before. Don’t do any of this self-help stuff without getting some actual in person training with the required education involved in your particular situation.
Not too sure which is which – auto versus jet – but the spring-leaded stringes are great when out in the thorns, sticks or elsewhere out of reach of an ALS – Advanced Life Support – clinic (ie more than Boy Scout/Girl Scout, CERT care.
Some big city fire departments, besides their EMTs, EMT-Ps and Para folks teach “intersseod” (spelling – the bone marrow delivery type). Personally speaking, I’d trust them no less so than what passes for physicians nowadays.
Didn’t know that root canals were “complex” dental procedures. For some years in retirement, I’ve been doing volunteer work with dentists and perhaps it’s a calibration matter. The dentists I have breakfast with when out in the field, don’t refer to root canals as “complex”. Perhaps with dangerous pain involving prevention of shock/loss of vital sign(s), it’s deemed “complex”.
If considering self-administering anything with a string, do get some formal, in person training and education.
The Army used to issue 3 (memory fading) auto-inject stringes along with gas mask in case of nuclear war of some sort.
Again, I consider link to be a good intro article for preppers.
Read MoreThought I’d post two articles I had published by FMG several years back. “Knives for the Field” and BMBG “Bare Minimum Go Bag”
https://documentcloud.adobe.com/link/review?uri=urn:aaid:scds:US:e616883e-223e-4a36-bd67-27afc18bc07d
Read MoreHeard The Prepared on NPR this morning in an interview titled “Doomsday Prepping Goes Mainstream”
I listen to NPR every day as part of my daily news sources and entertainment and was surprised to hear a friendly name, The Prepared!
The interview was well done and goes over how prepping is becoming more popular and isn’t just for the old white guys in their underground bunker.
If you need something to listen to on your drive into work here’s the link: https://the1a.org/segments/doomsday-prepping-goes-mainstream/
Read MoreA report from a non prepper from South Africa
https://unherd.com/2021/07/the-return-of-south-africas-militias/
Read MoreThoughts on creating a diy sleeping bag
As the reviewed gear is well out of my price range, I either have what I can afford or make my own. The one I can afford (locally) is rated 8°C, but in winter overnight can go lower. The other option is diy. The filling option are standard polyester, polyester wool blends or pure wool. Outer will be ripstop nylon which can be treated to waterproof it. The polyester and poly blends are what is available for craft work like quilting. I would appreciate viewpoints on these options.
Read MoreSelf-care in a pandemic stressed world
https://www.medicalnewstoday.com/articles/5-top-tips-for-self-care-in-a-pandemic-exhausted-world
Good afternoon,
This article has some good points to get through this somewhat new environment – especially those working from home.
I think it’s a valuable tip listed in 2. to start one’s day … whenever one’s day starts. Mine starts early even prior to the Greenwich meridan waking up … .”with things that we enjoy…”. We preppers can survive the rattle snakes and more deadly mosquitos but it’s the STRESS showing up in the many reports: medical, insurance, all of ’em. Can’t think of exceptions.
Number 3 is understood by some of us – especially senior citizens who did not start out this journey of life with the web. What is deemed “news” is frequently enough an opinion article.
Place max time into health, safety and preparedness.
Read MoreInsulin cooling case for field environment
Good morning.
https://www.frioinsulincoolingcase.com/wp-content/uploads/2020/10/Are-YOU-Ready-Disaster-Prep-PWD-and-Optimism-092020-WEBSITE.pdfC
The company Frio Case has a relatively new method and product to keep insulin within required temperature range during field work. Their basic website is Frio case . com
Rather than post link directly to their insulin cases, the top link is their good pdf intro on disaster prep that leads into the insuin cases.
Hope this proves of value to some forum members.
Read MoreHydrogen peroxide and the prepper
https://www.medicalnewstoday.com/articles/hydrogen-peroxide
Good morning,
Above article is informative and encompassing.
Under section titled “Alternative … for uses” at subsection “Wound Cleaning”, I believe a secondary definition of “sterile” is being used.
As a disinfectant or for oral hygiene, do get preliminary guidance from a colleague EMT, DDS.
Not in article but Walmart’s on the counter H2O2 is 3% USP and the 7-11 brand small bottle is also 3% USP.
Hopefully link is of value for preparedness.
Read MoreClarkson’s Farm, a TV show about a man learning how to start a farm
I’m wondering if any other The Prepared readers have watched Clarkson’s Farm on Amazon Prime? If you haven’t, it’s a great show. Jeremy Clarkson, mostly known in the UK for Top Gear and other car shows, has owned a farm for years and recently decided to farm it himself.
While it’s not strictly a prepping show, it touches on a lot of things of interest to preppers, like growing grain crops, raising livestock, and permaculture. Even if you can’t usually stand Clarkson, he’s in very different form here and undergoes something of a personal transformation.
Read More“Founder” of Wilderness Medicine Died
———————-IN MEMORAM———————-
Dr Paul Auerbach, considered the “founder” of wilderness medicine died.
Cannot post the NYT obit because it’s paywalled. Perhaps some have access. The NYT obit is titled “Dr Paul Auerbach, 70, Who Pioneered Treatment of Wilderness Emergencies”
He was the author/co-author-ediitor of “Management of Wildrness and Environmental Emergencies” (along w/ Edward Geehr). He also cofounded the Wilderness Medical Society.
An excerpt from the obit: “Paul literally conceived of the subspecialty of medicine,”
Read MoreHow to prevent and treat heat exhaustion
Yesterday I attended an outdoor graduation ceremony and was outside in 80+ (27C)degree weather for 2-3 hours. I sunblocked up, wore long jeans, a cotton t shirt, and a baseball cap. I had brought plenty of snacks and drank so much water during those few hours and it wasn’t until I went to the bathroom and got out of the direct sunlight that I realized how hot I was. I hung out in the shade for about 30 minutes to cool down before heading back out there.
Now I am more prone to heat exhaustion because of my spinal cord injury. I guess when ½ of your body isn’t functioning properly, it can’t regulate temperature as well as an able bodied person. If you are younger than 4, older than 65, obese, or are on certain medications you can be more prone to heat exhaustion as well.
I felt fine all day and came home and felt fine when I went to bed. It’s during the night that the heat exhaustion finally kicked in. I wore a hoodie, slept under the sheets and comforter, and was still freezing cold. I woke up around 4:30am and felt like I had a fever of 105! My entire body was so hot, I could have cooked an egg on my leg. I stripped down to just a sheet and after a while was able to get to bed again once my body wasn’t cooking itself.
This morning I feel achy, cold, shivering, dizzy, fatigued, and have a headache.
Here’s what I’m going to be doing today to try and feel better:
Took some ibuprofen to lower my fever and help with the aches Drinking a ton of water Drinking coconut water (not as processed as Gatorade, natural sugars, tons of electrolytes) Apples are so delicious with how juicy they are and the sugars inside Taking some magnesium supplements to replenish those electrolytes. Wearing cool and loose clothes. Although I am shivering pretty badly so I am wearing a hoodie again.Here’s what I am going to do next time to be more prepared and prevent this from happening:
Wear white or lighter colored clothing Bring a small umbrella for shade Wear a better hat with 360 degree protection instead of just protecting the front like a baseball hat does Bring a bandanna and wet it and apply that to my skin to promote evaporation Wear shorts and some sandalsIn Argentina they have a tradition of taking a siesta during the hottest part of the day. All businesses shut down from like 12:00-2:00 or 3:00pm and everyone goes home and they take a nap, watch TV, and just conserve their energy. They then go back to work and reopen for a couple more hours. They have things down and understand to take it easy during the hottest parts of the day.
Be careful out there with the temperatures increasing as summer comes.
Did I miss anything? What do you do to stay cool during the summer?
Read More
How I became a newbie ham radio operator (during a pandemic)
I want to tell you what it’s been like over the last few months becoming a ham radio operator, which I did mainly for prepping purposes and with no previous background in engineering or other related subjects. I didn’t have a lot of money to throw at this project, and I wasn’t interested in a new, time consuming hobby, so my approach has been a minimalist one. In fact, for a long time I assumed that ham radio would inevitably become an expensive rabbit hole and so ruled it out for myself, concentrating instead on getting a simple NOAA radio. But then some of you on this site clued me in to the fact that it was possible to get by with a relatively cheap handheld ham radio and that there were courses and materials to help people prepare for the FCC amateur radio license tests.
Studying for the Exam
If I was going to own a ham radio, I definitely wanted to get licensed with the FCC. Currently, the lowest level of license for amateur radio operation in the US is the technician’s license. This is the minimum qualification necessary to transmit on amateur radio. (Unlicensed operators can only listen).
Passing the technician’s exam involves taking a test comprised of 35 questions on which you have to score a minimum of 75%. The questions concern various subjects such as basic electromagnetic theory (Ohm’s Law), safety, amateur radio etiquette, etc. I used two main sets tools to study for the test.
The first was the HAM CRAM course offered by outdoorcore.com for $49. It promises that students can go from zero to license in six hours using the course. (A blog post from the creator explains how to study for the ham radio exam.) The course took me longer, primarily because it uses a lot of mnemonics to memorize information that might be on the test, but I’m a person who learns best by getting some understanding of what I’m studying, so I frequently delved into various subjects more than the course would encourage me. The other tools, which work in tandem with the ham cram, are the flashcards and practice quizzes at hamstudy.org/tech2018.
All in all, I spent several weeks (maybe three?) doing a little studying on most days. The studying was comprised of going through the ham cram modules and doing a lot of practice exams, as well as occasionally looking up terms and explanations on the internet. I also had one or two Zoom calls with Joe Bassett (W1WCN), the creator of the course. It certainly took me far longer than six hours, but I never felt overwhelmed or inundated.
Call me obsessive, but one of the things that helped me most to get my practice test scores up was going through every single flashcard in the total pool of 400 and something and reviewing every answer I got wrong. After doing that, my test scores went up dramatically until, by the end, I was routinely getting scores in the mid to high 90s.
I must say that getting up to speed with the test did not make me feel that I had learned electromagnetic theory or that I would immediately be able to sit down and operate a ham radio. Apparently, that’s okay. Joe says that the test doesn’t measure aptitude for operation, so much as it does aptitude for learning.
Taking the Technician’s Exam (During the Pandemic)
After the studying comes the exam itself. First you have to find a radio club or other organization that administers the exam and sign up for one of their sessions. (The club charges some money for this — I believe $10 in my case and the FCC also charges $15 for issuing the license). I found my session through hamstudy.org. My test was administered by GLAARG (Greater Los Angeles Amateur Radio Group), about which I had read positive reviews.
Taking the exam during the pandemic is a surreal and painstaking experience. I can’t speak to how it was done in the “before times,” but apparently it was usually in a large classroom. During covid though, people have to take the exam remotely and all manner of mechanisms are put in place to make sure that nobody cheats. The clubs display a plethora of rules for test takers on their pages, some of them in bold and red, looking rather intimidating. The rules try to exert as much control as possible over the remote test environment. There are rules about cameras, calculators, mouse devices and room setup — and the rules are not the same for every club!
To begin with, you have to take the exam in a space with no pets and no other people and one with a closing door. The space also has to be free of clutter. All these requirements together immediately ruled out most spaces in my house, as they do for a lot of people. (I considered doing the test in the kitchen, but it has no door.) Many of the organizations that hold these exam sessions helpfully suggested doing the test in the bathroom, which I actually did!
Many organizations administering the exam require the use of two cameras — one pointing at your head and the other at your hands, to make sure you don’t cheat. I did set up two cameras (by attaching my cell phone to the back of a chair with a rubber band!), but it turned out that GLAARG was a little less paranoid than most clubs and only required one camera.
Exam takers are let into the general Zoom session in the order they asked to be admitted, so it’s good to come to the session early to avoid a long wait. First stop after being admitted is the breakout room where an officer of the club explains how the test will proceed and then does a preliminary inspection of the space with each applicant, one at a time. We had to point our camera at the ceiling and swivel it all around the room (bathroom, in my case) to let the examiners see that there are no papers hanging around with answers to test questions. The examiner looked at our computer and our mouse. We were also told earlier not to look away from the screen in any manner that would suggest that we are looking somewhere or to someone for answers.
After this introduction we were let in one by one, each to our private exam room. Three examiner observers were present there for each one of us. They performed a second inspection of the space, much like the first. After this, the test itself was straightforward and proceeded in the same format as the study quizzes, which were familiar to me by then. The examiners are there to monitor the test takers and give them instructions. The actual test, once you start it, is administered by the software itself and looks very much like the practice quizzes with exactly the same wording of the questions. The online test is also graded immediately by the software, so you know right away if you passed and how many answers you got wrong. I was happy to pass with a pretty high score. From there all I had to do was wait a few days for the FCC to issue me my license and call sign. That was exciting.
These Are Not Your Childhood Walkie Talkies
I got my technician’s license in January. By this time I had two handheld radios in my possession (the Yaesu FT-60R and the BaoFeng BF-F8HP) which I had been asked to review, so I had to learn how to use them first. Here’s one thing to consider if you’re thinking about getting a ham radio: these are not your childhood walkie talkies, or even a CB radio your parents may have had in their car if you’re of a certain age. If you are getting a ham radio for use in emergencies, don’t think that you’ll be able to pull it out with minimal skills and training and start using it on the spot. You don’t need to become an expert at ham radio, but you do need to learn at least basic use of your equipment and practice with it with actual people.
Having to write a review of my handhelds had its pluses and minuses for me. On one hand it meant that I really had to learn the ins and outs of these two radios, which I might not have done to quite such an extent if I was just learning to use them for myself. On the other hand, I learned a lot. Mainly, I read the manuals for both radios, played with the knobs and buttons and asked Joe Bassett lots of questions, some over email and some over Zoom. Having him to mentor me has been extremely helpful.
At the end of the day I will be keeping the Yaesu FT-60R. I have also been playing with the Echolink app on my smartphone. Echolink software allows licensed ham radio operators to communicate over the internet. I was initially skeptical about the value of this. Don’t we have email and chat and social media for that now, not to mention Zoom? But it turns out it has its uses.
On a purely frivolous note it’s kind of fun to tune into stations across the globe and hear ham operators talking to each other in Afrikaans or listen in on a meeting of hams in Australia. It’s a different slice of life than you might find on websites or on social media. Also, however, Echolink allows me to connect to remote stations and participate in activities with groups which my little handheld radio could never reach on its own.
Finding Fellow Hams and Training
It turns out that, once you get your license and learn to use your radio, no delegation from the local ham radio community shows up at your doorstep to welcome you to the club and offer training. Far from it!
My interest in ham is primarily from the angle of emergency preparedness. In my area I had to dig around the local resources to find who coordinates the local ARES (Amateur Radio Emergency Service) group. This turned out not to be so easy. The local clubs have not been forthcoming with that information. In fact the local clubs have been haphazard (to put it generously) in their responses of any sort to me. If I ask several questions, they sometimes respond with enthusiasm, but no answers and sometimes not at all.
The gist of what I’ve gotten from the main ham radio club in my area is that I should join it before I get any information about what it offers or how it’s connected to ARES. To be honest this does not make me want to cough up $40/year to join! Apparently, this kind of lack of communication and followthrough is not uncommon.
With the help of my mentor I eventually did find the weekly ARES net (meeting of ham radio operators on the radio) and have been participating in it as time allows — without joining any clubs. The level of training offered by the local ARES is disappointing, however. It essentially consists of roll call over the local repeater (an amateur radio repeater is a station that amplifies and retransmits signals, allowing radios with weak signals a much wider radius of communication). The same roll call is then performed on a simplex frequency (simplex refers to direct communication on a radio frequency, not using a repeater). It’s good for a raw beginner, but doesn’t seem terribly useful for learning how to handle myself on the radio in an emergency.
Fortunately, I’ve been able to join an ARES group in Florida that IS doing some training. (This is where Echolink has been most useful.) Now, you might think, Florida? Don’t you live in California, Jonnie? I do. But training is training on a certain level. If I can learn how to follow protocol in an emergency, I might be of some use to my local hams when one comes.
In Conclusion
To sum it all up: is it possible for a person with no special previous training to become minimally proficient as a ham without spending a huge amount of money or time? Yes. Is it going to be as easy as the pros say it will be? Probably not. At least for me, ham radio did for a while take up most of my prepping time and energy, but now I think I’m coming to the end of that. Should you just get a radio and not worry about licensing or training? DEFINITELY NOT. At the very least, get your technician’s license and learn the basics of how to use your radio before an emergency strikes. Also, be aware that ham radio is a social activity and requires entry into a different culture. You will have to scope out the new turf and learn the rules, even if you do it very part time. Is it worth it? You will have to decide for yourself. For me it has been, and it’s stretched my mind.
Jonnie
KN6NHL
Read MoreAirline travel, what carry on preps do you all include?
Hi All! With travel resuming (I traveled throughout last year domestically too, fun, creepy, empty airports) I thought I’d ask the question of what all you travel with on an airplane, specifically carry on. Usually due to space & weight constraints my preps don’t go much beyond proper clothing, etc. for the journey & destination, but I kinda always feel exposed without some goodies that are prohibited on the plane, so what do you all do? Also I’m a little gal, so can’t load up too heavily or I’d look like a turtle.
Read MoreConfused about vaccine info (Discussion)
Full disclosure: I’m not a conspiracy nut. I don’t buy into the conspiracies of the vaccine turning your body into a magnetic, injecting tracking metals into you, et cetera. I fully believe in getting vaccinated for diseases that spread easily and/or very negatively affect people, but I’m trying to figure out as much as I can about the COVID-19 vaccines before talking to the rest of my family about getting them (they’re not conspiracy nuts either, just hesitant like me).I’d post stuff like this on other social media platforms, but they’re usually ‘echo chamber’-y (Reddit being the worst example in my opinion).
I’ve been researching a lot about the vaccines, but I’ve been getting all kinds of conflicting information; misinformation, disinformation, lack of information, et cetera. Like, I hear about how the RNA vaccines cause prion diseases (which was proven false a lot, but my mind likes to research further and second guess a lot), or how the mRNA vaccines came out too quickly (even though it’s been said that the idea and concept has been studied for decades).Basically, I don’t exactly know what to believe anymore with what’s out there for public viewing. I’m not sure what’s right, and I’m not sure what’s wrong. I’m not scared or fearful anything like that, just really really confused and trying to make sense of it all.
Read MoreNews article: Rural Ambulance Services At Risk As Volunteers Age And Expenses Mount
https://www.npr.org/sections/health-shots/2021/07/05/1012418938/rural-ambulance-services-at-risk-as-volunteers-age-and-expenses-mount
Good morning,
Hope all continue to have a happy and SAFE Indy Day celebration.
Linked article explains the rural situation in one state but applicable most other areas.
Please ignore any “pure” politics gleaned from article. Medicare and Medicaid are in transition.
Emergency chief Campbell has a quality setup. EMS paramedic Gordon and EMT Rinehart have a good logistics setup … better than my ALS [“Advanced Life Support”] trailer resupply system for our emergency shelter.
The pictures again validate the Chinese adage that a picture is worth a thousand words.
This is a good article to contemplate for disaster planning.
Read MoreJosh’s Farm Update: July 2021
With Redneck offering regular updates from his farm, I thought it was only fitting to update everyone on how my mini-farm is doing. It’s been a rough summer. I spent a couple of weeks away because my wife was in the hospital, but thankfully everything lived. But I haven’t had as much time for maintenance as I would like.
First, the raspberries. Two are doing great. I think one is either dead or dormant because I foolishly ripped out additional shoots thinking they were lookalike weeds. They didn’t have spines like the other raspberry plants. Oops. If it doesn’t come back, I may replace it with a strawberry. Ben Falk recommends planting a variety of perennials next to your house as well as in the field, so you have indicators letting you know when they’re ready to pick.
I have six raised beds. The first two are up against my house. The first bed was supposed to be growing lettuce. I tried the MIGardener technique of sowing thick bands of lettuce to fill the bed. Sadly, that didn’t work well at all, so now I need to replant it with something else. However, my marigolds are doing great.
However, the herb bed with rosemary, parsley, and dill is doing great. The dill has been surprisingly useful for fermenting, so I’ll definitely grow it again. If only I could get it staked properly so it doesn’t fall over. I tried cilantro in this bed, but it just wasn’t having it.
Pole beans are doing well, though they haven’t produced much yet. The PVC trellis has not held up well. I had to support the center with a metal t-post and even then it still falls apart at times. I’ll build something much more substantial (and less plastic) next year. I hung a bird feeder to help with a slight Japanese beetle infestation, but the birds aren’t taking the bait.
On the other side of the beans are a bunch of pepper plants and they’re already giving me some little peppers, which my oldest son will be very excited about. I have some experimental chard that was swallowed by the beans, and some small basil plants in between the peppers.
Cucumbers look terrible and have struggled with disease, but are producing well. The peppers alongside them are producing as well. This bed struggles to stay moist, probably because it is a completely no-till bed. The beds I double-dug or broadforked are doing much better.
On the other side of the cucumbers and peppers are some onions, lettuce, and golden giant amaranth. The amaranth has shaded the lettuce and kept it from bolting. Unfortunately, the last bunch I picked was incredibly bitter, probably due to heat. The rabbits like it though.
This mess of greens is German Pink tomatoes. They’re coming along nicely and I’m just waiting for them to ripen. The purple thing is basil, which I need to trim. The other purple stuff is “chinese spinach,” a type of amaranth. This bed was double-dug and then filled with compost and doesn’t dry out often.
The sweet potatoes seem to be doing great in this bed. A thick layer of grass clippings and a living mulch keeps it continually moist. I stuck a few marigolds in there that have grown above the canopy.
Next up: chickens, rabbits, grapes, and trees.
Read More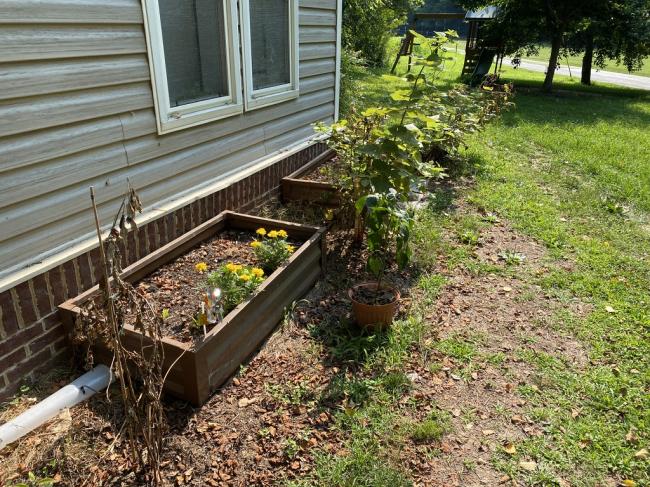
incredible story of quick thinking and skill that leads to a saved life
want to read about an incredible story of a father and son who used their intuition and skill to save someone at sea? this story really was inspiring to me to be alert, aware, and tap into what i know in order to better help others. it’s seriously a good read.
https://www.wsls.com/news/local/2021/07/08/roanoke-father-son-duo-rescue-missing-boater-40-miles-off-north-carolina-coast/
if put into that same situation, i’m afraid i wouldn’t have had the split second decision making that these two had and the knowledge and skill that would have been required to find him. it sounds like they did everything perfectly and it paid off. i’m trying to think about what i’m exceptionally good at and how i too might be able to use that someday to save someone’s life. i don’t know too much about first aid, but just having a kit and basic knowledge may save someone someday.
i think forum member bob is a boater in that part of the woods/ocean. maybe he can pitch in his thoughts
Read MoreReport from the front lines of the heatwave apocalypse
Greetings from eastern Washington state, where each of the past three days have broken all previous heat records (and it’s still June!). Today will hopefully be the first day in nearly a week where the high will not reach triple digits, but the forecast predicts high temps in the upper 90s/100s for at least the next 10 days, so we have a ways to go. We’ve had several days where the temps have reached 110+, and have seen widespread planned and unplanned blackouts. I’m sure you’ve all seen the headlines, but know the heatwave we’ve been experiencing throughout the Pacific Northwest is unprecedented. I’ll add that there is another looming disaster that I fear might push things over the edge; there is a nation-wide chlorine shortage that is hitting the west coast particularly hard. I wouldn’t be shocked if boil notices were issued soon. It’s easy to imagine how a boil notice during 110 degree weather with rolling blackouts, along with the forest-fire smoke we all know is coming, will create a downright dangerous situation.
I, like many in this region, don’t have air conditioning. I’ve lived in the PNW for several decades, and other than a week or so each summer, AC simply isn’t needed and has not been a part of building plans. Our usual high temps for this time of year are in the upper 70s, so right now we’re running about 40 degrees hot. I’ve taken measures to insulate and make my 100+ year old house as efficient as possible, and when the temperature is “normal” we do quite well. We have storm windows, efficient siding, an attic fan, energy-efficient curtains and shades, etc. We have done the eco-friendly responsible thing, but it is clear that that approach is no longer sustainable if this weather persists. We really have done everything right, which is why this is so frustrating and humbling.
Perhaps the biggest challenge has come from the fact that our “low” temperatures each night are only getting down to the high 70s. This all but makes the “open up and cool your house down at night” approach futile. Each day I’ve watched the interior temperature in my home rise: at 5am we’re lucky if the interior temperature is lower than 85. By 5pm the interior temperature has been reaching the upper 90s. The house is simply cooking, you can feel the heat in the floor as you walk barefoot, or in a plate that you pull from the cabinet. The house, and everything in it, is heating up and retaining that heat. Our front door has become so warped that it is nearly impossible to close and lock. The siding on a neighbors house is literally peeling off. The room temperature in our kitchen is so high that the refrigerator is running non-stop, pushing its motor harder than was ever intended. Our attic temperature is so high I’m terrified of fire. On a wider social/infrastructure scale, the electrical grid is not at all equipped to deal with the combination of heat and electrical use (hence the planned and unplanned blackouts), asphalt roads are literally cracking and buckling, and tap water is running warm and tastes terrible.
My preps have helped a bit: I’m double-filtering our water and have plenty of water stored, so we should be okay on that front for a bit. I’ve covered the south and west facing windows with cheap mylar emergency blankets. It’s made the house look like a baked potato wrapped in tinfoil, but has likely kept the interior temps down a bit. We have very strategically placed fans all over the house, and have been doing all the recommended things to keep cool. We have a generator to power things if the rolling blackouts turn to days-long blackouts. But that all said, if the weather were to stay like this for several more days I suspect we’d soon have interior temps over 100, and perhaps eventually reach temps hotter than the exterior highs. It’s become very clear that air conditioning, along with an independent means to power it in case of grid failure, is a vital prep for this new world we live in.
Read More
CERT alert for activation; my loadouts
Good afternoon,
Am on alert for CERT activation re Elsa … don’t know current category of Elsa.
Re assignments, I asked to work identification of types of downed trees eg palm, camphor, balsa – at least the bark …
Want to mention my basic loadout preps. The old boots are saddle soaped. Will of course be be carrying the Wellingtons (rubber boots). 3 pair of gloves one pair for anti-slip grip. Others for mere work.Two cans of DEET needed as a minimum. Don’t forget you local area’s snake bite prevention protocols. My helmet has 2 lights and 2 lights on load-bearing suspenders. Will carry a megaphone.
My advanced level non-basic loadout: Entenman coffee crumb cake. Will pre-cut since this is a best-seller with those of us working the palm tree identifications, if any. Fall-back is Trader Joe’s chocolate chip cookies. A six pak of V8 spicy needed to break the monotony.
Continue the prepping !
Read MoreMost compact folding disposable N95 masks?
I have good ones for keeping at home and taking with me when I know the air is bad (wildfire season), but they’re too bulky for carrying with me on a daily basis just in case (of an earthquake, for example). I also have this style of folding mask which is more compact but honestly still too bulky to carry around on a daily basis because they’re too long to fit anywhere I would carry them and if I fold the ends in to fit them in a shorter space (not sure if that’s ok or would compromise the mask long-term) then they’re too thick.
What are the most compact ones out there? As long as length & width are small enough to fit in a jeans back pocket (not actually where I intend to store them, just trying to give an idea of the size I have in mind), thinness is the top priority.
I’m ok with the protection being somewhat lesser since I’d only use it in an emergency situation where I’d be getting out of the area as soon as possible, as long as it’s good enough to be worth carrying at all.
Read More