Even if you never use it, the peace of mind that comes with knowing you can handle almost anything is well worth the cost.
New? Start with the beginner’s guide to emergency preparedness for more about the role of a bug out bag and how it fits in the overall modern prepper plan.
Putting a bug out bag checklist together can be daunting — even if you’re only thinking about one or two types of scenarios, the list of items you’d like to have in an emergency is always longer than what you can take. Even the most experienced and skilled people have to make tough choices about what to pack.
In our own journey as common-sense preppers, we were often anxious and frustrated by the horrible lists out there and the mental gymnastics of trying to figure out what gear we needed across different scenarios, what we didn’t need, why, how to prioritize, and so on — all while trying to keep it realistic within the range of modern reasons to prepare and sane prepper rules.
Good news and bad news: There’s no such thing as The Ultimate Bug Out Bag. There are just too many variables to allow for a universal answer that is perfect for all people in all situations. So the good news is you don’t have to stress over being perfect.
Yet there are still clear, life-altering differences between a good kit and a bad one. Many people pack bags that are too heavy to be useful, for example, because they (wrongly) assume they’ll definitely have access to a working vehicle.
You might see all kinds of labels for what is essentially the same concept:
- Emergency kit / emergency bag
- 72 hour kit / 72 hour bag
- Bug out bag
- Go bag
- Evacuation bag / evac bag
- Survival bag / survival kit
- INCH bag (“I’m Never Coming Home Again”)
- GOOD bag (“Get Out Of Dodge”)
- SHTF bag (“Shit Hit The Fan”)
We use some of those labels interchangeably, like bug out bag and go bag, but don’t tend to use time-based labels like 72 hour bag or INCH bag.
More: Why you should use a prioritized bag system instead of bags based on timelines
Although an “emergency kit” can mean a lot of different things (like a kit you keep in your vehicle during snow season), we believe a bug out bag is the closest thing to a singular emergency kit because it’s the one bundle of stuff that can help you deal with the widest range of scenarios.
It’s important to use a solid mental framework and understand why gear is included (or not), so that you can make your own decisions when putting together what’s right for you.
That’s why, in addition to pointing out our favorite products, weights, and reasonings for each category, we include common customizations and things to avoid so you can personalize your bag.
Or you can just keep things easy and follow this list exactly. We’re confident it’s a great mix for a wide range of people and scenarios — many of our personal bags look exactly like this.
Just want to see a list of specific products? Disagree with our suggestions?
We used our brand-spankin-new (and still in development) kit builder to turn this guide into kits that you can clone, customize, and share, complete with recommended products, weights, and prices:
If you disagree or just want to share your own loadout, leave a comment with a link to your kit!
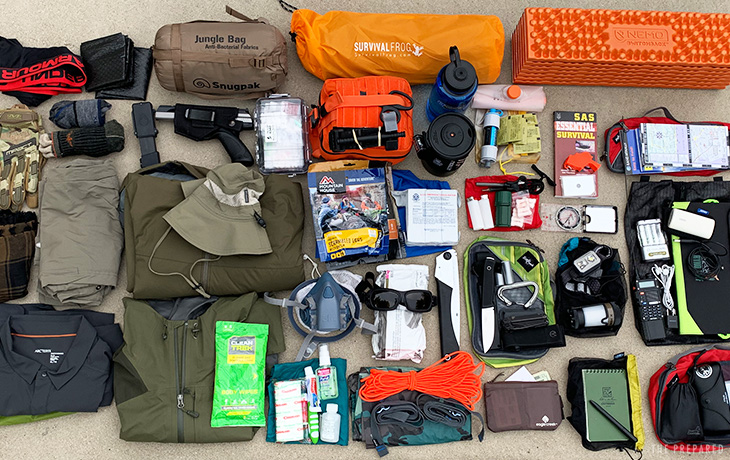
Summary bug out bag checklist
Since general lists aren’t helpful, we’ve prioritized the items below into three levels:
- Level 1: Under 20 pounds, fits in bags over 25 L, $400-$1,100. A well-rounded kit that covers the essentials of what you need to survive and recover away from home. Good for keeping things cheap or light. Built for more standard emergencies, such as a natural disaster that disrupts things for a few days, but can handle serious emergencies with the right survival skills.
- Level 2: Under 35 pounds, fits in bags over 44 L with sleeping pad and bag strapped to outside (otherwise need > 50 L), $800-$2,300. Adds core gear that can make a real difference, such as a solar charger and sleeping gear to get you off the ground with comfortable temperature control.
- Level 3: Under 45 pounds, fits in bags over 49 L with sleeping pad and tent strapped to outside (otherwise need > 60 L), $1,050-$2,750. Around the maximum weight anyone should carry, this kit is the best way to prepare for the widest range of emergencies, including longer-term SHTF.
| Level 1: < 20 lbs | Level 2: < 35 lbs | Level 3: < 45 lbs |
|---|---|---|
| First aid kit – Level 1 | First aid kit – Level 2 | First aid kit – Level 3 |
| 27-32 oz potable water stored in a hard canteen | Food that needs boiling water (eg. Mountain House) | Ferro rod fire starter and striker |
| Collapsible canteen / vessel | Stormproof matches x 20 | Extra AA/AAA/etc batteries |
| Water filter | Portable stove for boiling water | Battery charger |
| Water purification tablets x 30 | Pot / dedicated boiling vessel | Tent |
| Food that’s ready to eat | Spork | Extra full magazine |
| Lighter x 2 | Second flashlight / lantern | Hand sanitizer |
| Tinder | Sleeping bag / bivy | Signal mirror |
| Headlamp | Sleeping pad | Whistle |
| Field knife | Sleeping mask and earplugs | Hand saw |
| Multitool | Wet wipes | Blade sharpener |
| Cordage x 50′ | Travel toothbrush and toothpaste | Second pair of socks |
| Tarp | Chapstick | Duct tape (flat travel roll) |
| Waterproof paper and pen | Sunglasses | Field guide book |
| Documents (USB and paper) | Goggles | Misc fasteners / carabiners / ranger bands / etc |
| Cash | Gloves | |
| Condensed camp soap | Belt | |
| Toilet paper | Pistol / holster / full mag | |
| Nail clippers | Maps | |
| Hat | Compass | |
| Socks | Solar charger | |
| Underwear | Waterproof deck of cards / small mental health item | |
| Pants | Headphones | |
| Top base layer | Pack straps for lashing tents / pads / bags to outside | |
| Jacket / outer shell | ||
| Shemagh / bandana / gaiter | ||
| One- or two-way radio | ||
| USB charging cable and wall plug | ||
| Li-Ion power bank | ||
| Respirator (and filters if needed) | ||
| Storage bags / Ziplocs | ||
| Contractor trash bags x 2 | ||
| Cell phone * | ||
| Footwear * |
Why you can trust this plan
This list was crafted by a diverse group of experts with over 100 years of combined emergency and survival experience, including post-disaster shelter administration (eg. in New Orleans after Hurricane Katrina), military SERE instructors who teach pilots how to survive if they eject behind enemy lines, Special Forces operators, doctors, and the mentors behind the scenes of popular survival TV shows. Another 55 hours was spent debating and researching the details.
Most importantly, this list follows the Sane Prepper Rules by planning for a wide range of realistic scenarios and by assuming you’re a typical person who doesn’t already live off-grid.
Be prepared. Don’t be a victim.
Want more great content and giveaways? Sign up for The Prepared’s free newsletter and get the best prepping content straight to your inbox. 1-2 emails a month, 0% spam.
Tips and common mistakes
Don’t carry too much weight (details in next section).
Don’t design your bags based on specific timelines such as three days or two weeks — use a priority cascade instead and ignore the BOB vs. INCH arguments.
Don’t pack a bunch of extras. The point is to survive — not to battle zombie hordes. That essentially boils down to staying hydrated, fed, warm, dry, and uninjured. Everything else supports those goals or is a bonus.
Don’t assume your predetermined path and “bug out location” will work the way you hope. You are not prepared if you can’t handle unpredictable disruptions to your plans.
Be thoughtful about the environment around you and what risks are likely — but don’t get tunnel vision on specific scenarios like earthquakes or hurricanes. Spend more time thinking about things like terrain, whether or not there will be water (or too much water), temperature variances, urban vs. rural, if everyone around you is likely (or not) to be armed, and so on.
You don’t want to be at either extreme in the “carry a bunch of fish vs. teach a man to fish” tradeoff. Don’t simply carry 72 hours worth of consumables, and don’t skip consumables assuming you’ll hunt and craft your way through (unless you’ve already proven that you comfortably can in your area).
Premade kits are not looked at favorably by experts because almost every company tries to get under a $50-$200 price point by cutting corners, ie. including cheap gear you cannot depend on, having the wrong mix of gear to begin with, or requiring you to replace/add so much stuff that it defeats the purpose.
A good kit, even a basic one, is not going to be cheaper than $150-200. You spend more than that each month on insurance, so don’t skimp on this critical prep.
If you’re on a limited budget, don’t go cheaper than any of the “budget picks” we recommend in our reviews — it’s not worth buying a prep item if it will fail when you need it, and almost all of the uber-budget items found online are crap. Generally speaking, the cheaper the products, the heavier they will be. A budget Level 3 bag, for example, will likely weigh multiple pounds more than average. Whether you use the same budget for a great Level 1 bag or a middle-of-the-road Level 2 bag is up to you, for example.
You can’t assume your party/family will always be together, so don’t spread critical gear across bags. For example, it’s a bad idea to have water gear in one bag and food in another. Every person over 10 years old should have their own essentials in case they get separated.
Children under 10 can have their own bags, but you build theirs more for their comfort and your redundancy. In other words, build a child’s bag so that if they get separated they at least have some basic stuff/info to aid whatever adult finds them, and so you can raid their bag if you lose something critical like your water filter. But make sure it’s no big deal if they lose the bag altogether. In a bag that’s small enough to be appropriate for their age, you can usually fit in a few essentials such as a full set of clothes, special medicines, and documents/photos about their family and home, while adding more kid-friendly items like a stuffed animal, book, and sweets.
Don’t just throw everything into one pile in your bag. Not only does compartmentalizing your gear help you find it in a hurry and create better load distribution while carrying, the individual containers themselves are a great stem cell if you need to improvise something in the field.
There are only two items on this list that don’t need to be kept in your bag at all times: shoes and cell phones — and that’s only because it’s impractical to do so + it’s safe to assume 99% of people will have them on hand or nearby when it’s time to bug out.
Don’t double dip, mix gear with your camping/hiking supplies, or take other shortcuts that might stop you from being able to grab and go without thinking. Part of the whole purpose of a bug out bag is knowing that it’s ready at all times.
What’s the right survival kit weight?
People usually build bags that are way too heavy because they assume they’ll be in a vehicle, overestimate their physical fitness, underestimate just how hard it is to carry 50 pounds on their backs for hours, or can’t resist the urge to bring the Kitchen Sink.
You might have to abandon your vehicle, hike 10 miles through the wilderness, wade through floodwaters, or rush up high-rise stairs. You or someone in your party might be injured. You’ll probably be tired, hot/cold, and hungry.
Across our experience and with feedback from the experts interviewed for this guide, we like this rule of thumb:
- If you don’t exercise at least three hours a week, you should stay under 20% of your body weight or 45 pounds, whichever is less.
- If you’re very active and already comfortable hiking with gear, you can go up to 30% of your body weight or 60 pounds, whichever is less.
Studies that specifically focus on this “optimal pack weight” question reinforce those rules. A study of hikers on the Appalachian Trail, for example, found that the sweet spot was 30 lbs or 20% of body weight. While another study in the military found an optimal load of 30% — and that’s for soldiers who train with heavy gear every day.
It’s critical to test your bag. Go for a one mile walk around the neighborhood with your fully loaded pack and see how it goes!
Item weights
We calculated category weights by weighing and averaging what we thought was a good cross section of our favorite products. For example, common orienteering compasses averaged 2 oz while lensatic ones were 7 oz, but we used the blended average of 4.5 oz because 2-3 ounces in either direction felt acceptable.
When some people refer to their pack weight (especially in an outdoor recreation context), they’re actually referring to the “base weight”, which is the pack without any consumables (stored water, food, or fuel) or wearables. However, we include everything when stating weights.
Review: Best bug out bag backpack
Backpack weight was kept consistent across levels at 70 oz, even though such a bag is more than enough for a Level 1 loadout, because even if you’re at L1 you might want room to add more stuff after you’ve bugged out.
| Level 1: | Ounces |
|---|---|
| First Aid Kit – Level 1 | 20 |
| 32 oz potable water stored in a hard canteen | 40 |
| Collapsible canteen/vessel | 1 |
| Water filter | 2.3 |
| Water purification tablets x 20 | 1 |
| Food that’s ready to eat | 29 |
| Lighter x 2 | 2 |
| Tinder | 0.3 |
| Headlamp | 3.1 |
| Field knife | 10 |
| Multitool | 9.5 |
| Cordage x 50’ | 3.5 |
| Tarp | 24 |
| Waterproof paper and pen | 4 |
| Documents (physical and USB thumb drive) | 1.4 |
| Cash ($400 of mixed bills) | 0.5 |
| Storage bags (20L drybag and 5x gallon ziplocs) | 5.5 |
| Condensed soap | 2.2 |
| Toilet paper | 1.2 |
| Nail clippers | 0.3 |
| Hat | 3 |
| Socks | 0.3 |
| Top base layer | 10.5 |
| Pants | 22 |
| Underwear | 3.3 |
| Jacket / outer shell | 16 |
| Shemagh / bandana / gaiter | 3 |
| One- or two-way radio | 11 |
| USB charging cable and wall plug | 1.6 |
| Li-Ion battery pack | 7.5 |
| Respirator | 5 |
| Contractor trash bags x 2 | 3 |
| Subtotal | 326.2 oz / 20.4 lbs |
| Level 2: | Ounces |
|---|---|
| First Aid Kit – Level 2 | 32 |
| Food that needs prep | 5.2 |
| Matches x 20 in waterproof container | 1.6 |
| Stove | 18 |
| Pot / vessel for boiling water | 6.6 |
| Spork | 0.6 |
| Second flashlight / lantern | 6.1 |
| Sleeping bag | 35 |
| Sleeping pad | 32 |
| Sleeping mask and earplugs | 1.1 |
| Wet wipes | 4.6 |
| Toothbrush & toothpaste | 1.6 |
| Chapstick | 0.3 |
| Sunglasses | 3 |
| Goggles | 1.2 |
| Gloves | 6.6 |
| Belt | 5 |
| Pistol + holster + full mag | 36 |
| Maps | 4 |
| Compass | 4.2 |
| Solar charger | 24 |
| Cards / entertainment / mental health | 5 |
| Headphones | 0.5 |
| Subtotal: | 234.2 oz / 14.6 lbs |
| Level 3: | Ounces |
|---|---|
| First Aid Kit – Level 3 | 24 |
| Ferro rod | 1.6 |
| Extra AA/AAA/etc batteries | 4 |
| Removable battery charger | 5.8 |
| Tent | 50 |
| Extra full magazine | 7.7 |
| Hand sanitizer | 3.3 |
| Signal mirror | 0.7 |
| Whistle | 0.7 |
| Hand saw | 9 |
| Knife sharpener | 1.6 |
| Second pair of socks | 2 |
| Duct tape (flat travel roll) | 0.6 |
| Field guide book | 8 |
| Pack straps | 1.7 |
| Misc fasteners / carabiners / etc | 0.5 |
| Subtotal: | 121.2 oz / 7.6 lbs |
Notes on using this checklist
Items are split into prioritized levels, but are not ranked within a level.
The 5 C’s of Survival (cutting, combustion, cordage, cover, and container) and other models/acronyms out there are fine, but they’re just shortcut variations of the same concepts — not a rigid definition you must follow.
See the first aid kit checklist for breakdowns of each IFAK level.
Think of each item on this list as a goal to fulfill, not necessarily a separate product.
Adaptability is a key criterion when experts think through what to include in various levels. Many products are included because they do more than one thing. A tarp, for example, can be used for dozens of different shelters, bedding, rain collection, as a medical stretcher, to conceal you or your gear, a poncho, signaling device, and more.
On the other hand, experts find there are some needs where a dedicated product makes a real difference — even if it’s just mental. You can use the petroleum jelly in your medical pouch as chapstick, for example, but we recommend carrying a separate chapstick because it’s easier to keep in a pocket and apply without dipping dirty fingers into the jelly jar you might need for serious injuries. Similarly, you can get by using a knife or multitool for nail care, but combat medics have learned to carry a dedicated set of clippers for convenience and dealing with gnarly cases.
Combo and hybrid products are a wildcard. While we generally dislike products marketed as “14-in-1 survival tools!” because they tend not to be worth it, it’s common for otherwise fine products to come with a random button compass or some other “‘survival” feature built in. In some cases it’s okay to let that one product check two boxes — a compass with a large mirror that can be used for signaling is an example — otherwise err on the side of caution and only consider those bonus features as backups, not replacements.
Water
You know water is critical, but it involves some tricky decisions:
- Water is really heavy at 8.3 lbs per gallon. Do you even carry water at all and deal with the extra weight? If so, how much?
- How can you turn random water into safe potable water?
- Is it better to filter or purify?
- How do you actually treat water with limited gear?
- What do you carry water in? How do you collect it?
- How do you separate clean and contaminated?
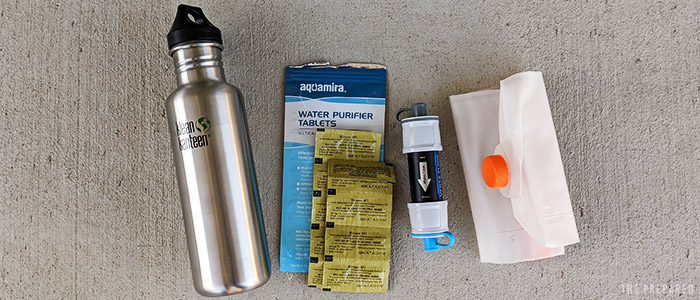
We strongly recommend storing potable water in your bag. It’s just too risky to assume you’ll find some random water and have the ability to treat it in a reasonable amount of time after bugging out.
How much to store is a debated topic. Across our experience and with feedback from experts, we recommend 32 oz (1 liter) or as close to that as possible (eg. a 27 oz Klean Kanteen is fine). That’s enough to get you through a day or so and only adds 2 pounds of weight. Some FEMA guidelines talk about three gallons of water, but that’s ridiculous (24 pounds!) and they must be assuming you’re an unprepared person throwing something in your car at the last minute without filters or purifiers.
Use a rigid canteen to store that water so there’s no risk of breakage in your bag. The right container — a single-wall metal canteen — does double duty as a vessel you can boil water in. That might be a lifesaver if you only have a Level 1 kit.
To make safe water, filtering water is generally better than purifying. One reason why is that filtering is instant while purification products can take up to four hours to treat your canteen.
Yet we include both in a Level 1 kit because a pack of 20-40 purification tabs are so small and light, you may as well throw some in.
Review: Best survival water filters and portable water purifiers
You have to be aware of cross contamination. Once a vessel holds dirty water, you can’t use it for potable water until it’s been properly cleaned.
Only having one container not only limits your ability to carry more water (eg. if you find a rare source yet have to move on), but some filtration setups are designed to work with two. One container, usually a soft canteen, is used to squeeze dirty water through filter pores or to hang and let gravity do the same. Your hard canteen can then catch the clean water.
Since a soft canteen is light and can be rolled up to reduce space, we include one in a Level 1 kit, resulting in a hard and soft canteen that together can handle a wide range of scenarios.
Customize:
- Consider adding more stored water (up to double) to your pack if you live in a very hot climate or you’re skeptical about easily reaching nearby water sources. It’s worth sacrificing less important gear if you need to make room/weight.
- If you’re really trying to shave ounces, you can store half the baseline amount (down to 16 oz) and save a pound. Just be thoughtful about that choice.
- Some people like to carry coffee filters because they help screen the big nasties from dirty water before a proper treatment. They also double as tinder. But you’ll have a shemagh/bandana anyway, which can fulfill the same pre-filter role, or you can DIY with rocks, sand, etc.
- People who build their kit for more long-term or less-mobile emergencies might add a large gravity water bag to Level 3. These make it easier to set-and-forget treat large volumes of water in fixed locations.
Avoid:
- Don’t store water in flimsy pouches, juice-box style containers, etc.
- Hydration bladders. They’re great for hiking, but the downsides aren’t worth it in prepping: less adaptable, can be punctured, it’s easy to lose track of your usage, etc.
Food
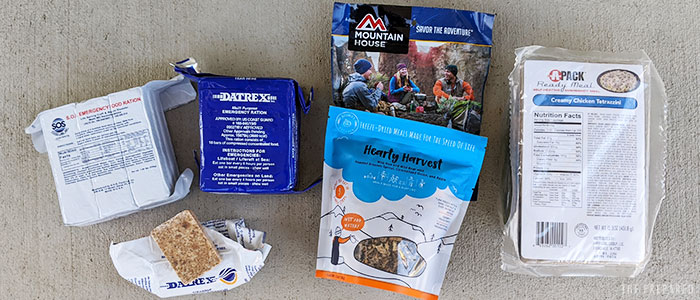
Although you can survive up to three weeks without food and can hopefully find or procure your own after bugging out, it’s good to have some on hand to keep your energy levels up and combat hunger pains and bad moods in the immediate aftermath.
But food can be heavy, space inefficient, expire, melt in a hot car trunk, require cooking, and other qualities that disqualify most common options from this kit. What food you choose matters. You want:
- Food that is ready to eat or requires nothing more than boiling water to cook.
- Maximum nutrition and calories in as small and light of a package as possible.
- “Durable” food that won’t expire quickly, fall apart in a bag, react weird to extreme temperatures, etc.
- The right kind of food for survival, not for taste and comfort. Put on your adult pants and leave the tasty snacks at home.
Level 1 priority is food immediately ready to eat — no cooking, no boiling. Good choices include granola bars, trail mix, peanuts, peanut butter packets, some types of jerky, pemmican, shelf-stable fats, etc. Ration blocks (ie. lifeboat rations) are a great choice because they pack a lot of calories into dense bars.
MREs are tricky because although they include everything you need (including an internal ‘cooker’ instead of external boiling water), they are not space and weight efficient for the nutrition you get. It’s telling that many military vets don’t carry MREs as their primary food choice in a bug out bag.
Reviews: Best emergency rations, Best MRE
Level 2 introduces food that requires preparation — which in this case should only mean the need for boiling water.
Standard freeze-dried hiking/camping food, like a Mountain house pouch, are the best choice. They’re light, nutritionally sound, tasty, you can pour the boiling water right into the pouch for cooking and eating, and they can even be consumed cold.
Customize:
- If you really want an MRE, Level 2 is where you can sub them in for the freeze-dried pouches.
- There are survival food options for people with food allergies.
Avoid:
- Anything that requires more than boiling water to prepare.
- Coffee. Your medical supplies have caffeine if you really need it.
- Salt supplements. The military stopped issuing salts to soldiers because they found there’s more risk than reward — you almost always get enough salt from the kinds of food you’d have in a BOB, but overdoing salts can cause constipation. The exception is if you’re in poor shape in a very hot and humid climate.
- If you choose a dietary restriction in normal life, such as being vegetarian or gluten free, recognize that a survival situation is not the time to nitpick over things like how you get proper protein.
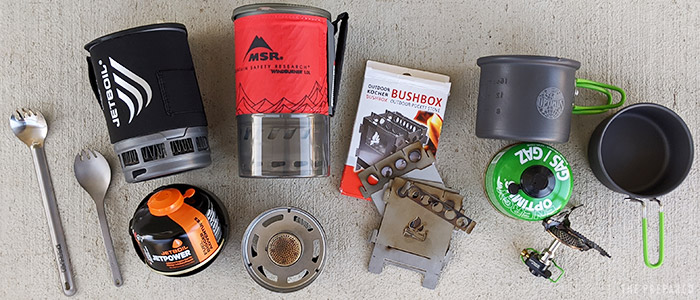
Cooking & eating
Since “cooking” in this case simply means boiling water or roasting something you found/hunted/fished, there’s a clear overlap between this topic and general fire making.
Your Level 1 kit has the bare essentials already. You can make an open-flame fire with random fuel and boil water in your hard canteen, or roast whatever else you have on a stick.
But there are two potentially better methods if you go up to Level 2.
A hobo stove is kind of like carrying a mini campfire ring in your bag. They’re essentially portable, flat-pack metal boxes that you feed natural fuel into (eg. twigs and brush). It’s still an open flame that requires fuel you find around you, but the box provides protection against wind, making it easier to build a concentrated cooking flame than just a pile of sticks on flat ground.
Hiking stoves are mini versions of the gas-fueled burners used in many home kitchens. You need a fuel source (typically a 100 gram gas canister) and the burner unit that screws onto the gas can.
Don’t carry both types of stoves. Which type you carry is up to you. Each have their tradeoffs.
There may be cases where you can’t or shouldn’t build an open fire: maybe you’re in an evacuation shelter, don’t want to be seen, wind and rain are making it difficult, you just can’t find random fuel around, or you don’t have time to build a fire and wait for it to heat up. A fueled stove is perfect for those situations. For example, you can go from a packed bag to boiling water in two minutes!
The clear downside to fueled stoves is the need for a specific fuel in a specific canister. So if you’re experienced with bushcraft, expect to be in nature, or want to be ready for the long term, a hobo stove might be better.
Another upgrade from Level 1 is the addition of a pot or kettle specifically for boiling.
Although you can boil water in your hard canteen, we generally dislike doing this because it creates ‘fouling’ on the metal, can lead to warping, and means you have to pour out whatever clean drinking water you had in there.
Many hiking stoves come with such a pot already, and the kit is designed so that the gas can and burner store neatly inside the pot. So you’re usually not adding much space or weight to include a pot dedicated to boiling.
Freeze-dried food pouches rarely need over 2 cups / 0.5 liters, so save the space and don’t go larger than a 0.8-1.0 liter pot.
Utensils are another Level 2 addition. Don’t go overboard — a simple camping spork will do the trick.
Customize:
- A small, light, and durable salt and pepper shaker marketed to backpackers can help with bland food (which is why they’re a popular prison item).
- If you end up with food that requires cooking inside of a pot or other washable container, you might want to add a small hiker’s dish brush. Stones and other misc stuff can work, but it’s a chore and tears up your gear.
Avoid:
- Multi-piece mess/cook kits. This isn’t car camping.
- Nothing that’s meant to be reusable should be plastic.
Fire
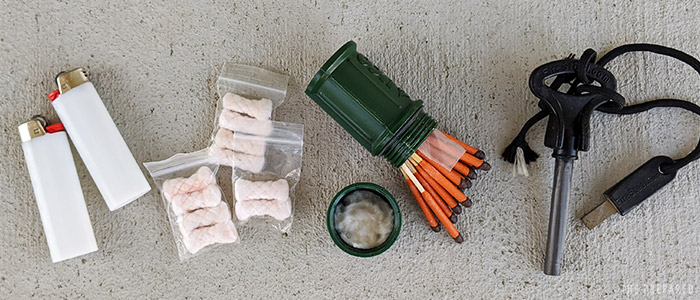
A simple lighter is the best overall choice, so having two are part of a Level 1 kit. We then add matches to Level 2, and lastly a ferro rod striker to Level 3.
That optimal mix means you can handle most needs in the short term, but if you go deeper, you end up with multiple ways to start a fire that compliment each other. For example, a lighter might fail in strong wind where the stormproof matches will work. Or if it’s a real nasty SHTF scenario, the ferro rod will keep your fires going for years after the lighter and matches are gone — but they’re harder to use, so they’re last on the list.
Reviews: Best survival lighters and cases, matches and waterproof containers, ferro rods and strikers, and tinder
Keep your lighters in a case (they’re cheap and common) so that they don’t get wet or accidentally leak fuel from a button press inside your bag.
Many people assume that as long as you have a lighter or other fire starter, you can always find random fuel around and it will spark right up. But experienced bushcrafters usually carry dedicated tinder, which can make a world of difference when things around you are wet or not great for catching a spark.
There are premade, small, and lightweight tinder products. Many preppers like to keep an old pill bottle or altoid tin with some cotton balls coated in petroleum jelly or similar (which catch a spark very nicely), or it could be as simple as some dryer lint, tampons, or your used and dried-out wet wipes. Whatever you pick should work when damp.
Customize:
- While you should always have a plain gas-fueled lighter, since a L1 bag has two, the second one can be a USB-rechargeable lighter.
- A fresnel lens is a lightweight addition or substitution, but only if you have already successfully used one.
Shelter & sleeping
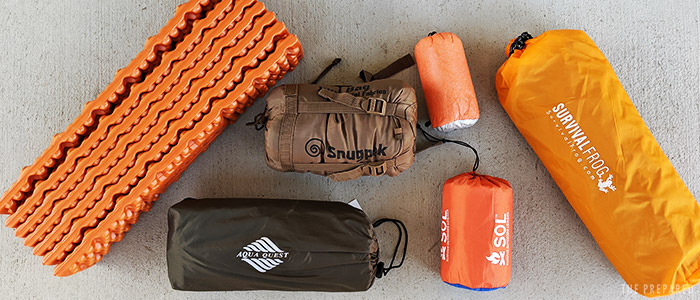
Shelter is one of the trickier parts of a bug out bag kit because of a wide range of climates, terrain, configurations, bulk, and weight. But it’s vital to be able to protect yourself from the elements and maintain core temperature — so much so that shelter may become your top priority, even above water.
More: How to shelter in and survive a winter emergency
Experts think of shelter in three pieces: What you sleep on, in, and under.
Level 1 has the bare essentials: multiple layers of clothing, a tarp, cordage, knife, and fire makers. With those few items you can make (or break into) rudimentary shelters, cover yourself, and retain a bit of body heat. It won’t be pleasant, but it will keep you alive.
Tarps are one of those versatile products that almost every seasoned pro keeps in their minimalist kit. Besides a wide range of shelter types, common tarp uses include rain collection, hiding your supplies, medical stretchers, sealing off a larger room for heat efficiency, covering a damaged home, or sealing off an area in an NBC/CBRN emergency.
Review: Best tarps for your bug out bag, best bivy, best sleeping pad, sleeping bag, and small survival tent
Level 2 introduces gear that can make a huge difference in your ability to sleep comfortably and control body temperature: a sleeping pad, sleeping bag/quilt/bivvy, and an eye mask with ear plugs.
A sleeping mask and ear plugs are one of those hard lessons learned by people who’ve actually had to bug out. For example, you might be holed up in a public school classroom with 20 other people who are snoring, farting, crying, talking, and using their lights. Some shelters even keep the fluorescent lights on 24/7.
Sleeping on the ground sucks. It’s not just a comfort issue. The real problem is contact with the cold, heat-sucking ground — anything that breaks that contact and traps some warm air is helpful.
That’s why homeless people use cardboard and newspaper even though it may seem meaningless — anything that creates cushion and insulation can make a difference. You can often create a “bed” with random materials around you, such as leaves or trash stuffed into a large garbage bag or poncho.
A sleeping pad designed for ultralight campers can make a surprising difference in comfort compared to just sleeping directly on the ground or a makeshift bed. There are versions with a meaningful amount of insulation (up to an R value of 10) at the expense of a few more ounces, which we think are worth it in all but the hottest climates.
It’s a personal choice whether you pick a sleeping bag, camping quilt, or bivvy. Just get the lightest, most compact version you can afford that’s right for your climate. A sleeping bag liner can be an easy and worthy addition if you’re in colder climates, and we like to store them ready-to-use inside the main bag.
Level 3 adds a two-person ultralight tent (which is actually only for one person). You can get most of the same value through your tarp, but a tent is nice because it closes you off from bugs and predators, can do a better job cutting the wind and rain, and can be set up more easily and in more places than a tarp — saving you time, calories, and exposure.
Customize:
- Ponchos are a popular addition or hybrid substitution for other gear. Some people have a tarp and rain jacket, while others use a combo product that can do both jobs reasonably well.
- Hammocks are one of the most debated shelter choices. There are benefits — getting off the ground, overcoming uneven terrain, and making use of the tarp you already carry as the overhead cover — but in the end we recommend robust bivvies and/or tents unless you’re already an experienced hammock camper or have specific reasons to go that route.
Avoid:
- Cheap gear. Pads, bags, bivvies, and tents tend to be a category where you get what you pay for. Higher price points typically mean lighter, stronger, and better-insulating materials.
- Inflatable sleeping pads save weight and space, but they may pop from a puncture or fire ember.
- Some parents think it’s better to have a bigger tent so they can keep children corralled. If children are small enough where you need to keep them that contained, then they’re usually small enough to share a two person tent with. Big tents are just too cumbersome for a modern bug out bag, so do what you can to avoid that kind of scheme.
Clothing
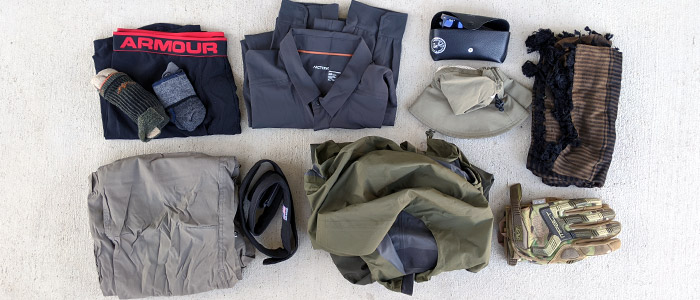
Although it adds a bit of bulk and weight, keeping a full set of climate-appropriate clothing in a Level 1 kit makes a ton of sense.
The key is to store the right kind of clothing.
Use the same products and principles backpackers use and do whatever you can to avoid underperforming materials like denim, khaki, and cotton. It’s worth spending a little more money on “technical” clothing from a sports or outdoor store because they’re lightweight, often take up less space, are designed to move, might have durable patches on hotspots like the knees, wick moisture, retain heat, can be easily washed by hand, and dry out quickly.
Even if you live in a hot climate, it’s generally a good idea to store pants and long-sleeve tops. The extra protection can be invaluable. The right gear is often adaptable, too, such as convertible pants that zip off to shorts and tops with features for rolling up and holding the sleeves.
Similarly, even hot climates can benefit from an outer shell to break up the wind and rain. Keep in mind that many desert areas can get very cold at night.
Depending on their local climate, some people (ourselves included) rotate the clothing in their bug out bag twice a year at the beginning of summer and winter to make a lot of this gear-mixing simpler. That method’s fine if you have the discipline to stick with it — if you want to keep it easy, err on the side of caution by storing clothing for the colder side of your climate. You can always wear less if it’s hot, make a summer layer or rain jacket with a tarp/poncho/bag/shemagh, wrap yourself in slain zombie skin, etc.
Quality socks are a critical part of footcare, which in turn is a critical part of surviving. Just ask anyone who’s been in the military or spent a lot of time outdoors. You definitely want at least one pair in Level 1, and it’s okay to add more as space allows.
Shoes, like phones, are another category where it’s okay to depend on having them around anyway, sparing you from keeping a dedicated set stored in your kit at all times — assuming you keep the bag stored somewhere obvious and shoes are naturally nearby.
Level 1 includes some kind of “does lots of things” bandana, shemagh, neck gaiter, or similar. These types of versatile products can be a hat, mask, scarf, sling, water filter, rain collector, signal, retain heat, cool via evaporation, etc.
A hat is clearly critical at Level 1, both for warmth and sun protection. We add sunglasses to Level 2 because although they might be considered a luxury, you’re pretty crippled if you can’t see.
Gloves are helpful for both warmth and protection, but we add them in Level 2 because you can get by without them in Level 1. Most of us aren’t calloused farmers anymore, so suddenly splitting wood with a knife or clearing debris after a natural disaster can really tear up your hands.
If you’re in a cold climate, consider having two sets of gloves, with one a thinner glove that can fit inside the second (and ideally more durable) glove for two layers of warmth.
A belt comes in at L2 because you can skip the bulk and weight in Level 1. If you only have Level 1 and need to keep your pants up, you can always use paracord or some other safety pin / fastener in your kit.
There are three types of belts common for these packs: The lightest possible, something built to hold survival gear or money in hidden compartments, or something sturdy enough to act as a MOLLE pouch and gun holster platform. All are fine, just pick what works for you.
Customize:
- Sink laundry kits are popular with ultralight travelers. It’s essentially just a pouch of concentrated detergent powder and a flat plastic drain cover so you can build up a bowl of water in a sink.
Avoid:
- Sandals, Crocs, Vibrams, etc. It doesn’t matter how tactical they are or how much you worry about a grimey shelter shower. Use proper footwear.
Light

A headlamp is almost always the best primary lighting choice because you can hold it like a flashlight, hang it on or around other items, or wear it on your head to keep your hands free (which can be a real lifesaver!) They’re small, relatively lightweight, and many modern models can produce a lot of light for a long time on a USB-rechargeable or standard AA/AAA battery.
Review: Best headlamps, best lanterns
Your Level 1 kit also includes one or two lighters, a cell phone, and possibly a solar/crank-powered radio, all of which serve as backup light sources even in a minimalist kit.
Level 2 includes a second powered light source. You can choose between a handheld flashlight, second headlamp, or lantern. As products in this space have advanced, we tend to carry a lantern for our second light because they’re small (some collapse down to the size of a hockey puck), rechargable, and do a better job flooding light into a room or camp site than a headlamp/flashlight.
Customize:
- Candles used to be a good idea across the board, but modern battery and charging tech has changed that balanced to the point where we generally don’t think they’re worth the weight and space. If you want candles anyway, a pack that takes up a few square inches and 5-6 ounces can provide 25-50 hours of light.
Review: Best Candles
Avoid:
- Glow sticks. They used to be a decent choice, but advances in powered lights have overtaken the value of carrying glow sticks.
- Similar story with standalone crank-powered lights. They used to be necessary, but advances in rechargeable tech have made them a niche thing.
Communication
Your cell phone is clearly a critical part of your prep. It already has your info, and it can contact anyone, find anything, entertain you, act as a backup flashlight/compass/map, take pictures of damage or where you’ve been, etc.
A phone is one of the few categories where it’s okay to not have one stored in your emergency kit at all times. This is mostly because the chances are very high that you’ll have your phone on your body or within easy reach when it’s time to bug out, and partly because it’s impractical for many people to keep another activated phone on hand just for emergencies.
However, you can buy prepaid “burner” phones or just keep an old phone with a spare SIM card from your main mobile phone account — just make sure they’re modern enough to use the same charging cables as the rest of your kit. Cell phones can call 911 without an active plan no matter what, but you could activate the SIM in your spare phone if the need arises.
But what if the grid is down?
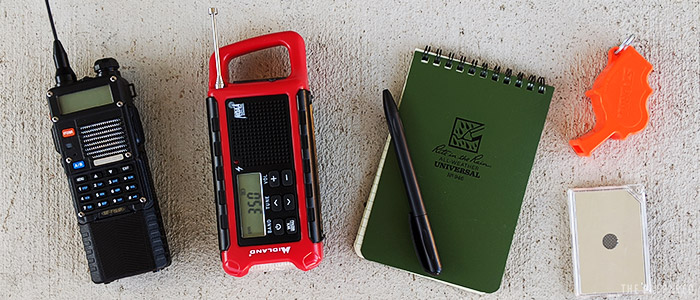
Amateur (ham) radio to the rescue! Radio is a big topic, so start with our ham radio for dummies guide, which explains why ham is the best choice and why you should avoid other types like walkie talkies and CB.
Since an amateur radio can also pick up public broadcast / NOAA stations and possibly local emergency services, people who know how to work a ham radio tend to only carry that one device.
If you’re not on the ham path, most people use a crank- and solar-powered NOAA radio to pick up one-way public broadcasts. They’re kind of bulky for what you get, but you’ll at least be able to hear what’s going on outside. Bonus: Many of these radios have a flashlight and USB charging port built in, so you have a second or third backup layer of solar/crank-powered light and electricity.
Review: Best handheld ham radio, Best emergency radio / NOAA weather radio
Signalling might make the difference between life and death, but it’s hard to pick one universal, portable product because the right signaling method is very dependent on your circumstances.
The best choices for small, light, and relatively versatile products are a signal mirror and whistle. They aren’t high on the list, only coming in at L3, because they only become more useful than your existing Level 1-2 gear in a narrow set of circumstances.
Review: Best signal mirror
Customize:
- Many advanced preppers buy tarps, mylar, or other gear they’d pack anyway with at least one surface in a bright color (like hunter’s blaze orange) so they can choose to be visible if needed. Here’s an example.
- If you’ll be on the water, signaling dye and/or flares are nice. Flares in a general sense typically aren’t worth the space and weight, though.
- Some people like to carry a “I need help, come find me!” GPS device known as a Personal Locator Beacon. The Garmin inReach is a popular choice.
- Satellite phones might be helpful, but they’re prohibitively expensive.
Avoid:
- Dedicated smoke products. Yes, smoke is a great signalling method in some situations where other methods fail. But the cost, size, and weight usually don’t justify the rare cases where you’d really need it and a fire won’t do.
- Tactical-minded folks sometimes carry a laser pointer because it can signal at a distance without giving away their position, but most civilians shouldn’t bother.
Power
The only powered items in a L1 kit are a headlamp, radio, and phone. Because of how battery chemistry works, you should store gear with around a 50% charge. Check and top up the power level during your routine prep reviews.
More: Beginner’s guide to batteries and beginner’s guide to off-grid power
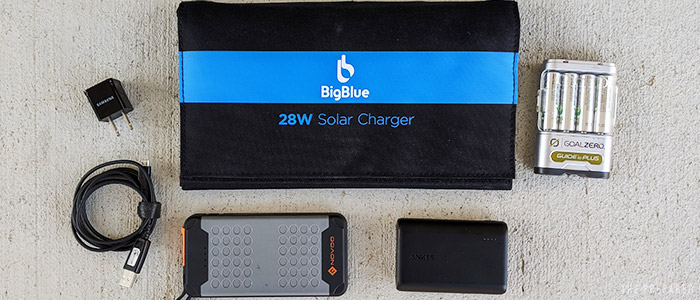
Including the relatively-heavy and limited-use Li-Ion battery in Level 1 was something we debated. But in the end, the few powered devices in a L1 bag are such critical preps that if felt important to have at least 1-2 charging cycles worth of power on hand no matter what.
Review: Best rechargeable portable power bank
Adding a simple wall plug and USB charging cable completes the L1 setup. Be careful to look at the totality of your powered gear to understand what kind of USB-A, -B, or -C ports/cables you need. It’s better to have a wall plug with only a USB-A port, for example, with A-to-B and/or A-to-C cables based on your needs. Vice versa, only throwing in the plug and cable that came with a Google Pixel phone, for example, is too limiting because the plug and cables are all USB-C and still too limited within the broader market.
Actually generating power comes in at Level 2 with a portable solar panel. Although they add a bit of weight and space, these panels can provide an infinite supply of power for any of your core gear.
Review: Best portable solar chargers
A solar panel alone can charge devices directly via USB, such as plugging the panel straight into your phone. A growing number of popular battery types (eg. AA and CR123A) also have USB plugs integrated directly into the battery.
Reviews: Best disposable batteries and removable rechargeable batteries
But Level 3 adds a dedicated battery charger for removable batteries that don’t have such a built-in plug. We also add a spare set of removable batteries that fit your core gear, especially if you have or find gear that can’t be charged directly from a solar panel via USB — ham radios are the usual culprit.
Review: Removable battery chargers
Avoid:
- Odd battery/power types. Try to standardize your power as much as possible so that everything uses the same common USB cables and battery types.
- Gimmicky water/wind/crank power generators. The tech isn’t good enough yet, but we look forward to the day it is.
Navigation
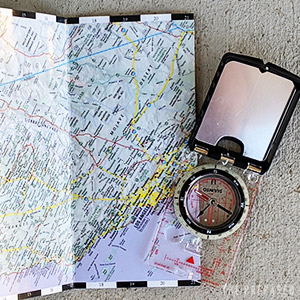
Part of being prepared is already having at least a general feel for your surroundings, knowing major routes and landmarks, and keeping basic map info downloaded on your phone so it doesn’t require the network.
Experts generally feel that, if you could only have one, a map is more valuable than a compass because a compass alone will only tell you NSEW direction while a map alone provides more immediate help — such as knowing if a hospital is nearby.
The trickier decision was whether to put a map in Level 1 or 2. Either way is fine, particularly since they don’t take up too much space or weight.
In the end, we didn’t think a map was critical enough for a L1 bag for the following reasons: your existing knowledge, the tools you should have in your phone anyway, the fact many GPS apps still work even when the phone network is down, your car should have maps too, and that a general sense of direction (eg. “we need to get away from the city”) will be enough in many circumstances.
Maps should be waterproof and, if you only have one, at a scale that shows the area within 1-2 hours of driving from your home, ideally including topography.
More: Learn how to use a map and compass, how to read a map and review of the best compasses, and best maps
Severe scenarios will require you to figure out your location without GPS, navigate terrain or waterways, estimate distance, and find resources. So a Level 2 kit includes a compass, which, combined with some basic skills and a map will cover almost everything you need.
Customize:
- Portable GPS units are fine if they specifically make sense for your plans.
- Ranger beads or pedometers are helpful for keeping your pace count. Knowing how far you’ve walked can keep you on course if you’re navigating without the grid.
- Binoculars seem like a good idea, but in practice they tend not to be worth the space, weight, and cost. Still, you can add them if you know you have reason to.
Tools
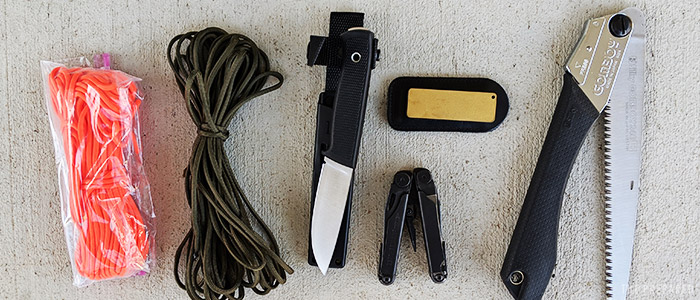
A field knife and multitool are two of the most important tools you can carry. They will always be in a Level 1 kit, even if you cut our suggested list in half, because there are very few items that provide more bang-for-your-buck versatility. Both tools should be kept in a sheath that you can attach to a pack or belt.
Reviews: Best survival knife, field knife sheaths, and survival multitool
Cordage is another critical prep. So much so that it has its own “C” in the popular “5 C’s of Survival” framework. The uses are endless, it’s relatively cheap, and it won’t add much weight to your pack for how much value you get.
Paracord is the go-to choice, rather than standard rope or other line, partly because you can split paracord apart into multiple smaller strands. So if you really needed it, 50 feet of paracord could be 350 feet of line. Plus some paracord products come with survival extras built in, such as a fishing line.
Review: Best survival paracord
We recommend carrying at least 50 feet because that’s a common package size and it’s enough to build basic shelters, rappel, and perform other common tasks. If you’re experienced and know you can get by with 25 feet, that’s fine too.
We don’t add another dedicated tool until a hand saw in Level 3. In a severe emergency, you may be processing a lot of wood, breaking into or out of things, crafting items, and so on. A great knife can get you through most needs in a pinch, but a hand saw can make a world of difference.
Review: Best hand saws
Another Level 3 addition for serious emergencies is a blade sharpener. You might be using your bladed tools quite a bit, and not only is a sharp blade safer, it can help you save calories and time. Go with either a pocket stone (strongly preferred) or pull-through sharpener to keep things small and light.
Reviews: Best portable sharpening stone and pull-through sharpener
Customize:
- Sewing kit
- Fishing kit
- Trapping kit
- Lock picking gear / bump keys
- Silcock keys are a common add-on for urban kits because they open (some) water valves commonly found in city buildings.
- Although a hand saw is a good universal choice, if you have experience with hatchets, machetes, kukris, and tomahawks, then consider which one is right for your environment and if you want to replace the hand saw. Choose something small enough to be portable, but some of the larger options might end up strapped to the outside of your pack.
- A shovel, trench tool, or frankenstein “emergency tool” is generally not a good idea because they take a large amount of space and weight for relatively limited value. Plus we don’t see many in the market that we actually like. Some people really have a need for one based on their plans (such as buried caches or snow cave shelters), in which case they’re not crazy to include.
- Pencil sharpeners are one of those neat prepper tricks that float around social media because it seems crafty and cool. A tiny $1 pencil sharpener can make tinder shavings or sharpen a stick, but you already have multiple blades. So the only time that might be a worthy addition is if the sharpener itself is magnesium, which can be scraped into tinder shavings.
Avoid:
- Don’t bother with the handheld wire saws commonly seen in amateur survival kits. They just don’t work well enough to be worth it unless you’re already practiced.
- A can opener is very likely already included in your multitool, and you can always use a knife or something random, so don’t bother with a dedicated opener.
- Door stoppers / wedges are another viral hack based on some stories of being in shelters (like a high school classroom) where people wished they could block the door for privacy. The need is valid, but you can use or make something else instead.
- Fuel siphons aren’t worth the space and weight for the very limited scenarios where you’d want one and they’ll work.
Medical & hygiene
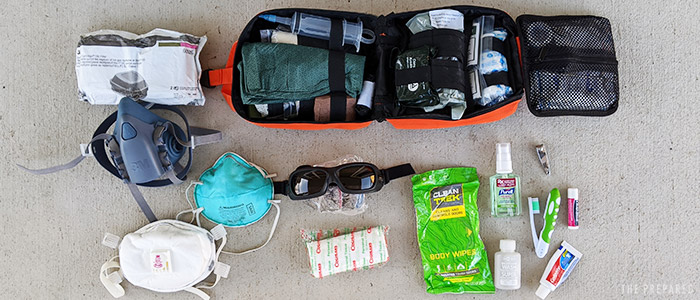
See expert’s checklist of survival first aid kit items, which map directly to the same three-level model for your bug out bag. The weights used in this guide are based on that list, including common containers used for each size.
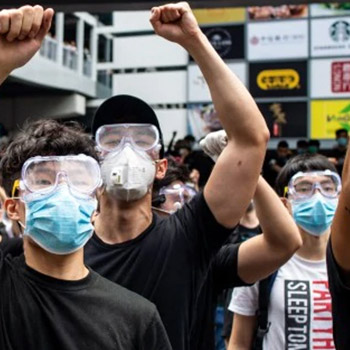
Respirators are vital in emergencies ranging from fires to pandemics to civil unrest to nuclear war because they protect your lungs from contaminants.
But a full gas mask is just too big for a realistic bug out bag. Outside of the most extreme nuclear and bioweapon disasters, you can recreate the value of a full mask by combining a half mask to cover your mouth and nose with a pair of googles to cover your eyes.
Whether you carry a reusable or disposable half-face respirator (with extras / extra cartridges) is up to you.
Review: Beginner’s guide to the best gas masks and respirators
Level 2 adds the goggles. You might be walking through smoke, tear gas, contaminated air from an earthquake or other disaster (eg. the 9/11 first responders lung illness), or even high wind. People often buy swim goggles, onion goggles, or other “industry safety” goggles that seal off the eye.
People often underestimate how important hygiene is in an emergency. Yet organizations like the WHO, CDC, FEMA, and Red Cross all stress its importance because they see first-hand how disease can spread as soon as groups of people get together in an austere setting. Typhus, tuberculosis, and even the literal plague are making their way through US homeless populations, for example, and recent hurricane floodwaters have tested for extremely high levels of feces and toxins as people wade through them with open injuries.
Soap is a no-brainer for Level 1. A small bottle of condensed camping soap, which you add to water to froth up, doesn’t take much space or weight and can make a world of difference in your health and comfort.
There was some debate among our experts about which levels to add nail clippers, toilet paper, and wet wipes. There are solid arguments in any direction, so you have some flexibility on how you prioritize these items.
We included nail clippers in Level 1 — even though you have other cutting tools — because hand and foot care is so vital, yet often overlooked, and experts with experience treating soldiers and hikers in the field have seen first hand how a proper nail clipper can make the difference.
Toilet paper was favored over wet wipes for L1, with wipes added to L2, because the soap already in a L1 kit can help with general cleanliness. Wet wipes are better used as whole-body showers, rather than simply as bum wipes.
Review: Best wet wipes
Chapstick and a travel toothbrush/toothpaste are added in L2 while hand sanitizer is added in L3. Similar to nail clippers, you can technically get by without these specialized products. You can fashion a toothbrush with your knife by flaring the end of a twig into whiskers, for example.
Experts find in practice, however, that people are more likely to keep their hands and mouth clean and prevent injuries when these cheap and light products are around. Plus it helps save water, soap, petroleum jelly, and other supplies with more versatile uses. But you can skip these if you’re experienced in the field.
Customize:
- Menstrual products. Although menstrual cups are great for home supplies, avoid them in bug out bags because you don’t want to assume you have clean hands for insertion/removal and want to avoid wasting water and soap for cleaning.
- If you need prescription eyewear, be sure to have a spare set of glasses in a hard case.
- Anything tangential you need for critical medical care, such as extra hearing aid batteries.
- If you’re in a very hot climate, you can add travel sunscreen, although you have enough other gear to shield you from the sun even when on the move.
- Some preppers include a small towel, usually marketed for travelers, hikers, or swimmers. There isn’t a ton of value here, though, so keep it light.
- Floss isn’t a bad addition because it’s insanely small and light and can act as a backup fishing, trap, sewing, or general line.
- You can consider a full gas mask if you have a bona fide reason to be worried about CBRN disasters, such as living near a toxic industrial facility.
- Iodine tablets don’t add much weight but will be vital in a nuclear scenario.
- Condoms and birth control. We’ll always remember the answer a tribal chief gave us when working in a remote village with an insane ratio of children to adults: “There’s no electricity here. What else do you think we do at night? ;)”
Avoid:
- Deodorant. If you’re around other people, they’re probably stinky too. If you’re not around other people, then who cares. Plus the wet wipes, soap, and technical clothing help mitigate odor.
- Mouthwash.
- Single-use pocket hand/foot warmers. You’re better off using that money/space/weight on something more valuable, such as better gloves. If you’re in a very cold climate, however, a USB-rechargeable pocket warmer tucked into an armpit can help.
Entertainment & mental health
It’s easy to dismiss creature comforts in an austere survival scenario, but even the most rugged manly man has to manage their mental health — a critical element to survival.
A small token or two can help fill the time, lift your spirits, and give you something to talk about that isn’t the emergency itself. As a bonus, sometimes the best thing to do is sit still, and if you have something to fill your time then you’re less likely to move about or do something stupid.
The classic go-to is a waterproof deck of cards. Small, lightweight, cheap, and versatile for solo and group use. Other common choices:
- Pocket Bible, Koran, Tanakh, Marcus Aurelius’ Meditations, etc.
- Dice
- Magic The Gathering
- Travel tabletop games
- Rubik’s cube
- Kindle
- Airplane-mode games, music, movies, podcasts, and books on your phone
You likely have pictures of loved ones for documentation and recovery reasons anyway, but a simple photo of anything that brings you joy (or even a will to survive) might go a long way.
Simple earbud headphones are added to Level 2 for entertainment, general hands-free communication, and (if compatible with your radio) to be more stealthy in tactical scenarios.
Customize:
- Vices like cigarettes, a USB vape pen, travel booze, etc. Some people carry these items as barters — an addicted smoker might give up something valuable in exchange for a cigarette. But they can also be acceptable choices if you are addicted, need something to dull pain from an injury, or just generally benefit from a hit to put you to sleep when you otherwise can’t.
- If you’re a parent and want to keep something small in your bag just in case you have a scared child without their own bag and toys, that’s okay, but try to leave the stuffies and other bulky stuff in the kids’ bags. What you keep in your bag is the emergency-tantrum backup.
Avoid:
- Keep it reasonable and don’t stress too much about “boredom.” You’re trying to survive. A large Harry Potter book is not right for this situation, you filthy Slytherin!
Documents
A weatherproof notepad and pen are a no-brainer in Level 1 because they can help with almost every other category, from documentation to navigation to medicine.
Important documentation should be stored both digitally and physically. In a bug out bag that typically looks like a USB thumb drive and small laminated papers you print and seal at home. Keep them stored in one of your watertight containers. That should cover all of your bases when combined with files stored in the cloud and on your phone.
Documents to keep copies of in your emergency kit:
- A list of important people and their contact/location information
- Birth certificate
- SSN card
- Passport
- State ID
- List of financial accounts and credit card numbers — don’t forget the expiration and CVV codes as well as the phone numbers for your providers
- Titles/deeds
- Marriage certificate, especially if you have different last names
- Anything proving parental relationships, especially if adopted or different last names
- Pictures of important people, both for morale and to give to others for recovery/reconnection
- Estate planning docs
- Health, homeowners, auto, life, and other major insurance policy numbers and phone numbers
- Important medical history, medication (with dosage), and allergies
- Living will or Do Not Resuscitate instructions
Level 3 adds a well-rounded pocket field guide. Since a L3 kit is typically for the more severe emergencies, having a small reference guide that covers basics like shelter making and animal trapping can be a real lifesaver.
More: Best survival books
Customize:
- Children’s bags should include things like a picture of their house, a map with a pin of their home location, pictures of and contact info for their family, etc. That way they can still get the right kind of help from strangers even when they’re upset and can’t remember or communicate specifics.
Avoid:
- Full-sized documents. It’s fine to shrink the printout copy of your documents and IDs for the sake of space. Or make your own text file with tiny font and cliff notes. It should not take much space to include the relevant portions of every document in the list above.
Currency
You clearly want to pack some cash, but how much? There’s no real rule, just a general guideline: as much as you can, within reason.
For most people, that looks like a few hundred or few thousand dollars in cash, split up between large and small bills. You may want to split it up so it’s not stored in one place, which may be helpful if someone loots or mugs you.
How helpful cash will be greatly depends on the situation. In a shelter after a natural disaster? $100 could be very handy. Total SHTF with people panicking? You might need $1,000 or more before someone you want to bribe will actually care.
Customize:
- Some preppers hold gold, silver, or other hedged stores of value. It’s fine to keep some smaller, more tradeable bullion in your BOB if you really want to. Just be careful of weight.
- Better yet, carry wealth in the form of jewelry instead of bullion. If you have to barter with it, it’s better to play it off like “this is my wedding ring and last keepsake!” instead of one gold coin that makes the person think “hm, I bet they have more.”
- If you think of cryptocurrency as part of your prep, or you simply have a bit of wealth there, keep your wallet and other critical info stored physically and/or digitally in your bag.
Self defense
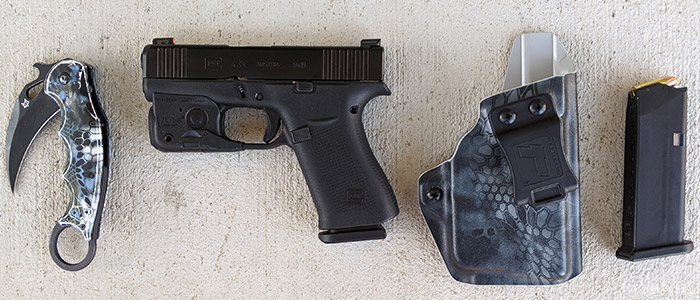
Another area where people tend to overdo it. It’s just not practical to carry multiple weapons with tons of ammo so you can fight your way through the zombie hordes. (And if your plan is to use weapons to take what you need from others, you’re a #badprepper.)
A L1 bag already has bladed tools that could be used for defense if needed. But in Level 2 we introduce a pistol, holster, and full magazine. Combined with a sturdy belt, you’ll be ready to defend yourself in most circumstances.
L3, which takes on more weight in order to handle more long-term or serious emergencies, adds a second (or even third) full magazine.
Customize:
- If you want something more robust than a pistol, try to keep it as light and concealable as possible, such as an SBR or takedown bow.
- If you don’t want to carry a firearm, but do want to carry a less-lethal option such as pepper spray, you can add it to your kit wherever it makes sense for you.
- It’s okay to throw in a simple taco holster or something similar for spare mags.
Avoid:
- Rambo fantasies.
- Multiple calibers of ammo.
- Night vision and other bulky but unnecessary accessories in a primary bug out bag.
Misc
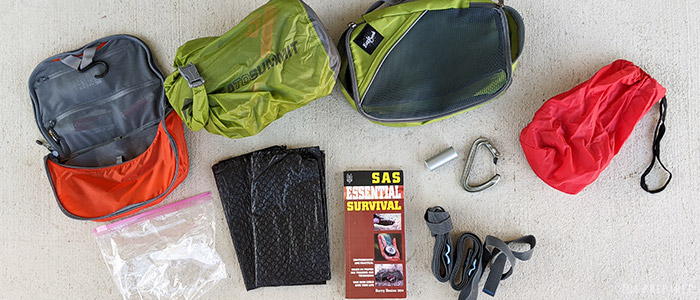
It’s a good idea to keep gear stored in compartmentalized bags or sacks within your overall backpack. You’ll find what you need more quickly, can grab-and-go specific pouches as needed, etc.
Those containers are also preps themselves, with countless uses when you’re adapting in the field. You might use a Ziploc bag to protect a severed finger, for example, or collect rainwater.
Whether you use standard Ziploc bags, ultralight packing sacks, stuff sacks, or dry bags is up to you. We like to have at least one large bag that’s capable of being watertight — not only for the reasons you’d expect, but because it can double as a floatation device.
Large contractor trash bags are included in L1 because they don’t add much weight yet can be useful for human waste, as an additional poncho or tarp, bedding or clothing layer, something you can use to go scout for supplies without taking your whole pack, and so on.
Fasteners are infinitely useful for improvising, repairing, and organizing. Be thoughtful about what you include. A quality twist tie to keep your USB cords together is better than a flimsy one, for example, and can serve double duty if needed.
Pack straps are added to L2 because you’ll likely want to strap your sleeping pad and/or sleeping bag to the outside of your pack (assuming you have a reasonably-sized pack). In a L3 kit, the sleeping bag tends to go inside the backpack, with the pad and tent strapped outside.
We like to add a small flat-pack travel roll of duct tape, climbing carabiners, and ranger bands (ie. thick and sturdy rubber bands) to our L3 bag.
The duct tape can patch torn clothing or shelter. The carabiners help hold weight without knots, such as suspending a bear bag or rappelling from a window. Rubber bands are generally useful and often used when combining two high-use products together, such as a light strapped to a weapon. Pack straps help carry gear on the outside of your backpack, like a sleeping pad or extra hoodie you find along the way.
Customize:
- Watch or time keeper, especially if you don’t assume you’ll have your cell phone.
- A padlock / luggage lock can be helpful when you’re sheltering with people you don’t know. Unfortunately, looting does happen when people are in a tough situation, but when in shelters they’re mostly crimes of opportunity — a simple, lightweight luggage lock can make the difference.
- Handcuff keys.
Avoid:
- Zip ties can do double duty as makeshift handcuffs, but they’re generally less versatile (and definitely less reusable) than other fasteners.