Share your knowledge & learn from experts
Because prepping and community go hand in hand
How to escape 2nd floor bedroom in case of fire
Do y’all have an recommendations for gear or protocol for escaping a second story bedroom in case of a fire between the bedroom and the stairwell that leaves the house?
I searched the forums and didn’t find anything.
I’m thinking a window breaker and some sort of collapsible ladder.
Read MoreGood portable hard drive or flash drive for bug out bag?
I’m trying to find a rugged and reliable portable hard drive or flash drive to include in my BOB for my digital data. The official BOB list does not include any recommendations. Has anyone found any that are built tough and worth looking into?
Read MoreDIY custom maps for print & reference
TL;DR – it is possible to make custom print quality maps, in some cases very quickly (though your first try may not be quick!). That being said it is also possible to waste a lot of time and money making less usable or useless maps. The following is an attempt at quickly “getting started” for technically savvy but otherwise novice users.
Try at your own risk, for what its worth I probably added more detail than strictly needed, I’m not 100% sure how approachable this guide will be but its offered in good faith, your mileage may vary! Once you have this down its really only 4 [main] steps that can be done in less than half an hour unless you want to do something fancier.But first, what I’ll be showing:
Above, a small “zoomed in” section of the final map as exported to a digital PDF file (the “misaligned” building/parcels are a data issue, not a software issue and acceptable for my purposes)
Roughly the same area on the printed poster for quality comparison ordered via Vistaprint (image darkness more a factor of my poor photography skills). Keep in mind this is less than a 5 inch wide segment zoomed in (it’s smaller than my iPhone 13 mini). The text quality is mildly disappointing compared to the original but otherwise this is actually pretty good quality IMHO, showing the ‘warts’ on purpose to be transparent.Above, a zoomed out view of a 36″x48″ poster sized map with the top/bottom cropped to hide my poor poster mounting skills (Again, I should have changed my photo settings, but photography is not the point of this post).To create your own version, in 5-7 somewhat “easy-ish” steps:
QGIS is an open source Geographic Information System (GIS) application. While this application is capable of a wide variety of tasks, one task it is suited for is the creation of maps for printing. This tutorial is a “simple” crash course in creating a custom map suitable for printing on either a home printer or a commercial service such as a Fedex-Kinkos or Vistaprint poster.
Note: Steps 4 & 5 are strictly optional, OpenStreetMap is often pretty good. Many sub-bullet points are FYI, assuming you leave default settings alone or don’t move/close something by accident this can go pretty fast.
Step 1: Download the application.
QGIS is available for most major operating systems, most users should be able to make use of an easy to use installer though advanced users may want to consider specialty options. Note that as an open source application this software is community driven and supported, including documentation and online help. The user interface may include subtle changes between versions which may result in slightly different workflows. This guide was written for version 3.20.3 on windows but should be broadly compatible with recent versions (users have the option to download older versions at their discretion).
Step 2: Open the application and add OpenStreetMap background layer
Open the application and navigate to the File Menu, select “New”] Make sure that the “Browser” and “Layers Panel” panels are visible If needed these can be added by going to the “View” menu, select “Panels” and make sure “Layers Panel” and “Browser Panel” have checks next to them Note that the panel layout/position can vary and that some panels can have tabs. Panels can be reorganized by clicking and dragging them as desired.Above, an example of “tabbed” panels in case one is not immediately visible
On the “Browser” panel, locate and expand the “XYZ Tiles” option, OpenStreetMap should be a preloaded option available. Double click this option to add it to the map. This should load a streaming map service (requires active internet connection) as a background reference layerStep 3: Navigate to an area of interest
QGIS includes a number of navigation tools such as pan and zoom, these should be displayed by default but if absent can be added by going to the “View” menu, selecting “Toolbars” and then making sure that “Map Navigation Toolbar” is selected Use the pan and zoom buttons to find an area of interest (Pan = first icon, click and drag with mouse, zoom controls are icons 3-10) If your mouse has a “middle mouse button” (oftentimes the “button” is your scroll wheel) you can “pan” while clicking and holding the middle mouse button. You can also scroll with the mouse wheel to zoom in and out. Equivalent trackpad gestures should also work. As you zoom in the streaming Open Street Map reference layer will add more details. Other data sources can be loaded however this is a useful “first step” in many cases.Above, global scale of OpenStreetMap Layer
Above, zoomed in to the same layer with more detail automatically displayed.
Step 4: Add more data (optional)
Note: Steps 4 and 5 aren’t strictly needed if you’re happy with the OpenStreetMap details. Much more data exists for free and you are largely limited only by your time and patience. Feel free to skip to 6.
The benefit of using a curated service, such as OpenStreetMap is that most of the design and display options are preconfigured and are often “good enough.” OpenStreetMap data can be incomplete, out of date, or otherwise inaccurate based on community support for your area of interest. Adding third party data and properly designing and labeling custom data can be very involved as many customizations are possible. These customizations are beyond the scope of this introduction however a partial example is provided to demonstrate basic functionality.
Locate a third party GIS dataset (shapefile format preferred) from any appropriate source such as an internet data portal. Examples of data portals can include: https://hub.arcgis.com/search – ESRI is a commercial GIS company that provides a variety of hosted datasets, many (but not all) will be compatible with QGIS Many federal, state, and local governments will have similar data portals, a google search for “shapefile open data download” and then key words related to your geographic or thematic area of interest is likely to return useful results, for example multiple data portals hosted by the state of Virginia can be found here: https://data.virginia.gov/ (includes non GIS data too) https://vgin.maps.arcgis.com/home/index.html (more specific to GIS data, note the “arcgis.com” domain, many organizations make use of this software to host their data) When searching for data, each website/source may provide a different user interface, the following points are worth keeping in mind Different file formats of GIS data exist, the most basic/universal is called a “Shapefile” and will almost always be compatible with QGIS “Shapefiles” are usually bundled as anywhere from 1 to 8 different files that all share the same name but have different file extensions. The file with a “.shp” extension is technically the “shapefile” file, however if you do not also receive a file with the “.prj” extension (projection information), the data will be virtually useless without a fair amount of extra work. Generally speaking try to avoid changing the names of shapefile and their bundled support files and store them all in the same relative directory. When downloading data you may (but not always) have the option to select the file format, for this tutorial a “shapefile” format is preferred. Most GIS data exists as either point, line, or polygon vector data, when selecting a dataset look for the type and detail you are most interested in. For example, “building locations” can often be stored as either point locations or polygon files. Roads and streams are often provided as line files, but can be provided as polygons as well.Above, an example of download options including Shapefiles, highlighted.
Once a suitable file has been located, download it, extract it if needed (shapefile collections are often provided as zipped collections) and store it at a known location on your computer. Extract the 5 files supporting the shapefile to a known location (note, GIS files can get large), such as “D:\Data\GIS\Tutorial” (your location will vary…)Above, an example of a group of related files, commonly stored in the same place but referred to as if it were a single “Shapefile”
In QGIS, select the “Layer” Menu, then click “Data Source Manager” next make sure “Vector” data is selected, the “Source Type” will be “File” and you will want to navigate to the location where your data is stored. You will see all of the support files for any given Shapefile, select the file with the “.shp” extension and click “Add” Note, large files or slow computers may take a minute Assuming you have all of the bundled support files, most importantly the “.prj” file, you should be able to safely ignore the “options” that are provided After adding the data, click “Close” on the “Data Source Manager” (or simply move it out of the way) and locate the “Layers” Panel, your new layer should be added. If you do not see the layer in the main map window make sure the checkbox to the left of the layer is selected. You can also turn off other layers or click and drag to reorder the layers. You can right click on a layer and select “Zoom to Layer” to zoom to the extent of the layer. When a layer contains very small features spread out over very large areas it may be difficult to see the features, try turning off other layers and panning/zooming as needed.Above, an example of a state wide polygon file using default display settings.
Step 5: Simple Symbology of custom data (optional)
When adding third party or custom data you will likely want to change how the data is displayed. QGIS has many options for this however this guide will only cover a very simple use case. Data symbology can involve many factors including design and aesthetic preferences so it is difficult to provide “one size fits all” guidance.
Return to, or find an area of interest In the “Layers Panel” click-drag the relevant layer(s) to a suitable order. Typically Basemap layers (like OpenStreetMap) should be on the bottom Usually “point” data should be on top of “line” data, and line data in turn on top of “polygon” data, however exceptions can occur. For any given shapefile layer, right click on the layer and click “properties” With the “Symbology” tab selected on the left, you have a number of options and presets for how the selected layer can be displayed. “Simple Fill” should be a default setting, if not available, remove any other options using the red “minus” button and add a “simple fill” using the green plus button, if needed. Click on the shaded color for “Fill Color” and drag the “Opacity” slider to be transparent (0%) Change the “Stroke” color, width, and style to your preferences (for example a light thin gray line) and hit “OK” Repeat Step(s) 3,4, & 5 as needed based on the data you’d like to show and how you would like it to be displayed.Step 6: Preparing a Print Layout
Once data is added to a map, an area of interest is visible, and relevant data has been symbolized the result can be put into a print layout for export such as a PDF file. Many options exist however PDF files are fairly common and support a number of useful print options.
From the “Project” menu select “New Print Layout” and provide a meaningful name if many layouts are expected. A new window will open, leaving the old window accessible as well. From the new Layout Window, right click on the blank canvass (the white square that represents the printable area) and click page properties. In the “Item Properties” panel, under page size select the size map for printing you are interested in. A “custom” size is available “Custom” size unlocks the Width and Height options and a number of units such as mm or inches are supported For example vendors like Vistaprint and Fedex-Kinkos allow for poster prints up to 36”x48” Printing and print proofing is its own sub-discipline, that often includes factors such as the printable area, printing resolution of the printer, paper quality and size as well as other factors. Defaults will be used to the extent possible. From the “Add Item” menu bar, select “Add Map” and then click and drag the approximate size and location of the map you wish to print on the canvass layout Depending on the amount of data and internet connection rendering the map on the canvass may take a moment Once added the map can be resized, and limited repositioning of the map position within the canvass is possible using the “Move Item Content” toolbar tool and click-dragging or mouse-wheel zooming Be sure to revert to the “Pan Layout” toolbar tool once the map content is positioned correctly. Using the wrong tool for switching between the map position and the layout tool can be frustrating so it is usually best to handle with care. Most printers can not fully print to the edge of a piece of paper so it is advised to leave a small border of “white space” For more exact control of the map item’s placement on the printable canvass, right click on the map area (make sure the “Select/Move item” toolbar tool is selected!) and click item properties. Under “Position and Size” you can enter in finer details about your placement. A bit of math is required relative to your printable area. For a 36”x48” canvass the following is suggested (make sure to use the upper left “Reference point” if using these numbers (in inches): “X” = 0.5 “Y” = 1.5 “Width” = 35 “Height” = 44 Traditionally Maps have Titles, credit data sources and other design elements. These can be added from the “Add Item” Menu, for example: From “Add Item” select “Add Label” and draw a label at the top of the page for a title Right clicking a map item and selecting “Item Properties” will expose relevant options such as a text box to add custom text (usually filled with “Lorem ipsum” by default) and options for changing font, font size, font color, etc. From “Add Item” select “Add Label” and draw a label at the bottom right of the page for data credit details Data is often subject to copyright and terms of use. This is especially relevant for any map you might share in a public setting (such as a tutorial!) however public domain data and personal use exemption are quite common for open data sources. OpenStreetMap has a generous but specific copyright and requests language to the effect of “© OpenStreetMap contributors (openstreetmap.org)” should be added In this example Virginia Department Of Transportation is listed as the author of the parcel data used and has a custom license that does not specifically claim copyright but rather a disclaimer that amounts to “use at your own risk” As a rule of thumb most data provided by governments will either be public domain or have generous terms of use, though aggregating quality data does take time and money it’s often provided as a public good (your taxes at work!). Exceptions do apply, for example it is technically possible (though probably illegal) to stream Google Maps imagery tiles into QGIS. Just because data is accessible doesn’t mean it should be accessed. Adding a scale bar is recommended for printed maps. Export PDF for printing From the “Layout” menu bar, click “Print…” and note the warning about streaming services, however this option appeared to produce a usable PDF file while testing.Step 7: Printing large format maps
If you select a normal 8.5”x11” canvass and have a home printer you should be able to print following your normal printer procedures. PDF files can usually be opened by web browsers or free software. In fact starting with smaller maps on a home printer is advised to get a sense of print-related issues prior to spending more on larger formats.
Large Format maps can be obtained from retail printing services that produce poster style products. For example both VistaPrint and Fedex-Kinkos have online tools. Some print vendors may have additional options that allow for oversize prints that are non standard.
As previously alluded to, printing and print proofing is a sort of subdiscipline of its own. VistaPrint provides a “Digital Proof” that attempts to be more representative of actual print quality but you should be aware that a print vendor will simply print the file they are provided. If you provide a file that is low resolution and highly pixelated, to the point of being unusable, you will probably not get a refund. There are steps you can take to mitigate this, for example PDF files can support vector based graphics and text meaning that the hypothetical upper limit of the print quality should be dependent only on the hardware rather than the data file but determining how to most effectively make use of these features is beyond the scope of this guide. As demonstrated the PDF export and resulting print may not always be 1:1 perfectly representative.
All this is to say: be careful, you might spend $60 on a map that looks good as a PDF but prints terribly based on a setting during export.
That being said, this is something I’ve been wanting to do for myself for ages and since I finally found a good/easy enough way to do it, I thought I’d share here.there is a lot of online help available, I may be able to answer a few questions if something I wrote above is unclear but keep in mind I don’t necessarily check here daily.
If you do try this and find it useful, I’d be mildly curious about what other use cases are out there. If someone has a good idea I might be inspired to do a follow up (no promises though!).
Read More
C. Crane Skywave and Skywave SSB out of stock – What is the best alternative?
I currently have a poor quality and ancient emergency hand crank radio and was looking to upgrade this aspect of my preps.
After reading the Best Emergency Radio Guide, I decided to purchase a C. Crane Skywave or C. Crane Skywave SSB emergency radio. I was disappointed to find, although I guess I shouldn’t be surprised, that the C. Crane Skywave and C. Crane Skywave SSB are both out of stock with a potential ship date that is several months out at best.
Given what is going on in the world right now, I’m not sure I feel comfortable waiting a few months (or more, knowing the current state of the supply chain) to upgrade my emergency radio.
The main reason I am looking to upgrade is because of the Russia / Ukraine situation and the increasing tension between Russia and the US / NATO countries. While I think it’s still relatively unlikely, I believe the possibility of a nuclear exchange between the US and Russia is becoming enough of a possibility where I want to be prepared for the situation if it were to occur. I believe part of that is having a really good radio on hand to be aware of potential incoming threats and to get information in the aftermath of a potential attack. Besides that scenario, it will be helpful in many other emergency scenarios.
I am hoping somebody could share some advice as to what emergency radio (C. Crane brand or other) would be best to have on hand in the above scenario, excluding the Skywave and Skywave SSB which is currently out of stock? C. Crane seems to have a number of different makes / models – so many so it’s a bit overwhelming.
Read MoreHospital go bag
When both parents started going into the hospital a couple of times in rapid succession, we put together Hospital Go Bags with items needed for comfort, privacy, and entertainment. The document package stayed in our cars as well. We did use the bags thereafter.
Hospital Go Bag
Leave personal medications and tobacco products at home. Clean out wallet of credit cards and large amounts of cash. Leave jewelry at home. Hospital has no responsibility for stolen valuables. Policies may govern if you can have electronic devices. If you’re uncertain whether to bring a valuable, ask yourself if you’re willing to lose it. If not, keep it at home. With a small amount of money you can buy newspapers, etc.
If something goes wrong with a day surgery, you may be admitted to the hospital for a time. It’s best to plan for that contingency.
Inventory of the bag contents. Date when last inventoried.
Gov’t issued photo ID and insurance card
List of emergency contacts (phone numbers, hard copy), including primary physician, ride home, clergy
Healthcare documents such as personal health history (with allergies, conditions, medications [name, dose, administration times], doctors, immunizations, history of major illness and surgeries), dietary restrictions, Advance Health Care Directive (meds and procedures you either will accept or not accept), Power of Attorney for Healthcare, General limited or durable Power of Attorney, Living Will, optional Do Not Resuscitate (Allow Natural Death) order. Recent reports, x-rays. Bring documents in a single bag or envelop.
Crutches, walker, cane, other assistive devices for use after surgery.
Mobile phone and wall charger, extension cord. Hospitals may have a policy if electronic equipment interferes with patient monitoring equipment. Check before going if possible.
Dental hygiene items (brush, paste, floss)
Personal hygiene items: nail clippers, comb/brush, shampoo, conditioner, skin lotion, deodorant, lip balm, shower shoes (flip flops). Shaving kit. Feminine hygiene products.
Special needs products such as denture cream.
Eyecare (contact lens kit, glasses, cleaning cloth). Glasses may be easier to deal with than contacts.
Eye mask, ear plugs. Contrary to what you believe, you are not in the hospital to get rest. Staff may awaken you at such hours that it is difficult to sleep. Be prepared to complain. They can do better.
Full change of clothes, a couple of changes of underwear
Light robe? Non-slip slippers
Entertainment of some kind, cards, puzzle books, book/magazine to read, religious book
Notebook, pen. Note details of any incident, any verbal instructions that are not documented. Journal?
Photos of family, friends.
For kids, favorite (stuffed?) toy
Any other staff-recommended items for a planned hospital admission.
Read MoreApartment window protection
Hi Preppers, We live on the 7th floor of a pre-war apartment in NYC. My question: Is there a way for us to put protection on our windows on the interior of our apartment in the event of a hurricane (or civil unrest or…)? Even better, if these shutters are not hideous and fast and easy to deploy? Any ideas? Has anyone put up the bolts for hurricane fabric? Thank you!
Read MoreLong term experience with reccomended Novoo waterproof power bank?
Hi all, I have been working through making a bug out bag. Because money is an issue, I was thrilled that the reccomended power bank wasn’t an arm and a leg. Looking into the reviews on Amazon though it appears that a lot of people love it at first but around 6 months it starts to fail and around a year when it is no longer in warranty it stops working entirely. It is tricky to guage how common that experience is- how many people actually come back to amazon in a year when something fails? Does anyone have any personal experience good or bad?
Alternatively, does anyone have a different power bank that has held up long term for them? (I have been mulling over spending the extra money and getting an otterbox power bank instead- they seem to have a longer lifespan looking at the reviews on Best Buy that tell you how long someone owned something when they submitted the review and much easier to get replaced if they fail. Not clear if they are compatible with a solar charger though.)
Thanks everyone!
Read MoreAnyone know of any good card multi-tools?
For a few years I’ve had one of those light weight credit card size multi-tools in the velcro pocket in the top of my hat (tilley wanderer), that way I always have it with me and it’s surprising how often I use it
I’ve tried a few of them now and they all seem cheap and tacky, does anyone here know of any decent quality ones? or of any other UK legal EDC multi-tool that would be slim/light enough to keep in my hat pocket? budget around £50 ish
Read MoreBug Out: All you need to know
For who have paying attention to news, all of you certainly know about the war between Russia and Ukaraine, yesterday I saw some of the refuge fleeing from their home in news, some are carrying duffel bag, while some using travel case with wheel, I can only shake my head for this one, despite living in a country that has high chance for war to happen, they are not prepared for the Bug Out, so I guess I will share my knowledge here for those who need.
This article is not intended to replace this post: Emergency kit / bug out bag list , but as a supplement to it. Bug Out means to leave your home and go to some place for better survival rate.
1. To Bug In(Stay at your shelter) or Bug Out:
Now first and most important, know if you should bug out. For example:
When hurricane heading your home = bug out
When war started and you are in the city = bug out
When your house is on fire = bug out
Civil unrest = depending on your country, and where you live
Food price rising = bug in
Power outage = mostly bug in if you have supply in home, otherwise bug out
As you can see, bug out is the last resort to take, that means its either you have no supply at home or staying at home would make your life in danger, otherwise you should always bug in.
2. Vehicle
One of the most ignored and most important, when bug out, you will want to leave as fast as you could. Most people, despite prepared or not, will bug out when noticing danger is coming (hurricane, bombing, etc), and most will bug out in four wheeled vehicle, which make the traffic jam happen. So the best choice is to bug out with motorcycle or bicycle, or just with your foot.
3. Location
If you are bugging out, certainly you will want to go to a safer place. In most natural disaster, the bug out location is hotel, or your parent’s/grandparent’s home, but there are also chance where these place are not accessible and you need to settle in abandoned building woods (there will be more about this later)
4. Bug Out Bag Content
Now after all the important parts, its time about the things you want to carry when you are bugging out:
Water: Water is one of the most important things for our survival (beside air of course), you will only need three things, a stainless water bottle, water filter, and collapsible water bottle.
Stainless water bottle is important since you could boil water in it, which kill the virus and bacteria. (You can also do this in mineral water bottle in emergency, it might be bad for your health, but its better than dying in thirst)
Water filter could make dirty water able to drink without boiling (which is important if you can’t light a fire due to some reason), I always choose water filter that could filter out bacteria, chemical (heavy metal), and virus. If you stay in a city you might not be able to find water from stream to purify it, but if you happen to find a small water puddle, you can still use the filter to purify it, so don’t ditch the water filter even if you planned to stay in the city.
Collapsible water filter are used to collect dirty water so the filter could purify it, however most filter could work with normal soft drink bottle.
Tools/Entrance Tools: One of the most important things in the backpack, which include a knife, multitool, tungsten glass breaker, small axe/tomahawk/machete(big knife), folding saw.
Knife is important for a lot of things, a survival knife in your pack should be around 3-4inch, full tang and made with durable material.
Multitool is essential for a bug out bag, simply because it have so much function. One of it function is bolt cutter, which might be useful if you need to break enter an abandoned building.
Tungsten glass breaker, usually located on a tactical pen or as addon to a multitool, can be used to break glass, which might be useful if you need to break enter an abandoned building.
Small axe/tomahawk/machete(big knife), depending on your location, is important if you are bugging out into the woods/rain forest. In some country like US which could become very cold during winter, axe or tomahawk is very useful to produce firewood even if you are not bugging out into the woods. Machete(Big knife) is important for tropical environment since there are thick under bush in the rainforest.
Folding saw is very useful if you want to cut furniture into firewood, or simply want to cut hardwood, using saw for hardwood save much energy compare to axe or machete.
Shelter: Depending on where you want to stay, you will need different things. If you are bugging out to hotel or friend’s/parent’s house, you could skip this. If you have no choice, you could either stay in abandoned building, or just bugging out into the woods. Please keep in mind that you will not live happily forever in the woods like some preppers imagined, you only stay in abandoned building/woods until the disaster/war is over in your area. If you are staying in the woods, you will need a tarp to keep rain off your head. But tarping is not easily mastered without practice, especially if you are alone, so remember to try setting up tarp when going outdoor, or just at your backyard.
Food: While human can survive longer without food compared to water, food is also essential to provide energy for every day work. I only recommend ration block, while they are not that tasty, they last long, provide multiple day of energy, while being small and not so heavy.
Example: Datrex ration, which could last 3-7days, weight is between 700-800 grams
Clothing: There are 2 type in this category, normal clothing and extra clothing.
Normal clothing: What you currently wear and are comfortable to you, pack a pair of extra into the bug out bag.
Extra clothing:
Gloves: Important to prevent blister in heavy work suck as splitting wood, or just keep your hand warm.
Shoes: Assuming you have your shoes nearby, you won’t have to pack extra in the bug out bag.
Rain gear: Being wet could cause cold which is deadly in disaster, you will need a rain gear to keep your self dry, Most people use Gore-Tex jacket these day, but I keep a tarp poncho in my bag which work to keep me dry while also work as shelter, just choose whatever work for you.
Winter/Cold Jacket: If your region is very cold during winter, remember to wear one if you are bugging out during winter, otherwise keep one in your backpack.
Medical: Medical supply is also important, but don’t just buy a medical kit, they are lots of useful article which tell you how to build an IFAK, while they are true, the most used item in a medical kit is normal pills for common illness, or some plaster and bandage, be sure to NOT overlook these simple content while building your IFAK.
MISC:
Lighter: Your average BIC Lighter should do, just bring 2-3 of these.
Paracord: Any rope are just as useful as your knowledge, paracord is also useful for setting up tarp, just bring 50-100ft of this.
Light: Headlamp is better than torch since you don’t need to hold it in your hand, if your headlamp is aa/aaa battery powered, remember to bring extra battery.
Toilet paper: Mostly you will use water, but just incase if you couldn’t find water.
Sharpening stone: Keep your tools and knife sharp, I personally use Fallkniven DC4.
Toothbrush: Even without tooth paste, could brush off leftover from your teeth, wont make your mouth smell fresh but at lease you wont have cavity.
Spork: Utensil is important since you won’t have much water to wash your hand.
Nail clipper and ear spoon: Stay outdoor for 2 weeks and you will know how important these things are.
Duct Tape: Very useful when you need to fix or make something.
Pen and paper: Useful to write down your plan or leave note for others.
Battery: Depending on the situation, a 10000-20000 mAh power bank should do for your headlamp and phone, if your headlamp use aa/aaa battery, don’t forget to bring extra.
Mood booster: During hard times, its important to stay sane so you could make right decision, some people bring card or board game, some bring photo of their loved one, whatever you choose, keep it light and simple.
5. Weapons
In disaster, you will need a way to defend yourself, just remember you will need to practice with what you choose.
Guns: Pistol, shotgun, riffle, whatever you choose, make sure you know how and are prepared to use it.
Spear: Always choose gun if it is legal in your country, otherwise simple spear is the best as long as you have the space to wield it.
What not to choose:
Sword: Require so much practice only to be defeated by spear.
Knife: I stab you, you stab me, then we are both dead. While knife is a useful tool, it should not be used to fight unless you have no better option.
6. The bag itself:
The bag should be the last item you buy, so you could know how much space you need. Your bag should be very durable, so it would not fall apart when you need it the most. Keep it mind that your bug out bag should be able to keep on your back COMFORTABLY, that means no duffel or any wheeled case. Also don’t choose camo color as it would make you look like a military unit if you are in a war region.
My Golden standard: Cordura 500D (or Nylon 1000D) and above, YKK Zipper, good carrying system, good hip belt.
I personally use Tasmanian Tiger backpack because its simple and works, other brands like 5.11 and Mystery Ranch also meet my standard. Just choose what you like and are comfortable to you. Even you want something lighter (my backpack weight 2.1 Kilograms without anything), anything 400d nylon with YKK Zipper, good carrying system and good hip belt should do, but keep in mind you are sacrificing durability for weight. Don’t worry about the greyman tactics unless you choose camo color, you wont be much different than the bugging out crowd.
My backpack which carrying everything I need.
Feel free to give some suggestion and if you have any questions, just ask below.
Read More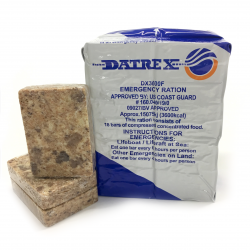
Is Hydroblu still a viable company with good products? Amazon reviews are terrible
I looked up the Hydroblu Pressurized Jerry Can Water Filter online and the most recent reviews on amazon were terrible. Has this been sold to another firm? Are the smaller products still recommended? Thx
Read MoreJoolca HOTTAP – a very impressive off-grid hot shower solution
I never click on Facebook ads, but today was an exception when I saw this hot shower system that works off propane.
The product is pretty impressive, 30 day trial, free returns, only $270. Watching the above video, it looks like a quality company who has thought of everything and isn’t just putting out an inferior product to make a quick buck.
I’d like to get one of these as a backup shower system in case my hot water heater goes out or any number of natural disasters that could interrupt my shower time. It isn’t a NEED, but certainly would be a very welcome luxury.
I am not associated with this company and just wanted to share a cool product I saw and thought this community might enjoy.
Read More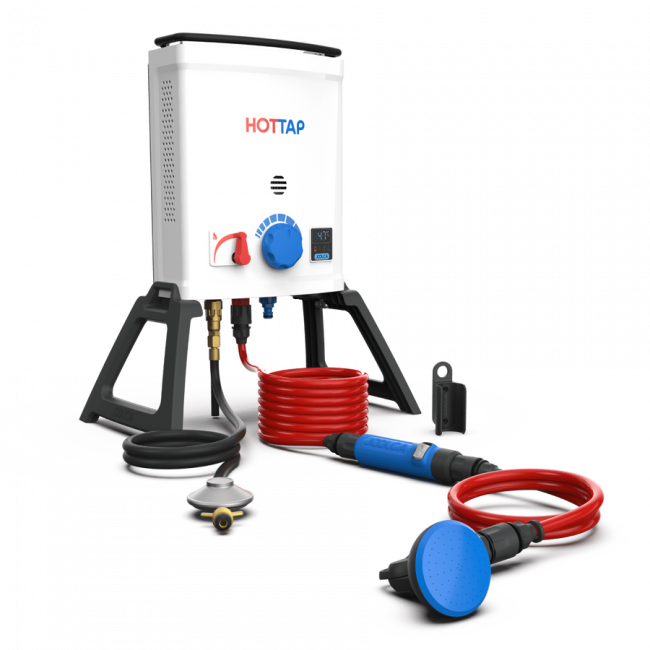
Testing $1 fire starters from Walmart. Insta-Fire and Firestart
While browsing the camping section at Walmart I saw two fire starters that were under a dollar. As you know, I am a bit of a pyro and wanted to test these out and see if they were the next big survival fire starter that I need to add to my supplies.
The first product is the “As Seen on Shark Tank” product called Insta-fire. I’ll call this the Dippin’ Dots fire starter. It claims to be:
Eco-friendly Smokeless Does not contain harmful chemicals Good for camping, emergency, fireplace, or campfire “Military Grade”! — Oooo… Fancy… Lights wet wood because it burns at 1000 degrees Burns on snow and floats on water Nonvolatile with no unexpected flare-ups Burns in winds up to 30 mph Has a 5 year shelf life, and more…The second product is an indoor/outdoor fire log by Duraflame called Firestart. It more or less resembles the inside goo of a Fig Newton with bits of wood chips in it. It is sticky and I ended up tearing the wrapping while trying to get it out of the packaging.
Taking both products outside, I tried lighting a US quarter sized piece of each. The ferro rod was not able to ignite either one so I switched to my trusty Zippo lighter and held the flame to each product for over 10 seconds. The Firestart did not light and the Insta-Fire lit for a few seconds before going out. It wasn’t even a particularly windy day and I was blocking the flame with my hand and huddled in a corner. The Insta-Fire claims to burn in winds up to 30 mph, but the trick is first lighting the darn thing.
Having no success outside I wanted to give them the best shot possible and took them into the garage. This time I took a book of matches and figured if I couldn’t light them by the time the match burned out then I wasn’t interested in it. The Firestart took a light but burned such a small flame that didn’t spread to the rest of the piece. The Insta-Fire caught flame and burned decently for a few seconds before self extinguishing itself again and leaving many unburnt pieces behind.
Okay… So far this is very disappointing. Lets try Insta-Fires’s bold claim of being able to float and light on water. This time I wasn’t messing around and poured in 1/4 of the bag into a cup of water. And the Dippin’ Dots fire starter did float! It also lit into a good sized flame. I lit the Firestart and placed that in the water to see if it would float and it just instantly sunk and went out.
Overall I would give the Firestart a 0/10 for survival and prepping purposes. As a fire log in a fireplace it might have some potential, but I will not trust this to start an emergency fire. It just doesn’t hold a flame well enough or burn hot and large enough to do much good.
The Insta-Fire gets a 2/10. One point for being cool and burning on water, and one point for at least lighting into a semi-usable flame if you put 1/4 of the package together. But again, not trusting this for an emergency situation. It’s problem is that you do need to use a large cup of it to actually do anything with and all the pieces don’t burn before it extinguishes itself. One of it’s main claims is to be nonvolatile and not flare up, but I want it to! I want it to catch fire easily, spread to all the pieces and burn completely.
I’ll just stick to my cotton balls and vaseline for now. They catch easily, burn very long, produce a large and hot flame, and are DIRT cheap!
Read More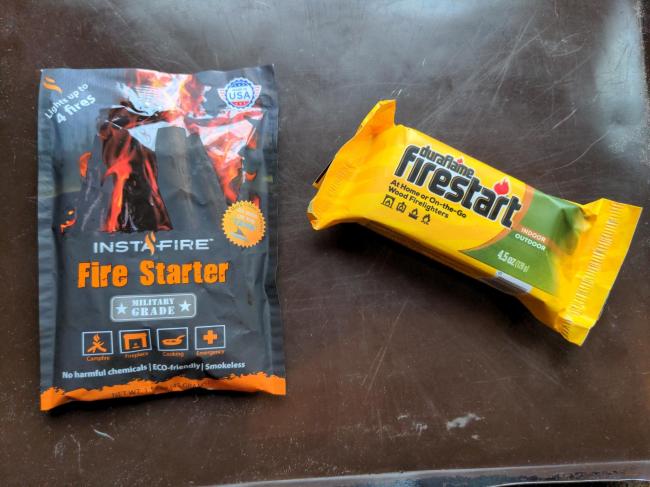
What’s in my everyday backpack?
Although I only got actively interested in preparedness quite recently, I’ve long been in the habit of carrying a well-stocked everyday backpack, though the contents have been assembled haphazardly, never with any particular comprehensive review. This started when I was at university and carried a backpack like most university students, and I just never quit carrying a backpack. Well over a decade ago, when I was in grad school, I recall telling a friend how I keep all sorts of stuff in my backpack because I never know when I’ll need it, and my friend lightly teased that “so basically you carry your junk drawer everywhere you go”.
I just got myself a new backpack and am about to transfer the contents over, and I figure it might be interesting to do an inventory of what’s in my backpack (and I’m sure I’ll make a few adjustments to the contents as I do this, as well). The new backpack is an Eddie Bauer 29L cargo pack – the same as my old backpack, except I got my old backpack second-hand and a previous owner had cut off the waist strap and sternum strap, and I was getting annoyed by the lack.
Asterisks mark items that I’m not transferring over to the new backpack.
Clothing/shelter
A knit wool hat A cotton sun hat A flimsy disposable poncho (I’d have preferred a sturdier plastic poncho more designed for reuse, but I saw this one in the shop cheap and I figured it would tide me over until I come across a better one) A clean handkerchief A reflective emergency blanket A “raincoat for my backpack” – a garbage bag with slits cut in it to let the shoulders straps through A pair of socks (likely dirty, got separated from my laundry, oops)* There’s usually some combination of sweater / down vest / windbreaker in there as well, but they migrate in and out depending on weather, laundry, usage around the house, etc., and happen to all be out at the moment. There are also usually some gloves or mittens at least during the winter but they also happen to be out at the moment.Food/drink
An insulated water bottle/thermos 5 bags of green tea (genmaicha) and two small packets of salt contained in a zip bag 3 sugar packets; I’m moving those to the zip bag with the green tea and salt 5+ bags of a black tea that I find works well made in a single cup Some beef jerky Some expired coupons for my favourite fast-food restaurant* 5-ish bags of one of my standard black teas* (I find this tea works well made in a teapot but not made in a cup, so it’s less suitable for backpack stock)Medical/hygiene
2 Can99 respirators (FFP3 NR certification) – when this gets down to 1, I add another 5 from my home stash. Some surgical-style non-certified masks (these are mostly for giving away) A pack of wet wipes A bottle of hand sanitizer The end of a roll of toilet paper. (Two instances. Reducing to one.) 13 bandaids A dozen or so cotton balls A small container of petroleum jelly Some sanitary napkins A medieval-style bone comb Some extra strength Advil/ibuprofen Some Diphenhydramine Hydrochloride antihistamine tablets [generic Benadryl equivalent] An up-to-date EpiPen An expired EpiPen* Some expired Cetirizine Hydrochloride antihistamine tablets*Electronics
A portable power bankPaper-related
A Rite in the Rain notebook A mechanical pencil A pamphlet-sized prayer book Another pamphlet-sized prayer book* (so well tucked away I didn’t even know it was there…) A small leatherbound notebook with handmade paper; two pins through a page near the back* (Notebook superseded by the Rite in the Rain notebook which I acquired more recently. Pins are not essential enough to keep in there.) A book that I’m reading with a friend* (This goes in and out because it only needs to be in the bag one day a week) Miscellaneous papers acquired in daily life and not yet filed*Other
9 grocery bags (this is way too many, they tend to accumulate; reducing to 3) A clean small zip-seal bag inside a larger zip-seal bag (I’m replenishing this depleted supply by adding 3 more clean small zip-seal bags and 1 clean large one) A BIC lighter A travel-sized diptych iconOne key item I’m adding to my new backpack right now: a LifeStraw that I recently acquired.
Things I carry in my pockets instead of my backpack: keys, credit card, transit card, health card, Swiss Army Knife, wallet, phone.
I also plan to add to my backpack:
A bit of cash, probably about $60-80 – enough to be useful, little enough that I won’t be too upset if it’s lost or stolen The right charging cord for my phone, and a wall converter (I got a new phone recently, and so far only have one charging cord for it; the cord with my power bank fits my old phone and I haven’t yet updated it)What do people think would be particularly useful to add to this? (One thing I’m not looking for is weapons.)
Is there anything here you wonder what it’s there for?
Read MoreHas anyone found a small, good wall-plug charger with all major USB ports?
Looking for:
At least one port for each of the three most common types used in portable devices: USB-A (the big boxy one), Micro-USB (was common on cell phones until recently), and USB-C (the new standard). Small enough to be appropriate for a go-bag. Durable. For example, maybe the electrical prongs can fold in to make it more compact and less likely to bend/snap.It makes sense that if you’re in an emergency away from home you’d want the all-in-one ability to use any of the common cables and devices scattered around.
I assumed there would be lots of options, but haven’t found something obviously worthy after some quick searching. This kind of product seems ideal for a go-bag, and if we find a great one, I’ll buy and test it.
Here’s what A, Micro-B, and C look like:
Edit to add: I wasn’t aware of all the multi-headed hydra cables, like this: https://www.amazon.com/CHAFON-Multi-Cable-Micro-Charging/dp/B01DK13VZ6/
So if you’ve used those kinds of cables, share that feedback too! Seems like we can solve the same problem by having a wall-charger with only USB-A and -C, combined then with a cable with a wider range of options.
Read More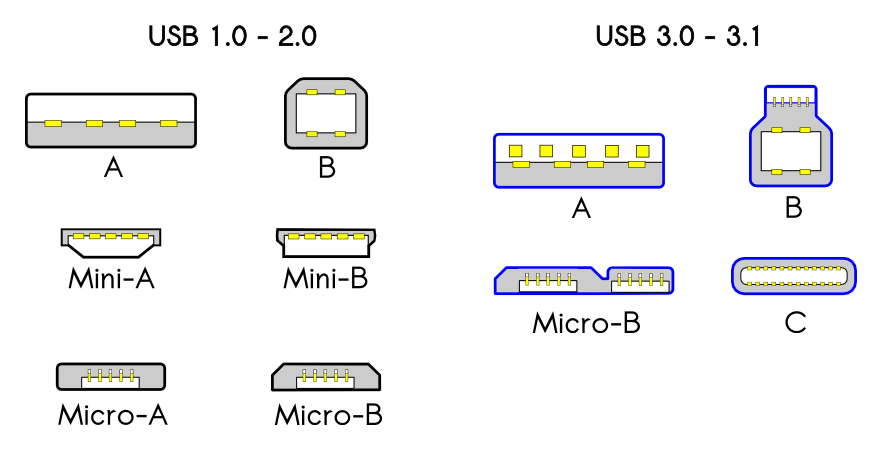
Mini greenhouse out of scrap materials
While spending way too much time on Reddit, I came across a project that I wanted to talk about with someone. To avoid hurting the creator’s feelings, I didn’t want to comment on the actual Reddit thread itself. It’s a great project, but there are some changes I would make.
I don’t have a sunny windowsill, so I made a mini greenhouse to start my seeds
The creator of this project used standard pane glass and scrap wood from a previous project. Cost them $10 to build.
People in the comments said that the creator needs to provide some ventilation so that the plants do not cook and the creator responds that they did put some small holes in and filled the holes with cotton so bugs don’t get in. This probably won’t provide enough ventilation.
Changes I would make:
Place a hinge on one side so you could prop it open or easily gain access without having to remove the entire lid. Drill holes in the sides for ventilation and staple squares of screen window over the holes to prevent bugs. Add a thermometer inside to monitor temperatures. If things get too toasty I would prop open the lid or turn away from the sun. If things were not warm enough, painting the box black would absorb more warmth. Create 3″ feet in each corner to get the box up off the floor to prevent it from sitting in water and rotting.Has anyone made a mini greenhouse like this before? What changes would you make to this design?
Read More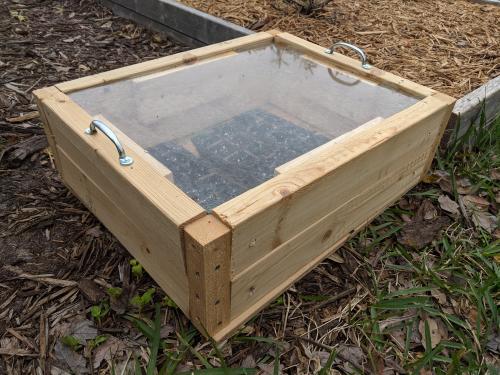
Little work light that pulls very few watts
Each time I have to actually use my preps, in a real world situation, I find things that need to be done differently than I originally thought & I find things I need to add to my preps. In the past several weeks, I’ve had to deal with two separate, multi day power outages at my mother in law’s. After the first event I added a Mr. Heater 30,000 BTU LP gas heater and it worked incredibly well at the second event last week.
I noticed, even with my two solar generators & several rechargeable Goal Zero lanterns, that I could use some extra lighting that would be flexible, bright & pull very little watts. During these events, I would use the solar generators to power lights & devices when the generator wasn’t running, such as overnight or when refueling. I found the lighting around my mother in law’s house would really drain the solar generators. Nothing they couldn’t handle but it gave me some concerns.
So after the first event I ordered these little mini LED work lights from Amazon for $13 each with free Prime delivery. They didn’t come in before the second event, but they did come in today. They are very highly rated on Amazon, and I can see why. They are small, lightweight & the legs can be manipulated to point it anywhere, or you could hang it by the handle. They are very bright at 1000 lumens yet only pull 11 watts. That means 9 of these would pull the same power as one 100 watt incandescent bulb.
I think these could be very helpful for folks planning on running some devices off of battery units, such as solar generators or the like. These last outages during freezing weather brought home some points to me. You can always use more lighting and being cold for long periods ain’t fun. I have adapted my preps accordingly.
Read More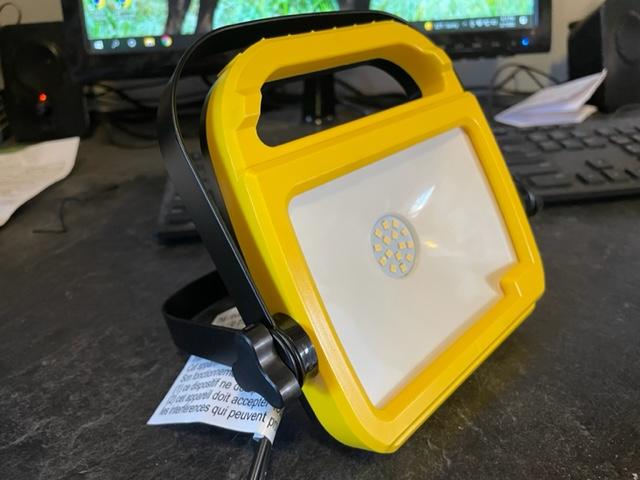
Grid down home/bug-out hygiene kit
What do y’all store to prepare for hygiene without running water and electricity? I put together a list that seems like it would cover the basics.
Read More7 things to prepare before it’s too late
I’ve been thinking about TEOTWAWKI or The End of the World as We Know It. To be clear, I believe that there are many other more likely scenarios to happen before this, but if you plan for the worst you will be prepared for the rest.
As part of my family’s plan I wanted to make a list of the things we need to get in order before it’s too late. They are in no particular order and is just a very short list of things we need to do. I am planning on expanding my description of and notes for each point once I finalize the list. What do all you preparedness experts think of this list and what would you add or change?
1) Have ways to collect, treat, and store water
Water is life, we all need a lot of it not only for drinking but cleaning, cooking, and hygiene. Not having it will quickly lead to disease, dehydration, and death. Not only is storing clean water important, but have ways to collect and clean more.
2) Store food and ways to cook it
Start with a week of food, then a month, then three, then six if possible. Have ways to cook and prepare multiple recipes with the food we store and don’t just do beans and rice every day.
3) Learn basic first aid and have a supply of medical supplies
Be able to treat wounds, sprains, cuts, and breaks. Store medications and don’t forget about dental and eye health. Store more than we think we will need.
4) Have backup sources of energy
Have alternative ways to stay warm, cool down, modes of transportation, and power the various devices and appliances in our home.
5) Fortify our homes and self
Secure our home against nature, humans, and animals. Learn personal self defense and carry some defense tool with us at all times if possible. No use preparing if we get our stuff stolen or die.
6) Create a reference library and practice various skills
The internet may not always be available, have some paper reference material and practice skills so we aren’t trying new things during the disaster.
7) Work with other preppers
We want to create a network of other like minded individuals and have goods and skills ready that can be used for trade and bartering.
Read MoreWhat preparedness items do you keep in your vehicle?
I’m sure the answer to this question varies widely by geographic region, however I was reading the article: “What to do if you witness a car accident” that The Prepared team put together and afterwards I was curious what items other preppers kept in their vehicles.
Here’s my list:
Ztylus Stinger Car Emergency Escape Tool (a multi-tool window breaker and combined seatbelt cutter attached to a USB phone charger) Individual First Aid Kit (IFAK) Emergency Foil Blanket LuminAID Solar Lantern or Flashlight Jumper Cables Flares or Reflective Triangles Wet Wipes or Hand Sanitizer Water Non-Perishable Snacks Emergency Phone Numbers for Auto Insurance/Local Tow Companies etc. Properly Inflated Tire, Wheel Wrench and Tripod Jack (only useful if you actually know how to change a tire) Car Tool Kit (again only useful if you actually know how to use it) Regional Maps/Atlas (also requires some effort in order to familiarize yourself with not relying on a phone/GPS system)I’d consider keeping oil, extra fuel and a fire extinguisher as well but I’m moving to an area where temperatures are consistently above 90 degrees Fahrenheit and I don’t want to leave those items in a hot vehicle if I don’t have to. Also, for me personally, part of preparedness is always leaving my vehicle with a full tank of fuel, parked facing outwards (in case of severe weather events or emergency) and keeping up with proper maintenance. What do you keep in your vehicle?
Read More
Drones as a survival and evacuation tool
Hi Everyone. I’m new to prepping but have been researching and working hard to be prepared over the past few weeks. What has me most concerned and focused in regards to prepping is needing to evacuate my home in event my neighborhood becomes an area of extreme civil unrest. I don’t want to run over anyone, I don’t want to shoot anyone, I just want to get my family and I out.
I’ve been considering getting an inexpensive drone so that I can quickly survey the area around my home to determine the easiest path out during a period of civil unrest. I don’t have any experience in flying drones and am not interested in taking it up as a hobby. I just want something that I can quickly and easily launch and get a picture. Any suggestions?
On a related note, entering “drone” in the search block of this site yielded no results. While my plan is to evacuate by car and go stay with relatives in the country, it seems a drone would be a phenomenal survival tool for someone on foot in terms of navigating, finding resources (water, food, shelter), finding help (other people), or in my case avoiding danger (other people). I think a write up on suitable drones for prepper use would be an excellent resource reference.
Read MoreAntique store hunting, can I find better preps from the past?
This is going to be a picture dump of my most recent trip to an antique store. I love to go to these places and see the ingenuity of the past and how things have evolved over time. Some items have improved with time, and some have gotten worse and the antiques are actually better than what can be found today. Here are some items that stood out to me on my last trip:
Believe that this is a manual powered drill. The end looks like a shoulder pad to give you someplace to put pressure down on the piece you are drilling.
Dietz kerosene lantern for light and warmth
If you grew your own cotton or raised sheep and learned how to use a spinning wheel, you could be very popular on your block after SHTF when you are the only one who can make clothes.
I saw a few of these torches and was very curious on what kind of fuel they burned and how they worked. Does anyone have any insight on these? It looks like there is a little pump that you will pressurise.
Manual hand mixer for baking
Hand crank butter churn. Butter is the best!
Kerosene powered space heater
Hand crank manual powered clothes washer. Isn’t this so cool!? I would like to have tried this out.
hand crank coffee grinder
I had fun looking at all this neat old stuff and imagined myself having to use these in a non-electric world.
Do you have any vintage machines or gear that you keep around for prepping?
Read More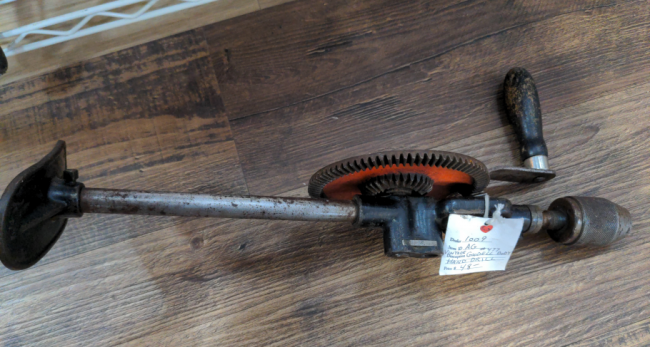
Car supplies
I’m drafting a few lists of gear to acquire this year and I find myself stuck on car supplies beyond the basics (spare oil and coolant, spare wheel, tire iron, jumper cables, belt cutter/glass breaker…). Besides any GHB and your EDC, what do you keep/want to keep in your vehicles ?
Read MoreGear question – recommendations for a first aid case to fit in a BOB?
I’m looking for a “good” case for my first Aid Kit that I want to fit in a BOB or have as a not to large ride along. As a note and personal assessment – bit of an organize freak, everything needs its place!
I like the Large First Aid Kit by Surviveware that you can find here – clearly labeled mesh pouches, easy to find what you are looking for. I’m looking at the bag specifically here. And honestly, one of the better pre-assembled kits that I’ve seen. Contents list below for those interested.
Cons – It does not have everything that I’d like to have a kit (fine, again few do). Given that, it in itself seems pretty full as is – does not leave much room for adding in my own materials.Then I set out to look for just a case – preferably something easily organized that can be adjusted to suit my materials and needs, something like the Pelican EMS case found here. I love the Pelican aesthetics.
Cons – The price is out of range by a large degree, as are the dims (16-7/8″ W x 20-5/8″ L x 8-1/8″ H) – too large to lug about unless I was using it constantly such as a lifeguard or park ranger. Definitely not a BOB option. Perhaps kept in the home.Finally I was looking at JUST a case such as the NANUCK910. Its nice enough. Good sized at exterior dimensions of L 14.3″ x W11.1″ x H4.7″, not too large and not so small its pointless. The price point is decent (its just an empty case).
Cons – it is literally just a shell. Any material placed in here is going to be dumped in haphazardly and a pain to find the item needed rapidly.Not too be put of this last solution to quickly, I was looking for pouches like these or like these. They are not the perfect solution — I’d like to get something closer to the Surviveware example.
A final option would be getting pre-made single purpose kits like the Red Cross Professional Trauma Pak with QuikClot or the Everlit equivalent and throwing all the specialized baggies in a case. But that is disorganized and likely to get rather expensive.
But as you all must have thoughts on this matter and must have solved it for yourselves (and as I cannot be the only organize central fellow in the ether) I thought I’d post the question and see what advice was to be had!
Large First Aid Kit by Surviveware Contents:
600D Polyester Bag(1), 7.5″ Shears(1), 18″ Splint(1), Cold Pack(1), Combine Dressing(1), Conforming Bandages(6), Gauze Swabs(5), Ear Buds(20), Emergency Blanket(1), Eye Pads(4), Hydro Gel(5), Tape, Non-Adhesive Dressings(10), Laminate Baggies(6), Refuse Bag(1), Pressure Bandage(1), Safety Pins(10), Splinter Probes(10), Strip Closures(9), Triangular Bandage(2), Tweezers(1), Whistle(1), Wound Dressings(2),Adhesive Bandages: Butterfly – Large(5), Butterfly – Medium(5), Large(5), Standard(30), Square(5), Mini(5), H-Shape(5),First Aid Handbook(1).
Read MoreHas anyone used a DD tarp?
What is opinion on a DD tarp ( 3m x 3m)? They are expensive but they have good reviews on Amazon and YouTube.
Read MoreEDC FAK for classroom/school use
Good afternoon!
I teach at a commuter college in a major metropolitan area that in recent years has experienced a disproportionate number of school shootings (mass shootings, drive-bys, and the occasional random disgruntled student shooting at a classmate). In at least one instance, a couple of students lives were saved by quick-thinking campus security guards who applied tourniquets while waiting for EMS to arrive. Fortunately, none of these incidents have affected my school yet BUT it does seem like a reasonable situation to be prepared for.
While I do keep FAKs in my truck and office, I’m thinking about putting together a small EDC (sub-Level I) that I could stash in my book bag or briefcase while in meetings or classes where, in certain types of emergencies, it wouldn’t be practical or possible to retrieve a larger FAK from my office or truck.
Another variable that I’d like to consider is tornadoes, since we live in tornado country, which would likely be the other main scenario where I might find a need for a FAK but am unable to retrieve my main kit from my truck or office.
For most other likely scenarios, if the smaller EDC classroom kit was insufficient, I’d most likely be in a position to retrieve my main kit or, at least, hold things together until campus security and/or EMS showed up. Another piece that’s helpful is our school now has AEDs on every floor of every building. I’ve heard that some schools now stock basic “trauma kits” in each and every classroom so, if that’s a things, perhaps I could suggest that our school consider doing that as well.
With this background in mind, here’s my question: Based on this prioritized FAK list, how far down the list would you recommend that I go in assembling an EDC FAK for the purposes described above AND would you recommend changing adding or deleting anything from the topi-tier Level I list?
Thanks for your input!
Read More