Share your knowledge & learn from experts
Because prepping and community go hand in hand
Let’s make the ultimate emergency reference guide for a bug out bag
In a previous forum thread talking about light weight gear, I recommended that people ditch the heavy and bulky survival manual in their bug out bag, store most of that info in your noggin, and maybe have a laminated 1/2 sheet sized reference guide as a reminder or for those hard things to remember.
Another member asked if I or anyone else has a 1/2 sheet reference guide like this, and to be honest, I don’t. But let us change that and come together and come up with some things to add.
What do you all think of the following list? What do you like, dislike, or want to add? I’ll do all the work and compile it into a document, but I need ideas of important things you would find helpful on a 1/2 sheet size reference guide.
Here are some of my ideas:
Contact info for someone out of town, for your child’s school, spouse’s workplace, and other important numbers like doctor, insurance company, or utility company. Emergency meeting place location and instructions Diagrams of how to navigate using a wrist watch Diagram of how to set a snare Diagram of knots Escape routes Important radio frequencies Read MoreDIY 12V shower
During our last extended power outage (8 days, February ice storm), we used a little Zodi camp shower that uses four D-Cell batteries. It put out a pathetic little dribble of water. We later got the bright idea to build a better shower.
This unit consists of a 1gpm RV demand water pump, an RV handheld shower head with on-off button (the RV pump turns off when the button on the shower head is pushed off (there is an extension hose attached), a 3/8″ uptake hose with filter, an on/off switch and a plug that fits a corresponding socket on the battery. We have a big deep cycle battery that we got to maintain tropical fish life support (no longer have the fish). The little filter on the uptake hose was pilfered from a small drip irrigation filter, the open end was sealed with a little plastic wrap and an o-ring. The uptake hose is dropped in a bucket of warm water and clipped onto the side of the bucket so it won’t fall out. All contained in an old tackle box.
The pump delivers a very refreshing shower, of just the right pressure!
Read More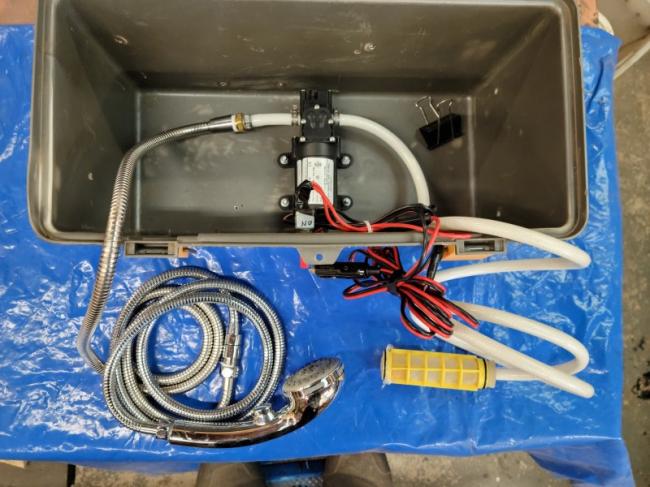
I’d like to avoid using a cook kit and just carry ready-to-eat meals in my emergency bags
While building my emergency bag in my car and my one at home to evacuate out with, I am faced with the dilemma of including a cook kit or not.
Pros
Ability to cook freeze dried foods Cook anything I might hunt or gather Boil sketchy water and make it safe Heat up water just as a comfort for coffee, tea, or hot chocolateCons
Additional weight, space, cost Slower to prepare a meal and eat it then just grabbing a granola barI can maybe justify having the cook kit in my home bag because I that will be surviving for a longer period of time, but 100% of the time I’ve needed a meal or snack in my car emergency bag, it has been because I don’t want to stop by a McDonalds and would rather just get something quick and cheaper. So up until now I have just stocked some granola bars that I buy by the box.
What other snacks or meals could I possibly add to my car emergency bag that I can quickly grab and consume? Something that can withstand the heat, be filling, and nutritious.
Read MoreHow to make a “well bucket” in case electricity goes down and you’re on well water
I have a 500 foot deep well. The pump is normally powered by solar, and if needed, a generator. But in case those power methods fail or SHTF and we run out of fuel, how would I get water?
I made this manual “well bucket” backup out of scrap pieces of PVC pipe, wood, cordage, a pulley and crank, some nuts and bolts, and a foot valve. It’s all available from a local hardware store or Amazon. I only needed simple hand tools and a power drill. Depending on how you put it together, it might be $25-$100.
It’s essentially like any bucket you’d drop into well for water, but this one is designed for modern, narrow, and deep wells. (This picture shows everything except for the foot valve on the bottom of the bucket/pipe:)
Although you can piece this together with random stuff, here’s a kit of essentially what I used and prices:
Step 1: Build a tripod or similar foundation that can hold a pulley directly over the wellhead. There’s no magic to the design, it just needs to be strong enough to handle 50-100 pounds of hanging force. In my case, the tripod is about 9 feet high and I can fold in the legs to make it easier to store.
But that might be overkill for your needs. If you’re really tight on storage space, you technically could skip the tripod and pulley/crank parts altogether and just have the PVC bucket and line.
Step 2: Attach a simple pulley wheel so it hangs down in the center.
Step 3: You can attach a hand crank to make drawing the bucket up easier. Or you can decide to skip this and just use your hands to pull the rope up. Keep in mind, though, that you might be pulling 20+ pounds up over hundreds of feet. It’s also possible to use an ATV, vehicle, or animal to pull the load up.
If you don’t attach the loose / non-bucket end of your line to a crank, as added safety against the whole thing dropping into your well, you can tie a big knot, attach some random nuts and washers, or some other idea to the end of the line. Whatever works so that if, while raising water by hand you accidentally let go, the whole thing won’t go down and you can’t reach the line anymore.
Step 4: Build the PVC bucket body. You need to know what the diameter of your well pipe is so that you can buy/use a PVC pipe that will fit inside but isn’t too narrow to require lots of round trips. It’s okay to leave a little bit of wiggle room between the PVC bucket and the well wall.
In my case, I used a 4 inch wide pipe that’s 4 feet long. If I did my math right, that pipe/bucket will carry about 2.5 gallons of water.
Step 5: Create the attachment point between the top of the bucket and your pulley line. The simplest way is to drill two holes directly across from each other, 1-2 inches below the top of the pipe, and then just thread your line through.
You can see how I used metal hardware in the picture above to create more of a pivot point that will let the bucket move and spare abrasion on the line. You could do something in between where you run one bolt through the two drilled holes, put a nut on one end to keep the bolt in place, and tie the line to the cross bolt.
Step 6: Making the bottom of the bucket. You have multiple options here, but in any case, you’ll need to put a PVC end cap on the bottom of the main bucket pipe to create the “floor” of the bucket. The end cap will be in the hardware store next to the PVC pipes, as will the glue you might need to secure it to the main body (remember, this bottom cap will hold all of the water weight). Just ask for help.
The simplest version is just a plain ‘ol bucket – the PVC pipe is the body, the bottom end cap is the floor, and there’s no top cap. So you dip the bucket fully underwater until it fills from the top, then pull it up.
There’s a potential problem with filling the bucket from the top, though. Your well might not have enough water in it for the whole bucket to submerge to the point water fills from the top. Or the bucket might be too light to naturally sink below the water line. If that happens, add some weight to the bottom of the bucket to help it sink.
I took an extra step to avoid those problems and have the water fill the bucket from the bottom, using a special (but only ~$20) device called a foot valve. The foot valve lets water come in from the bottom, but not back out as you pull up the bucket.
The white is the bottom PVC end cap. I drilled a hole in the center of that cap to match the foot valve and threaded it together. How you attach the foot valve (such as using washers/gaskets and a threaded nut) will depend on the foot valve, but again, your hardware store can help.
Another option is to buy or build a “check valve.” Some of the links below show this.
Practice: You’ll need to know how to remove the daily-life cap from your wellhead, or whatever else you’ll need to do in case power goes out and you need to swap in this manual method. Don’t wait until you actually need water to try this out!
Additional resources:
https://www.benzinga.com/11/06/1199871/how-to-diy-well-bucket-using-pvc-pipe http://thevalleypiper.blogspot.com/2012/11/how-to-build-well-bucket.html https://www.youtube.com/watch?v=OrMBKePS4Xg https://www.youtube.com/watch?v=Eclhqf7BNlE https://www.youtube.com/watch?v=SERwTNJki10 Read More
Need recommendations on buying an RV system sized solar setup
I’m looking into buying some solar panels, a battery, inverter, etc. that could be used to power some small appliances (not a whole house or even air conditioning or a furnace blower—basically something about the size of an RV system) in the event of a power outage.
At the very least, setting up and using a small system will give me some idea of whether we want to install a larger system down the road.
Does anyone have recommendations as to a retailer where I could buy the solar panels and other items? It would be helpful if the retailer has actual technical support available. I know some about electrical systems but am definitely not an electrician or an engineer. Of course, I have found some retailers online, but I’m very hesitant to spend that sort of money with a retailer online without knowing much about them.
In addition, if anyone has suggestions on the brands of the panels or batteries, feel free to mention those as well.
Thanks in advance!
Read MoreWhat is the best disaster-proof pouch for important documents in my BOB?
I’m looking for a somewhat budget-friendly disaster proof pouch for my important documents but I don’t know where to start. Is there a brand I should begin with?
Read More100 things to disappear first
I was going through some prep info today and found this article originally published in 2007 on Fluwiki. It is a very interesting list of items and has been helpful in planning some of my preps, so I thought I would share it with you. Some of you may have already read this, but it is worth looking at from time to time. I keep tinned gravy in my preps because of this list.
(I have added spaces between the lines for ease of reading)
Quote begins:
Tips From Sarajevo: 100 Items to Disappear First
Generators (Good ones cost dearly. Gas storage, risky. Noisy…target of thieves, invites marauders; maintenance etc.)
Water Filters/Purifiers
Portable Toilets
Seasoned Firewood. Wood takes about 6 – 12 months to become dried, for home uses.
Lamp Oil, Wicks, Lamps (First Choice: Buy CLEAR oil. If scarce, stockpile ANY!)
Coleman Fuel. Impossible to stockpile too much.
Guns, Ammunition, Pepper Spray, Knives, Clubs, Bats & Slingshots.
Hand-can openers, & hand egg beaters, whisks.
Honey/Syrups/white, brown sugar
Rice – Beans – Wheat
Vegetable Oil (for cooking) Without it food burns/must be boiled etc.)
Charcoal, Lighter Fluid (Will become scarce suddenly)
Water Containers (Urgent Item to obtain.) Any size. Small: HARD CLEAR PLASTIC ONLY – note – food grade if for drinking.
Propane Cylinders (Urgent: Definite shortages will occur.)
Survival Guide Book.
Mantles: Aladdin, Coleman, etc. (Without this item, longer-term lighting is difficult.)
Baby Supplies: Diapers/formula. ointments/aspirin, etc.
Washboards, Mop Bucket w/wringer (for Laundry)
Cookstoves (Propane, Coleman & Kerosene)
Vitamins
Propane Cylinder Handle-Holder (Urgent: Small canister use is dangerous without this item)
Feminine Hygiene/Haircare/Skin products.
Thermal underwear (Tops & Bottoms)
Bow saws, axes and hatchets, Wedges (also, honing oil)
Aluminum Foil Reg. & Heavy Duty (Great Cooking and Barter Item)
Gasoline Containers (Plastic & Metal)
Garbage Bags (Impossible To Have Too Many)
Toilet Paper, Kleenex, Paper Towels
Milk – Powdered & Condensed (Shake Liquid every 3 to 4 months)
Garden Seeds (Non-Hybrid) (A MUST)
Clothes pins/line/hangers (A MUST)
Coleman’s Pump Repair Kit
Tuna Fish (in oil)
Fire Extinguishers (or..large box of Baking Soda in every room)
First aid kits
Batteries (all sizes…buy furthest-out for Expiration Dates)
Garlic, spices & vinegar, baking supplies
Big Dogs (and plenty of dog food)
Flour, yeast & salt
Matches. (“Strike Anywhere” preferred.) Boxed, wooden matches will go first
Writing paper/pads/pencils, solar calculators
Insulated ice chests (good for keeping items from freezing in Wintertime.)
Workboots, belts, Levis & durable shirts
Flashlights/LIGHTSTICKS & torches, “No. 76 Dietz” Lanterns
Journals, Diaries & Scrapbooks (jot down ideas, feelings, experience; Historic Times)
Garbage cans Plastic (great for storage, water, transporting – if with wheels)
Men’s Hygiene: Shampoo, Toothbrush/paste, Mouthwash/floss, nail clippers, etc
Cast iron cookware (sturdy, efficient)
Fishing supplies/tools
Mosquito coils/repellent, sprays/creams
Duct Tape
Tarps/stakes/twine/nails/rope/spikes
Candles
Laundry Detergent (liquid)
Backpacks, Duffle Bags
Garden tools & supplies
Scissors, fabrics & sewing supplies
Canned Fruits, Veggies, Soups, stews, etc.
Bleach (plain, NOT scented: 4 to 6% sodium hypochlorite)
Canning supplies, (Jars/lids/wax)
Knives & Sharpening tools: files, stones, steel
Bicycles…Tires/tubes/pumps/chains, etc
Sleeping Bags & blankets/pillows/mats
Carbon Monoxide Alarm (battery powered)
Board Games, Cards, Dice
d-con Rat poison, MOUSE PRUFE II, Roach Killer
Mousetraps, Ant traps & cockroach magnets
Paper plates/cups/utensils (stock up, folks)
Baby wipes, oils, waterless & Antibacterial soap (saves a lot of water)
Rain gear, rubberized boots, etc
Shaving supplies (razors & creams, talc, after shave)
Hand pumps & siphons (for water and for fuels)
Soysauce, vinegar, boullions/gravy/soupbase
Reading glasses
Chocolate/Cocoa/Tang/Punch (water enhancers)
“Survival-in-a-Can”
Woolen clothing, scarves/ear-muffs/mittens
Boy Scout Handbook, / also Leaders Catalog
Roll-on Window Insulation Kit (MANCO)
Graham crackers, saltines, pretzels, Trail mix/Jerky
Popcorn, Peanut Butter, Nuts
Socks, Underwear, T-shirts, etc. (extras)
Lumber (all types)
Wagons & carts (for transport to and from)
Cots & Inflatable mattresses
Gloves: Work/warming/gardening, etc.
Lantern Hangers
Screen Patches, glue, nails, screws,, nuts & bolts
Teas
Coffee
Cigarettes
Wine/Liquors (for bribes, medicinal etc)
Paraffin wax
Glue, nails, nuts, bolts, screws, etc.
Chewing gum/candies
Atomizers (for cooling/bathing)
Hats & cotton neckerchiefs
Goats/chickens
From a Sarajevo War Survivor:Stockpiling helps, but you never no how long trouble will last, so locate near renewable food sources.
Living near a well with a manual pump is like being in Eden.
After awhile, even gold can lose its luster. But there is no luxury in war quite like toilet paper. Its surplus value is greater than gold’s.
If you had to go without one utility, lose electricity – it’s the easiest to do without (unless you’re in a very nice climate with no need for heat.)
Canned foods are awesome, especially if their contents are tasty without heating. One of the best things to stockpile is canned gravy – it makes a lot of the dry unappetizing things you find to eat in war somewhat edible. Only needs enough heat to “warm”, not to cook. It’s cheap too, especially if you buy it in bulk.
Bring some books – escapist ones like romance or mysteries become more valuable as the war continues. Sure, it’s great to have a lot of survival guides, but you’ll figure most of that out on your own anyway – trust me, you’ll have a lot of time on your hands.
The feeling that you’re human can fade pretty fast. I can’t tell you how many people I knew who would have traded a much needed meal for just a little bit of toothpaste, rouge, soap or cologne. Not much point in fighting if you have to lose your humanity. These things are morale-builders like nothing else.
Slow burning candles and matches, matches, matches.
More matches
End Quote
Read MoreThe Gottman Island Survival Game
While reading a marriage book, I came across an exercise about communication and being able to influence your spouse. Thought it would be interesting for people here to think about and maybe do with each other here or privately with their own spouse.
The Gottman Island Survival Game
Imagine yourself shipwrecked with your partner/the members of this forum on a tropical desert island. Gilligan and Ginger are nowhere in sight – the two of you/the members of this forum are the only survivors. You have no idea where you are. A storm appears to be on the way. You decide that you need to prepare to survive on this island for some time, and to find some way to ensure you can be spotted by a rescue party. There are a lot of items from the ship on the beach that could help you, but you can only carry ten items.
Step 1: Each of you writes down on a separate piece of paper what you consider to be the ten most important items to keep from the inventory list below. Then rank-order these items based on their importance to you. Give the most crucial item a 1, the next most important item a 2, and so on.
Ship’s Inventory:
Two changes of clothing AM-FM and short-wave radio receiver Ten gallons of water Pots and pans Matches Shovel Backpack Toilet paper Two tents Two sleeping bags Knife Small life raft, with sail Sunblock lotion Cookstove and lantern Long rope Two walkie-talkie sender-receiver units Freeze-dried food for seven days One change of clothing Bottle of whiskey Flares Compass Regional aerial maps Gun with six bullets Fifty packages of condoms First-aid kit with penicillin Oxygen tanksStep 2: Share your list with your partner/people here on the forum. Together come up with a consensus list of ten items. This means talking it over and working as a team to solve the problem. Both of you need to be influential in discussing your viewpoint and in making the final decisions.
Let’s all do this exercise. Pick your 10 items, list them down in the comments, and then discuss/convince/argue on why we should pick the various items. Let’s see if we can get down and agree with at least 7/10 items as a community if we all were together in this situation of being stuck on an island together.
(Ignore Step 3 if doing it here on the forum, but I’m leaving it in case you want to work with your spouse on your communication)
Step 3: Once you have compromised on a third list, it’s time to evaluate how the game went. Think about how effective you were at influencing your partner and how effective they were at influencing you. Did either of you try to dominate? Were you competitive? Ask yourself if you had fun. Did both of you work well as a team and feel included, or did you sulk, withdraw, express irritability/anger?
Read More
Get Home Bag vs Bug Out Bag – duplicate items?
I’ve been working on rounding out our bug out bags and I’m finding that a lot of items would be duplicates from those in our get home bags. For instance, I have compasses in the get home bags stored in the cars. What is everyone’s opinion on getting additional compasses (or other replicated items) for my bug out bag?
Read MoreWhich lighter is best for use in cold weather?
Many people (including The Prepared) say to carry a butane powered BIC lighter.
While I do agree that they are great because they are cheap ($1-1.50/each), pretty dumbyproof, don’t evaporate fluid, and just work, they do not work the best in cold weather. To test this I placed five lighters in my freezer for 30 minutes and noted the results.
The two lighters on the left in the picture above are regular Zippos that run off of lighter fluid. The three lighters on the right are two standard butane BIC lighters and a Zippo lighter with a butane torch insert.
The two lighter fluid Zippos work off of having a liquid fuel suspended in cotton that evaporates up the wick. When pulling these straight from the freezer they did not light on the first strike but required about 5 seconds to warm up just that little bit to start evaporating the fluid. It lit to a full strength flame and worked every strike there after.
The two BIC lighters had to be warmed up in my hand for about 20 seconds before the smallest of flames would be released. Even a couple minutes after being removed from the freezer they still had very small and weak flames. The Zippo with the butane torch insert was the worst of them all. It was very very cold and required many minutes in my hand to be able to light.
Summary – Butane does not function well in cold temperatures. If a butane lighter is part of your EDC or emergency bag these will need to be placed in a pocket close to your skin and warmed up before use.
The trouble with the lighter fluid fueled lighters are that they do evaporate unless they are sealed with an O ring like a peanut lighter. If you don’t EDC one of these and fuel them up weekly, then storing them dry in your bag and having a small 4oz bottle of fluid ($3 at Walmart) or storing fluid in a fluid canister are options in an emergency bag.
Read More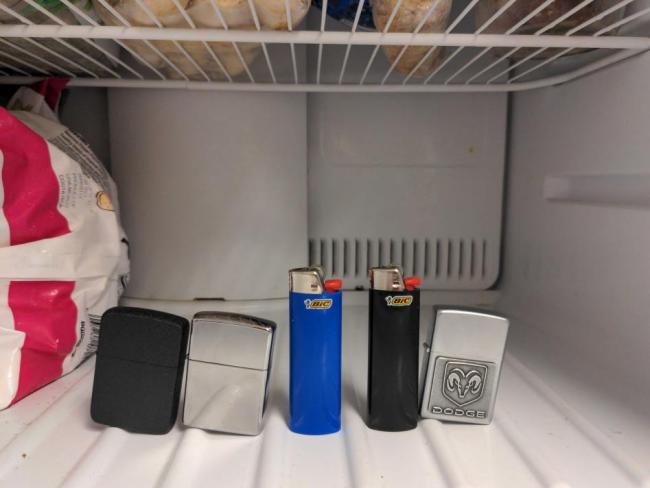
Do you really need small portable solar power?
Not trying to be controversial, just trying to think through the benefit of portable solar. Recently bought a 28W panel, which was damaged so I’m returning it but got me thinking that I’m not quite sure it’s place. To be fair, I have a 2200W inverter as well, and some way of generating more power is good. But I also have a couple battery packs, and tool batteries with a USB converter.
My current thinking is I have enough stored power for a short term disruption. I have fuel for on inverter to run it for maybe 40ish hours. And from past events it only needs run sporadically. We live in a hurricane zone so wouldn’t be my first round.
Anyway… I’m finally getting to my point (I think) small apartment, no storage, urban environment that you’d want to evacuate in SHTF scenario it makes more sense to get portable power generation. I’m more likely to bug in it seems, and if we get past my short term needs then being able to charge a mobile phone probably isnt gonna help. If we need to evacuate, the. It’s cause of a hurricane etc which is more localized and you can move to areas where power isn’t the issue.
So am I wrong? What am I missing or failing to consider? I know The Prepared advocates not fixating on a particular situation but also doesn’t advocate waste so I’m curious what people think.
On top of that I’m curious peoples thoughts on what common items for BOB/GHB etc maybe they don’t see as much use for. Just curious how people approach stuff.
Read MoreInquiry: Spring sales on handheld ham radios
Good morning! I’m currently in process of studying for the Ham technician license and, in anticipation of actually passing the test, am shopping around for deals on new handhelds, most likely The Prepared’s “best for most” Yaesu pick or something similar. With that in mind, I was wondering if there are typically spring sales or Memorial Day sales that I should be keeping an eye out for or, if not, what the next best opportunity for a discount might be in the annual sales cycle. Thanks for your help!
Read MoreMakeover of a pre-assembled BOB in 1 week and $125
Last weekend I pulled my husband’s BOB out from its storage spot and did an inventory. He bought it pre-assembled when we first started dating (and I said, “You have an earthquake kit, right?”) and I remember going through it at one point, but I had forgotten how long ago that was and how crummy the kit was to begin with. (I don’t know what I thought about who was maintaining it during this period of time.)
At first, I thought it would take a lot of time and money to rectify the situation, but then I found a ton of extras and replacements in the house, spent $125 on new stuff, and one week later, the bag is SO much better. It’s not “done”, but I’m really pleasantly surprised at what a difference I was able to make. I thought I’d share it with you all to celebrate this small prepping win, and also because it might prompt some interesting discussion about where these pre-assembled kits fall down.
On that point, I feel like the biggest gaps between what we got in the pre-assembled kit and my husband’s actual needs were in the following areas:
IFAK. I give the kit maker credit for including a triangle bandage and safety pins in the FAK, but the rest of it was basically bandaids, and I don’t see the point of including trauma shears if you include none of the other materials one would need in the scenarios in which one needs shears. The “improved” kit still needs a lot of work, but my husband doesn’t have a lot of first aid knowledge, so I think training should be the priority for him here. In the meantime, I was able to improve the kit a lot by adding a lot of basic OTC medicines in small Ziplock bags that I already had on-hand, as well as useful things like oral rehydration solution. Toiletries. His had a lot of cheap stuff that he didn’t actually need and wouldn’t make him comfortable. Power/charging. It makes sense that the pre-assembled kits don’t include charging cords, since that has to be customized to one’s own electronics, but this was a major hole in the kit, and a power bank, wall plug, and charging cable set me back $40.The “survive outdoors” stuff in the kit was also pretty bad, but given our particular circumstances, that doesn’t bother me too much: I’m against buying BOB duplicates of our better-quality backpacking and camping gear that we use regularly, so I’m fine with a cheap tube tent and mylar sleeping bag as lightweight, low-volume insurance in case we don’t have time to grab the better stuff on our way out the door.
The thing that bugs me most about his BOB right now is the quantity of cotton clothing, but we have some pretty good used outdoor gear stores here that I plan to hit for synthetic replacements and a fleece.
Here is a list of the CURRENT contents of his BOB, broken down by categories. Everything with an asterisk (*) is a new addition, (†) indicates new purchases. Aside from power, most of the $$$ were spent on a better food and water setup.
FOOD & WATER
Lifestraw* 27 oz. Klean Kanteen, single-walled, filled* 30-pack Katadyn Micropur Purification Tablets*† 2 Coast Guard-style ration blocks*† (1 replaced from home supplies, 1 ordered) 5 tea bags of his favorite tea* (Note: I have a stove to heat the water.) 1 collapsible mug*†SHELTER, WARMTH, & LIGHT
plastic tube tent 1 mylar sleeping bag 2 single-use hand warmers (almost certain they are expired, but they’re light) 1 rechargeable headlamp 2 lighters* (had 1, added 1) an unknown, but volumetrically large quantity of very cheap cordage 1 “5-in-1” survival tool consisting of a whistle, a tiny compass, a tiny signal mirror, a very tiny and questionable “flint”, and a compartment for matches (came without matches) 12 stormproof matches* packet of dryer lint “tinder”*CLOTHING
1 cotton t-shirt 1 pair jeans 1 pair long underwear bottoms* 1 warm hat 2 pair of socks* (had 1, added 1) 2 pair of boxers* (had 1, added 1) 1 old down jacket 1 old rain jacket 1 plastic poncho 1 bandana*TOILETRIES
1 travel toothbrush 1 travel toothpaste 2 oz. Dr. Bronner’s*† 2 oz. hand sanitizer* 1 compact roll of toilet paper (i.e., no cardboard tube)*† 1 Paper Shower* 3 pair ear plugs* 1 eye cover*† 1 chapstick* 1 pair nail clippers*INFORMATION & COMMUNICATION
1 walkie talkie and charging cord 1 very crappy hand-crank radio evacuation list* (things to grab in addition to the bag if we have a few minutes) photos of us together and with our dog* names, addresses, and phone numbers for various friends and relatives emergency information specific to our city the “critical information sheet” I made with all of our insurance policy numbers, claims department phone numbers, the dog’s vaccine info and microchip numbers, regular and emergency vet contact info, our most recent vaccines and doctor and dentist numbers, etc. detailed street maps for 3 West Coast cities small Rite in the Rain notebook*† pen, mechanical pencil, sharpieTOOLS
1 off-brand Swiss Army Knife-style multitools (the big kind with a scissors) 1 credit card-size Fresnel lens*IFAK
8 cleansing wipes 5 Q-tips, sterile 4 gauze pads (2 sizes) 1 pair trauma sheers 6 pair nitrile gloves* (kit came with 1 pair, which I put in an exterior pocket for ease of access; other 5 are in the kit) 1 CPR mask 1 triangle bandage 4 safety pins 1 pair tweezers 1 teeny tiny roll of medical tape 65 bandaids in varying sizes Coban roll* 3 packets oral rehydration solution* 20 Benadryl* 11 Acetaminophen* 6 Naproxen sodium* 20 Ibuprofen* 6 Loperamide* 5 mini-Ziplock bags for storing medications (dosage info written on these)*POWER
1 Novoo Explorer power bank*† 1 USB wall plug*† 1 USB A to USB C charging cable*†MISC.
1 KN95 mask* 1 cloth mask* 1 reusable half-face respirator* 1 packet of respirator filters* swim goggles* 1 deck of cards heavy gloves cash extra Ziplock and trash bags, varying sizes*And here is what I removed from the pre-assembled kit:
12 packets of emergency drinking water, expired 2 Coast Guard-style ration blocks, expired 1 very flimsy “can opener” that looks far more likely to open one’s hand than one’s can 1 mylar sleeping bag 2 glow sticks 2 plastic ponchos 1 vinyl bag for toiletries, so stiff and sharp-edged that I nearly cut myself trying to open it 1 travel toothbrush 1 tiny hotel soap wrapped in paper 1 wash cloth 4 single-use shampoo packets (my husband shaves his head; it would take a long time for him to really need any shampoo, let alone three packets’ worth) 2 menstrual pads (my husband does not menstruate) 1 large plastic comb (as long as he has trauma shears, he won’t have hair long enough to need this 😀 ) 1 disposable plastic razor 1 travel-size shaving gel 1 roll of toilet paper (like a giant normal one from the bathroom, with the cardboard inside) 1 off-brand Swiss Army Knife-style multitool (there were two) 4 cleansing wipes 5 cotton balls, packaged to be sterile approximately 2 million-minus-65 bandaids Read MoreReview: Xtar 100W semi-portable solar panels and 678W battery pack
The Prepared was sent over a sample power station and solar panel by the company Xtar Direct. After a few weeks of testing I have to say that it is a pretty good off-grid power solution for medium draw devices.
The solar panel
The 100W solar panel surprised me with its build quality and efficiency. In direct sunlight it produced a steady 110 watts and even when it was overcast and cloudy it could still ink out 20-25 watts. The panel is slightly flexible, is able to fold in half during transport, and is held together using strong magnets. It features a pouch on the back that houses the generous 10 foot cable with extra room to spare. The cable has a DC7909 (8mm) port, so you will need an adapter if your power station doesn’t use this type of connector. Two adjustable kickstands are attached to maximize the output from the sun.
One of the downsides of having a lightweight panel is that it is easily blown in the wind. After two days of use, I noted that the wind was scooting it forward against the asphalt and was starting to wear down the points of contact. To protect it from wearing down further, I placed some binder clips where it comes in contact with the ground. I would have liked to have the edges dipped in rubber to be more durable and prevent sliding.
To prevent the panel from blowing away, tipping over, or sliding and wearing against the ground, I took various measures to keep it stable. I laid out an old pair of jeans along the front edge of the panel to protect it from the asphalt. A smaller piece of denim was placed on the back kickstands as those are just made of fabric as well. I made two sand bags and tied the top edges to it with some scrap paracord. The sandbags prevent the panel from blowing forwards, and the power station nestled under the panel keeps it from blowing backwards. Another benefit to placing the power station under the panel when charging is that it keeps it cooler in the shade of the panel to prevent the batteries from overheating, and shelters it from any rain that might come down.
Overall, I am very happy with this panel. I love how lightweight it is, easy to transport, the magnets holding it closed are nice, and it pumps out more electricity than advertised. My one recommendation to Xtar is to dip the edges in rubber to prevent slipping and wear.
The power station
This is a well built power station that will hold up to moderate use. I liked the very thick and grippy rubber bumpers on the bottom, easy to grab handle, and 11 pound lightweight build. It packs in 568Wh of lithium ion batteries that will retain 80% of their original charge after 800 discharge cycles. There is a 500W pure sine wave inverter which can handle a 1000W surge load. Packed with two full sized AC wall outlets, three USB-A ports, a DC cigarette lighter port, and two additional DC outlet ports you don’t need much more than this.
The user manual was poorly translated and led to some confusion. And maybe it is just me, but I could not figure out what the giant ‘678W’ stood for on the front of the unit. It didn’t mention this number in the manual or on their website, so I had to contact their customer service team to find out and they said that the 678W is the output of all the ports combined. 678w= AC(500W)+ DC(140W)+ USB(10W+10W+18W).
When testing the USB ports, I was only ever able to pull 6W out of any of them. When all three USB ports were loaded I was drawing 26W. I don’t have a USB multimeter, and was just going off the display of the unit of what it says it was drawing.
The display tells all the info you need such as how many watts are coming into the unit when charging, how many are going out during use, the remaining percentage of battery capacity, and which outlets are being powered. The display is great indoors, but difficult to read outside in the bright sun.
For many days I put this unit through some real world tests and it handled things excellently! I ran a giant old TV and video game console, Dremel rotary tool, lamp, computer, and monitor. Not all at once, but one or two together at the same time and it all worked well.
When running my desk setup off of it (laptop, monitor, speakers, mouse, keyboard, USB hub) I was able to start with 98% at 10am and run till 6:40pm and still have 37% left over. This desk setup only drew between 40-50W, so not too draining. I did run into a weird quirk however when powering my work desk devices. If I was powering everything at the same time, just the monitor, or even just the laptop I would experience constant turning off and on randomly with my keyboard and mouse in the USB hub. So weird that the power station would influence that even if it was just my monitor being powered by it and the monitor is only connected to my laptop through an HDMI cable.
The included 100W wall charging brick comes in a nice pouch and works flawlessly, but I did run into an issue when charging the power station with the solar panel. I would set everything up and leave it out to charge in the sun only to find out later that it wasn’t charging. Xtar had a very responsive and personalized customer support team, so A+ for that, and they informed me that there was a charge procedure issue with the power station and that I would not run into this issue if I depleted the unit below 40% and started charging from there. So I drained the unit to 5%, plugged it in and it charged the entire day without issue. But whenever I start the solar panel charging at say 55%, it will only charge like 6% and then stop. If I unplugged the charging cable, waited 30 seconds, and then plugged it back in, it would start charging at the full 110W again for a couple more minutes.
Unfortunately, this power station seems to be a Chinese white label product from what I’ve seen. That means that a company in China makes a ton of these with no branding, sells them to various companies who just put their sticker on them and say that it is their product. This model can be bought in bulk on Alibaba.com for $252, then one sticker later they turn around and sell it for $370.
How does it compare to other power stations?
At $370 for the power station, $270 for the solar panel, or $600 for the combination when bought using that link for the power station, this is a very economical way to get into powering medium sized devices.
Quick comparison to more “name brand” power stations:
Xtar power station – $370 – 568Wh battery capacity – 2 AC ports
Jackery explorer 500 – $500 – 518Wh battery capacity – 1 AC port
Goal Zero Yeti 500X – $700 – 505Wh battery capacity – 2 AC ports
Summary
With the issue of the unit charging for only a few minutes while powered by a solar panel, it is a major irritation to constantly be sitting by it and unplugging and plugging it back in. But if you are just going to buy the power station and use the AC charger, then I highly recommend the Xtar power station as a cheap source of emergency power or as a unit you could bring camping.
Read More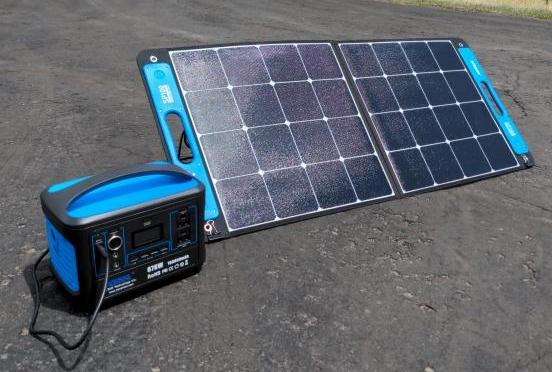
Ham radio for local communication
Hi all. New here. Just found this site today. I’m hoping some of the more experienced preppers might be able to help me out. I earned my Ham Radio Tech license last August. My hope was that I would be able to communicate with my brother in law (25 miles east of me) and my nephew (20 miles southeast of me). We all purchased HTs. Unfortunately, I live on the wrong side of the hills and we can’t find a repeater that all three of us can reach reliably. We tried new HT antennas, mag mounts for our cars and even roof mounted antennas. No luck. My next thought was to get a mobile HF radio. Maybe one that works on six or ten meters, which our tech licenses allow us to use. I did try contacting our local ham club, but that was a dead end. They suggested I use Echolink (which worked) but it defeats the purpose of having an emergency backup when the internet/cell communications are down.
Any suggestions?
Read MoreNeed advice about BOB organization
Hi, I’m fairly new to prepping excuse me in advance if maybe is a trivial topic I’m gradually making my 72hr BOB, it’s a general purpose one but with some gears userful in a countryside/wilderness settings. I’ve some trouble to organize all the stuff in a way that is easy to identify, retrieve and put away At the moment I’m working with what I have and small budget but open to spend some bucks if I find a decent solution. I prefer to use tech backpacks since I already have a couple of them (30 and 65lt) and the single big storage compartment make me wonder what could be the best approach to keep all your gears well separated in their specific categories (first aid, food, water, electronics, tools, warmth, hygiene, ect, ect) To organize my stuff I’ve used what I already had: a cheap roll bag a and some molle pouch (from my old softair playtimes), and at first I thought to build a sort of taylor made insert ( I don’t mind go into diy and do a bit of sewing) that fold like a book and fit into the backpack (something similar to the commercial Seventy2 pro system) but now I realize that probably all this contraption is adding too much weight (all molle pouches + a heavy fabric that keep them together) and probably is not so practical.
A photo of what I was doing so it’s easier to understand
So I’m a bit of stuck…should I ditch this idea and maybe simply use a collection of small and lightweight drysack with different colors (for identify the content) and put them inside the backpack in the most logical way based on weight and needs?
Read More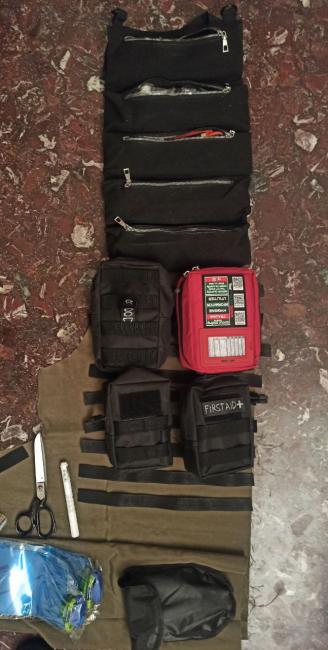
Solar blanket (panels) by Off Grid Trek
Do any of you own or tried the “28.5W Solar Panel, 23.8% Efficiency Rating, 1.1lbs” by Off Grid Trek?
I own two Ryno Tuff 21W Foldable Solar Panels, based on The Prepared’s extensive testing and recommendation. I am wanting to get one more, and want to diversify, as I believe in redundancy that is partially diversified in the scenario that one brand decides to crap out.
At $280, it is considerably more expensive than Ryno Tuff’s $50 offering. I am willing to pay more for a better product that will last longer (years). It also has a DC port.
As I’ve mentioned before, I live in the Arizona desert with temps upwards of 120F in the height of summer. We also have dust, wind and monsoon rains (oh, joy).
Your thoughts and input are appreciated 🙂
https://www.offgridtrek.com/collections/solar-blanket/products/28-5w-solar-panel
Read More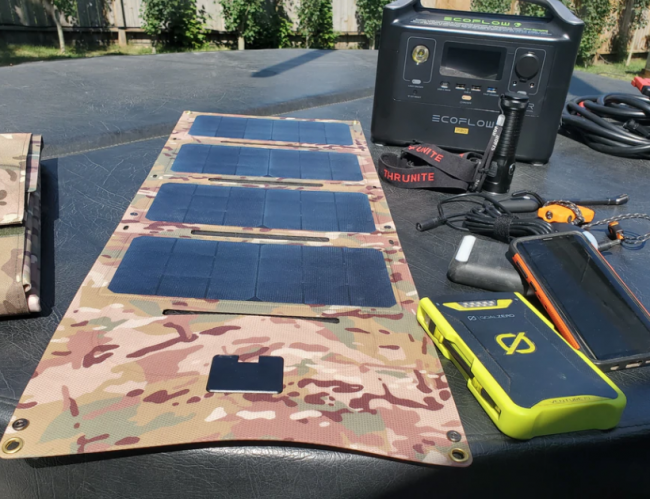
Community portable water filtration systems
Hello,
I am a member of my local Community Emergency Response Team (CERT) and we are looking to replace our portable emergency water filters.
Does anyone have any recommendations for a company that produces portable, self-contained emergency water filter systems?
Our CERT currently has an Emergency Potable Water Program where, if our local water supplier was unable to provide potable water to the community, we would step in and supply potable water through several distribution sites.
The manufacturer of our current units (Global Pure Water) has gone out of business.
Thank you for any thoughts.
Bob Clements
Milwaukie, Oregon
Read MoreFree DIY: How to make small waterproof containers using plastic trash
It’s great to store smaller bug out bag items in waterproof containers, like medication, tinder, or water purification tablets. In this post, I show how to DIY a free and quick method that recycles/upcycles the plastic bottles you’ll be throwing out anyway.
When deciding what containers to upcycle, favor sturdier plastic with quality caps, like the too-expensive disposable water bottles.
–A 16oz water bottle or old apple sauce container provides a large capacity inside the lid and a definable lip that can be cut across.–
Next take a hacksaw or sharp kitchen knife and cut below the lid. If you need a slightly larger container, leaving a portion of the neck of the bottle will give some extra capacity. After that, sand down the rough plastic to create an even and smooth surface. You can even just rub it against some concrete. The nice thing about this project is that it does not need to be exact or perfect and further steps will make up for any imperfections.
–Before and after sanding–
Taking another piece of thin plastic that would have ended up in a landfill for the next 500 years, trace around the lid and cut out the little circle, this will form the base of the container.
–-I cut out clear plastic circles (which is why they are hard to see in the picture) so I could see inside of the container, but you can go with colored plastic if you want.–
Run a thick bead of hot glue or super glue around the rim of the lid and press on the plastic circle. Hot glue is nice because the thickness of the glue fills any imperfections between the sanded portion of the container and the plastic circle base. Any excess that comes out of the side can be wiped or scraped off.
Possible uses:
The container made out of the large apple sauce bottle can store three large cotton balls that can be coated in vaseline for an excellent tinder source.
Learn more about how to make these by reading this post by forum member Jay Valencia.
Using one of those slim and more eco-friendly water bottle lids, I created a small container that can hold red pepper flakes for spicing up food. On the right is a container made from a full sized lid that is able to hold four ibuprofen liquid gel capsules, perfect for throwing in a pocket or purse.
By combining two wide mouth Gatorade bottle lids, a larger container can be made. Or you can place one of those plastic circles in between the two halves and make a container on either end. Perhaps one side is your medicine in the morning and the other end is for the evening.
By screwing a waterproof container on the end of a Sawyer Mini or Hydroblu Versa, top rated in the Best portable survival water filters article, you will protect the protruding tubes on either end that can be damaged if dropped and also stop any leaking of the filter inside your bag after use.
Read More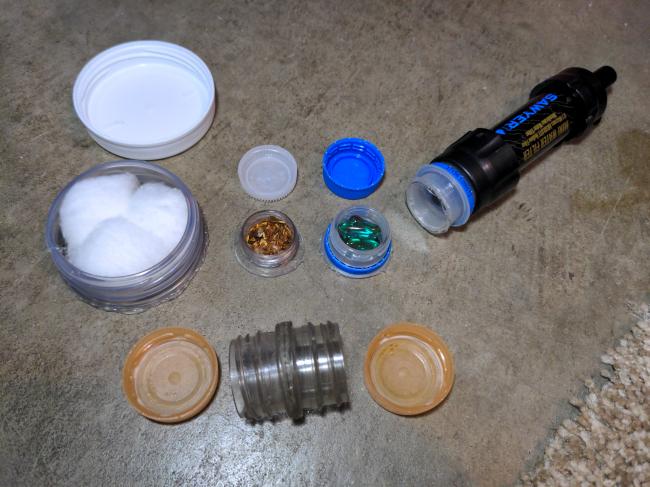
Using a vintage hot water bottle to stay warm and lower your energy bill
I’ve seen many news articles and posts on the forum here about rising energy costs and rightfully so, it is discouraging.
Following the example of brownfox-ff from the weekly news roundups, I would like to share an idea to help. Take action rather then be reacted upon. I don’t thank brownfox-ff enough but I do read their weekly uplifting support and try and work on one or two that week.
The past few months have been cold, especially at night. Instead of turning to the thermostat and clicking it up a few degrees to solve the issue I have been thinking of ways I can overcome my trial in a different way.
Tip #1 One of the big solutions that has helped is to move my couch and computer desk in front of windows so that when I am just sitting there, the warmth of the sun heats me up.
Tip #2 I’ve been wearing more clothing lately. It involves putting on another shirt or a jacket when just around the house during the day. At night I put on a hoodie, a beanie, and an extra blanket on top of my pajamas to keep the warmth in more.
Tip #3 When I just can’t seem to get warm from the above steps, I go to my secret top tip of using a hot water bottle to snuggle up to. These have been around for years and years but I’ve seen them fall out of fashion. Here’s a classic red one on Amazon for $6. The one I have is blue and has a comfortable outer sleeve to reduce the heat against bare skin.
If you don’t have one with a sleeve you can sew one up yourself or just wrap a dish towel around it. All this costs me is the energy that it takes to boil two electric kettles of water and then I have hot water for the entire 9 hours I sleep. I wake up and the bottle is still warm!
I bought this as a way to stay warm without having to rely on a fireplace or furnace and couldn’t be happier. It’s a nice little preparedness item that you should consider. Even if all the stuff hits the fan, we can probably boil some water over a fire.
Thank you all for reading.
Read More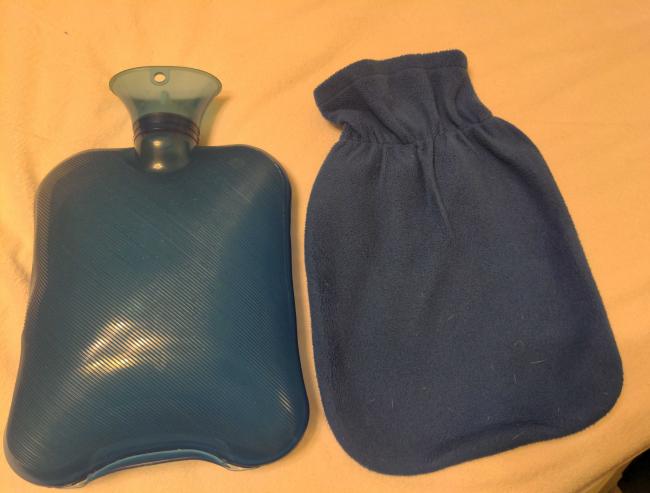
1 gal water containers for storage
I’m new to prepping, and I’m working on water storage. My sister and I live alone together, and we aren’t particularly strong, so we want to store a portion of the water in 1 gal containers. Those will be easier for us to carry and use, especially for short-term emergencies when we might not even need to break into our 5 gal containers.
From reading The Prepared, I understand that we shouldn’t use cheap plastic containers like milk cartons or soda bottles. Would a beverage cooler like this one be appropriate? https://www.walmart.com/ip/Coleman-1-Gallon-Beverage-Cooler-Jug-Blue/23787717? My concern is that it might not seal securely enough for long term storage.
If this won’t work, can anyone suggest an alternative 1 gal container? Thanks in advance!
Read MoreIncluding Naloxone in EDC or IFAK
Naloxone is new to me but has been featured in several TV news clips in my area over the past month. Basically, its a drug that by-standers can administer to somebody overdosing on opioids which will potentially save the person’s life.
https://www.cdc.gov/stopoverdose/naloxone/index.html
Wondering if others living and working in busy urban areas keep this on hand as part of their EDC preps.
Read MoreColeman kerosene pressure lanterns available again!
Coleman kerosene lanterns are available again. They only make these sporadically and haven’t been available for quite a while. Buy from Coleman direct for $119 and free shipping. I highly recommend these lanterns. They are among the brightest lanterns Coleman ever made. Coleman bumped the price to $129 since I first posted this. Still a good deal.
https://www.coleman.com/lighting/lanterns/kerosene-lantern/SAP_3000004258.html
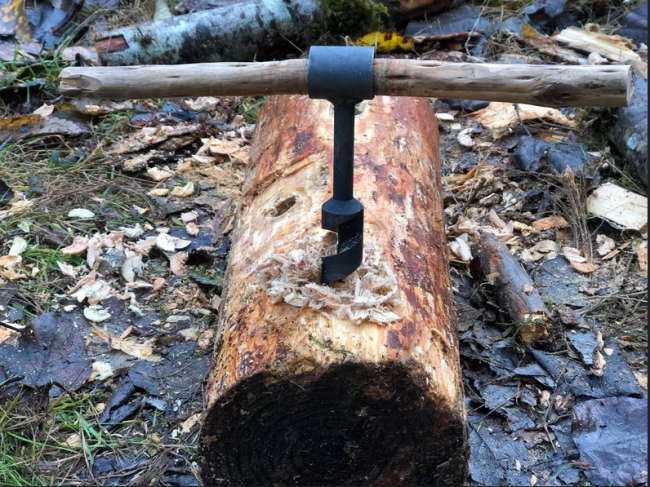
Read MoreUsing a bushcraft auger to build things during a bug out or electricity-free disaster
Just came across a thing called a bushcraft auger. It’s like a giant drill bit that can be turned by using a stick.
Originally I thought that must be pretty hard to drill through something by hand, but then remembering my physics class, you can make it as easy as you want by inserting a longer stick longer and getting more leverage.
“Give me a lever long enough and a fulcrum on which to place it, and I shall move the world.” – Archimedes.
From a preparedness perspective, it would be good to have a way to drill holes without the need for complex machines that run off of electricity.
On Amazon you can buy a variety of sizes –
You could even make your own by welding a normal drill bit onto a piece of pipe. It seems to be what this person did-
The most common projects I’ve seen the bushcrafter crowd make are stools, ladders, and swedish rocket stove fires.
Sorry I got a bit carried away there with multiple pictures, hopefully there isn’t a forum limit and they all come through. Has anyone heard of or used one of these before? What are your thoughts on it being a practical prep vs. just being a cool tool for bushcraft projects?
Read More