Share your knowledge & learn from experts
Because prepping and community go hand in hand
Making your own popsicles to stay cool
A nice frozen treat is a perfect remedy after a hot day outside. And while we are now in October and most of us aren’t thinking about having frozen foods, (I’m always late to the game, sorry) I hope this can be a resource in the future.
Now I’m no scientist, but I think cold drinks and frozen food are a great way to stay cool because they go inside of you and cool down your organs and blood that is then circulated throughout your body. Whereas something like a fan or air conditioning cools your skin but takes a while to cool your core.
Popsicles and ice cream are readily available and cheap at the store, but have you looked at the ingredients? While they taste amazing, they aren’t that amazing for our bodies. I wanted a healthier option. I could make my own popsicles using the style of mold that I grew up with which has a stick, but you have to constantly hold those and mostly just suck on or lick them, and they melt and get all sticky down your hand. Plus how do you eat the bottom without stabbing yourself down the throat with that stick?
I liked the otter pop style of popsicle. These can be sealed if you want to take a break and set them down for a minute, the little caps prevent any melted juice from running out, and they are thin enough that you can bite down on it and swallow a piece of frozen popsicle that will then melt inside your stomach and cool you down more. This pack from Amazon is $10 for 6 silicone popsicle molds.
During this past month, I’ve made several batches of these using a few different recipes. To be healthier and to make this more of a useful prep to cool me down and rehydrate my body, I started by making a homemade electrolyte drink and freezing that.
Homemade electrolyte popsicles
Squeeze a lemon or lime Magnesium glycinate powder Salt Cream of tarter (potassium) Liquid stevia sweetens and does not add calories or spike insulin. WaterI’m not going to put down ratios because I don’t remember what I used and don’t claim to have the perfect mix. This tastes good as a drink, but when frozen as a popsicle, all the flavor migrates to one side and then the rest just tastes like an ice cube.
The next recipe I tried was a store-bought electrolyte powder mix and I added half the recommended water so the flavor would be more concentrated when frozen. This worked better than the first attempt, but still had a majority of the flavor in the first few licks, leaving the rest pretty plain.
I also tried using some leftover lemonade we had in the fridge and this by far was the best tasting because it had so much sugar in it. Go figure…
If you aren’t so worried about tracking the amount of sugar you are consuming or don’t care for all those additional minerals then just some plain fruit juice can makes some good popsicles.
Read More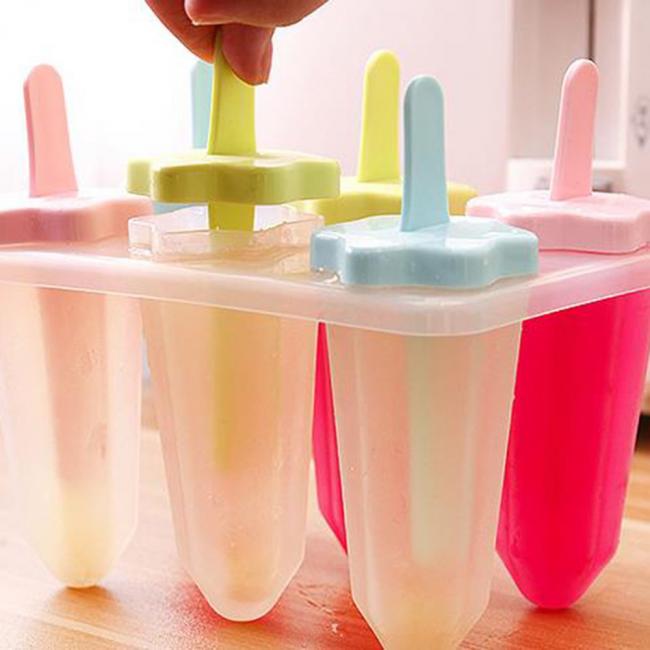
Giveaway: New survival guide book from Alone’s S9 Juan Pablo Quinonez
Edit: All copies are spoken for
To spread the news about the books release, current Alone season contestant JP is sending out 3 free copies to the TP community, with the expectation of a fair review shared here later! (Your help is how we keep the best books list updated too!)
The book is THRIVE: Long-Term Wilderness Survival Guide. (It’s 120,000 words, so you’re not expected to read the whole thing. Just a fair shake.) Seems like more of a reference guide “covering modern survival skills with bushcraft techniques, step-by-step instructions, and over 400 illustrations.”
First come first served. Reply here (we’ll email the address on your account) or contact us directly via email: hello@thissite
Read MoreCar battery jump starter advice
There are alot of vehicle battery jump starters out there these days. They seem like a great replacement to the old cables.
I am fine tuning our 2 vehicles car kits in prep for winter in the Northeast of US and want to add 1 per vehicle in place of cables. That said I didn’t see any official TP gear review and wanted to see if anyone has any thoughts or advice?
We have been AAA members for over 25 years so they are only a phone call away if needed but as everyone says on here, have backups to the backups and plan for the worst case.
Thanks for any comments from those that have or used any of these jump starters.
Read MoreNerd out on everything you ever wanted to know about batteries
I came across a website called Battery University. https://batteryuniversity.com/articles has tons of articles on various battery types, best ways to charge batteries, how to prolong battery life, future technology, and so much more.
It seems like everything we own relies on batteries. Phones, laptops, watches, ham radios, flash lights, power tools, and even our cars.
The articles are in basic English that all of us here should be able to understand and comprehend, but does require a bit more focus than it takes to read a Facebook comment.
Here are a few nuggets I’ve read so far and have been translated into Facebook comment easy reading –
It’s better to slow charge devices than to use an ultra-fast charger. Have a slower charger (1 amp) by your nightstand for slow charging over night. And a faster charger (2 or 3+ amp) in another location for those occasions when you need a quick top off. It is better not to drain a battery fully but charge it more often. Lithium-ion batteries new from the factory start out at 100% capacity and lose their ability over time. Lead acid batteries start out at 85%, and actually gain more capacity as they age, but after hitting their peak will start to decline. Avoid aftermarket batteries and chargers to save some money. They might not have as much capacity or performance and are a safety hazard that take work arounds of knowing when to stop charging. Keeping lithium-ion batteries topped off at 100% actually stresses them out and causes them to decline and age. Keep batteries between 30-80% charge for longest life. This also means though for prepping that it’s important to have ways to charge devices without the grid. Elevated temperatures are one of the biggest contributors to battery decline.Table showing how temperature and battery charge affects capacity –
One last note from myself. Don’t just throw away any electronics or your batteries. Electronics contain precious metals such as gold and silver, and other toxic materials like lead or acid. Best Buy recycles old electronics, or take things to your nearest Apple store for free recycling or they will even pay you for old devices, not just Apple products. https://www.apple.com/shop/trade-in
Read More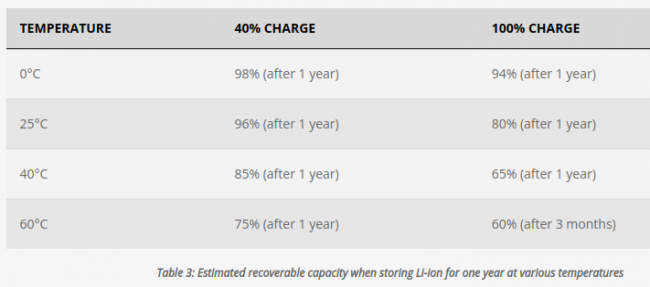
My experience of using a WaterBob during a personal disaster
Recently, on another thread, Advice for a new prepper – hurricane/flood scenario in Florida, I spoke about actually using one of our water preps (for a family of five), a WaterBob.
Biggest Pro: An opportunity to add 100 clean gallons of potable water in minutes without leaving the home. This water is safe to store/use for up to 16 weeks.
Pro: The unit cost of $35-$40 is fairly reasonable. Buying 40 one gallon bottles takes up a lot of space. The WaterBob takes up a small amount of space and can be stored for years and only used during an emergency.
Con: Once filled, the WaterBob is not reusable. If you don’t use it, it will need to be thrown away and another WaterBob purchased to be placed in your storage.
Pro: If you think you may lose tap or well water: Hurricane, public health warning, possible wildfire evacuation, PSPS (California acronym for a Public Safety Power Shut off), or a broken water pump that has to be shut down for repair, this box can be pulled from under your bathroom sink, put in the bathtub, filled with 100 gallons of potable tap water.
Con: Yes, you lose the use of the bathtub. But, perhaps baths/showers aren’t a best idea if you’re short of potable water. One could always take out a few gallons from the WaterBob, heat it on a stove and take a spit bath.
Pro: WaterBob comes with a hand pump included. The hand pump does work. (However, if one doesn’t have strong hands, a new, $12-$14 liquid transfer pump that requires two D batteries is much easier than the included hand pump.)
My personal experience: Family of 5 in rural San Diego county had a broken water pump. In the 3 weeks until that pump could be repaired, we used the 4 WaterBobs from our preps to fill all 4 bathtubs in the two homes on the property. We also used a lot of our stored 16 oz. bottles, 1 gallon water bottles, and 5 gallon water containers for donkey/goat/dogs and to flush the toilets. Showers and washing clothes was done at the home of a nearby family member, and the empty 5 gallon containers were also re-filled at the nearby family member home to be used again (and again….) until the crisis was over.
Even being careful, we used nearly all of the 400 gallons available in the WaterBobs. We were grateful for the much easier battery-powered liquid transfer pumps vs. the hand pump. After the pump was repaired, we actually tried to see if the WaterBobs could be dried and reused, but after 3 weeks of use, it was not feasible, so I purchased 4 more for $140. Even at $140, this was still cheaper and easier all round than getting 400 potable gallons any other way. (Trust me–we explored ALL of our many water redundancies first!)
Feel free to provide your own pro/con statements. If anyone else has actually used a WaterBob for any reason, please tell your story.
Read MoreIphone case with camera cover?
Hey Folks,
Has anyone come across a decent phone case that has built in sliding front and rear camera covers? I now there are a few on amazon but the reviews don’t look so good and it seems that the covers break rather quickly with limited use? The little sliding stick on covers are okay for the front but suck for the rear cameras.
thanks,
Jesse
Read MoreFlood preps & emergency raft recommendations
Seeing all of the flooding over the last week has moved prepping for floods to the top of my list of missing items. We are in a flood zone and have insurance. Our house was also built with the first floor 8 feet above the 500 year flood maps and flood vents in the foundation. We have a large stack of pre-prepped sand bags too. Along with power outage, food and fresh water supplies.
However, our location is surrounded by roads below flood level and they are they only exit from our area. High ground is several miles away as the crow flies.
We have an axe for the attic and life vests for the kids. (Life vests for us are on our list.)
One thing I know we’re missing is an emergency raft and paddles. Any recommendations for that? Preferably in the under $200 range?
Any other items specific to flooding, especially flash flooding, that you can think of?
We live in the vicinity of two powerful rivers (one of them dam fed approximately 80 miles upstream) multiple creeks and holding ponds. Good chance for significant debris, chemical, and sewage in flood waters. With enough notice we would evacuate pre-flood. If our home is habitable, we would shelter-in-place. So, for the raft and attic supplies, they would be last resort/caught by surprise/no other options.
Read MoreLightweight and cheap hand saw for your bug out bag
In a forum post that I can’t seem to find now, a member shared the World’s Lightest Backpacking Saw. Coming in at only 3.95 oz (112g) this minimalist collapsible saw would be a great addition to throw in a bug out bag. However, this commercial product is no longer being made. So if I wanted one, I was going to have to make one myself.
I am going to share two designs that I came up with so this type of saw will be accessible to those on a tight budget with no tools to work with or if you want some additional features, you can take it to the next level. Video of completed product at the end of this post.
Design #1 – Cheap, quick, and minimal.
For this first model, you will need to get a 9” or 12” sawzall blade from the hardware store ($4-$8), a 9.25” long ½” diameter PVC pipe ($3) (they can help you cut it at the hardware store or you can use your saw blade), a piece of paracord, and a small stick the length and diameter of your finger.
This is really easy. Thread the paracord through the hole in the saw blade, stick the paracord through the pipe, tie a knot at the end, thread the stick through the hole of the paracord knot and twist until the blade is firm in there.
That’s it!
Design #2 – Slightly more expensive, requires more tools, but has more features
This design does require a bit more work, but is far superior in my opinion. One of the things I didn’t like about the commercial product and Design #1 is that you had to store your blade next to the handle and it had potential for cutting up other gear in your pack. I wanted a larger diameter tube in Design #2 to be more comfortable in the hand, and offer a storage space for the saw blade inside.
With the larger diameter tube however, the saw blade would just slip through. To fix this, take a ½ inch diameter 1” long piece of PVC pipe, sanding down the outside until it fits snuggly inside the ¾” pipe, and apply some PVC glue to keep it secure. By doing this, it creates the necessary diameter for the saw to sit in while still maintaining the ability to store the saw inside the handle. An additional modification that I did with Design #2 is to cut slits in the ½ inch pipe so that the blade has a secure slot to sit in and won’t spin around when you are tightening down the rope.
You can just stick with threading the paracord through the hole in the blade, or go with the cotter pin attachment that the commercial version uses. I don’t really see the benefit of the cotter pin besides being able to remove the rope without having to untie the knot, or maybe distributing the tension between two points instead of one. I probably wouldn’t bother buying the cotter pins again, but if you want to I’ll show you how to bend and use them.
Get some ⅛” X 1” cotter pins ($1.25/pack of 5) in the nail and screw aisle of the hardware store, thread it through the hole of the saw blade, pinch slightly up on the cotter pin with some pliers and bend the legs of the cotter pin over the pliers teeth.
The finished product will look like this.
Another modification I made with Design #2 is to sand little ridges in the base to lock in the stick better than a smooth surface. The commercial product gets around doing this by just really cranking the line until it won’t move and holding the stick while you saw, but I like the grooves better. You can recreate this by wrapping a pencil in sand paper and running it back and forth over the end of the pipe.
Comparing the DIY version with the commercial product.
To be honest, I like the PVC pipe version much more than the commercial product because of the low cost, and additional features.
Comparing Design #2 to the top recommended hand saw in The Prepared’s Best survival handsaw article, the Silky Gomboy costs and weighs three times as much and doesn’t have cheap easily replaceable blades.
The commercial product uses a better rope called Zing-it that is lighter weight, stronger, and doesn’t have any stretch. I couldn’t find Zing-it anywhere cheaper than $27 for a roll and the paracord works perfectly for me, so I am sticking with that.
For $1 more, I could have gone with the superior saw blade that the commercial product uses, the Diablo carbide teeth blades. The reason I went with the Milwaukee blade is because that fits inside the ¾” PVC whereas the Diablo blade was just slightly too wide. In the future, I would like to get the Diablo blade and grind down the wide spine so that it will fit inside the handle. The commercial product also went with a long 12” blade which is much faster at cutting with its longer draw length, but for this compact version I stuck with a 9” blade. Here’s a short video showing what the Diablo blade can do compared to a similar sized Fiskers saw.
There is enough room inside the handle of Design #2 where you could have both a wood and metal saw blade. Perhaps you have this in your bug out bag and use the wood blade to cut firewood or build a shelter with, and the metal blade could be used to cut a chain link fence or padlock if you are stuck somewhere and need to get through during SHTF.
Video of completed Design #2
https://youtu.be/ltvS1SPyACc
Read More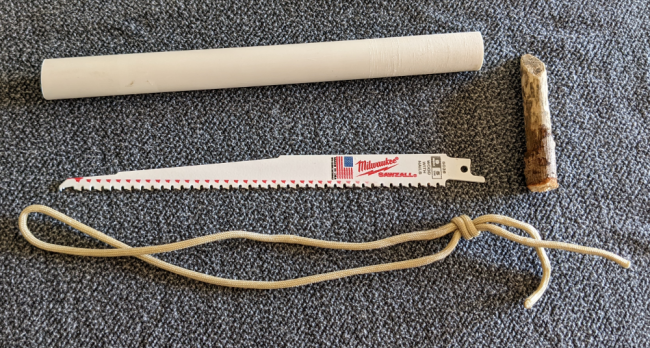
Klean Strip/Klean Heat kerosene alternative for oil burning lanterns and lamps
Klean Heat kerosene alternative is about as pure as kerosene gets, and is recommended on one of my favorite lantern websites. It’s taken me a long time to find it (buried in the Home Depot labyrinth) but I found it last week. Just now refitted my two antique lanterns with new wicks and filled them with the new product, then lit them.
It is unquestionably a far superior product in the old lanterns than either K-1 kerosene or lamp oil! My two lanterns, a 19th century railroad lantern and a 1920s Dietz cold blast contractor’s lantern, just reeked when burned inside with K-1. There is almost no kerosene smell at all with the new fuel. The Dietz burns far cleaner than the railroad lantern and I couldn’t smell anything from it. Most of the smell came from the other one.
From the Klean Strip website: Klean-Strip® Klean Heat® My understanding is that the alternative produces slightly less light and heat, but probably imperceptible.
Consider the kerosene alternative if you use kerosene in any of your heating/lighting equipment. It’s spendy but seems to be a better option if forced to use such fuels indoors in an emergency.
Read More⛺ Springbar, aka Kirkham Tent?
We’re thinking about splurging on a Springbar tent and would like to hear real-world feedback on them. Our reasons for wanting to get one are:
1. Heavy duty: we live in the Arizona desert and everything here is rocky. 99% of our plants and trees have thorns and thorns. Our desert eats up tents
2. 4 season: we hit high temps (like 115) in the summer and can hit in the 30s in the winter. We need something that “breathes” in hot temps but can insulate in cold
3. Storms: We have a monsoon season, and that means wind gusts up to 80 mph and rain that lashes sideways
4. We’d like to be able to “hot tent,” i.e. use a small wood stove in the winter inside the tent, as you can do with canvas tents.
5. Durability: We’d like this tent to last more than a year (or, sometimes, a trip)
6. Color: We like that they have a color (“Suntan”) that really blends into our desert7. Critters: We need to sleep “zipped up” or mostly zipped up as we have rattlesnakes and scorpions…we’ve been stung by scorpions and our dog took a rattlesnake bite, last year.
8. Usage: For a car bug-out situation to our “base camp” as well as enjoying it throughout the year on our adventures.
Anyway, it doesn’t seem like anyone has written about this brand, yet, according to my searching on here. Would love to hear your feedback and experiences, or suggestion for an alternate option. ⛺⛺⛺⛺⛺⛺⛺⛺⛺⛺⛺⛺⛺⛺⛺⛺⛺⛺⛺⛺⛺⛺⛺⛺⛺⛺⛺⛺⛺⛺⛺⛺⛺⛺
Read More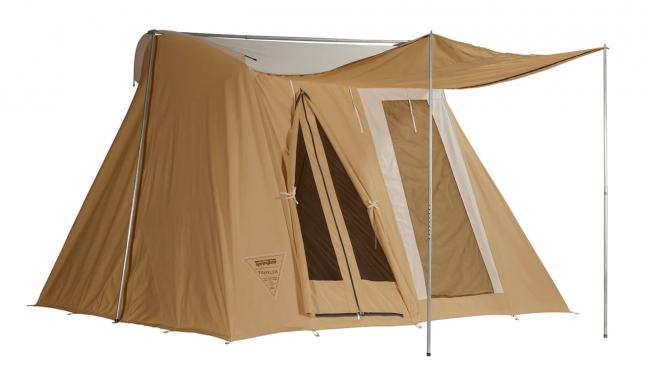
Phones for prepping
Phones are a communication tool that can be used to save someone’s life. But are they reliable enough to be trusted in an emergency situation? I think important considerations should be:
– Repairability
Phones are so complicated and so often used that breakdowns are inevitable. But electronic circuits are not designed to be repairable, and so have to be replaced when they fail.
Whether you’re choosing a new phone or sticking with one you’ve got, try to find (and later stock up on) replacement parts – especially the screen and battery, which need to be replaced most often. That way, you can take your phone to be repaired by a specialist (or do so yourself if you have the skills) even once the phone and spare parts are no longer being sold.
However, some phones are much more repairable than others. On one side of the extreme, some phone manufacturers actively design to reduce repairability (often citing tenuous security or safety concerns) by gluing parts together or serialising individual parts so that the phone will refuse to work with new ones. On the other side of the spectrum, a few rare phones are made with repairability as an express goal. They’re known as “modular” phones and are designed to be taken apart by their owners using simple tools. The companies producing these phones may even be happy to sell you spare parts. A (non-comprehensive) list of phones and their repairability can be found on iFixit, a website dedicated to making electronics repair accessible to consumers.
– Battery life
The difficult truth (for my generation at least) is that “dumb” phones are most certainly better in this regard. Even with a battery bank, you can only extend the life of a typical smartphone for a few days of normal use (compared to the month’s battery life of a dumbphone), and this brings with it extra storage requirements and greater vulnerability to any one piece of equipment breaking. Not to mention the stress of worrying whether it is sufficiently charged, or having to remember to charge it regularly. In an emergency situation, this is one thing you don’t need on your mind.
A dumbphone is far more practical and reliable in the case of, say, a flood, where you may not be safely able to charge your phone for an unknown period of time. And if you can swap out the batteries, you can also carry around a spare so that you don’t need to charge immediately. Fewer charging cycles also means that the batteries will get worn down more slowly and will last much longer.
This does bring up an interesting point: according to Sane Prepper Rules, preps shouldn’t make life harder for ourselves now. Which begs an interesting question: do smartphones make our lives better? They make us better connected and easily entertained, but do they make us happier? They provide a lot of utility, but could we find that same utility elsewhere?
– Ruggedness
It’s all well and good being repairable, but just as important to not need repairing in the first place.
Beware that just because a phone is marketed as rugged, or has “active”, “tough” or similar words in the name doesn’t mean that it will actually last (I write this from experience). Look for real-world tests that put the phone through its paces. I note here the lack of manufacturers rating their devices for impact resistance.
The most fragile part of a phone is the screen, and the bigger the screen, the more prone to breaking it will be and hence another advantage of dumbphones. For smartphones, a screen protector and case that provides a “lip” that extends above the screen should be a bare minimum.
Water/dust resistance: the IP (Ingress Protection) scale gives two numbers to indicate a phone’s dust and water resistance, e.g: a phone rated IP68 is rated a 6 for dust protection and 8 for water protection. To find out what each number means, look it up in an IP code table. Two things to note here: these are tested in labaratory conditions and your phone may react differently to, say, salt water as opposed to pure water, and secondly, resistance to the elements is not a permanent condition and can become less effective over time.
(Credit due to PCMag for a lot of the info about IP ratings.)
– Your considerations
I’ve only given 3 suggestions. What considerations do you think preppers should have when choosing a phone (smart or dumb)?
Tons of great bushcrafting and survival books on HumbleBundle this month
There are a lot of well known and quality bushcraft and survival books on sale this month on HumbleBundle. The proceeds of your purchase goes to charities I believe. They are digital copies, so just be aware of that.
Some of the ones I am interested in: The Dave Canterbury bushcraft series (like the bushcrafting bible), survival hacks, first aid, home preparedness, building tiny home with recycled materials, weather 101, RX from the garden, Modern-day pioneer, improvised weaponry.
Here are pictures of some of the books you can get. There are even more!
Read More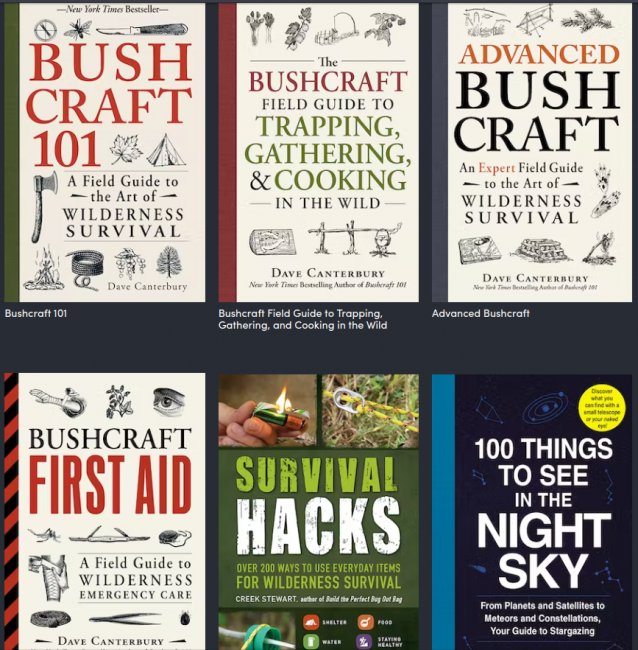
So many types of camo out there
I recently got an email about a new type of camo that is supposed to break up a silhouette better than previous types. It’s by a brand called Hiden.
This got me going down a rabbit hole about all the various types of camouflage that have been thought of and produced over the years, but I had to stop myself from going too deep because there is a lot! Did you know there is an entire encyclopedia about camouflage? https://camopedia.org/ It shows various colors and patterns used by countries all over the world.
You have the traditional kind
You have the digital pattern which I imagine was designed and useful in the early 2000’s when digital cameras and scopes were being used by the military and the digital pattern made people blend in with other pixels on screens.
There’s the abstract pattern that looks like a bunch of watercolor spots
The popular leaves and limbs
And this unique one by Sitka
There are tons more, but these are the ones I’ve seen out and about as being common and easily available.
I know the prepared and many of you discourage camo because it actually does make you stand out as possibly owning guns and being a bigger target versus the gray man blend in with the crowd, but there are also times when some camo might be useful when needing to hide and breaking up a silhouette.
What are people’s thoughts on camo and do you prep with it? What pattern do you use? It will be very dependent on the environment you are in or are planning on being in, each pattern comes in various color schemes, and the above pictures are not good representations of how good they actually are in the real world because these are on a solid white background.
Read More
Making your own solar panel adapter cables
Over the past year, I have built up quite a collection of power stations while doing reviews for The Prepared. An issue I ran into is that the one solar panel I have can only charge one of the three power stations because the plugs are not interchangeable.
Reviews for each power station: Orange ammo can, green Joyzis, blue Xtar and solar panel.
Looking at all the power stations and adapters, I realized they have one thing in common, a car cigarette lighter adapter. I couldn’t find an 8mm (size of the solar panel cable) to cigarette lighter adapter on Amazon or eBay, so I decided to make one.
Note: This type of DIY cable making is very straight forward and hard to mess up for my small use case. While you can make your own cables and adapters for larger setups and different connectors like MC4 or Anderson, make sure you know what you are doing so you don’t fry your system or shock yourself.
Even the parts for this build were difficult to find, with AliExpress being the only place I could get them. I like Aliexpress because things are often a fraction of the price for the same item you would buy from a reseller on Amazon or eBay. The parts are shipped in from China, so they take a while to get here, but these arrived very quickly in less than a month.
Female car cigarette lighter socket ($1.38) and 8mm female adapter ($3.78).
If you haven’t ever done any electrical work like this before, it’s not that complicated. Pair up the red with red and the black with black wires using electrical tape, or for a stronger connection, solder it together as I did.
I twisted the cables together, applied some solder, then slid some heat shrink tubing over the connections to insulate and protect them.
The finished product worked perfectly and I now can charge all three of my power stations from the one solar panel.
Read More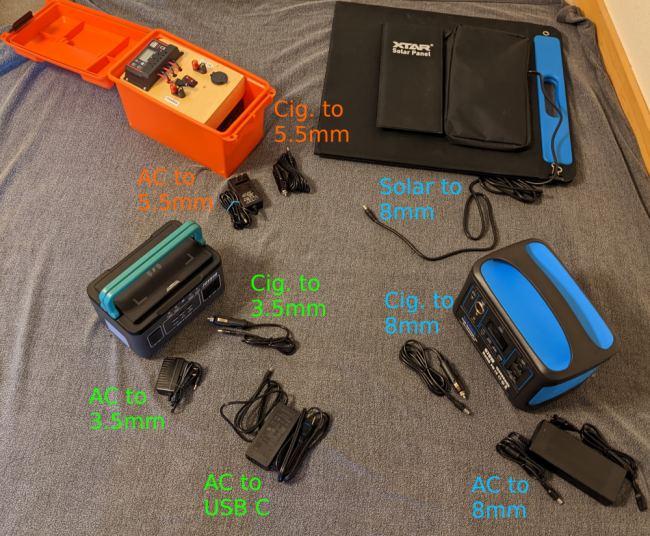
Reuse wet N95?
I’ve switched up my workout routine in the gym and when I leave my N95 is soaked with my sweat. If I let it dry for a few days is it safe to use again?
Read MoreHow to set up a new axe for first use
Even if you buy a quality axe, it’s very unlikely it will arrive from the factory ready for first use. Here are my tips for preparing the handle and sharpening the blade on a Council Tool Boy’s Axe, a gift from my wife that she found from TP’s best survival axes roundup.
Unlike the cheap axes you tend to find in hardware stores, the Council Tool axe is made in America with quality materials and is well hung. A lot of times, you can pick up an axe in a hardware store and the head is already loose, which is unacceptable. The Council Tool Boy’s Axe is an incredible bargain at well under $100.
Summary:
The handle has a factory varnish finish, which you’ll want to scrape off and replace. After scraping the handle, sand it to get it silky smooth. Oil finishes are usually preferred for tool handles. Raw linseed oil is safer than boiled linseed oil and works great. Apply multiple thin coats of oil on a warm, sunny day. Linseed oil can combust. Lay oil-soaked rags flat when not in use and soak them in water before disposing. Once the handle can’t accept any more oil, sharpen the blade. A Lansky sharpening puck is a convenient sharpening tool for axes. Buy a good sheath to protect the axe blade (and yourself).More: Want to become a sharpening pro, especially with limited tools? Check out TP’s video lesson.
A boy’s axe is enough for a man
When looking at axes, you may be tempted to pick a big, heavy axe. I also made that mistake. Yes, a heavier axe can more-easily cleave through wood with less applied force, but when you’re using an ax, you’re going to be swinging it. Over and over again. A heavy axe will tire you out quickly while you can swing a lighter axe for much longer. A heavy axe is also harder to pack into the woods unless you’re car camping.
A boy’s axe, with a head weight of about 2.25 pounds and a 28-inch handle, is the best general-purpose axe for most people. It’s just heavy enough to handle most tasks, but light enough to be easy to carry.
You can also manipulate an axe of this size for basic wood shaping (think holding near the head and doing fine-control work). You also want a poll or single-bit axe. A double-bit axe can be handy, but having a cutting edge on both ends of the head adds extra risks. Plus the flat poll is handy for driving in wedges and smashing things in a pinch.
If you become a serious woodsman, you’ll likely assemble a collection of axes. If you split a lot of wood you may want a full-size axe with a duller blade. And hatchets are handy for bugging out, camping, and dispatching roosters. But the boy’s axe is a good starting point.
Preparing the handle
If you have an axe with a factory handle, or the next time you pick one up in a store, feel along the handle. Most axe handles come from the factory covered in a rough varnish. Those spots may not feel rough as sandpaper, but imagine the handle sliding along your palm hundreds of times. You want your handle to be as smooth as possible.
The first step is removing the varnish, which takes only a few minutes. Take a knife (not one of your fancier ones) and scrape it at a 90-degree angle across the handle to scrape off the varnish. You could also use a cabinet scraper if you have one around. Don’t cut into the handle, just scrape the surface.
The finished result should look like bare, pale wood.
Next, smooth the handle with some sandpaper. A lot of people use 250-grit sandpaper for this, but I had finer 800-grit so that’s what I used. Fold the sandpaper on itself like an accordion to make it easier to grip. Then wrap the sandpaper around the handle and lightly move it up and down. You’re not trying to remove a lot of material here, just smoothing out the surface.
You’ll probably find that it’s hard to move the sandpaper up to where the handle wides. So when you finish with the narrower part of the handle, unwrap the sandpaper and lightly sand the wider bits.
Run your fingers along the handle, feeling for any rough spots. Sand them down. When the handle is smooth, wipe the wood dust off with a rag.
Choosing a finish
You can’t use a bare wood handle because moisture will soak into the wood and it will eventually rot. So you need to apply a finish.
Wood finishing is a complex topic and I could go on at length about various pros and cons. For our purposes, there are two types of finish: exterior coatings (varnish) and finishes that soak into the wood (oils).
The problem with exterior coats like varnish is that they only cover the surface of the wood. When they inevitably flake off, it exposes the wood to the elements. They’re tricky to apply correctly, and even trickier to repair — you basically have to strip the wood and apply varnish again.
Many woodsmen like oil finishes, which penetrate and soak the wood to repel water from the inside out. They’re easy to apply and maintaining the finish is as easy as applying more oil. You have to apply the oil more often than you’d have to redo varnish, but the application takes just a minute.
There are two types of oils: drying oils like linseed and tung, and non-drying oils like coconut and tallow. You want a drying oil for tool handles, which will polymerize so that it won’t be slick. If you soak a handle in something like coconut oil, you could be dealing with a greasy handle for a long time.
The often-recommended oil for this is boiled linseed oil (BLO), which is cheap, quick-drying, and makes for a nice finish. The problem is BLO is a misnomer, as the oil isn’t actually boiled. Instead it’s mixed with solvents and heavy metals like lead to speed up drying time. You don’t want that stuff in contact with your hands, which is why I avoided the handles when I treated my scythe snath with BLO and turpentine.
A better choice is raw linseed oil, which allegedly takes a bit longer to dry but is all-natural and non-toxic. However, I found that it dried as quickly as BLO without toxicity concerns.
Properly oiling a tool handle
It takes a long time to get the first layers of linseed oil in a handle. You won’t want to slather on a thick coat all at once, because it will dry into a tacky mess that’s a pain to remove. You want to apply multiple thin coats to let it soak into the wood.
Check the weather forecast and pick a couple of warm, sunny days for this project. The warmer the better, as heat helps the oil penetrate deeper in the wood, and sunlight will help speed up drying.
Pick a spot that gets good sun that has a stump or fence post to drive the blade into. I used a fence post in a sunny spot. Chop into your wood so the axe is firmly in place and won’t fall off. That will give you a safe, stable base to work from.
Pour a little linseed oil onto a clean rag and wipe the handle down with it. Wipe it thoroughly to keep a thin, even coat. And don’t forget both ends of the handle — the end grain is extra absorbent. While you’re at it, wipe down the blade on your first pass to protect the steel from the elements.
Wait 10-15 minutes to let oil soak into the wood and then wipe off the excess with a clean rag. If you’re busy and can’t go out that often, wipe down the initial coat with a clean rag to thin it out a bit more.
Warning: Linseed oil can spontaneously combust when soaked into wadded-up rags. Lay your oily rag flat outside and put a rock on it to keep the wind from blowing it away. When you’re finished with it, soak it in water before throwing it away.
Give it an hour or so, feel the handle to see if the oil has soaked in, and if it has, do the same thing again.
Expect this to take a couple of days. Take the axe inside at night to protect it from the dew.
I applied seven coats total: five on the first day and two on the second. You want to repeat this process until the oil is no longer soaking into the wood.
After a day of applying oil, the finish already looks richer.
You can keep repeating this process over time. Consider oiling it once a week or so until the finish gets dark enough for you. I plan to do a second round of oiling this summer when the temperatures are much warmer and the oil can soak in better.
Sharpening the Council Tool Boy’s axe
The factory edge of the Council Tool Boy’s axe is okay, but not especially sharp. More experienced axemen might want to reprofile the head with a file, but I didn’t feel it was necessary.
There are many tools for sharpening axes. Even a simple bastard file works. But I’m a big fan of the Lansky sharpening puck, which is cheap, easy to transport, and made for axes.
You want some sort of lubrication. Many people put oil on their stones, but I’m not a fan of oil for two reasons: once you oil a stone you have to keep using oil and oil makes a thick layer between the steel and stone, making it cut less effectively. Some recommend kerosene or diesel, but I like plain water and keep a bucket nearby when I’m sharpening. Water is safe and can be found just about everywhere. You can spit on the stone if you need to.
You want a stable sharpening surface. Putting the axe in a vice would be the best, but I wanted to simulate field conditions. I sat down with my stone and bucket and laid the axe across my knees, with the head on one knee, facing away from me.
I dunked the puck in the bucket and then using the fine side of the puck, ran it in a circular motion up and down the blade’s bevel. When that side was done, I’d switch sides (and knees). But that’s an oversimplification.
Sharpening is intimidating when you’re new at it, which is why TP offers a whole course dedicated to it. Part of the learning process is getting a feel for the blade. That starts with carefully running your finger across the blade edge to feel for the “burr,” which is a rough spot in the edge.
You want to work that burr to smooth it out, which then folds the burr over to the other side of the blade. Then you work on that side to smooth the burr out. You keep repeating this process with progressively lighter stone grits and pressures until you end up with both sides of the blade meeting in a sharp, smooth edge.
Don’t run the stone across the entire blade unless you’re planning to reshape it. You want to put the puck on the bevel (the end of the sharp edge of the blade) and angle it so that it “catches” the bevel. That takes some experience. The key is trying to maintain an even angle across the bevel.
After about 30 minutes of light sharpening, I had an edge sharp enough to shave hair off my arm.
I decided to take the axe for a test run. I hacked down a couple of annoying saplings in the edge of the woods near my house, and tested the edge by peeling bark from them.
Once your axe is good and sharp, you want to be careful with the edge, not only to prevent injuries but to avoid damaging the edge. You definitely want some sort of sheath to carry it around in. I like leather because it plays nicely with oil. In the meantime, you can hang it up in a safe place.
Read More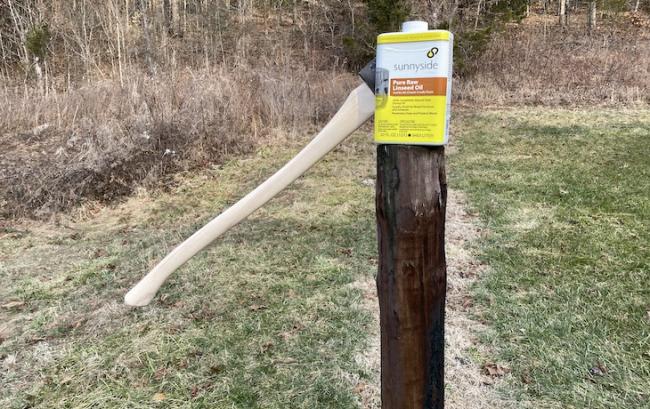
Review: Joyzis 300W battery pack. A lightweight powerhouse
The Good:
Where this little unit shines is that it only weighs 4 pounds making it very easy to travel with or move around if you had restrictions on how much you could lift. I loved the recessed handles that can come up for easy carrying, or be stowed down for a flat surface and expose the wireless charging pad on top.
The Joyzis has a battery capacity of 296Wh, which is about 8X as much juice as a portable power bank, plus you get the ability to power smaller wall outlet devices like a laptop or CPAP machine. With this capacity, I was able to power my work laptop and cell phone solely off of this battery pack for 2.5 days. And impressively, it was able to keep a portable fridge powered for two full weekends of camping.
In another review, the Xtar power station for some reason caused the keyboard and mouse to glitch when I connected my work-from-home setup to it. The Joyzis however was able to power all of this (laptop, monitor, keyboard, mouse, speakers, and USB hub) flawlessly.
Joyzis offers a one-year warranty with this unit, but you can extend that to two years if you register your product with them. If you want this extended warranty, go to this website or email them at joyzis(at)afterservice.vip. Ignore the service.joyzis(at)outlook.com email address on the sticker on the bottom of the unit, I wasn’t ever able to reach a human when contacting them through this address.
This power station comes with a 60W USB C wall charger which will charge from 0-100% in about 5-6 hours, and a car cigarette charger for topping it off on a road trip.
I was worried when I received this unit that they sent me a European version because the outlet is unlike any that I’ve seen here in the States, but both two prong and three prong US plugs still work in this along with various types that seem to be used in other countries. Pretty neat!
The Bad:
Over a year ago The Prepared was sent over a sample power station but during our testing, the unit suddenly stopped being able to be charged. We contacted the company and they sent us over a replacement and this review is on that second unit.
Looking through Amazon reviews, a large percentage of people have received their unit, lifted it out of the box, and the entire top pops off and is broken. So there are some quality control issues here. The good thing though is that most of the reviews say that they contacted the company and were instantly sent a new unit.
A missed feature on the Joyzis is that you cannot charge this unit and power devices off of it at the same time. So if you had it charging by a solar panel during an emergency, you have to wait until it is done if you want to plug things into it. Also, a bummer if you wanted to use this as a UPS (uninterruptible power supply).
Something annoying that I found with the unit is that the buttons stick out quite a bit and the power button is easily clicked on with the slightest touch, making this a poor choice to throw in a bag. All of the other buttons need a three-second hold to activate, I don’t know why the ON button couldn’t have this ability as well. Funny enough you do need to hold that power button for three seconds to turn off the unit.
Instead of using a display like most power stations, which give you valuable information like battery percentage, load, and how much time is left to charge, the Joyzis opted to use four bright LED bars. But this simple display of remaining battery capacity still left me wondering how much each device was draining and if I was close to overloading the unit or not.
The Joyzis does utilize a PWM charge controller that is inferior to MPPT units in higher-end power stations. It gets the job done, but is not as efficient.
Comparing this to other small power stations:
When comparing the Joyzis to the other two power stations I have had my hands on before, the Xtar is nice in that it has recessed buttons that require a three-second hold time to activate, twice the capacity, and can handle surge watts up to 1000, but at twice the cost of the Joyzis.
In a previous post, I made a power station and while it was a fun project, for the same price, the Joyzis has an additional 100Wh of capacity and weighs a fifth of the DIY option. The Joyzis is small enough to fit inside the 50 caliber ammo can that I used for that DIY project, which could be a nice container to store cables and keep it more protected and waterproof.
I haven’t held the Jackery Explorer 240, but comparing specs, the Joyzis is cheaper and lighter, has more capacity, two additional USB ports, wireless charging, and is a much smaller profile. Jackery however, is a much more trusted company and with the large number of quality control issues that Joyzis seems to have, I would pick Jackery to get me through a disaster over Joyzis.
I would love to try out an EcoFlow product as they are known to be very high quality. The River model is similar to the Joyzis in capacity but has a much more powerful engine under the hood allowing for 600 running watts and 1200 surge through 3 AC outlets compared to Joyzis’s 1. However, that amount of power output and ports is overkill in my opinion for a sub 300Wh capacity power station. It just doesn’t make a ton of sense to run 600 watts of devices through a 288Wh station and only have it last for 20 minutes or so.
Summary:
If you want a lightweight power station to keep phones, tablets, and a laptop topped off during a short power outage or on a camping trip, this is a cheap option that can fulfill those needs.
The Joyzis BR 300 power station is listed for $280 on Amazon, but there is always a $90-$150 off coupon right under the price tag as long as you click it.
Read More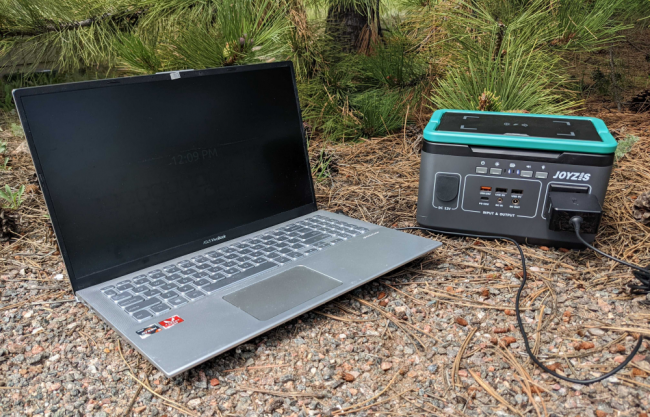
Two websites for tracking lightning and thunderstorms in real time
In Florida, we receive our share of thunderstorms. I wanted to share two websites that I use to track lightning and thunderstorms in real time. There is usually a 2-5 second delay between a strike and when it shows up on the screen, but that’s impressive timing still.
Use this to know when to unplug or plug back in electronics from around your house to avoid surges, track storms, and know when it’s safe or unsafe to go outside or swim.
The first site is https://www.blitzortung.org. Click on your nation’s flag on the left side of the page to zoom into that area. All of the green lines that point to each strike are different research stations that see or hear the strike and by adding in the data of multiple sites and locations, they can quite accurately triangulate each strike.
There is also historical data at the top of the screen so see the general direction and intensity of the storm if you are just tuning in. Click on dates and times in the bottom left corner to select a particular date.
The second site is https://www.lightningmaps.org. By default the lines that point to each station is toggled off, but you can enable it using the icon that looks like an antenna in the top right corner. They also have historical data by clicking on the calendar icon near the top.
((Location of icons and buttons may be different on a phone. I was using my laptop when viewing these.))
Hope this is helpful for someone and can be another resource to make us more prepared.
Read More
Buying extra supplies as a hedge against inflation and be better prepared
Over the past couple months I have been going through previous articles on The Prepared and updating prices for our product recommendations. It’s probably no surprise to anyone but many products have been discontinued as supply chains have adjusted, some companies (like with freeze dried food storage) cut down their offerings from say 10 products to just their top 3 to keep up with demand and cut down the amount of downtime rotating the machines and such, and the mostly universal thing I am seeing is that the prices for everything are going up and up because of inflation.
For example, in 2020 we reviewed and recommended a #10 can of scrambled egg mix that cost $20 at the time. Now, it is MSRPd at $105. The same goes true for many of the items I am updating such as axes, multi tools, and more. Sometimes it’s just a dollar, other times there is a 20%, 50%, or I’ve even seen things double in price.
I remember reading all these articles when they first came out and had fun day dreaming about using all of the gear recommended. Sometimes I would buy the recommended item, but there was just too much great stuff to buy so I had to put keep adding to my prepping wish list using The Prepared’s kit builder.
For further reading: How to shop for preps without going over-budget or buying fantasy gear
When that food dehydrator I was wanting used to be $250 but now is $325 I can’t help but wish that I had bought it back then. I tell myself though that I am proud that I didn’t overspend at the time or put things on credit, but still… it’s harder to get that same dehydrator now.
It got me thinking though about how I want to adjust my future spending and savings. If a can of scrambled egg mix can increase more than 5X in two years, it might be a good investment to buy more physical items if I have some extra cash at the end of the month, can rotate through things smartly, and have the space to store them. This really is a balance that I need to keep a calm and level head about, I can’t be turning into the hoarder house or having items spoil because I am not using them fast enough, but for some products it might be good to store extra of them.
The first items I am going to work on increasing my stores of are those items we use on a regular basis that are very shelf stable and can sit there for 5, 10, or even 20 years and still be good to use. For example if I spend $10 on a box of 500 garbage bags today and after 10 years of inflation and shrinkflation that company offers a $30 box of 275 bags, I have quite the valuable box there that I use and can tap into. Probably a bad example, but look at the things you usually use such as dish soap, aluminum foil, plastic wrap, toilet paper, air filters, water filters, toiletries, and more and see what would be good to store up. Not only will you have a small hedge against inflation, but if there is panic buying or shortages you will still have some, and if a product becomes discontinued you still have some to hold you by until you can find an alternative.
These are just things I’ve been thinking about over the past few months and I haven’t done all the math or worked out the kinks but wanted to share something I was observing. What are your thoughts, and what items do you store to be better prepared?
Read MoreHow to maintain a fan?
Hello everyone,
It’s been a while but I had a question that I thought this audience could help out with. I have a few fans that I use around the house and seem to go through them every few months or years.
Do any of you know how to maintain a fan and keep it working for many years like new? I tried doing research but only could find the recommendation of “wipe the blades off of dust every month”. I probably could blow a can of compressed air in there every month to help things out, but is there any oiling I can do?
This little USB fan is perfect for my nightstand. It provides some good white noise, doesn’t make me too cold, low power draw, and I can use it with a power bank if the power went off. I want it to last the rest of my life but don’t know how to make it do that.
Read More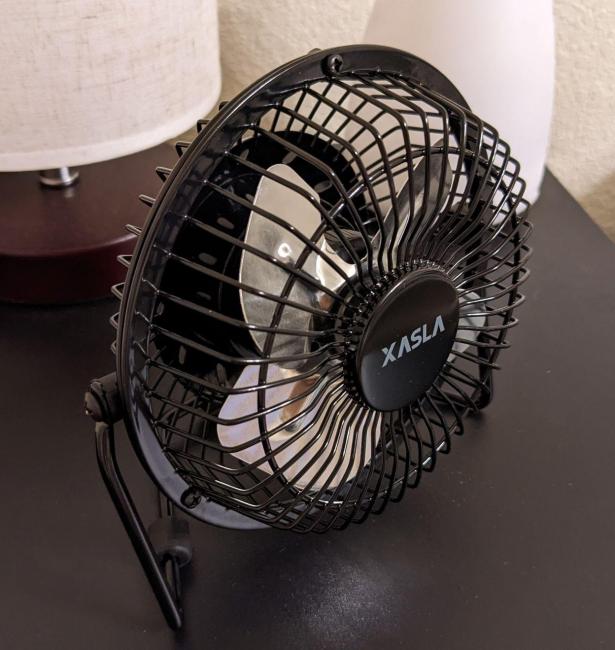
Opinions on fire escape hoods?
Looking for opinions on fire escape hoods. One is on sale now at several sites such as https://mypatriotsupply.com/products/ready-hour-fire-evacuation-mask . For the price, it might be worth having a few around. It just concerns me that something this life-saving would be this inexpensive.
Read MoreMaking your own first aid supplies after a disaster
If a large region-wide or even country-wide disaster occurred which harmed many people, store shelves and hospitals will quickly run out of first aid supplies from band-aids, gauze, antibiotics, and more. The hope for us as the prepared is to have enough of this stored before this happens to be able to treat injuries we and those close to us sustain. But what if that disaster happens before we are able to accumulate all of those supplies or we run out because the disaster was worse than we had prepared for?
How do you craft and make various first aid supplies from things you have around the house? It will be hard to make things like antibiotics but instead of gauze for a large cut on the arm, could you use pieces of a tshirt that has been washed? Instead of band-aids can you fold a square of toilet paper and attach that with some tape? And even during the normal times, why not save a buck and make your own supplies? What makes the store bought gauze better or different than say a piece of tshirt or toilet paper?
I don’t have any answers but was curious if other people had thoughts on the subject.
Read MoreSanding down a cast iron pan for that “smooth as glass” finish – Awesome results!
Just a heads up, but I am very new to the world of cast iron cookware so hopefully you seasoned veterans (cast iron pun) will go easy on me. I know cast iron people are very opinionated.
– – –
Being new to cast iron, I always wanted to strive towards that “smooth as glass” finish that people seem to get. Where an egg will just slide off not leaving anything behind, but after years of working towards it I never could get it to be as non-stick as I would have liked it to be. There are some techniques that I learned about a year ago that did make a big difference like only using the smallest amount of oil and applying it to a hot pan in between cookings instead of a large amount of oil to a cold pan like I was doing, but I still knew I could get it better.
While watching some YouTube videos of Cowboy Kent Rollins, I came across a video of him talking about using actual sand paper on your cast iron to shave years of wear off of it. He says that you could get to that finish naturally in like 30 years of use, but in just a few minutes you can fast track the process and get to enjoying your pan sooner.
Looking into it further I learned that cast iron cookware is called such because the iron is cast into a mold made of sand, which is why it has that rough texture. If you look close on your pan you will understand what I am talking about and see all the grains of sand that the iron formed around. This texture however, makes for a lousy cooking surface and is why you have to apply layers of seasoning to fill in these holes and pores to get that smooth surface.
You can do this solely by hand, but a cheap $15-$20 electric sander will make it go by much more quickly. There still will be areas that the sander can’t reach that need to be buffed by hand though. I first started off with some cheap sand paper but was going through it very quickly and not much material was coming off. I then switched to my good stuff and it made a world of difference. I highly recommend 3M’s pro grade precision sand paper with Cubitron II technology. For this project or wood working, this is the best stuff that lasts extremely long.
Start out with a course grit sand paper (like 60 grit) and take the bulk of the material down, buff down sharp points, and get it to more or less how you would like it to be. Then follow up with some medium grit (like 120-150 grit) to smooth things out more.
The goal here is just to knock down the high points and not to get it down to a mirror finish. There needs to be some pitting and texture for the seasoning to adhere to.
Here’s a video showing the before and after in better detail than a picture is able to do.
https://youtu.be/MT5dE4QdppA
This will strip any existing seasoning on your pan and you will have to start it over from scratch. The bare iron that you have exposed will be very sensitive to rusting so you need to at least put on two layers of seasoning before you start using it. Do this by preheating your oven to 450–500 degrees F. Place aluminum foil on the bottom rack of the oven to catch any excess oil. Apply a very thin layer of oil on your cookware and place it upside down on the center rack. This helps prevent oil from pooling on the cooking surface. Bake for 1 hour. Take it out, let it cool down, and repeat and it is ready for use.
Did it work? Yes! After about a month of regular use, a good seasoning built up again and I finally got that non-stick finish that I was looking for. It is just so much nicer to cook in now. Here’s the residue that was left after cooking some eggs:
Getting that cooking surface to a non-stick finish was great but another benefit of going through this sanding process was that I was able to knock down the sharp edges of the pan and handle. I can’t stress enough how great it feels in the hand now compared to what it used to be like.
I have two more skillets and a dutch oven that I want to apply this finishing process on. This took a cheap Lodge pan and transformed it into a much higher quality pan that functions and feels significantly better.
Read More
Remove rust off your gear and tools with vinegar or ketchup
Did you know that vinegar is a great way to remove surface rust off of metal objects like tools, stoves, or camping gear? I didn’t, but after seeing it done on YouTube I gave it a try and it worked quite well.
I do take care of my tools, but have inherited and found some used tools that were neglected and gathered some rust.
The following two were my fault though. The small pair of wire cutters and the rust on this parang were from me not applying a protective layer of oil on them.
The first step is to scrub everything down with soapy water to remove any grease or oil that is on there. This is an important step because I forgot to do that the first time I put all these in a vinegar bath and not very much rust came off. After washing them properly and then soaking in vinegar again, it worked much better.
Because it would take quite a lot of vinegar to submerge the parang, I opted to try spraying it and the wire cutters down with some ketchup on just the areas that have built up rust.
The rest of the tools I submerged in vinegar for 24 hours. Without even touching them, look at the rust that has just flaked off.
Taking a brass wire brush, I lightly brushed off the remaining rust and the tools are looking much nicer now!
Some of the files and punches still had some of the 20+ year old rust on them, but they do look much nicer now and I’m happy with the results. Another soak or two with additional brushing probably could get them back to new.
The parang however didn’t show any signs of improvement. I’m not sure why, because the ketchup worked great on the wire cutters. Maybe it is the type of steel it is made out of.
I then put some oil on a rag and wiped all the tools down to prevent this from happening again.
Neat little trick, but hopefully I never have to do it again and can prevent this from happening with proper maintenance in the first place.
Further reading: How to maintain garden tools with a bucket of sand and oil
Read More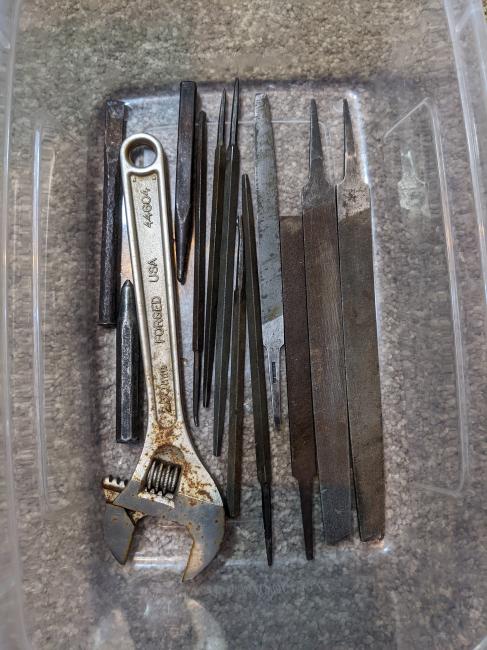
Best modular bag for car?
Hi guys,
I’m pretty new to prepping and have been reading a ton of stuff on this site. I’m in the middle of assembling my kit but I really could use some recommendations for a bag. I have almost all of the items of a level 3 kit stored throughout my truck but scattered throughout. I’m ideally looking for some sort of modular bag to use that I can attach smaller packs or bags on/in based on the situation I’m in. For example, I want to keep all my clothes/hygiene in a small day pack and possible use this also as a gym bag or emergency change of clothes for work. I also want to be able to strap a sleeping bag and tent if I’m in a bugout situation but leave in the truck if I’m just trying to get home. I also have a rather large molle ifac (9”x7”x5”) that would be nice to strap to the bottom or side but keep easily assessable.
I am leaning toward an Osprey Aether AG 60 or a Deuter Aviant Voyager 65+10. Both of these have removable daypacks but I’m worried they will take up two much space in my truck (won’t fit under the backseat)
Does anybody have a good recommendation for a bag in the +/-40L range with attachment options for top, bottom and sides (or separate daypack options)? Conversely any recommendations for internal bag pouches?
Thanks
Read More