Share your knowledge & learn from experts
Because prepping and community go hand in hand
Hands-on experience with a Scout Rifle?
Does anyone have any actual hands-on experience with any of the current Scout rifles (ex. Ruger GSR, Savage, Mossberg)? What’s been your experience (good or bad)?
Read MoreWhat are the best solar panel/generator brands?
Which one is the best?! Eco flow? Jackerry?
Read MoreDIY air filter protects an entire room from COVID-19
Will this pandemic ever end? We finally have vaccines, and we still have breakthrough infections. We finally reach herd immunity from vaccination, then a new variant is 50% more infectious and brings the pandemic roaring back. We’re not even recovered from that when another variant comes along, even more infectious and a bit resistant to vaccines. At this point we need 150% of people vaccinated to reach herd immunity again, and 6 months after that another variant will set us back to the beginning.
The problem is that we’re relying too much on vaccines. They’re a great tool, but just not enough on their own. That’s why we need a layered approach.
Every COVID precaution has some failure rate or side effect that prevents it from being the magic bullet that fixes everything. That’s okay. We can make up for this by using several layers of protection. If one layer fails 20% of the time (vaccine) and another layer fails 20% of the time (N95 mask) then you can combine both precautions for a failure rate of only 4% (odds that both fail at the same time). If that’s still not enough, just add a third layer.
Here’s one more layer you can add, either for added protection or as a replacement when, for whatever reason, you can’t wear that mask.
One of the most overlooked precautions is also the easiest to keep up long term. The virus can only spread if you breathe it in. Cheap and effective ventilation systems remove viruses from the air, so that you can safely breathe that air without getting infected. With enough room air filtration, it becomes possible for people to share a room together without spreading infection, even if none of them are wearing masks. This is especially important for places where people need to remove their masks, such as dental offices or restaurants. It also makes a great backup layer for especially high risk environments, like classrooms or shared offices, where it’s difficult to wear a mask properly for many hours at a time.
Just build one of these filtration systems for each place that you want to protect. One unit is enough to hang out with friends, especially if you spread out a little with the fan placed between you pointed up. Three of them will provide supplemental protection for a typical, crowded classroom, in which everyone is still wearing masks.
The best part about layered defenses is that you can always afford to drop one of the layers, and the remaining layers will still take care of you. A filtration system is just one more layer you can use, so that you can safely drop any other layer if it’s getting in your way.
There’s a whole menu of layers that you can choose from:
Filtration System – keep the above air filter near you Outdoors – because the ventilation is built-in N95 Masks – for when you need to visit areas that you haven’t secured Vaccines – 5 months of easy protection Distance – just stand further away while talking(BTW, hand washing and scrubbing doorknobs don’t belong on this list. They might help a little bit, but not nearly as much as any of the above. COVID-19 usually spreads through the air, not by touching surfaces.)
I always aim for at least two layers of protection, and sometimes add a third if I need to be in a crowded room. Decide how many you feel comfortable with – you definitely don’t need to use all at once.
And the best part about filtration systems? If one business owner installs filtration, every single customer is that much safer and doesn’t need to work so hard on protecting themselves. Bring your own filter, or ask your favorite businesses to take care of it for you. You and everyone around you will be that much safer.
Imagine if all of our public spaces had good ventilation. Everyone would be protected, even those that refuse to protect themselves. We might finally end this pandemic.
Until then, this is one more tool that you can use to protect yourself and your community.
Read More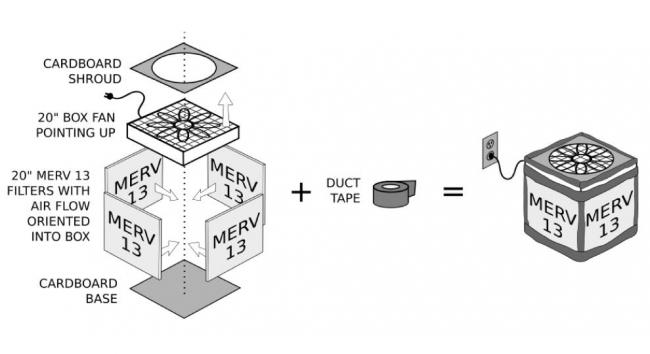
Nat gas “sniffers” for friends who can’t smell anymore due to Covid
So here’s a fun prepping mashup: Both my mom and one of my friends have recently had gas leak scares when a gas-powered appliance began to malfunction and they realized, suddenly, that they would not necessarily be able to tell if it was leaking gas because they’d lost their sense of smell due to Covid. In my mom’s case, it was actually kind of funny, at least in hindsight, because she texted my husband and said, “Please don’t tell Sarah, because I know she’ll be worried, but…” My husband (who was sitting right next to me on the couch, watching Andor, and dutifully concealed their conversation from me) told her to call the utility, since they make free house calls 24/7 when a gas leak is suspected, and of course this is ALWAYS the best thing to do if one has any reason to believe that there might be a gas leak. That said, he and I were thinking that we should gift my mom and our other friend who can’t smell some portable gas “sniffers” (like this, for instance) as an added layer of assurance/protection (especially in my mom’s case, since she’s probably now going to lie awake at night worrying that there is a gas leak she not smelling, even now that her gas dryer has been ruled safe and repaired).
So my question for y’all: Do any of you have experience with these types of units? Are they reliable in general? (When we’ve called out PG&E because we thought we smelled gas, the technician has checked the house with a handheld detector, so presumably this technology can be good, but who knows what kind of units the utility uses? Not I!) Can anyone recommend a model? I searched for past threads on this but couldn’t find any (perhaps because there are so many candidate search terms… gas, propane, detector, sensor, sniffer…), but please feel free to redirect me if I missed something!
Read More12V RV interior lights as emergency lights
I continue to struggle with emergency lighting options. I have several but each has drawbacks.
Last night we were discussing the issue while enjoying the Aladdin lamps and the wood stove and hubby said, “What about 12 volt RV lights?”
Smacks forehead.
We maintain several 12V batteries on tenders at all times. One is a heavy duty deep cycle that sits under a coffee table in the house. It used to be life support for a tropical fish tank. We also have plenty of generator power for recharging. How could I not have thought of this?
I just ordered two wall/ceiling mount LED RV interior lights, declared to emit roughly 60 incandescent watts of light each, for about $50 the pair. We’ll know in a week or so how it works out.
Read MoreNo Grid Survival Projects book, has anyone tried it?
I’m tempted to order this, but thought I’d see if any of you have checked it out? Might be pretty basic stuff, but looks like he’s made it easy to complete his projects by referencing exactly where to get supplies.
It might be a good one to have on hand in the prepping library, if his projects seem legit.
Please chime in with your thoughts!
https://nogridsurvivalprojects.com/book/
Read MoreClip & Carry Gerber MP600 sheath review
So. I’ll start out by saying that I’ve had this sheath for about a year now, and carry it every day. I’ve never had a retention issue. I got a Gerber MP600 multi tool a year or so back, and I wanted a kydex sheath for it. After some research, I found this, and I’ve loved it ever since. I carry it IWB, so I can carry it if I’m in my farm clothes or my Sunday best.
Note: if a multi tool isn’t in your EDC, I highly suggest the Gerber MP600. I’ve put mine through hell, using it multiple times a day, nearly every day. I can’t recommend it more. I’ll leave a link for the sheath and the MP600.
Second Note: my dad has had the same MP600 for 10+ years, using it when he worked with the FD and when he had a lawn care business, and his is still kicking it!
MP600:
Sheath:
Read MoreHarvest Right Food Dryer review & notes
Last spring we invested in a Medium Harvest Right Food Dryer (“FD”) and various extras for a little over 3 grand. Hubby negotiated a good price with Harvest Rite with an upgraded vacuum pump and about 12 weeks later “FD” showed up in our driveway.While Harvest Rite has some vacuum and tech problems according to multiple posts on a Harvest Right/Other Food Dehydrator Fakebook group, our experience has been pretty positive overall. Since it IS 2023, we WOULD love to be able to see and use the controls via something like phone remote. Still, we’ve had a lot of fun trying new foods and processes.
It has upped our prepper game substantially, provided a way to share our pork with friends and family who are far away, brought our food waste to close to zero and increased our larder with food we love and plan to eat. We raised 3 pigs last year, and with our freezers full of over a quarter ton of pork, I was anxious about electric loss over a long period that could result is wasted meat. We started to cook and freeze dry that meat to share with others as well as stockpile. I jokingly tell people I am planning to “FD” enough meals so that I never have to cook again.
Amongst the items we’ve done – Puerco Pibil, pulled pork, pork sausage patties, pork chops pork liver and heart dog treats :)), ham, pork and beans, black beans, garbanzo bean humus, pea soup, soup stock, farro chicken soup, barley turkey soup, beef bean Chile, beef goulash, pasta bolognese, gravy, lamb gyro meat, red and green salsas, guacamole, corn tortillas as chips, egg frittatas, oatmeal, cream of wheat, shrimp, turkey, chicken, raw milk, breast milk, 1/2 & 1/2, coffee, coleslaw, green beans, sautéed mushrooms, asparagus, spinach, corn, mashed potatoes, potatoes au gratin (COSTCO and they ROCK!!) rice, varied, Indian and Thai meals, barbacoa beef, ice cream sandwiches, pumpkin pie, coconut ganache, pudding, skittles, apples, bananas, berries, mango pineapples, peaches, pears, asian pears, figs, top round, crab, lobster, cheesecake, eggs and more. Looking forward to doing some medicinal and seasoning herbs.
Some general hints from our journey -If you can afford an upgraded pump, get it. You might be able to cut a sweet deal if you call the company direct. If you don’t ask, I can guarantee the answer is no. In general, just ask. When it’s hot, put a fan on the pump to cool it off. As newbies, we ran the AC in the room the FD was in all summer. Our electric bill was ridiculous and now that we have several boxes of food, we agreed to not run the machine 24/7 this upcoming summer.We now just do a “natural” defrost instead of using electric ($) to defrost. We select “No Defrost” and leave the door and valve open. It takes more time but saves money.Extra trays and lids are super useful to have. We use the dividers, but the silicon liner sheets we rarely use, and instead use parchment paper for just the messy and greasy items.Use Tupperwares or glass jars for “tastes” and foods you will snack on right away instead of wasting the mylar bag and oxygen absorber.Raw meat is not as tasty as cooked, so we don’t do it anymore. If you can make it taste better, please share how…Chocolate and fat do not do well alone so we have modified their processing by either cutting the fat off, patting dry with paper towels or integrating into some other fibrous food/carbs.Lining and covering fatty and sugary items will save on clean up and absorb some of the fat. Shredded meat or crumbles seems to do better than big chunks.When using shiny metallic pens to mark mylar bags, write and let the package dry well or they could smear to unreadable. When we need to crush items to save space, we have a “crush person” with clean hands or use a paper towel to keep outsides of bag more hygienic . We keep a “pump bottle” of 70% alcohol to constantly sanitize our hands through processing.Use large resealable mylar bags or vac containers for items like dried fruit, oats, etc that you will eat often.Sometimes I used to waste half a bag or more of asparagus or green beans. Now I just cook the whole bag. We eat some and then the leftovers go straight onto the tray and then in the freezer. So easy.Pre-freeze liquids like broth, milk and eggs into the machine tray while its setting on a cookie tray IN THE FREEZER. Let it freeze solid. Pouring direct into the machine can be ok maybe, but moving liquid trays not recommended.
We keep a “FD LOG” by the machine to track what foods we did on what dates as well as oil changes and other maintenance. We used to log energy use and time info, but quickly lost interest and motivation in that and now just dates, foods and maintenance.
Being consistent with temperatures of each load and thickness of items in the freezer trays will insure better results, as will maintaining and keeping the machine clean and performing scheduled oil changes. If you are nerdy and full of money there is an app for checking the temp of the food via your phone. There are tons of online groups and YouTube videos to learn from. We especially enjoy “Retired at 40” FD videos and his products as well.
We figured our electricity added 6-10 bucks a load to the process cost, the bags and oxygen absorber packs, extra trays and lids and divider gizmos etc., add a tad more. You can also store product in clean canning jars, though for long term storage, you’ll want to add oxygen absorbers and vac seal and keep those items out of sunlight as sunlight, air and moisture are the major reasons for food spoilage. Some producers claim that their FD items will last 20-30 years!!Some “stupids” we’ve done – -not closing the drain valve when starting a load and the machine was beeping probably for hours not able to vacuum and stuck in beep mode-leaving the door closed for natural defrost and water mess all over-forgetting to push ‘start” button-not covering sweets or dab drying some meat very well and big ol Sugar or FAT EXPLOSION all over the machine
Since we are lazy, and canning requires some serious following of hygiene rules to maintain safety, our FD has been a great investment. Glass and cans are heavy, but the mylar bags are perfect for storage and transport. Many delicious food, easy quick meals and preserving foods that might become extinct are other reasons why will continue to use, experiment and share our food dehydration experiences.
The majority of the Freeze dried food we bought in the past is just not as yummy as our own foods or our friends’ Thai restuarant. Additionally some of the cost savings can be HUGE! Amazon has ONE ice cream sandwich for 11 BUCKS! Wal Marte has a TWELVE PACK for $2.62……I am concerned about items going extinct, skyrocketing prices, food insecurity and the fact that over 90% of the people I know are not prepared AT ALL! I would like to see at least one FD in every neighborhood. If you want one, but feel the cost is out of your budget, I would encourage you to investigate getting investors to help finance your machine as a social business (google social business/ Yunus to learn more about) or do an on-line fundraiser like kiva.org or a go beg me or organize a collective purchase with friends and/or family. As with all business arrangements, ESPECIALLY with friends and family, be sure to hammer out the details IN WRITING of location, costs, maintenance, use time and so on BEFORE you spend money on it. I for one will be glad to support you on this wholeheartedly in theory and possibly a tad financially if you hit me up at the right time, especially if you offer some kind of delicious premium.Happy Drying and HAVE FUN!!!
Read MoreWhich are the best all-around boots: combat, work, or hiking boots?
Not much of an outdoors person and I don’t know much about boots for a SHTF kind of thing. Would love to hear specific suggestions if you have them, but to get started I just wanted advice on what category to search through?
Read MoreSump Pump Kit: Keeping your basement dry (and your neighbour’s too)
(image credit: Magnolia Field Flooding by Doc Searls. Licensed under Creative Commons CC-BY 2.0)
It’s 2 am. Your neighbour bangs on the door. Their house is flooding, and their sump pump just broke. The hardware store is closed. Can you help?
..
If you live somewhere with a basement and water, you may use a pump to keep your basement dry. This kit contains everything needed to get water out of your house.
This kit may seem expensive, because you are buying a pump. But it’s cheaper than an emergency call to a plumber. And it’s cheaper than an insurance claim and a flooded basement.
A sump pump is a perfect example of something worth preparing in advance. When you need it, you *really* need it. And chances are – everyone else may too. Better to have a kit ready than to be part of the crowd, rushing to the out-of-stock hardware store during a flood.
How To Use It
Usually you want to send the water one of two places: into the storm drain system (in a city) or out onto the lawn or road. The farther away from the house, the better – at least 20 feet.
Note it is illegal in many areas to permanently connect your sump pump to the _sewer_ system (it should connect to the _storm drain_ system), including a floor drain. But in an emergency, if choosing between a floor drain and a flooded house – put the water wherever it needs to go. You can point the hose at the floor drain and remove water, if the hose is not long enough to reach outside of the house.
How To Store It
You have several ways to store this:
One Bucket, stuff sticking out. If you use a standard hose kit, it is unlikely everything will fit into one bucket. If you’re not concerned about being neat and tidy, this is the cheapest, easiest way to do it. You could also measure the hose length to your floor drain and cut the hose to save space. Two Buckets, one for hose, one for pump. If you coil it nicely, 20 feet of 1-1/2″ hose will juuust fit inside a 5 gallon bucket. Put the pump and other items into a second bucket. This lets you put lids on top, to keep it all together. You must carry two buckets around. One Bucket, smaller hose. If you buy an adapter, you can use a marine hose (strong garden hose) instead of a regular hose. This lets you fit everything in one bucket. The marine hose may be longer, but have a smaller diameter, so it will move water more slowly.Can I Really Use A Garden Hose?
You should *not* use a garden hose for a permanent setup. But in an emergency a hose will move water. It’s an option.
I spent twenty hours of research and one hour of testing creating this kit. I found a dozen people online and one person in my real-world prepping circle who have used (real life) or claimed to have used (online) a pump with an adapter and garden hose. I called three pump manufacturers and two plumbers to ask about pumps, PSI, and setup. All of them recommended *NOT* using a garden hose as your permanent pump setup.
A garden hose or marine hose has a smaller diameter, so it will move the water more slowly.
Your first bet should be the main discharge hose that is sized for your pump.
But if you want to buy a $15 adapter, you can.
References
https://www.bobvila.com/articles/best-sump-pump/ https://www.ag.ndsu.edu/waterquality/documents/check-you-sump-pumps-now https://diy.stackexchange.com/questions/164984/sump-pump-ok-to-reduce-1-5-to-3-4Related Threads
https://theprepared.com/forum/thread/protecting-homes-from-water-infiltration/ https://theprepared.com/forum/thread/flood-barriers-alternatives-to-sandbags/ https://theprepared.com/forum/thread/prepper-home-safety-how-to-prevent-and-avoid-accidents-in-the-home-during-a-crisis/ Read More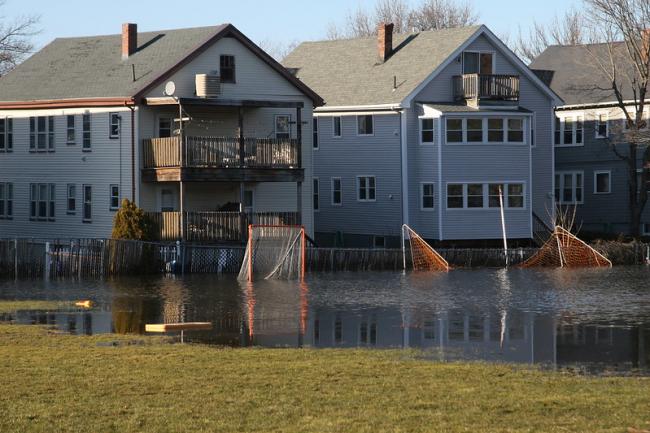
Prepping with infants?
So, I’ve decided to start prepping. I’ve been reading all these articles bout prepping and gear. I’ve even read how to prep with kids but I’ve found nothing about prepping with infants. And so I don’t even know how to start prepping with infant.
Read MoreHelp me decide on a portable generator. Single fuel but fuel injected or tri fuel with a carb?
Alright I’m ready to pull the trigger on a new electric start 11000 watt portable generator…but I have to choose one over the other of two possibilities. #1 is elect start, fuel injected so no carb to worry about…but is only gasoline powered. #2 is same brand, same wattage but with typical carb and is tri fuel…gasoline, nat gas or propane. So there’s trade offs. The tri fuel version is also $200 cheaper. I did the generac whole house estimate which came back at $10, 790. YIKES! There will still be some electrical contractor expense as I’ll get them to put in that sub panel so I can plug this portable in. I have a nearly new generac 3500 watt portable I’ll be selling so I can recoup part of the purchase price. So….which would YOU consider? Single fuel but fuel injected or tri fuel with a carb? I have a torn rotator cuff with damage so pull starting ANYTHING is out of the question now. So I’ll be selling the new chain saw, weedeater and generator.
Read MoreTesting 8 methods to make the best cotton ball and vaseline fire starter
Last year I saw a forum post by Matt Black about a new way to combine vaseline and cotton balls to make an even longer lasting fire starter. His post encouraged me to test my own DIY fire starters and I found out that they all were pretty much garbage and useless. Over a year later I finally am going to take the time to get some decent fire starters for my kits.
I wanted to test out various methods of creating vaseline cotton balls that I have seen online and find out what would be the best method for my long term strategy.
Here’s the various methods I wanted to test. As you read this, place your bets on what method you think will be the best and then read the results and see if you were right.
#1- A bare cotton ball straight from the pack.
#2- A bare cotton ball that has been unrolled to create more surface area.
#3- A cotton ball that had petroleum jelly smeared over ¾ of the ball. The thought process here is that the uncovered ¼ would give you a clean area to grab and a place to catch a spark.
#4- A cotton ball that had petroleum jelly smeared over the entire ball.
#5- A cotton ball that had petroleum jelly smeared over the entire ball and then was dipped into a bowl of flour to prevent the outside from getting all vaseliney, making it cleaner to handle.
#6- A cotton ball that had petroleum jelly smeared over the entire ball and then was dunked under water to see the waterproof ability of this fire starting method.
#7- Following the strategy of Matt Black and melting petroleum jelly and then dipping the cotton ball briefly into the jar of melted vaseline.
#8- Same as #7, but instead of a quick dunk this one was completely soaked until it could no longer hold any petroleum jelly.
I went outside with this tray of cotton balls and used a ferro rod to try and light them. It was a fairly windy day so the cotton balls were really put to the test on their ability. I started a timer once the cotton ball caught flame and then stopped it when the flame was entirely extinguished. + or – 5 seconds to each time below due to human ability of having to strike the fire and then move my hand to my watch to start the timer.
Here are the results:
#1- Bare cotton ball – took 5 strikes of the ferro rod to catch it on fire. It burned for 30 seconds
#2- Unraveled bare cotton ball – took 5 strikes of the ferro rod to catch it on fire. It burned for 30 seconds.
#3- ¾ covered ball – took 3 strikes to light and burned for 3 minutes.
#4- Fully covered ball – Couldn’t get started after 10 strikes. Opened up the ball and exposed the dry cotton inside which then caught a spark. Burned for 3:45 minutes.
#5- Flour covered ball – The flour did help keep from sticking to fingers but after 10 strikes it wouldn’t light. Had to open it up and my fingers got all petroleum jellyish anyways. So flouring your cotton balls didn’t help much after all. The burning flour didn’t smell good, but the cotton ball dipped in flour lasted for 4 minutes.
#6- Wet vaseline ball – Poured an entire 12oz water bottle over it. Was too wet and wouldn’t light even when opened up and held over a flame of a lighter for 10 seconds. This shows that the vaseline doesn’t make these waterproof and you need to keep your tinder dry.
#7- Ball quickly dipped into melted vaseline – By far the best by a long shot! It wouldn’t catch a spark from a ferro rod until it was opened up and exposed to the dry cotton inside but once it caught, it burned incredibly strongly and brightly for 9 minutes! Even if you don’t need the full 9 minutes of burn time, the force and strength of the flame was 4X that of the #4 fully covered ball.
#8- Ball completely soaked into melted vaseline – Vaseline will not light if held to an open flame, making it a very safe fire starting method. #8 was so completely soaked through that it was more petroleum jelly than it was cotton ball. Even being held over the raging flame of cotton ball #7 for 10 seconds, #8 would not light at all. If your cotton balls become too soaked, they will not work.
The clear winner was #7, the ball quickly dipped into melted vaseline.
To melt the vaseline, I used Matt Black’s double boiler method. I placed a used and cleaned out soup can into a pot of boiling water and scooped a couple spoonfuls of vaseline into it. I placed the quickly dipped cotton balls onto a sheet of wax paper to allow them to dry and harden back to room temperature. Another benefit of this quick dip method is that the cotton balls are actually less sticky than ones where you just smear it on the outside, which is a complaint people have about making these.
I used about ⅓ of the 3.75oz container of vaseline to run all of the above tests, with a majority of that third going to the melted vaseline balls #7 and #8. Doing this melting method isn’t the most “fuel efficient” and uses more vaseline, but it does produce significantly better results. The jar of vaseline was $1 and the 400 jumbo cotton balls were $2. This is an extremely cheap fire starting method and I highly recommend taking the extra time to melt the vaseline and quickly dip the cotton balls in it.
How do you store your vaseline cotton balls?
Many people recommend using old prescription pill bottles but I like using small snack sized ziploc bags. It allows for a lighter, more compressed storage, and even more waterproof than a pill bottle.
Another idea I had was to unroll a cotton ball into a strip, like #2, and smear the cotton strip with vaseline. I then cut up a clear drinking straw, crimped the end and sealed it with a lick of a lighter. ½ of a vaseline coated cotton ball is able to fit inside of a ⅓ straw. I thought this method would be nice to throw in an EDC pouch or have a very small fire starter anywhere you want. The straw keeps it waterproof and protected.
Hope this all was helpful to someone.
Read More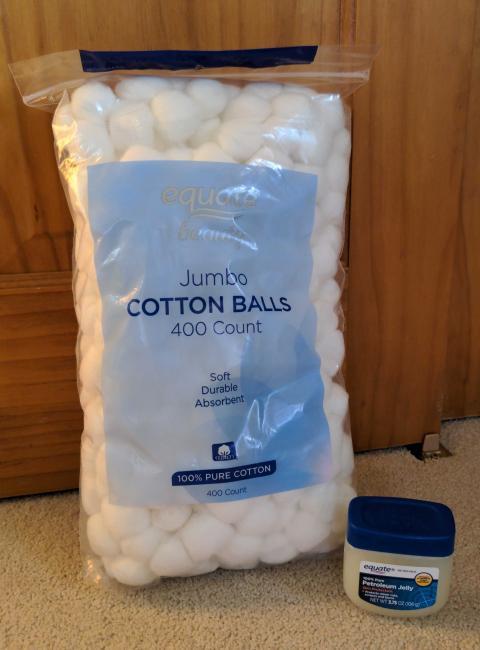
Preliminary review of EcoZoom Versa rocket stove
First Impression: I am going to LOVE cooking on this stove!
I just got this thing this afternoon and could not WAIT to try it out.
It is small enough to fit perfectly on my Dutch oven table, which “lives” on our covered wooden deck. I thought I’d have a lot of safety concerns about burning this device on the deck but now – with all due caution of course – I do not. I think my most important impression is that it seems virtually windproof. The fire is thoroughly protected within the body of the unit. The metal table also has a wind screen. I don’t have another outdoor cooking device that is this likely to survive a windy cooking session.
I was nervous about starting with wood, but I wasn’t getting any usable heat out of six charcoal briquettes after 20 minutes (too far below the grate – more briquettes would have done the job, but the the object of this device is to be able to cook with scrounged materials). So I broke down and fed three skinny sticks of fir kindling into the firebox.
It smokes quite a bit until it warms up and really starts to draw, after that it was smokeless.
After putting the kindling in, it took about 20 minutes to heat a quart of water to boiling. (Oh, it was 40 deg F outside). Closing the lower draft door brought the temperature back down to a simmer, but it took a little while. I’ll be using one of my heat diffusers with it, probably.
My three little sticks of softwood kindling burned for 45 minutes. Yes, it does need to be tended.
The fire never crept out of the fire box. It did not burn the wood sticking out the door.
The cooking surface is pretty neat. There are ridges that hug the bottom of the pot and stabilize it.
If I could have anything, it would be some sort of lid to help snuff the fire, along with closing the doors.
I absolutely LOVE this stove. My next experiment will be with hardwood kindling, perhaps varying the number of pieces. (The sticks in the picture were about 1″ diameter and a foot long.) Then probably scrounged sticks which are plentiful here.
Barbecue tongs and gloves are useful. It will be a little while before I can actually cook on it, but my inner Outdoor Cook says this stove is a winner.
Read More![20221128_151515[1]](https://theprepared.com/wp-content/uploads/hm_bbpui/99375/aufawg9d99vuh4joeje8b3d32qlw6r07.jpg)
What to attach to a Plate Carrier
I’m thinking of getting a plate carrier and some level III+ body armor, but want to plan out what gear I will attach to my plate carrier because that will heavily influense which one I get.
I want to have a small ham radio, at least two AR15 mags, and two glock mags attached.
What do you have attached to your plate carrier? What does your ideal setup look like?
I’d love to see pictures of your setup if you could snap a quick pic.
Read MoreLiving off a Datrex ration block for 2 days
Before investing the Datrex lifeboat ration block to my bug out bag, I wanted to see if I could even stomach the taste and if my body would do well on it. Putting my body out there for science, I only ate these rations for two days. Well, I’m proud to announce that I survived and am writing this now.
The ration block was easy to tear open using the ‘Tear Here’ line at the top. Inside you could see that the packaging is a foil material which looks to be airtight. Cookies are individually wrapped in tight plastic wrap and two are the same length and width as a playing card and are about ¾ of the height.
The cookies were extremely crumbly, so make sure to collect all those crumbs and not waste them. The flavor was very subtle which I liked and if I had an upset stomach I could probably still eat these. To me, they tasted like a soft, crumbly, powdery, dry, graham cracker. They were very dry in texture and taste, but surprisingly not thirst promoting like you would normally think with dry foods.
The instructions on the packaging say that if you were on a lifeboat at sea, to eat one bar every 6 hours, which equals out to 800 calories a day. There are also instructions for an emergency on land and it says to eat one bar every 4 hours which equals out to 1200 calories a day. That makes sense because you most likely are burning more calories on land than if you were sitting in a lifeboat.
For my experiment, I wasn’t going to wake up every four hours though to eat a cookie, and I wanted to maintain my about 1700 calorie per day diet as to not stress out my system too much. Here are the options I thought about running:
S o every four hours that I am awake, I need to eat 2 cookies to get 1600 calories a day. This is an example of crunching the numbers and trying the product before you need to rely on it. Depending on the situation, you may just want those few calories to survive, and if you were not in a dire circumstance then you probably could splurge a little more like me and maintain the amount of calories you are used to.
It felt I was in a futuristic sci-fi movie where they get their nutrient pill ration. I enjoyed these past two days though, no cooking, cleaning, or time spent eating. It took me about a minute to eat two cookies and I was done. The ingredients and nutritional value is very low so this isn’t going to be a regular meal, but it was nice for two days.
About 30 minutes after each of my little meals I would get a sudden burst of energy that would last for for about 3 hours. The 30 minutes before my next meal would seem like a drag. This implies to me that these are fast burning carbs and give you a lot of energy for a short period of time. Probably another reason why they space them out every 4 hours.
I was craving some homemade potato fries cooked in the oven coated in coconut oil. I don’t know what that means, but I think these Datrex cookies are fast burning and my body needs more slower burning fuel from fat. These cookies were great for breakfast and lunch, but come dinner time I wanted some real food. I probably will store a few multivitamin pills along with future Datrex ration blocks to even out the nutrients.
I was glad to have this experiment over and to go back to normal food. I could go more days on just Datrex, but I just feel better with more variety. That gives me a thought to not only have these ration blocks in a bug out bag but also include some variety granola bars to vary things up. I am glad that I did this experiment and have more confidence in my future preps.
Read More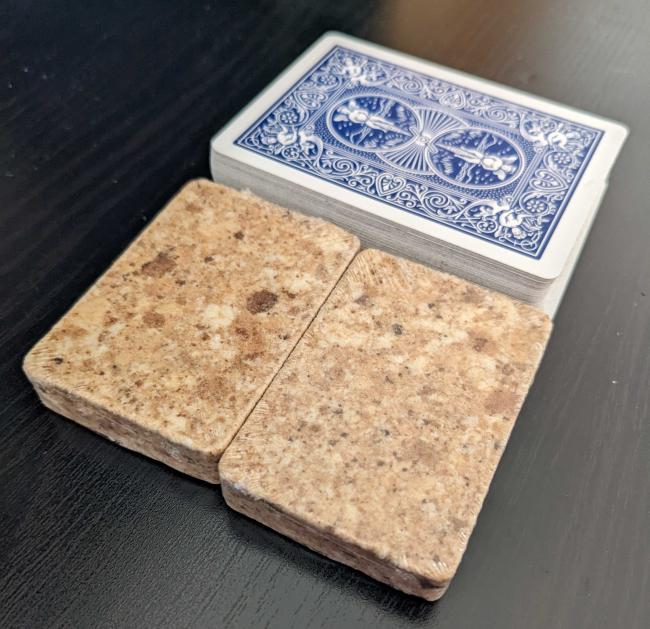
Winnerwell Nomad camp stove
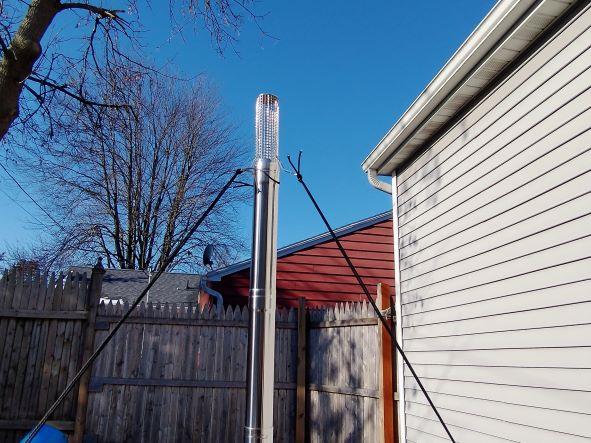
One of the gaps in my prepping was that I never learned how to start a fire, keep it lit, use its warmth, put it out, and manage the ashes. Someone here mentioned the Winnerwell Nomad camp stove (thank you), so I bought it and recently used it for the first time. I bought the small version, along with a fireproof mat and the “water tank” that nestles against the chimney.
It’s compact and easy to assemble. I liked the three eyelets on the spark arrestor for attaching guy lines to tent stakes to keep the chimney steady in the wind. I used my own cords and tent stakes, not ones from the company.
Its small size meant that the only wood able to fit in it was kindling that I chopped in half or dried stems of a shrub. I need to figure out how to shorten standard size split fireweed. I tried using my Sawzall, but the firewood bounced around, so I quit.
I got interrupted and had to stop the process the first time and start it later. The water in the tank didn’t get super hot during the time I spent with the stove, but it was hot enough to make tea.
I made the mistake of apparently touching the chimney while wearing synthetic fiber gloves and burned holes in the fingertips. I have a melted mess on the back of the chimney. It’s broken in now! I did not burn myself. I learned these are not the gloves to wear while using a wood stove.
I think that I will like the stove. I need more practice lighting fires and keeping them lit. I need to figure out how to reduce the size of standard firewood to fit in the stove. I need to figure out how long it takes to heat water, maybe cook an egg, or heat soup. I need to obtain more wood. I need to figure out how to anchor the guy lines if the ground is frozen. Maybe retaining wall pavers? Then I need to keep three of them where they don’t freeze and get covered by snow. I need to figure out what to do with the ashes.
Once I get more comfortable with this controlled fire, I plan to practice making a campfire in a portable metal fire pit. One step at a time.
Read More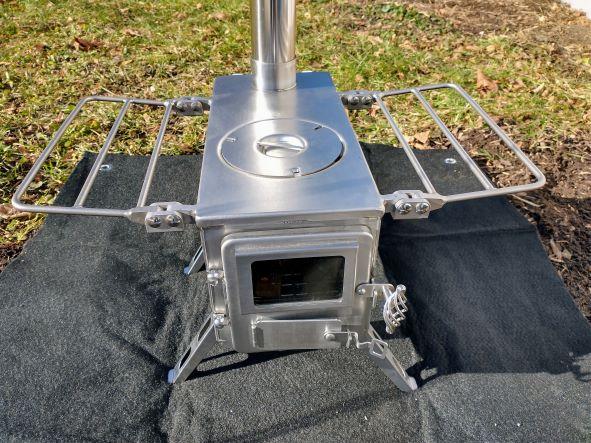
How to prepare with pets
I’m fairly new to prepping (I’d been thinking about it for a good while, but the pandemic combined with world events really kicked things into gear for me) and while I have a solid go bag and a plan in case I need to leave the city with my two kids – I’m at a complete loss with regards to how to prepare for travelling with my cat. I don’t drive, and even though my partner does, I don’t want to rely on that necessarily, so all of my plans are based on walking to my folks’ house in the country, a journey that could potentially take 2 days. Anyone in a similar situation? What do I need to keep my cat safe and warm in an emergency situation that could involve camping overnight?
Read MoreCooking in a haybox – a fuel efficient way to slow-cook your meals
This has been discussed a little before, but I’ve got a “new” resource to share in the form of a 1909 online booklet: https://archive.org/details/firelesscookbook00mitc/page/n7/mode/2up “The Fireless Cookbook”. The Haybox is a type of thermal cooker that only requires fuel for the initial boiling of the food. The container of boiling food is placed inside a box filled with hay or other insulating material and allowed to slow-cook for a few hours. I’m just about ready to give it a try. Bought an excellent heavy duty box from the UPS store and have a supply of hay. Just need the time to get all set up. I’ll start with some dry beans, which are notorious for their long cooking time/fuel consumption.
I’m pretty interested in this method because most of our power outages occur in foul weather and my cooking resources would otherwise all be mainly outdoors.
Read MoreWAPI – Skip boiling and make water safe with less fuel
I was watching a video on water treatment and came across something I had never seen mentioned. It’s an indicator that shows when the water is safely pasteurized without the need to bring it to a full boil. It’s tiny, light, and will save a ton of fuel. It would really extend the fuel in a BOB and still be useful to have around even in a bug in situation.
Link to the video with the explanation (the whole series is worth watching): https://youtu.be/rIMeq0c7rJM?t=877
Product link: https://www.amazon.com/dp/B00F7104EY/
Read MoreRambo style survival knife or multitool?
Standard recommendation is a full tang, 4″ blade (or more). I have several, including a nice KaBar, but I think a quality multitool is even more versatile. Way back when, I carried an SAK, which served well in youthful escapades, but I changed to a Leatherman PSK when they came out, and I now have several L tools. My current normal EDC is a Skeletool CX, but I will also carry a fully accessorized Wave on occasion.
Having gadgets like saws, screwdrivers, and pliers can be really useful, even when the blade is a folder. I have never experienced a problem.
It is best when preparing for specific situations, to choose the most suitable items, but for general use I am quite happy with a multitool.
Heresy, I know. Please comment….
wav
Read MoreWhy won’t canned heat boil my water?
I’m preparing for a winter power outage. Some of the food I bought is prepared with boiling water, and I want an emergency cooking option in case there’s a problem with my gas. I was considering using a butane camping stove, but I heard butane canisters don’t work when it gets cold. Since my building uses electricity for heating, it will most likely get cold, so I think trying to use butane might be a bad idea.
I decided to try using canned heat and a Coghlan camping stove to boil water. I had 3-4 cups of water in my pot, and I waited for 20 minutes after lighting the canned heat, but the water didn’t boil.
Is canned heat a bad option for boiling water in an emergency, or am I doing it wrong? Would the brand of canned heat or type of pot affect this? In case the type of pot would affect this, I used a regular stainless steel pot from my kitchen. Is there a better option for indoors emergency cooking at cold temperatures? I considered using a propane stove, but I haven’t seen any that aren’t designed for outdoor use. Read MoreWays of heating a MA apartment without electricity?
I am prepping for a winter power outage in Massachusetts. I live in an apartment with central heating that depends on electricity, so I need a way to keep warm when the power goes out. Looking at the article about emergency heating, it seems that a portable propane heater is recommended for indoor heating. However, I don’t know how to effectively prevent carbon monoxide buildup while using one indoors. Another concern is that I heard that it’s dangerous to store propane indoors, and I’m pretty sure someone will steal my propane if I leave it on the porch. So, I have a few questions about heating my apartment without electricity:
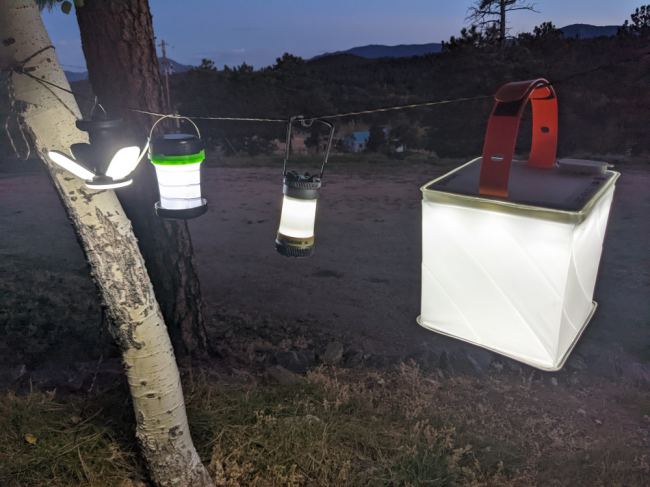
Would I realistically be able to use a portable heater in my apartment without dying from carbon monoxide? Would cracking open a window provide enough ventilation without the risk of carbon monoxide buildup, and how possible is this during a snowstorm? How would I store the propane? What’s the most cost-effective way of prepping for at least 2 weeks when using a propane heater? Assuming that a 1 lb propane canister lasts 6 hours, I would need a lot of canisters to heat my space for 2 weeks. Other than using a propane heater, what would be some other ways of keeping my space warm? Read MoreA comparison of four electric lanterns under $75
This is a quick review of four electric lanterns you might want to consider.
LuminAID PackLite Titan 2-in-1
Stats:
300 Lumens 4000mAh battery 12.5oz White and red light modes High, medium, low, very low, and SOS modePros:
The small solar panel actually does charge this lantern. While it is recommended to have dedicated lanterns, solar panels, and power banks, if you were hard set on only having one product and were going to use this in your home preps, the LuminAID PackLite Titan could be a good option. Provides room filling light in both white and red colors. This does feel like a premium item and isn’t a cheaply constructed product. Can charge android tablet, cell phone, or gaming console and power light at the same time.Cons:
Buttons are hard to see in the dark and difficult to press because they are not raised up very high. I don’t see many use cases for the very low and SOS settings. Not sure of how durable or rip resistant the plastic fabric is. If you throw this in a pack a sharp cook set or knife could slice it and while it still will diffuse the light, it might expose the electronics inside to moisture. Keep it wrapped in a shirt or bandanna to solve this. There was a strong plastic smell for the first three days of using it that smells like pool water wings that toddlers use.Survival Frog Pocket Light 3.0
Stats:
Unknown lumen 1200mAH battery 5.75oz 4 modes – high, low, SOS (strobe), and flashlight modePros:
Compact for storage and travel, large for use. Lightweight. Because of the diffusion material that the lantern uses, the normally harsh white light was actually very nice to read and work by for a long time. Great job Survival Frog from moving away from that crinkly plastic diffuser that many pop-up lanterns use, this fabric mesh is a much better solution.Cons:
Unknown how well the solar panel works because there is no battery life indicator, but guessing not very well. The SOS mode is more of a flashing strobe light that hurts your eyes.Survival Frog QuadPod camping lantern
Stats:
700 lumens 2400 mAh battery 8.8oz 6 lighting settingsPros:
This really is a great camping lantern. The many settings and adjustable angles make it so you can light up any situation. Glow in the dark button and USB dust cover A very bright room filling light.Cons:
USB dust/water cover doesn’t stay in place very well Doesn’t seem like it would survive too many drops onto hard surfaces before cracking. The solar panels are so small that they don’t do anything. I left this lantern in the sun for three full days and it didn’t get any more charged during that time. The SOS mode is more of a flashing strobe light that hurts your eyes.Streamlight Siege X
Stats:
300 lumens 2600 mAh battery 7.2oz White and red light modes 7 lighting modesPros:
Durable and small Uses the popular, replaceable, and powerful 18650 battery.Cons:
Although the red light is a welcome feature, it is rather dim and not very useful.Summary:
Best shelter in place at home lantern: luminAID Titan
Best collapsible and nicest looking light: Survival Frog Pocket Light
Best lantern for camping: Survival Frog QuadPod
Best bug out bag lantern: Streamlight Siege X
https://youtu.be/rrXykQQDv0E
Video review showing a close up of how the lanterns are constructed and function along with seeing the brightness levels and various settings.
Stress testing
To simulate these lanterns being left out during a cold winter night, the lanterns were sprayed down with a hose for 30+ seconds and then left in the freezer over night. They all survived the rain and freeze test, but the two lanterns by Survival Frog did get water inside of their housings, so they aren’t very water tight and it may not be the best to leave you lanterns out when it rains.
https://youtu.be/7rjo3zZ0IvM
Read More