Cooking in a haybox – a fuel efficient way to slow-cook your meals
This has been discussed a little before, but I’ve got a “new” resource to share in the form of a 1909 online booklet: https://archive.org/details/firelesscookbook00mitc/page/n7/mode/2up “The Fireless Cookbook”. The Haybox is a type of thermal cooker that only requires fuel for the initial boiling of the food. The container of boiling food is placed inside a box filled with hay or other insulating material and allowed to slow-cook for a few hours. I’m just about ready to give it a try. Bought an excellent heavy duty box from the UPS store and have a supply of hay. Just need the time to get all set up. I’ll start with some dry beans, which are notorious for their long cooking time/fuel consumption.
I’m pretty interested in this method because most of our power outages occur in foul weather and my cooking resources would otherwise all be mainly outdoors.
-
Best Replies
 Barb LeeContributor
Barb Lee
- April 2, 2022
Barb LeeContributor
Barb Lee
- April 2, 2022
My hay box is ready for a trial run. It is a 20x20x20″ box from the UPS store, very sturdy. Pot is a 4 1/2 quart copper bottom stanless steel, about 9″ across and 5″ tall. The box is large enough for a 6 quart pot, easily. Top insulation is a couple of deck chair cushions (saves me making something for this experiment!) Handiwork has been thoroughly inspected by the chief box inspector. I’ll try some beans in it tomorrow.
![20220402_121704[1]](data:image/svg+xml,%3Csvg%20xmlns='http://www.w3.org/2000/svg'%20viewBox='0%200%20487%20650'%3E%3C/svg%3E)
![20220402_121755[1]](data:image/svg+xml,%3Csvg%20xmlns='http://www.w3.org/2000/svg'%20viewBox='0%200%20650%20487'%3E%3C/svg%3E)
![20220402_122116[1]](data:image/svg+xml,%3Csvg%20xmlns='http://www.w3.org/2000/svg'%20viewBox='0%200%20566%20455'%3E%3C/svg%3E)
- Gideon ParkerStaff
Gideon Parker
- November 14, 2022
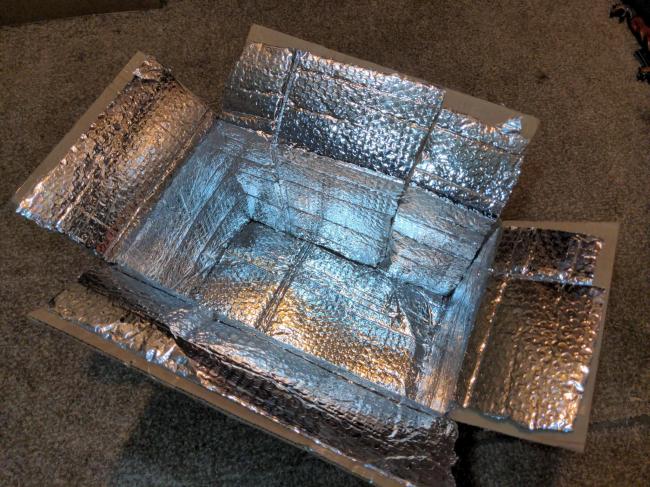
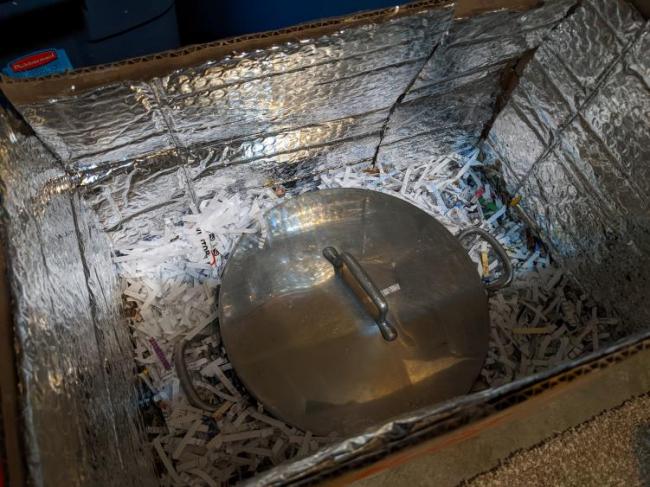
Finally got around to making a haybox out of office supplies! Using a cardboard box, lined with bubble mailers, and shredded junk mail I had the makings of an urban haybox.
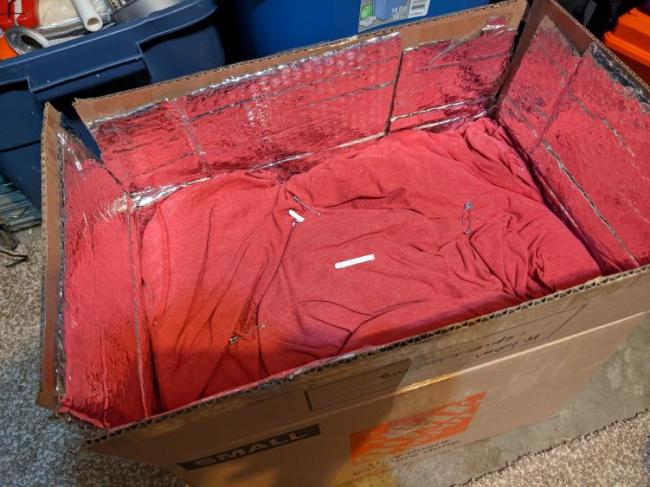
For the little topper I took an old Tshirt and safety pinned the arms and neck shut and stuffed it with more paper shreddings, that way I could lift it up easily and not have paper all over the top of the pot.
I decided to make a chili that normally is cooked on a simmer for 40 minutes (a long time to have a flame going) and with the haybox version just brought it up to a boil for one minute and then transported to the haybox for 8 hours to slow cook from the residual heat that was inside.The celery was a little crispy, meaning that it didn’t cook as thoroughly as it would have been on the 40 minute simmer. But it was the perfect temperature to go from pot to bowl after 8 hours and I didn’t have to sit there and blow on my food for 5 minutes just to be able to eat it.
Cooking this way gave me a new appreciation for this way of living. It was weird making dinner in the morning to allow for the 8 hours to slow cook and it involved quite a lot of planning and prep work that I wasn’t used to doing. I appreciated learning a new skill and if there ever was a scarcity of utilities, I probably would turn to this method of cooking more often.
Another use case I can see with this is a way to keep dinner warm if your family is scattered and is arriving home at various times. Instead of keeping it on the stove on simmer or putting it away in the fridge only to be taken out and reheated, you could just slide the pot into the haybox to keep warm to eat many hours later and it will be the same temperature.
Below is the recipe for us to add to The Prepared Cookbook, which hopefully I’ll be able to start on here soon 🙂
Texas-Style Chili
Serves: 4
Prep: 20 minutes
Normal Cook: 40 minutes
Haybox Cook: 8 hours
Ingredients:
- 1 lb. ground beef
- 1 package of beef hot dogs chopped or pork chop cut into cubes
- 1/2 cup onion finely diced
- 1/2 cup bell pepper finely diced
- 1 cup peeled zuchinni finely chopped (or skip these because zuchinni is nasty)
- 1 cup celery finely chopped
- 3 tablespoons minced garlic
- 1/2 cup diced tomatoes
- 3 tablespoons bacon fat
- 2 cups bone broth
- 1 tablespoon apple cider vinegar
- 1/2 tablespoon coconut aminos
- 1 teaspoon worcestershire sauce
- 1 tablespoon chili powder
- 2 teaspoons smoked paprika
- 2 teaspoons cumin
- 1 teaspoon oregano
- 1/2 teaspoon black pepper
- 1/4 teaspoon chipotle powder
- 2 teaspoons garlic powder
- 1 teaspoon onion powder
- 1 teaspoon salt
Instructions:
Brown the beef in a large pot or dutch oven. Add the chopped hot dog/pork. As the meat is almost browned add all the vegetables and cook until soft. Add the liquid ingredients and stir. Add the dry ingredients and stir well. When cooking normally, bring to low heat and simmer for 40 minutes. If you are cooking in a haybox, bring to a boil for 1 minute and then transfer to the haybox for 8 hours.
![20220402_121704[1]](https://theprepared.com/wp-content/uploads/hm_bbpui/81014/dune84zivjmvcv27up5j9lhtl8u8zsae.jpg)
![20220402_121755[1]](https://theprepared.com/wp-content/uploads/hm_bbpui/81014/3f5fg0xawpasd9ghtp1nyjlqigiz1q7l.jpg)
![20220402_122116[1]](https://theprepared.com/wp-content/uploads/hm_bbpui/81014/3hmwb9s643y798pj88jnp732jqi9i136.jpg)
 I decided to make a chili that normally is cooked on a simmer for 40 minutes (a long time to have a flame going) and with the haybox version just brought it up to a boil for one minute and then transported to the haybox for 8 hours to slow cook from the residual heat that was inside.
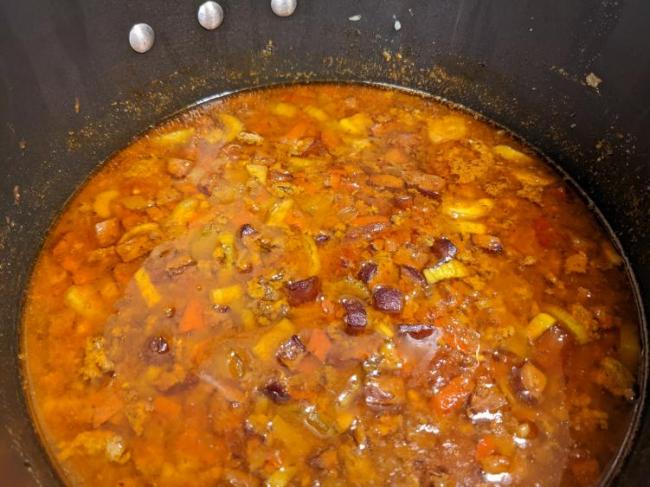
-
Comments (61)
-
JennyWren
- April 1, 2022
What a cracking book! I’ve downloaded it to read at my leisure. I have a number of old timey books like this. We can still learn a thing or two from these resources.
I’m a big fan of Project Guttenberg.
-
Barb LeeContributor
- April 1, 2022
So glad you like it JennyWren. Thank you for your haybox experience shared on a previous thread. I think the recipes are going to be really helpful. It immediately pointed out a mistake I was making yesterday when I was going to start a pot of beans in it…not enough water used in the pot to create and sustain the necessary heat.
Perhaps you may have seen a couple of really wonderful BBC documentaries on YouTube, one entitled Wartime Farm and another entitled Wartime Kitchen and Garden. Both are outstanding reenactments of WWII challenges of keeping the British population fed when being blockaded during WWII. Astounding resilience. Many things to learn there, including two presentations of haybox cooking.
-
JennyWren
- April 1, 2022
Oh I have indeed. Harry Dodson and Ruth Mott are heroes of mine. I have the books from the series as well. They also made a series called the Victorian Kitchen and Garden, there are some truly weird, wacky and absolutely inspired methods of growing and cooking.
-
Barb LeeContributor
- April 1, 2022
Hopefully we’ve inspired some others to look up these worthy documentaries!!
-
Alisa Felix
- April 1, 2022
You’ve inspired me! I’m going to check them out now.
-
-
Alisa Felix
- April 1, 2022
This is along the same lines of the forum post I just made about staying warm by using a hot water bottle. The concept is similar, boil some water and use the heat over a long period of time through insulation.
I hope you post some more results when you have cooked a meal or two in your haybox.
-
JennyWren
- April 2, 2022
The wartime Farm is another series I have watched and love. I had a bad dose of cooker range envy when Ruth Goodman fired up that paraffin stove!
Ruth, Peter and Alex have made a number of historical series that a full of information that we as preppers could well make use of. Mainly of farming through the ages.
-
Michelle_B
- April 11, 2022
Jenny,
I have seen every one of their shows and read all of Ruth’s books, and I completely agree with you; there is so much information for us in there. Wartime Farm was great for cooking efficiently, and was where I first learned about hay box cooking.
-
-
Amy S.
- April 2, 2022
This is fascinating — Thank you for the link as I really enjoyed taking a quick look at the book and intend to go back and read it in more detail later. I love the idea of a low tech/fuel method to slow cook and I am wondering if this type home made thermal cooker would be superior to the vacuum insulated stainless steel pots that are available? On-line, I see several types, such as the Stanley camp crock. I hadn’t previously considered what a nice way this might be to prepare steel cut oats overnight. Or how handy it might be to have one of these to keep foods hot enough for a second meal without letting the food temperature get down to the food safety danger zone. This is going to be a fun project for me to explore.
-
Barb LeeContributor
- April 2, 2022
I think the biggest advantage to the old style is that you can scrounge just about everything and build one for free, or nearly so. But new tech is usually more efficient! And less bulky, for sure. One of the points stressed in the booklet is that if you open the box prematurely to peek, you going to have to put the kettle on to boil again, before closing the box back up. So, with the expenditure of a little more fuel, you could probably return the kettle to the box, to warm for another meal. All sorts of tempting experiments!
-
-
Gideon ParkerStaff
- April 2, 2022
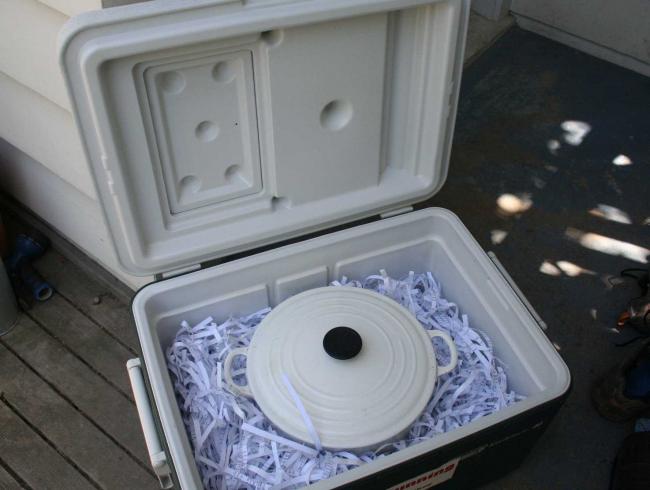
I am excited to see your results! I wanted to learn more about haybox cooking and was looking up some pictures.

Here’s what a traditional one probably looks like full of hay

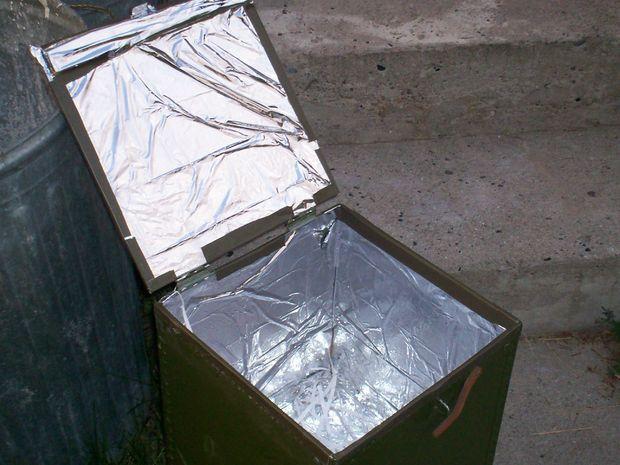
I thought this was very creative and a 2022 urban solution to a very old cooking technique. I’m actually going to save my paper shredding and try this out with you at the same time.

Lining the box with foil is a smart idea to reflect the heat back towards the food.

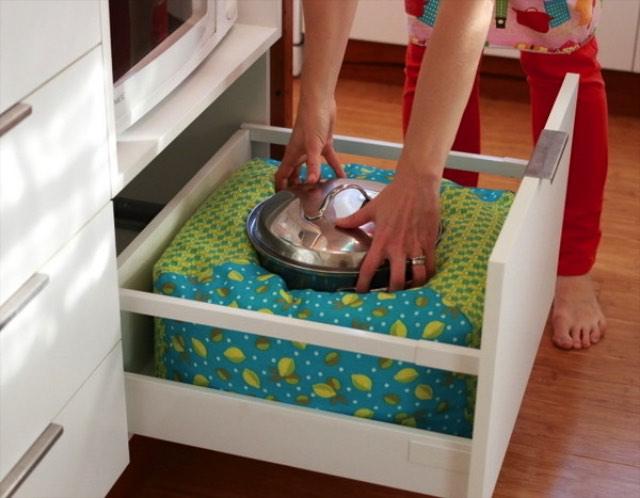
And in this article, they made a permanent installation in their kitchen drawer, place the pot down into it, and then place another layer of insulated fabric on the top. Creative!
-
Barb LeeContributor
- April 2, 2022
Brilliant! And you can use just about any “found” materials to make one. I hope this works!
Paper shredder! It never even crossed my mind! Lots less dusty, and hypo-allergenic, too.
-
JennyWren
- April 3, 2022
I’ve just been looking at the link, and I have had an epiphany! I have an old round laundry basket that is redundant, soooo I’m going to make a ‘wonderbag’ to fit it. Will have to wait til payday, but I’ll keep you posted.
-
-
Barb LeeContributor
- April 2, 2022
My hay box is ready for a trial run. It is a 20x20x20″ box from the UPS store, very sturdy. Pot is a 4 1/2 quart copper bottom stanless steel, about 9″ across and 5″ tall. The box is large enough for a 6 quart pot, easily. Top insulation is a couple of deck chair cushions (saves me making something for this experiment!) Handiwork has been thoroughly inspected by the chief box inspector. I’ll try some beans in it tomorrow.
-
Gideon ParkerStaff
- April 2, 2022
Those deck chair cushions fit nicely. Are you using those rather than just covering it up with more hay to make it easier to access?
Should work, given the chief box inspector’s seal of approval. Need to get me one of those….
I have a cast iron dutch oven that I will probably try for mine, do you think that would work well?
-
JennyWren
- April 2, 2022
Hi Gideon, Dutch ovens work very well.
Oh and your chief box inspector is slacking….mine would have made himself comfortable in there long before I had a chance to put anything in it 🙂 LOL.
I’m really looking forward to your results DP.
-
Barb LeeContributor
- April 2, 2022
LOL! I was hurrying to get it closed up!
-
Barb LeeContributor
- April 2, 2022
Gideon, trying to dig the pot out of loose hay would be extremely messy! So it seems the majority of literature I’ve read (including the little 1909 book) favors insulation inside a cover for the top. You could probably lay a sheet over the kettle, fill it with hay, and fold the sheet over the resulting pad. But I get the impression that time is of the essence when putting the boiling pot in the box. The booklet says to have the box right next to the stove so there’s no delay.
Of course the book is trying very hard to assure success for the user. The videos I’ve watched aren’t nearly as fussy.
I had been debating about a Dutch oven, but I see JennyWren answered the question! A Dutch oven excels at slow cooking, so seems it would be perfect!
-
Gideon ParkerStaff
- April 2, 2022
That is a good point about there being a large mess digging out your pot covered in hay. I’ll wrap some shredded paper in a towel or old tshirt and place that on top. Thanks for sharing some tips, I’m sure you will have more once you start trying it.
-
-
Forager
- April 2, 2022
I remember my mother cooking in something similar when I was young. It used sawdust, with a basket in the middle that fit tightly to her main cookpot (I guess to avoid having to scoop out a new hole in the sawdust every time) and the “lid” was just an old pillowcase loosely filled with more sawdust. She used it in the summer, to avoid having a fire going for so long in hot weather. I hadn’t thought about that in years.
-
Barb LeeContributor
- April 2, 2022
Forager, you come from sturdy stock!
Jennywren, while laboriously screenshotting the old book in case I lost my bookmark somehow, it occurred to me I could buy a copy online somewhere. I bought one on Amazon. LOL! It’s in print. Along with some other books on thermal cooking.
-
JennyWren
- April 3, 2022
I never even thought to look! But I have one sitting in my basket now waiting for payday. I would love having a physical copy. Thanks!
-
-
Barb LeeContributor
- April 4, 2022
First pot of beans was a success. After eight hours, the beans came out of the pot at 144 degrees F, well within the safety zone.
From here it gets more complicated. I’m going to try corned beef tomorrow.
-
JennyWren
- April 4, 2022
Thanks for the report. Really pleased that it turned out well for you and I look forward to the corned beef results. I’ve made a lot of stews this way so I’m hopeful your corned beef will work.
-
Gideon ParkerStaff
- April 4, 2022
That’s so awesome! So you just brought the beans to a boil on the stove and then transferred to the haybox for eight hours?
I’ll need to get a thermometer because that sounds important in checking the safety.
For my experiment, I’m going to make a peach cobbler!
-
Barb LeeContributor
- April 4, 2022
Gideon, Since the beans are hard, dense little units, I went ahead and boiled them for 10 minutes before putting them in the box. It wouldn’t have hurt them to go another hour, but they were very nice after eight.
I looked up the safe temperature parameters and it looks like 41-135 deg. F is the danger zone (for four hours), but if the food falls below 135, I believe it’s safe to return it to a boil briefly before serving.
I watched an excellent video this morning where the person cooked three items in three different cookers simultaneously. One was a home made unit, one was an amazing original fireless cooker, and the third was a modern Thermos brand thermal cooker. The home made unit also cooked the food to 144 deg upon removal, one was used for baking steamed bread in tin cans, and the modern vacuum unit yielded food at 170 degrees when finished! Those things are going for almost $200 on eBay though, and I don’t think you could be as creative with it.
I had to try another dish today, sort of a dehydrated/canned food mashup, as I’m really looking forward to seeing how it rehydrates foods.
-
-
Greg P
- April 4, 2022
I’m loving the innovative use of materials in this thread. All of you experimenting, please keep posting about your results. I’m leaning towards trying the old cooler & the shredded paper…maybe I can get some old cushions at the local Goodwill store? Also, here in Indiana garage sale season is just around the corner, so who knows what treasures I might find!!
-
Gideon ParkerStaff
- April 4, 2022
Definitely will keep you updated! Thanks for sharing your enthusiasm and that you like this thread. Dogpatch sure picked a good topic to write about.
-
Amy S.
- April 7, 2022
I came across another innovative material — for anyone who sews and has perhaps an old beanbag chair around, I just came across this “Wonder Oven” idea. http://prepared-housewives.com/alternative-cooking-wonder-oven-2/
-
-
JennyWren
- April 5, 2022
I did mean to say earlier.
TIP: To make it easier to lift out your pot, I use an old teatowel folded twice lengthways to line the dent for the pot, in line with the handles (if there are any).
When I make the basket cooker, I’m going to make a removable pouch to put the casserole dish in to make it easier to put in and lift out.
2nd Idea: When I was reading the instructions for the basket cooker, they were suggesting putting a tray of hot ash or sand in the bottom. Now I’m not going to do that, but I’m wondering if you had a pizza stone or maybe a cast iron griddle or trivet, whether heating it and placing in the bottom of the cooker would improve heat keeping qualities? Just a thought.
-
Barb LeeContributor
- April 5, 2022
JW, some of the really cool looking antique cookers had “radiators”; disks of soapstone that were heated and placed in the cooker, one below and one on top. You could then bake or roast in the cooker. Iron plates, possibly fire bricks could be used too. These cookers though, were non-combustible.
As a possible insulator I remember a ceramic fiber blanket called Kaowool that was used to insulate ceramic shells used in precision metal casting where I worked. This stuff is available online, not terribly expensive, withstands temperatures of over 2000 degrees. There are so many possibilities
-
-
Barb LeeContributor
- April 5, 2022
I used the haybox with a cast iron kettle full of canned and dehydrated items to make a kind of stew yesterday. The contents rehydrated perfectly, and the kettle was about 12 degrees hotter, after an hour longer cooking time than the previous experiment.
-
Barb LeeContributor
- April 5, 2022
I can scarcely believe it…corned beef, cabbage and potatoes cooked to perfection in a box full of hay.
I’ll leave you all alone now until I try a steamed pudding and some steamed bread.
-
RS
- April 6, 2022
Great stuff — thank you for sharing your tests and results!
-
-
RS
- April 6, 2022
“Thermal cooking” is another search phrase to use for modern recipes. For example, a great resource is https://www.thermalcooking.net/
Cindy Miller, the author of that website, has also written: “Let’s Make Sense of Thermal Cooking Cookbook”, as well as produced a number of youtube videos.
And I also picked up the book “Fireless Cookers Haybox Cookers & Retained Heat Cookers: Making & Using Off-grid Cooking Devices” by Mr George Eccleston.
I still have a bunch of experiments to do (out of curiousity, I ended up picking up several vaccuum and foam thermal containers, but haven’t run as many tests as I’ve wanted just yet).
-
Barb LeeContributor
- April 7, 2022
This is very much appreciated. I can see where a person could develop a real enthusiasm for the method, much like the Dutch oven – it’s just so novel. I have gotten a bit stumped at the fact that the basic thermal cooker seems limited to boiling or steaming, whereas the DO can also fry, roast and bake. Of course the DO is limited to outdoor use.
I’ve been going deeper, investigating the use of the soapstone radiators that were used with the more versatile originals. So far I’ve invested in a double boiler to provide more heat for smaller quantities, sourced soapstone firebricks, and am considering a non-combustible insulating blanket called Kaowool for a more versatile DIY cooker.
Vintage cookbooks provide a great platform for learning and getting tips, but they have a somewhat limited appeal to modern tastebuds, so contemporary books are a great resource!
-
RS
- April 7, 2022
I took a course that mentioned some very basic thermal cooking (in order to get beans while camping without spending hours and hours next to a campfire), and the instructor mentioned those books as a good reference for both recipes and for more discussion of the ideas behind thermal cooking. (For example, that water’s high heat capacity makes it a good “storage” material for enough heat to properly cook the food — as you mentioned in a test above– and that’s why a certain amount of water is typically used in recipes to create that heat bank.) I believe both books also address how to consider doing more delicate things like pasta.
Another good discussion you might enjoy: https://theprovidentprepper.org/thermal-cookers-powerful-solution-for-efficient-emergency-cooking/
When I learned about thermal cooking, the instructor was emphasizing the reduced energy requirements, the largely unsupervised (and somewhat stealth) cooking process, and the freedom from energy/grid connections at point of serving. This may be harder with a larger hay box, but for the smaller vaccuum/foam-insulated based thermal cookers, a common example is preparing everything on the stove at home, letting the meal cook in the trunk of a car, and then opening it up whereever the family decides to stop for a picnic (no outlets or battery banks required). And that’s a routine, “no emergencies here” use, which is very cool.
So I haven’t been too worried about this type of cooker being limited to boiling or steaming, because I’d be planning to use it for its energy- and supervision-saving strengths, and supplement it with other methods when dry heat is needed.
By that I mean, my idle “what do I hope I could do?” daydreams about bugging in if “the grid is down for weeks and we still have to cook for people!” involve a kitchen + backyard with a collection of thermal cookers, solar cookers, a “charcoal” grill (but building small hardwood fires in the grill, instead of limiting ourselves to charcoal briquets), plus a rocket mass heater stovetop with oven that I “conveniently” had in my backyard for entertaining long before the emergency (eg https://walkerstoves.com/photos-and-video.html). Also, plus some pressure cookers, although I don’t have real experience with them yet. (The provident prepper website has a really nice “cooking off grid” experiment/practice adventure that they reported on, which includes discussion of putting the pressure cooker into a haybox to take advantage of both of those technologies.)
That was a bit of a ramble, so anyways, thank you for sharing your ongoing tests with haybox cooking!
-
-
Barb LeeContributor
- April 15, 2022
I recently bought a good sized double boiler to try in the haybox. The upper pot is 3 quarts and the lower pot is 4 quarts. I wanted it so I could have more thermal mass to hold in the heat, so I could try being more creative with smaller quantities of food. The haybox is a specialized boiling/braising/simmering cooking tool. I don’t think things like casseroles were too common in 1913.
Yesterday I cooked a stuffed flank steak smothered in a spicy tomato sauce in the haybox. After six hours, the meat roll had an internal temp of 165 degrees F. So the extra four quarts of boiling water made a big difference. It all tasted good and the sauce was excellent over rice.
I still want to try steaming some bread in the cooker, maybe make something like a casserole in the double boiler. After that I’ll probably put the experiment aside until I can begin a major redesign that will include ceramic wool insulation and soapstone firebricks, so I can use it for roasting and baking.
-
Gideon ParkerStaff
- April 15, 2022
Update: I took some mylar coated bubble wrap that I got as packaging in a shipment that came to my house and lined a cardboard box in preparation for the “Urban Haybox” I am going to make.
I also shredded all of the paper in my house that needed it and filled the box halfway. I don’t get much junk mail so it will be another month or two before I have enough to make it how I want. So more to come…
It’s not pretty, but I wanted to have some imperfections to really test if a subpar approach would work. If it works and I like this method of cooking, I’ll take the time and make a much more efficient model.
While reading more about hayboxes I found some cool info that makes me even more excited about doing this project.
- A haybox cooker can save up to 80% of the energy used to achieve the same results by simmering, so there are both economic and environmental benefits – i.e. cash saved and much lower pollution / CO2 emissions.
- Food cooked slowly at a lower temperature tastes nicer and is better for you, as more of the vitamins are retained.
- Leaving the pot in the haybox ‘too long’ doesn’t harm the food (unlike boiling which turns vegetables to mush)
-
Barb LeeContributor
- April 16, 2022
Today’s haybox project: Corn bread. Batter placed in parchment lined Bush’s Baked Beans cans (fit my cooking pots). Two cans held batter for 9″ round pan recipe. Covered with aluminum foil and rubber band (could have domed the foil a bit). Boiled gently on stove 10 minutes, placed in haybox for 3 hours. Timing was guesswork. Taste test: Needs butter and honey!
-
Gideon ParkerStaff
- April 16, 2022
I’m on my way over to your house! You can’t have all those delicious corn breads to yourself.
Really creative use with the cans. Question… If a corn bread recipe called for 20 minutes of baking in the oven, could you heat them up for 10 minutes in the oven and then do the rest in a haybox? Or does it not work like that and you need the heat of boiling water to finish cooking things?
-
Barb LeeContributor
- April 16, 2022
LOL! I’m actually not a big fan of cornbread, but I’m enjoying gathering proof that quickbreads can be made without an oven, as long as you don’t absolutely need a crust.
The use of the cans as molds isn’t my novel idea. Traditional steamed puddings and breads have probably been made in cans as long as cans have been made! (The famous traditional Christmas “Figgy Pudding” is steamed in a covered mold this way).
You actually need that mass of boiling water to cook the food in the box, so it may not be practical to warm it in the oven while boiling the water on the stovetop. What I’ve read is that some dishes might be improved/finished by going in an oven after cooking in the box.
-
-
Gideon ParkerStaff
- April 19, 2022
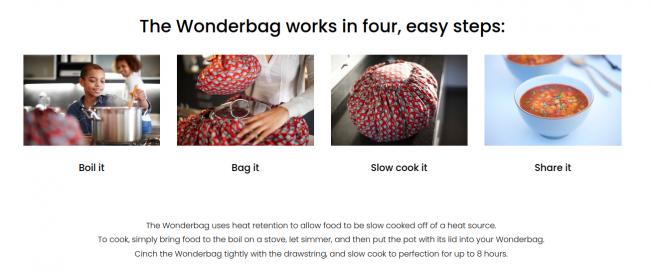
A new user named Dan commented on another thread and talked about using a Wonder Bag. Looks to be the same thing as a haybox, but in bag form.

So if someone is wanting to use this method of cooking but not have to make it from scratch, this could be a way to do it. The Wonder Bag sells for $60-$80 depending on the size
-
Forager
- April 19, 2022
Y’all are making me hungry!
I’m wondering though about the methods that involve adding additional thermal mass beyond the food itself. Whether soapstones or a double boiler, you are using a lot of extra energy to heat up the extra material. I wonder how much gas or electricity a stove on high uses to heat the extra four quarts of water in a double boiler all the way from cold to boiling, compared to just heating the three quarts of actual food, then simmering on low for the required cooking time.
If I had to venture a guess, I would think the haybox method would still be slightly more energy efficient, at least for things that need to cook for a long time, but you are still offsetting a considerable portion of the potential energy savings by heating so much extra mass.
I can think of two potential ways around this. One would be to construct a box so super-insulated that even a small dish would hold it’s heat.
The other (and probably easier) would be to make use of it. For example while cooking tonight’s dinner in the top of the double boiler, instead of just water in the bottom, could it be water with potatoes in it? To be turned into potato salad tomorrow?
-
Barb LeeContributor
- April 19, 2022
Forager, We’ve tried to critically examine the potential for energy savings with the haybox, but there are other considerations as well. One is preheating of most cooking utensils, not the least of which is the oven (electric in my case). If I wanted to bake that batch of cornbread in the oven, I would first have to preheat the oven to 400 degrees, which one might think of as 20 minutes of almost wasted energy while the oven does nothing but preheat. The pan of cornbread itself would take about 25 minutes to bake. To preheat the water on the stovetop took about 10 minutes, with an additional 10 minutes to boil the food before placing in the box. So overall, the corn bread took 20 minutes to come to a boil on a stovetop element, versus almost an hour of running an oven element. If I wanted to cook something that required LONG cooking times, like dry beans, I would only have the expenditure of heating the beans and boiling them briefly before shutting off the energy source and placing the pot in the box.
But energy savings is not the point, so much as having an excellent cooking device that can be used indoors in a grid down situation, whereas some campstoves, etc. are not safe to use indoors. Additionally, the water can be boiled over sources of heat, like a woodstove, that are performing the function of warming the dwelling.
Additionally, it doesn’t emit any odors that would attract unwanted guests.
Cooking an additional dish in the boiling water container was a common practice. But you also have the advantage, with clean double boiler water, of having your wash water, for dishes or body, at a very toasty temperature after the energy was expended to heat the water to cook the food.
If you want to cook meat and potatoes/veggies in one pot, you would cook the meat for a few hours, take the pot out of the box, add veggies, return to boil (which would expend very little energy) and put back in the box.
-
Forager
- April 19, 2022
Yes, I was only referring to the energy use aspect specifically – I know there could be other benefits too depending on the situation.
Interesting that you’ve timed the different steps, and it does sound like it’s at least a slight energy savings over doing the whole thing stove-top, and more so over using the oven. My gas oven actually comes up to temperature so fast that I only preheat it at all for the most picky recipes, so I wasn’t even thinking about the fact that some ovens need to be preheated for 20 minutes!
I want to experiment with thermal cooking myself soon, mostly because it would put less humidity into the house than keeping something simmering, which would be nice in the summer, I think. I like the idea of doing beans or stew that way, which we often just forgo cooking during our very damp summers.
-
-
Forager
- April 22, 2022
The ultra-lazy method:
Instead of finding a box and loose material to fill it with, I grabbed a big armload of spare blankets out of the closet and spread them out on the floor in a stack, with a thick cotton towel as the top/inner layer. (The towel was to prevent the wool blankets from getting scorched or synthetics from getting melted.)
Next I brought 2 lbs. blackbeans, soaked and treated the night before, and 7 cups water to a rolling boil, then set the pot on the stack and folded layer upon layer of blankets up over the top.
Two hours later the beans were fully cooked, and the pot was still way too hot to even touch. Conclusion: I probably could have used fewer blankets!
It usually only takes another 35 minutes of simmering on the stove to cook treated blackbeans, once they’ve reached boiling, so it wasn’t any huge savings that way. Mostly it was nice that they didn’t require watching/stirring, boil over and make a mess of the stove, or steam the kitchen up. I would definitely do this again. Thanks for the inspiration, everyone:)
-
Amy S.
- June 23, 2022
Could you please explain what “treated” refers to? Sounds like it reduces cooking time? Thanks!
-
Forager
- June 24, 2022
Treated just means I dissolved 1 Tbsp. of baking soda per lb. of beans in the soak water. The next morning, drain and rinse them, then cook in fresh water. The baking soda in the soak tenderizes the beans (especially the skins) and drastically reduces cooking time.
In my opinion it also gives a better final texture than can be achieved in untreated beans by any length of cooking, in that they end up tender without falling apart.
-
-
Gideon ParkerStaff
- June 23, 2022
Found a video showing how to make a possible bug out bag cook kit pot cozy to help retain the heat in your cooking pot on the go.
-
July LewisContributor
- June 23, 2022
Oh, you’re taking me back to my commune days! At the ol’ hippie commune I used to live at, we used a haybox all the time for cooking rice and/or beans. It was an insulated, tight-fitting box with reflective material on the inside (no actual hay). Because we cooked huge quantities, it was a perfect method because the big pots retained heat really well. And if we cooked those big pots on a stovetop, it was too easy to scorch the bottom. I never knew until now why it was called a hay box!
-
APFM
- June 24, 2022
The cornbread looks amazing!
For those in small apartments, you can also wrap your pot in an old cotton towel or wool (not polyester!) blanket in the morning, then put it on your bed under a double-up duvet to cook throughout the day.
Not a good solution for overnight cooking or if you live with kids, pets, or Chief Box Inspectors who like to jump on the bed, but otherwise it definitely works for beans (have tried it myself) and rice pudding (Milchreis aus dem Bett is a whole German grandma thing).
Just make sure the pot is tightly wrapped so you don’t end up with a load of water vapour in your duvet.
-
Barb LeeContributor
- June 24, 2022
I’m trying to up my hay box game, having purchased four soapstone fire bricks to use as “radiators”, like the old fireless cookers. Between the bricks and buying assorted vessels, I’d have been better off searching for an original complete fireless cooker. Still have to buy the ceramic wool for insulation, but the project is on hold for the summer.
The biggest drawback is the amount of fuel required to heat the bricks. (The radiators make the cooker suitable for roasting and baking). I think the project is a bust. Ideas welcome.
-
Gideon ParkerStaff
- November 14, 2022
Finally got around to making a haybox out of office supplies! Using a cardboard box, lined with bubble mailers, and shredded junk mail I had the makings of an urban haybox.
For the little topper I took an old Tshirt and safety pinned the arms and neck shut and stuffed it with more paper shreddings, that way I could lift it up easily and not have paper all over the top of the pot.
I decided to make a chili that normally is cooked on a simmer for 40 minutes (a long time to have a flame going) and with the haybox version just brought it up to a boil for one minute and then transported to the haybox for 8 hours to slow cook from the residual heat that was inside.The celery was a little crispy, meaning that it didn’t cook as thoroughly as it would have been on the 40 minute simmer. But it was the perfect temperature to go from pot to bowl after 8 hours and I didn’t have to sit there and blow on my food for 5 minutes just to be able to eat it.
Cooking this way gave me a new appreciation for this way of living. It was weird making dinner in the morning to allow for the 8 hours to slow cook and it involved quite a lot of planning and prep work that I wasn’t used to doing. I appreciated learning a new skill and if there ever was a scarcity of utilities, I probably would turn to this method of cooking more often.
Another use case I can see with this is a way to keep dinner warm if your family is scattered and is arriving home at various times. Instead of keeping it on the stove on simmer or putting it away in the fridge only to be taken out and reheated, you could just slide the pot into the haybox to keep warm to eat many hours later and it will be the same temperature.
Below is the recipe for us to add to The Prepared Cookbook, which hopefully I’ll be able to start on here soon 🙂
Texas-Style Chili
Serves: 4
Prep: 20 minutes
Normal Cook: 40 minutes
Haybox Cook: 8 hours
Ingredients:
- 1 lb. ground beef
- 1 package of beef hot dogs chopped or pork chop cut into cubes
- 1/2 cup onion finely diced
- 1/2 cup bell pepper finely diced
- 1 cup peeled zuchinni finely chopped (or skip these because zuchinni is nasty)
- 1 cup celery finely chopped
- 3 tablespoons minced garlic
- 1/2 cup diced tomatoes
- 3 tablespoons bacon fat
- 2 cups bone broth
- 1 tablespoon apple cider vinegar
- 1/2 tablespoon coconut aminos
- 1 teaspoon worcestershire sauce
- 1 tablespoon chili powder
- 2 teaspoons smoked paprika
- 2 teaspoons cumin
- 1 teaspoon oregano
- 1/2 teaspoon black pepper
- 1/4 teaspoon chipotle powder
- 2 teaspoons garlic powder
- 1 teaspoon onion powder
- 1 teaspoon salt
Instructions:
Brown the beef in a large pot or dutch oven. Add the chopped hot dog/pork. As the meat is almost browned add all the vegetables and cook until soft. Add the liquid ingredients and stir. Add the dry ingredients and stir well. When cooking normally, bring to low heat and simmer for 40 minutes. If you are cooking in a haybox, bring to a boil for 1 minute and then transfer to the haybox for 8 hours.-
Barb LeeContributor
- November 14, 2022
Well done, Gideon! My haybox “design” is taking a turn toward the use of soapstone “radiators”, which in my case are soapstone bricks, heated and used for thermal mass when baking/roasting were desired, without using a lot of water. I’m kind of bogged own on the project at the present though, having not had much of a chance to experiment with heating the bricks. And then there’s fireproof insulation and such. So I’m kind of stalled until we get wood stove weather.
-
Amy S.
- November 14, 2022
Gideon: I love your post! What an amazing box you have made. I am inspired to try one. I laughed at your zucchini comment (I love zucchini but have the same unpleasant feelings towards celery so I won’t have to worry about celery being on the crunchy side because I’ll be omitting it from your tasty sounding and good looking chili.) I have a question given your comment about not having to blow on it to eat it: how hot was the chili when you took it off after 8 hours? Do you think we should use a thermometer to check on food safety or was the chili still pretty darn hot? Thank you for sharing the recipe and I really hope this cook book happens.
-
Gideon ParkerStaff
- November 15, 2022
Thanks for the nice compliment, I’m really happy with how this turned out. It would be interesting to compare this paper shredding version with one containing straw to see which is the better insulator.
When I took the chili out 8 hours later it was the perfect temperature for eating and might only need heating up after 10+ hours.
Since the meat was properly cooked before boil, it was safe to eat and I would only worry if the chili was warm or cool for a few hours.
-
Robert LarsonContributor
- November 15, 2022
Looks great! Although, you don’t seem to have one crucial part that Barb’s box had. The chief box inspector.
-
Barb LeeContributor
- November 15, 2022
Oh Robert, you brought a delighted laugh to my day! Thank you!
-
Gideon ParkerStaff
- November 15, 2022
Yes! I definitely need a box inspector haha! The chili would have tasted 5X better with proper inspection.
-
Barb LeeContributor
- November 15, 2022
Oh, NOW you need an official taste tester! WOOF!
-


![20220416_150355[1]](https://theprepared.com/wp-content/uploads/hm_bbpui/82169/h1yeaf707jbmoquhptqkxonczvg42ysd.jpg)
![20220416_150507[1]](https://theprepared.com/wp-content/uploads/hm_bbpui/82169/ruucqfu5i6jojx7zq7me5eb1lnz5liym.jpg)
![20220416_150905[1]](https://theprepared.com/wp-content/uploads/hm_bbpui/82169/nebi1c9gqe6dur24sksk0wznhl393ayb.jpg)
- Whats going on with this site - 2 months ago
- Mylar Bags - February 27, 2026
- Shot Show 2026 recap - January 22, 2026
- News for the Week 2026-1-12 - January 12, 2026
- News for the Week 2026-01-05 - January 5, 2026
This forum is heavily moderated to keep things valuable to as many people as possible. Full community policies are here. The basics:
- 1. Be nice to each other.
- 2. Stay focused on prepping.
- 3. Avoid politics, religion, and other arguments.
- 4. No unfounded conspiracies, fake news, etc.
- 5. Debate ideas, not people.