Share your knowledge & learn from experts
Because prepping and community go hand in hand
How do you store your cans?
My house is reasonably sized but has limited storage space. I’ve been accumulating canned food because of the pandemic, which I’m now also using as a backup food prep — I also have a bucket of freeze-dried food. The cans have mostly been stored in various cubbyholes: e.g. in the space under the couch, under the bottom shelf of my walk-in closet, etc. This works fine for a supply of cans I seldom use, but since I’m trying to rotate the canned food and use it regularly it’s becoming a pain in the butt to crouch on the floor of my closet trying to sort out which cans are which and trying to see the dates. I need a better system. What do you use to store your canned food?
Read MorePrepping stocking stuffers
I’m wanting to share the gift of being prepared this Christmas and am having trouble thinking up some $20ish small gifts/stocking stuffers to give to family and friends. What would you recommend?
My social circle is a mix of preppers and non-preppers, so I want something that just about everyone could use.
Read More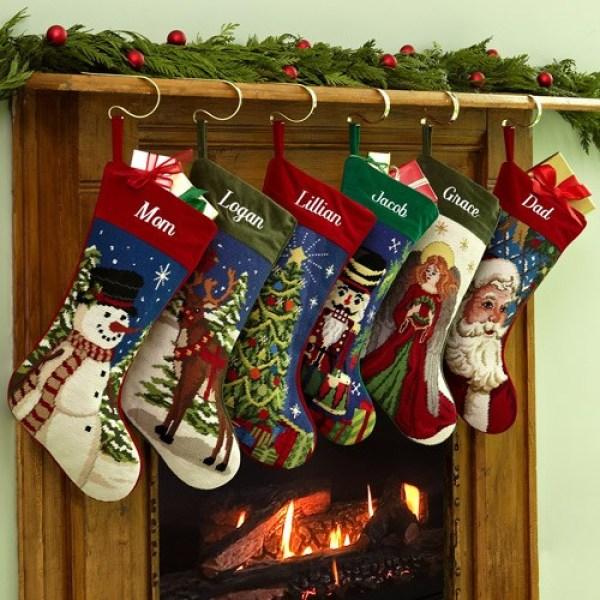
Sealing push-pin style airflow vents on water containers
I have a 10L water container with the push-pin style airflow vent. I know this style of container was not recommended, but it was cheap. It definitely leaks when the container isn’t upright. I plan to store the container upright, but I’m just being extra cautious.
I was thinking of sealing the push-pin plug by wrapping the plug with some Teflon tape. And then some scotch tape over the plug to prevent it from accidentally falling out.
Has anyone dealt with this issue? Any ideas or criticisms of my idea? Would the teflon tape even work? Would it be considered food safe?
Read MoreNational Space Policy and Preparedness
https://www.whitehouse.gov/wp-content/uploads/2020/12/National-Space-Policy.pdf
Good morning,
Per title, it’s hot off the cyberpress, dated 9 December 2020.
Of prepper interest, at least to me, is the page 17 section titled “Protection of Electromagnetic Spectrum”.
Only 1 EMP sensitive item I depend on is probably subject to the electromagnetic interference. This is my old, smallest, lightest ,Grundig AM-FM-SW radio (uses 2 AAA batteries). So far, shortwave reception works. This might be a national trait.
Phones: cell, sat, landline close down. Of course web access lost.
Read MoreSutures: Can I use Vet/medical school practice ones to stock my first aid kit?
I’m having a difficult time buying sutures to stock my emergency med kit with. The only ones I can find online at Amazon are for either medical students or Veterinary uses. Are these appropriate to rely on for my med kits? Thoughts?
Read MoreBBC preppers going mainstream article
https://www.bbc.com/news/business-55249590
Good morning,
The BBC, with global coverage, has the above article about preppers going mainstream.
Article has a picture of some prepper gear and stuff. I like that textile item displayed on the wall. Hope it’s not used for a tarp.
Article mentions the premier US preparedness website.
Thank you John !!!
~ Bob
Read MoreWhat’s the best prepping advice you have ever received?
Sharing the best advice that we have received will help new preppers and also teach us what others have found most helpful as they got started.
The best advice my wife has ever received is: “Start with the basics” and “It doesn’t matter how much money you have if you don’t have food”
The best advice I’ve received is the advice found in The Prepared’s Sane Prepping article. It really helped me out at a time when Prepping was overwhelming and stressful. It helped me have a level headed look at prepping and made it seem attainable for me.
Read MoreChild needing regular hospital treatments
Hi. We live in the UK and my 10 year old has recently been diagnosed with leukaemia requiring regular hospital visits for chemotherapy (around a 35 mile round trip each time).
Does anyone have any experience or ideas around planning for this? Instead of getting away from a disaster, we are likely to have to drive into it and into a city to still access life saving treatments.
Read MoreThe point I wanted to make (but was cut) on this recent BBC podcast about prepping going mainstream
It’s a nice segment that went out to their worldwide audience. About 18 mins long: https://www.bbc.co.uk/sounds/play/w3csz799, my part’s around 3:00. Another TP community member, Julie Fredrickson, also joined.
EDIT to add: The podcast was popular, so they did a follow-up article with Julie and I https://www.bbc.com/news/business-55249590
There was a part of the interview that was cut for time. It wasn’t hugely insightful, but wanted to ramble the point here since it keeps getting cut from these interviews:
When someone like Bill Gates says “we have major SHTF risks around disease/bioweapons and it’s important to prepare now,” we need to do a better job of listening and taking those people seriously.
In that example, Gates has spent more money on trying to solve medical problems than any other individual in history. He’s abundantly qualified to make that statement. And he’s certainly smart, known to be rational, and has a track record of being right about these kinds of problems / solutions / the future.
Yet people will hear someone like Gates say these warnings and dismiss it with a “hmph, so you’re a crazy prepper!”
Crying wolf is a good way to lose credibility. But there’s a difference between people like Gates and someone like an actress who spouts anti-vaxxer stuff. But what’s happening is people hear one person cry wolf too many false times, then when another person cries wolf, they dismiss it and ignore who the new person is. “The last times we heard someone talk about a wolf, it wasn’t true.” Well yeah, but this is a different person, and in fact this new person crying wolf is a trusted wolf expert!
A non-prepping example of this problem where people won’t let credentials override stereotypes: When Michael Phelps was “caught” smoking marijuana, people reacted with statements like “oh thats so horrible, how could he do that!”
… well, maybe if the greatest athlete of all time is smoking marijuana, your stereotypes about cannabis were wrong? The evidence that the stigma was wrong is right in front of you.
Dismissing the best people in society because what they say/do sounds similar to what the worst of society say/do is a recipe for disaster.
This societal problem, a twist on the No True Scotsman problem, is one of the biggest meta reasons I’m pessimistic about the future — we can’t avoid massive problems if we keep ignoring the people best qualified to lead us away from / out of those problems!
Another bit that was cut from the BBC interview perfectly demonstrates why people would rather put their head in the sand than face an inconvenient truth:
Me: “We’re not talking about some theoretical alien invasion. These problems like worsening natural disasters and late-stage capitalism are happening right now.”
BBC: “Here in the UK, someone is likely to say to you ‘cheer up love, it’ll be fine!’ A keep calm and carry on sort of thing.”
Me: “That’s part of the problem!”
Read MoreCatalogs with A+ tech information
Good morning,
The catalogs with high-quality and expensive products can also be loaded with high-quality technical information.
One example is: https://www.streamlight.com/ecatalog/2020FullLineCatalog/index.html
DISCLAIMER: Not making recommendations or have any interest in company. I do use some of their products.
At above link – hopefully it hyperlinks – is a half page chart titled “Different Lights For Different Hazardous Locations”. This tech info is super because it is to the point and product examples explain and clarify.
……
Recently I posted a link to Forestry Suppliers of Jackson, Mississippi with their tech info in catalog.
Some of the industrial safety products catalogs have charts on eg explaining the catagories of face masks like the 3M N-95 to the P-100.
As I get to my pulp catalogs, will post those with decent web links with tech info. Again: I am not “pushing” ant company or products.
~ Bob
Read MoreI am an experienced outdoorsman with an eye for conservation and sustainable land use
Besides being a writer and researcher for The Prepared, I consult in the outdoor industry and work as a precision rifle instructor. I am an experienced hunter and angler and have spent thousands of hours in the outdoors catching fish, hunting, bird watching, and exploring planet Earth.
Here to answer any questions about hunting, angling, or general outdoor activities. Questions related to gear selection, ethics, game recipes, stalking, training, mindset, and hunt preparation are welcome.
Here are a few photos from a recent mule deer hunt in Central New Mexico.
A tripod is an excellent tool in the woods.
Approaching with caution and reverence.
Solid kit. Mystery Ranch pack, semi-custom Remington 700 rifle, Athlon scope.
Read More
Treking staff; the pike pole
https://www.google.com/search?source=univ&tbm=isch&q=%22pike+poles%22&sa=X&ved=2ahUKEwjB8arstcDtAhUJ2qwKHXK-CVcQjJkEegQIARAB&biw=1280&bih=641
Good morning,
For those who have basic plans to evacuate from home via walking, it can be advantageous to carry a stick, cane or pole of some sort.
For my plans involving much walking – but no wilderness expedition – I have a 9 ft fiberglass fighter fighter’s pike pole. The fitting is a non-ferrous metal.
Above link has some examples.
For my situation, next to the Chesapeake Bay, weather problems involve lightning storms. Am mentioning this because metal can be dangerous when elevated over one’s body. Thus, aluminum shafts are “verbotten” and so too, even the non-ferrous metal tips.
My pike pole is rigged with a sling made of an old cotton web belt and attached by wrapped 550 paracord.
Without specific needs, a wooden pole from a hardwood tree can exceed requirements.
A couple in our preparedness group developed something noteworthy. I forgot the actuals dims but for illustration, they have 2 each 7 ft lengths of PVC pipe. One is 1 inch diam and other is half inch diam. Fitting the smaller into the larger, they drilled holes at the top and bottom. The contraption is held together by a wing nut and bolt at both ends. For versatility, when not walking/hiking with their treking pole(s), they can disassemble the poles yielding 4 poles for a makeshift canopy tent. Thry, too, have paracord and web handles on their “walking sticks”.
Read MoreEveryday footwear
When I think of my own personal safety and vulnerability, and the absolute “must-haves” in any kind of emergency situation, a good pair of shoes or boots is very high on my list. I know what I’d want to be wearing if and when the SHTF (in my case a good pair of waterproof, lightweight hiking boots) but I am very aware that wearing such footwear all the time simply doesn’t make sense. Some professional and social situations demand for more formal attire, and sometimes you simply want to relax and “put your feet up.” But let’s face it, much formal attire is ridiculous and makes us very vulnerable. I cringe at the idea of ever wearing something that would hinder me from running, walking long distances, climbing a fence, etc.
I know footwear choices are very subjective, and highly affected by one’s gender, style, career, and environment. That said, I’m interested in how others have approached the conundrum of needing to meet formal expectations while not wanting to put themselves in a vulnerable state.
Personally, I am a big fan of Keen’s PTC Oxford series. They may not be the most stylish shoes around, but they get me through most professional and formal situations. I believe they were designed for service-industry workers who need comfortable shoes with good traction, and I find they give me comparable support to a pair of lightweight day-hiking shoes.
Does anyone have any awesome everyday footwear advice? How are you approaching this challenge? I’d particularly like to hear how women are approaching this, as I understand the choices are likely fewer and the societal expectations are (unfairly) more demanding. My wife has really struggled to find an everyday shoe that fits all her needs.
Read MoreWhat are your thoughts on pull-tab lids on cans?
I am starting to see more and more cans get these pull-to-open type lids. What are your thoughts on these from a prepping standpoint?
I can see them being nice to get into food quickly without a can opener. But I see the traditional style where you do need a can opener being sturdier and less likely to failure.
I’ve heard that you should avoid the pull-tab lids for long term food storage, because they give way over time and can expose and spoil your food.
Read More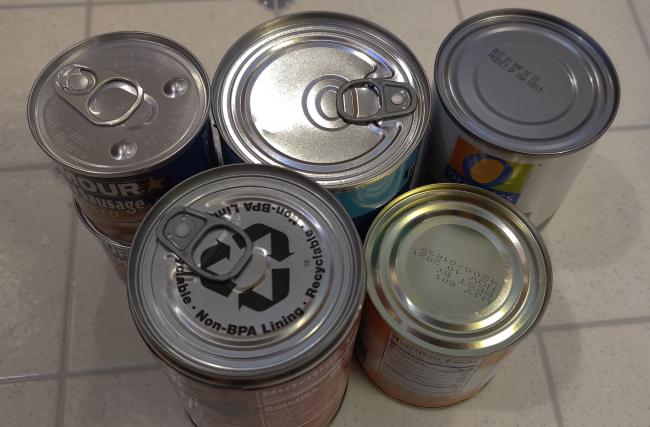
Lockdowns, part 2
Welp, a new round of lockdowns in several states across the US, and less than a day after the Governor announced specifics here in Washington state, there are already wide reports of empty shelves and mayhem at the grocery stores. Canned food and toilet paper, once again, have been wiped out (sorry for the bad pun).
My household was already stocked up and steered clear of the stores this weekend, but I can’t help but to shake my head at the inability of the broader public to assess situations and plan ahead – how anyone could be surprised by these new lockdowns is beyond me. It’s really disappointing, and reminds me that we are actually prepping for two things at once: the disaster that strikes, and the disaster of the masses who seem unable to recognize, and plan for, the potential threats around them.
Read MoreGrowing rice
I really don’t know why, but I’ve never grown rice before. It is usually an integral component of most prepper’s long term food stores… it sure is for me. I like to grow items that could help me become self sufficient during a SHTF crisis, and I don’t see why rice shouldn’t be near the top of the list. I especially like items that store easily and rice surely does that. So I’ve ordered some seed and will try it next year.
I think the main reason I never grew it was because of images in my mind of rice grown in Asia and actually over in Arkansas, with these large perfectly flat fields that need to be flooded. I was considering doing that but as I researched rice, I found out there are two main types. Lowland rice is what I was thinking of, where the rice grows in flooded fields. But I found out there is a type called upland rice, which grows like any normal crop. It does not need flooding but does need an inch of water a week… similar to corn. This rice can be grown all over the US, including the far north, such as Maine. There are a bunch of varieties available. I’ve ordered Loto, which is a risotto type of rice.
Been doing a bit of research. Seems upland rice produces about half the yield of the flooded lowland rice. I’m reading where the lowland rice average yield is around 7000-8000 lbs per acre. So obviously half of that would be say 3500 lbs per acre. Now being realistic, growing during a crisis with limited resources, I’d count on maybe 1000-2000 lbs per acre for upland rice, to be on the safe side. One pound of uncooked rice has around 1600 calories. So just looking at rice, which I understand is not a balanced diet, someone would need around 1 1/2 pounds of rice per day. Multiply that by 365, you get around 550 lbs per year. That tells me an acre of rice could feed two people for a year… and probably more. That is rather impressive.
Now of course I grow more food and one needs more balance, but still, in my book that is great news. My main go to survival crop is amaranth, and just those two would provide a lot of nutrition. Mix in the three sisters (corn, beans & winter squash), which I store lots of seed, and you have a very healthy diet. Then of course other things can be made from rice… such as wine (sake) and flour.
I will test this next year & report back. Anyone here grown upland rice?
Read More
Learning from the past – Otzi the Iceman
In 1991 hikers found the glacial well preserved remains of a mummy from the Copper age (around 3300 BCE) who came to be known as Otzi the Iceman.
I want to just share a bit about him what scientists have been able to figure out about his life. This man was a true primitive survivalist, as that is what he had to do to live.
Research has revealed educated guesses into Otzi’s background and they believe that he was a high-altitude shepherd. In his stomach they found partly digested remains of ibex, goat, chamois, and red deer meat, einkorn wheat grains, herb bread, roots, sloes (plum-like fruit), and various seeds and berries growing in the wild. So pretty much a diet of meat, fruit, and grains.
They found that he had an intestinal parasite, from his fingernails they show that he was sick three times in the six months before he died, cavities from his high carbohydrate diet, and that he was lactose intolerant. Otzi had 61 tattoos on his body made from pigment manufactured out of ash or soot. He had wear on his spine, knees, and ankle joints and may have used the tattoos as a form of acupuncture to treat pain from those issues. Life probably was not easy for people during this time period. Incredibly limited medical knowledge meant that people probably relied on their own immune system for healing.
Otzi wore a cloak made from woven grass, coat, belt, leggings, loincloth, and shoes made of leather. He had a bearskin cap, and waterproof shoes designed for snow walking that were made up of bearskin, deer hide, and tree bark. He had soft grass inside his shoes that acted like socks. Sinew was used as thread to hold everything together. He had a small pouch on his belt with a scraper, drill, flint flake, bone awl, and dried fungus (probably used as tinder).
His tools consisted of a copper axe made with a yew handle, a knife with a stone blade and wood handle, and 14 arrows.
I just think this all is so fascinating. We can learn so much about survival just from how people lived day to day in the past. I imagine myself back in that day without my Lifestraw water filter, BIC lighter, weather proof coat, and more. What would I do? How would I survive?
I’m not going to go into the cause of Otzi’s death, as I don’t want to spoil it for anyone, but I recommend you look into it if you are curious. Stuff You Should Know did a great podcast on him.
Read More
Getting started into canning
Hi Everyone,
I have been leveraging this site for a while now and it has been very helpful with my journey into being more prepared. As I lay here in my food coma from Thanksgiving dinner, I have been thinking about getting into canning. Searching on Amazon for supplies is overwhelming. Any advice for a beginner and which supplies/Brand you prefer that balances cost with quality? Finally, any good websites or articles that you found helpful to get started?
I searched this site and forum for canning information and couldn’t find anything. If I missed something that already exists, please reply with a link. If not, hopefully this thread will help others as well 🙂
Read MoreSituational awareness (digital, near real time?)
This is equal parts suggestion, question, and brainstorming – I’m looking for ideas for gathering [near real time] situational awareness.
As I’ve read this site and others I get the impression that different parts of the country are experiencing things in very different ways. I see people sharing images of empty shelves in a store on the other side of the country but down the street things seem “normal.” I realize a lot of online content is more anecdote and less data but I also figure that with a lot of anecdotes you might be able to tease out some data/trends.
One idea (not my favorite) is twitter, there are some interesting advanced searches.
For instance if I want to see tweets within 50 miles of Washington DC, this search term seems to work:
near:”38.901862736383556,-77.0102291245727″ within:50.07mi
https://twitter.com/search?q=near%3A%2238.901862736383556%2C-77.0102291245727%22%20within%3A50.07mi&src=typed_query
likewise if I want to search for recent tweets about “groceries” or “grocery store” this seems to work (and would perhaps work through the end of the year?) this search string appears to work:
(groceries OR grocery store) until:2020-12-31 since:2020-11-15 -filter:replies
https://twitter.com/search?q=(groceries%20OR%20grocery%20store)%20until%3A2020-12-31%20since%3A2020-11-15%20-filter%3Areplies&src=typed_query
It seems I can combine these manually, too:
(groceries OR grocery store) until:2020-12-31 since:2020-11-15 -filter:replies near:”38.901862736383556,-77.0102291245727″ within:50.07mi
https://twitter.com/search?q=(groceries%20OR%20grocery%20store)%20until%3A2020-12-31%20since%3A2020-11-15%20-filter%3Areplies%20near%3A%2238.901862736383556%2C-77.0102291245727%22%20within%3A50.07mi&src=typed_query
I feel like with a few saved search strings you could search your area for recent activity at various distances. You still have to sift through random people on twitter but maybe there are more filters/tips I’m not aware of that others could share.
My only other thoughts on “real time awareness” are things like crime maps, however these often lack context (trends over time, comparisons, etc) so its hard to know what a “normal” amount of crime looks like. These also tend to be specific to certain areas and each area may have different reporting parameters making it hard to gauge changes between jurisdictions.
https://www.crimemapping.com
Not sure how many tech/code savvy people are on here, but this was inspired by a surge in ‘bots’ to scrape retail websites for available stock of PC video cards. I thought it would be neat to scrape data from retailers by store for stock of things like toilet paper or other “in demand” items to get a sense of where demand was spiking, but thats probably a bit niche and beyond my coding skills.
Any other ideas, either different resources or tips for refining twitter searches?
Read MoreBlack Friday – Cyber Monday deals 2020
This forum thread is going to be updated throughout the next week with various Black Friday and other holiday deals related to prepping. Keep checking it out often and share it with others to get the best deals on your preps.
ThePrepared.com’s Water Essentials Course – 50% off if you preorder.
Olight – Free i1R 2 EOS flashlight, Free $5 credit, and ability to earn more free store credit. Up to 45% off all but one flashlight on their website.
HUGE deals on Berkey Water Filters – Here and Here (our review on best home water filter)
Legacy Food Storage – Starts now. Use code BLACKFRIDAY to get 20% off your order. (our review of best food buckets)
Valley Food Storage – 15% off. (our review of best food buckets)
Emergency Essentials – Up to 50% off site wide. (our review of best food buckets)
Thrive Food Storage – Up to 40% off. (our review of best food buckets)
Harvestright – Save up to $400 and free shipping on home freeze dryers.
myfoodstorage.com – 20% off
Battlbox subscription box – Free tent with every new subscription on Cyber Monday with coupon code: cybertent
Survival Frog – Up to 75% off. If you spend +$150, you get a free electric hand warmer.
Solostove.com – Over 30% off fire pits
Darn Tough Socks – 25% off through November 30, 2020
Mymedic.com – 30% off sitewide. No code necessary. Orders over $49 will get a free neck gaiter and cold & flue medpack.
Rapid Medical – 30% off sitewide
Traeger Smokers and Grills – various discounts
32 Degrees clothing – 70-75% off site wide
Lowe’s Giftcard – $100 gift card for $90
Apple Products – Various apple gift cards with purchase
Rush 72 packs -dropped in price from $180 to $100
SanDisk Extreme PRO Portable SSD V2 – $100 off
Amazon:
Sawyer Mini Water Filter – Price dropped 28% from $25 to $18. (our review of best portable water filters)
Lifestraw Water Filter – Price dropped 35% from $20 to $13. (our review of best portable water filters)
Ka-Bar Tactical Spork and Knife – Price dropped 25% from $9 to $7. (our review of best spork)
FoodSaver V4840 2-in-1 Vacuum Sealer Machine – Price dropped 35% from $200 to $130.
Augason Farms Variety 4-Gallon Pail – Price dropped 29% from $85 to $60 (our review of best food buckets)
12X Magnification Binoculars – Price dropped 58% from $60 to $25.50
Craftsman 20V Cordless drill driver – Price dropped 32% from $87 to $60
64 Drawer Plastic Parts Storage Cabinet – Price dropped 34% from $42 to $28
Ring Video Doorbell 3 + Echo Show 5 – Price dropped from $290 to $150 – (our review of best Home Security Cameras)
Ring Video Doorbell Pro – Price dropped from $250 to $170 (our review of best Home Security Cameras)
SimpliSafe 9 Piece Wireless Home Security System – Price dropped from $300 to $210 (our review of best Home Security Cameras)
Blink Outdoor wireless weather resistant HD security camera – Price dropped from $250 to $150 (our review of best Home Security Cameras)
Amazon Fire HD 10 Tablet 32GB – Price dropped from $150 to $80 (forum post about E-Readers for use in a survival situation)
Amazon Kindle w/ Front Light – Price dropped from $90 to $60 (forum post about E-Readers for use in a survival situation)
Samsung Cube Smart Air Purifier – Price dropped from $700 to $600.
Molekule Air Purifiers – up to 20% off
Instant Pot Ultras – up to 33% off – (our blog post about using an instant pot to cook dried beans)
Masterbuilt Electric Smoker – up to 17% off
Samsung EVO microSD cards for your trail camera, security camera, phone, and more – various discounts
Coleman Outdoor Gear – Up to 40% off
LifeStraw Go Water Filter Bottles – Up to 30% off
Walker’s Ear Muffs – Up to 50% off
9-Hour Emergency Candles – Price dropped from $30 to $20 – 33% discount
Enbrighten LED camping lantern – Up to 20% off
Read MorePrepping for civil unrest
Anyone here anticipating/prepping for civil unrest?
Read MoreToilet paper vs. a bidet
With toilet paper in short supply, many people are switching over to bidets that you can attach to the side of your toilet. I know bidets are very popular and common place in countries other than the US, but it is something I’m not too familiar with.
Do any of you have one? What was installation like? What are the steps to using one? Do you recommend it to others?
Read MoreShout-out for arugula!
My wife and I experimented with some cool-weather crops this fall, our first time doing so since recently relocating to northeastern Washington state (zone 6). We planted spinach, kale, and arugula from seed in late September, but then winter came early and we had 2 hard freezes (when the temperature drops below 27 degrees f), 10+ frosts, and 3 snowfalls totaling about seven inches, all before the middle of November. I all but gave up on the crops, but as the snow melted off we were pleasantly surprised that things were still alive, and the arugula was nearly ready to harvest. Granted, the growth was rather stunted, but after spending a week covered in snow I was amazed we had anything. The spinach and kale produced enough to garnish a salad, but the arugula stole the show.
Note the frost in this picture!
Read More
Non ham radio choices
Which non Ham radios format do you recommend, FRS, GMRS or MURS? And second to that which hand radio do you recommend that would also allow for listening to NOAA, emergency radio, FM, AM, etc?
Read MoreMini flashlight recommendations?
Hello! Has anyone found a mini flashlight that they love? By “mini flashlight” I mean a flashlight about the size of your index finger. A single AA battery type, or rechargeable, but something that could easily fit in a pocket.
Thanks!
Read More