Getting started in gardening
Developing a successful garden requires some preparation and basic knowledge, but no complex skills. It’s fun – especially if you love cooking or have kids – and it’s pretty cheap, especially if you focus on growing things from seed instead of buying plants from a nursery and if you compost instead of buying fertilizer. Even if you have no tools at all, you can get started for less than $100 (assuming you don’t buy a wheelbarrow). If you own the basic tools, you can get started for $25 or less. A small garden won’t make you food self-sufficient, but it will add variety to your table and it will give you the skills you need to expand your garden rapidly if you do want or need to grow more of your own food at home.
I’m writing this post in mid-July, when many people might think they’ve missed the window to start. Good news: you haven’t. There is a fall gardening season starting in a few weeks. Start preparing now and you’ll be ready.
I’m writing this post as a Quick Start-style guide. I’ll give you the major points and some details on why they are important and how to do them. I may update and expand it or add supplemental guides as I have time and as the seasons change. Other experienced gardeners should feel free to chime in with their advice. Novices should feel free to post questions.
Here are the main steps, each of which are explained in detail below:
1) Pick a sunny spot big enough for two 4×8 foot beds
2) Order your seeds
3) Prepare your soil using double dig or hugelkultur methods
4) Plant seeds
5) Water frequently until seeds sprout, then less often
6) Mulch heavily
7) Thin seedlings as necessary
8) Manage your weeds
9) Harvest or prepare crops for overwintering in the ground
10) Put your beds to rest for the winter
11) Compost
Obviously, these are my personal opinions, based on my experiences and reading. I make no claims of professional expertise. Use at your own risk.
Quick Start Guide to Gardening
1) Pick a spot in your yard that is sunny all day long and convenient to check on. It should be big enough for two 4×8 foot beds with a 3 foot row between them.
Too many people (including myself when I started) assume that the garden will be unsightly or will somehow offend the neighbors, so they try to tuck it into some far corner of the yard where no one will notice. Don’t do this.
You need to pick a spot that gets as much sunlight as possible each day. Go out at 7am, 10am, noon, 3pm, and 5pm and look at how the shadows move across your yard. Find the spot or spots that get maximum sunlight. Gardening guides talk about a minimum of 7 hours, but you don’t need to count. Just find the spots that get the most sun.
Also, your garden will do best if you visit it every day. Some plants, like peas, actually bear more heavily if they are picked often. Some vegetables, like okra, get tough and inedible if left on the plant too long. So when choosing among your sunny spots, try to put your garden someplace where you will see it and walk by it every day.
If you don’t live somewhere with a strict HOA, consider a front yard garden. Most front yards have fewer trees and so more sun, and you’ll see it whenever you open your front door, get the mail, or get out of your car (assuming you’re driving anywhere these days). Yes, the garden can get unruly, especially in summer, but the flowering plants are often beautiful and kids absolutely love a garden, especially if you plant things like sorrel or snow peas that they can pick and eat. It’s a like a treasure hunt for edibles. It will become a conversation starter with neighbors, and may inspire some of them to start gardening too.
You may also consider drainage. Being toward the bottom of a hill, where the soil is continually moist, can be good, but don’t pick anyplace that is constantly muddy or gets big flows of water during rainstorms.
Select at least two rectangular patches of about 4×8 feet. If they’re side by side, leave at least 3 feet between them to walk and kneel. If you are very ambitious, you can add a third patch, but I would suggest starting modestly and adding beds over time because preparing beds is a lot of work.
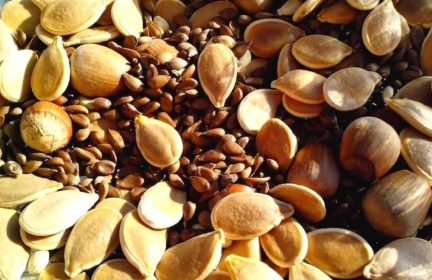
2) Order seed. Focus on fall vegetables like carrots, beets, turnips, kale, collards, radishes, mizuna, and green onions.
I put seed ordering second on this list because you need to make sure that you actually have a suitable space to garden before you order seed and you may choose to order more if you decide on a bigger garden.
As a very rough rule of thumb, a typical packet of seed will fill at least half of one of your 4×8 beds. (We’ll talk more about plant spacing below.) You’ll also want some variety, so with these things in mind I would suggest buying 4-5 packets of seeds for two beds.
The key things to consider here are your frost date and time to maturity. You want plants that will produce food before the first frost in your area (you can look this up online ‘first frost in [zip code]’). When you start browsing seed, you will find in the seller’s description (if shopping online) or the seed packet (if you are in a store) a ‘time to maturity’. For most root crops and greens, this is the typical time from planting the seeds until the plant is ready to eat. Pick things that can be ready at least a week or two before your expected frost.
A word of caution: things get more complicated if you are growing crops where you eat the fruit of the plant – things like tomatoes or okra. Then date to maturity means the date when the plant starts to produce food. If you want a good harvest, you’ll want another 2-6 weeks or even more to regularly harvest the produce. Also, some plants, like tomatoes and peppers, are typically started in a greenhouse or indoors under grow lamps. (Often the description/packet will mention something about starting indoors.) In that case, ‘time to maturity’ begins from when the juvenile plant is brought outside and planted in the garden. For your first fall garden, I don’t suggest trying anything you need to start indoors, and you will save money if you don’t buy whole plants from a nursery.
What to plant? I suggest things like carrots, beets, turnips, radishes, mizuna, kale, collards, or green onions. All of these are fairly simple to grow and come in multiple interesting varieties. I suggest having some fun and picking things you don’t always see at the grocery store (at least where I live): Chioggia beets, Lacinato kale, French breakfast radishes, red carrots, etc.
Some people grow legumes as a fall crop, but you may need to build a trellis, so I don’t recommend it for your first garden. You might try garlic, especially if you want to eat the immature green garlic in the spring, but I won’t cover the details here, so you’ll need to find a guide online. Choose hardneck varieties so that you can eat the garlic scapes.
Where to buy seeds? You can order from a big nursery company, like Burgess or Gurney. Buying seed packets from your local nursery or big box store is fine too. But far and away, I have had the best results with ordering from Seed Savers Exchange (SSE), which sells heirloom, organic varieties. Their shipping and handling can be higher, but their seed prices are reasonable.
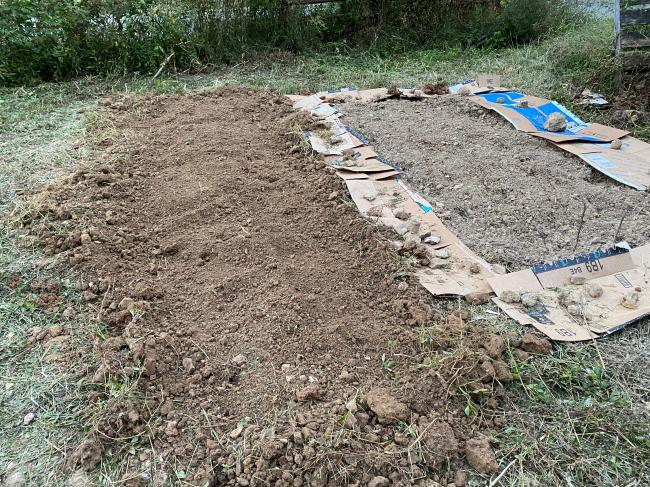
3) Prepare your soil using the double dig method, which will create frameless raised beds.
There are many, many ways to prepare garden beds. I like the double dig method because it’s effective, it uses simple hand tools, and it creates raised beds without having to build framing. You can find out more about its benefits here: http://www.growbiointensive.org/FAQ/FAQ_DoubleDigging.html It does require some sweat and effort, but you don’t have to do it all at once. You can do part of the project every day until it is done.
I’ve also included a note about hügelkultur (building sharply raised beds over dead tree trunks or branches) below.
If you are physically unable to dig or have contaminated soil (e.g., you live in an urban neighborhood where the houses were painted with lead), you can look into bag gardening and straw bale gardening as easy ways to get started without the expense of building framed beds and filling them with clean soil. I don’t recommend using a rototiller. It breaks up the soil structure and doesn’t get deep enough.
The double dig method works like this:
1) Read this list all the way through. If you are going to skip step 7, mow your grass really short on the selected patches. If these instructions are unclear, see if you can get a copy of How to Grow More Vegetables by John Jeavons – your library probably has a copy. It has illustrations.
2) If you don’t have them, buy:
a. D-handled, square bottomed spade (basically a square-tipped shovel)
b. D-handled spading fork (looks like a pitchfork, but isn’t)
c. Large plastic watering can (cheap and durable) or a sprinkler and hose
d. Optional: Tape measure (you can get by using string or a garden hose or a ruler)
e. Optional: Hard rake (bow rake or level rake, not a leaf rake)
3) Water thoroughly the space you have selected for your beds or wait for rain. You want moist soil (moist like a good cake), not mud. If you pour water on the spot and any standing water is not absorbed into the soil within 2 seconds, stop watering.
4) Wait a day, so the water can soak in
5) Use the spade to cut the edges of your rectangle. Go all the way around your 4×8 foot bed, just driving the blade in and taking it out. You can use a tape measure to make sure the dimensions are correct, but I wouldn’t too much worry if it is exactly square; the edges won’t be perfect anyway if you’re not building a frame. (If you really do want it square, you’ll need 4 stakes – scrape wood or sticks work fine – and some string. Use a measuring tape and your eye to get a 4×8 shape (make sure you have two 8’ sides and two 4’ sides), tying the string around each stake so that the lengths of the sides can’t change. Then measure corner-to-corner, diagonally across the bed. Adjust the stakes until the diagonals are equal. Now your bed should be square.)
6) Use the spading fork to break up the top layer of soil. Start about 12” from the short side of the bed, touching one long side. Step on the fork to drive the tines all the way in, and then pull backwards on the top of the handle until the tines come almost out of the ground. Then lift low on the shaft, just above the tines, to pull the head out of the soil.
Work sideways until you have gone all the way across, then step back 12” and repeat. Work backwards until you have forked all of the bed. You always work backwards to avoid compressing the soil. Note that you are just loosening up the soil, not ‘turning it over.’
7) Pull up all of the grass clumps. (Truthfully, I don’t always bother. Sometimes I just cut the grass really short with the mower before I start and leave it there. You may have to deal with more weeds later (grass in the garden = weed) but it saves time and effort at the start.) Set aside the clumps to compost.
8) Dig the bed. Start again at the short side of the rectangle:
a. With your spade, dig out one 4 foot row of soil, putting it some buckets or wheelbarrow.
b. Take your fork and stand in the trench you have created. Fork over the soil at the bottom of the trench. The goal here is to loosen it up to make it easier for plant roots to penetrate. Don’t worry if it’s still a bit chunky.
c. Move over 12” and start again. Shovel the dirt from this new row into the trench from the first row. Don’t turn over the soil. Just let it slide off your shovel in way that helps it break up and fluff up a bit. Once you have an open trench again, fork the bottom.
d. Repeat until you get to the end of the bed. After you fork the bottom of the last trench, fill it in with the soil from your bucket or wheelbarrow.
9) Use a hard rake to level the top and shape the sides of the bed. All of that forking and shoveling will have added air to the soil (which is good), and raised the soil level 3-6”. Also, if you skipped step 7, raking may let you get out some clumps of grass.
10) Water the soil lightly and let it settle for a day before planting.
Alternative method: Hügelkultur
Hügelkultur involves using dead wood (preferably green) as a source of nutrients and moisture retention for your vegetables. It can work well anywhere, but I think it is especially good on gently sloping ground, where it can make de facto terraces. Be aware that these are much less attractive than traditional garden beds, especially if you are doing a front yard garden. Here are your steps:
1) Use a spade to outline a space about 2×8 feet. On a hill, make this perpendicular to the slope. You can even make the shape a very gentle ‘U’ or arc, so that water running downhill will be caught in the belly of the U.
2) Dig out the trench about 12” deep. Try to keep the top grass layer together. You might try cutting the grass out and putting it on one side of the trench and digging the soil and putting it on the other.
3) Fill the trench with green wood from recently cut trees, until the wood is slightly higher than the surrounding soil. Whole tree trunks are great – they don’t need to be split. Branches with leaves still on them are great too. The wood acts as a nutrient source for the plants and a sponge that soaks up and releases water. You can use woodchips, but they will decompose faster, so you’ll lose the special properties of a hügelkultur bed after a couple seasons.
4) Put the grass upside down on top of the wood.
5) Put all the extra soil on top of the upside-down grass
6) Dig out a shallow trench (about 6” deep) on the uphill side and dump the dirt from that on top too. The trench will help catch water, especially if you built your bed in that gentle arc.
7) When you are done, your bed will have a tall, almost pointy shape, like a miniature mountain range. The dirt will have probably run down the sides, making the bed closer 3×8 or 4×8.
8) Give the soil a day or two to settle before planting. You can plant on the peak of the bed and along each side, especially near the top.
4) Plant seeds. Time your planting so that the plants will mature at least 2 weeks before frost. Use the ‘space between plants’ directions for your seeds for the space between plants AND the space between rows. Don’t walk on your beds.
How late you can plant your fall garden depends on your climate zone. Find your frost date and then use the time to maturity information on your seeds to figure out how early you need to plant. Hedge your bets by adding 1-2 weeks to the time to maturity.
Plant your bed while kneeling on the path next it. Don’t walk on the bed. It will undo your hard work in the double-digging. If you absolutely must walk on the bed for some reason, put down a board and stand on it to distribute your weight.
The instructions that come with your seeds (or are found on the website where you ordered them) will give instructions for space between plants and space between rows. The spacing between rows assumes that you are growing a large, conventional garden rather than a densely planted raised bed. Ignore than number, and instead space your rows just as far apart as you space your individual plants. This will make better use of your garden bed space and, as your plants grow up, their leaves will help shade out weeds and trap moist air close to the soil. For plants with wider spacings, stagger the rows to make better use of space.
You can make spacing easier by finding a piece of scrap wood and marking common planting spacings on each edge. Adjust where you start the markings on the second edge, to create staggered rows. Another option is to make a cardboard triangle with each side the length of the desired distance between plants. If you put a seed on both bottom edges and the top point, you’ll get two staggered rows as you move it along.
Plant seeds at the depth specified on the package. If you are working with very small seeds, you can try making a little chute out of a folded scrap of stiff paper, putting some seeds in it, and then shaking them off the end one at a time. If you get too many seeds in your row, don’t worry. You can thin later.
Not every seed you plant will germinate, so many plants suggest a dense planting (e.g., every 2”) followed by a thinning (e.g., thin to 4”). For the best harvest possible, you should follow this. However, if thinning sounds like a tedious chore (and it can be), you can plant seeds at the thinned spacing (e.g., every 4”) and just accept that you will have a smaller harvest if 20-30% of your seeds don’t germinate.
5) Water. Water as soon as your seeds are in the ground. Water frequently (at least every other day, unless it rains) until your seeds germinate. Soil should be moist, not muddy. Then water less often but monitor soil moisture regularly.
Once your seeds are in, water gently. A watering can or sprinkler will work.
To know if you have given enough water, spray or pour out a bit of water and count how long it takes for the soil to absorb it. If the standing water is gone quickly, keep watering. If it is not absorbed after 2 seconds, stop watering.
Keep the surface of the soil moist until your seeds sprout. Moist means like the inside of a good cake, not mud. Feel the soil with your hands; don’t just look.
Once your seeds have sprouted, they will still need regular watering or rain. To know if your soil needs water, push your fingers into the soil about 2”. If the soil is getting dry 2” down, it’s time to water.
Aim for fewer, more thorough waterings. This encourages root development.
6) Mulch. Mulch is the key to efficient gardening. It suppresses weeds, adds nutrients to the soil, and traps moisture.
Mulch is almost any organic, weed-free medium that you can spread over your soil. You can use leaves, grass clippings (preferably mixed with leaves), or wheat straw [see Josh’s post below, however, about buying these things]. My favorite is partially decomposed compost.
Mulch keeps weed seeds from reaching the soil, reducing the amount of weeding you need to do. It also traps moisture and keeps the soil from drying out. This reduces the need for watering and also makes your soil a friendlier place for helpful creatures like earthworms. The mulch will break down over time and the worms will incorporate it into the soil, making it healthier.
When you have seedlings, spread your mulch between the rows. After you thin your plants (if you are doing that) you can spread your mulch further so that it surrounds every plant. It can touch the plants – that’s fine. Just make sure that it is lower than the lowest leaves.
As your plants grow, deepen your mulch. 3-6 inches deep is ideal, but you’ll get plenty of benefit out of just 1-2”. Make sure to add more as your mulch decomposes.
7) Thin seedlings. If you planted anything that needs thinning, use scissors to snip off unwanted seedlings just above the soil. If the mature plant has edible greens, put the thinnings in a salad.
8) Weeding and pest management. Weed as necessary. Don’t let weeds take over your garden. You probably don’t need pesticides.
Weeds compete with your plants for sun and nutrients. With close plant spacing, you will have fewer weeds once your plants mature. Mulch will help too. But do take the time every few days to pull whatever weeds you find. A hoe can be helpful, especially if you have trouble bending over, but you can also pull weeds by hand. If you have neglected things and need to remove a lot of weeds, a hand cultivator (looks like a large, bent fork) or similar tool will make things faster.
Pest control is tricky to advise on, since things vary by region. Research organic solutions online if you’re having a serious problem. I use almost no chemicals in the garden and rarely have problems (I’ve used neem oil a few times). Cool fall weather means fewer bugs and the larger crops you’re planting mean that a little damage is more tolerable than if slugs eat one of the only 3 pepper plants in your garden.
9) Harvest. Research which of your crops can overwinter in the ground. Research best ways to store. Use all of what you harvest.
If you are checking on your garden regularly, you’ll get a sense for when things are close to being ready to harvest. Don’t worry if things seem to start small or grow slowly. Your plants will grow faster as they get larger and develop more leaves and roots.
You can check your root crops by brushing away some mulch and soil and checking the diameter of the top of the bulb. Cover it back up if it’s too small, although recognize that your garden vegetables won’t always be as big as what you’re used to at the supermarket (especially conventional produce grown with fertilizer).
Not every plant will be ready at the same time, and you can also start using some things when they are on the young side, to have a continual flow of fresh produce into your kitchen.
Not all crops needs to be pulled when they are mature. Some plants will overwinter in the garden depending on your climate. Kale can overwinter in some places. Carrots can stay in the ground even in some cold climates, if you mulch them really heavily so that the ground doesn’t freeze around them. Research your crops and your climate.
You’ll also need to do research on storage techniques. Many greens freeze well if blanched in boiling water first. Many root crops store well in the fridge (or even outside it, if you have cool, dark space). Perhaps someone else can create a guide and forum on food storage to provide help.
Lastly, make sure to research how to use all of what you harvest. Radishes can be roasted and pickled, not just eaten in salads. Radish greens are edible and beet greens and turnip greens are delicious. You don’t often see them attached to the roots at the store, but don’t reduce your crops to their supermarket brethren. Use all of what you get. A little online searching will yield numerous recipes.
10) Put your beds to rest. Any beds without overwinter crops should be heavily mulched.
Clean any plants or weeds out of your beds (including the roots of any greens you have harvested) and then put down a thick layer of mulch. This will protect your soil until spring. This can be as simple as blowing the leaves from your yard over your garden bed.
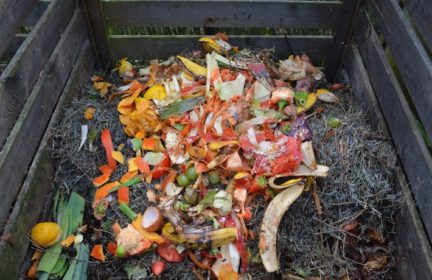
11) Compost. Collect your kitchen scraps and yard waste to enrich your garden in the spring. You don’t need a special bin, but you do need to alternate layers of ‘green’ waste (fresh grass, weeds, or kitchen scraps) with ‘brown’ waste (leaves, straw, or dry grass).
Compost is just decomposing organic matter that breaks down, over time, into a rich humus. Added to your garden, it will restore nutrients, loosen up your soil, and introduce beneficial organisms. It is far, far better for your soil and plant health than chemical fertilizer, and you can make it at home for free.
If you layer your compost properly, it will, well, compost instead of rotting and will not be particularly smelly.
A lot of science has gone into studying how to get the most soil nutrients out of your compost pile. It is worth reading some of that information, but a lot of that literature assumes you are building a whole compose pile at once, and so can layer it in a fairly scientific way. Most people don’t have enough waste on hand to do that. Here is what you can do instead:
1) Pick a good spot (most people go for someplace out of the way, but others like to put the pile right in their garden, so that it enriches the soil underneath it).
2) Loosen the soil under the pile with a spading for and then put down a 1-2 inch layer of brown material about 3 feet in diameter – leaves, straw, dry grass, old corn stalks, etc. Basically anything from your yard that looks brown and dry and isn’t a twig. If you blow your leaves, blow them into a pile next to where you compost pile is to have on hand. You can buy a bale of straw from your garden center if necessary [but see Josh’s caution in his post below] and use a few handfuls from that if you have no brown waste in your yard.
3) Get a compost bucket for your kitchen. You don’t need to spend any money. Go to the bakery at your grocery store (if you are still going into stores) and ask them if they have any old frosting buckets. Get a bucket with a lid. I find that a smaller one (about 1.5 gallon size) can hold a week of kitchen waste. It’s better (less smelly) if you empty it more often, but you may not have the time.
4) Put in your compost bucket everything that is not oily, meat, or dairy. Some people skip egg shells out of fear that they’ll attract rats, but I’ve never had that problem. Collect vegetable scraps, coffee grounds (with the filter), tea bags and leaves, white napkins, etc.
5) When your bucket is getting full or you have the time, take it to your compost pile. Dump it out (may be quite smelly if it has been a while since you last emptied it) and use a stick to spread it into a layer (more or less, no need to be precise). Throw leaves or other brown material over the top to get at least a 1-inch layer. Tip: if your bucket is really smelly, rinse it out and then pour a half-inch of white vinegar in the bottom. No need to empty it; just start collecting your next batch of waste on top of the vinegar.
6) If you do weeding or mow the lawn and bag the grass, put that on the compost pile too. If it is a large amount, break it into several layers 3-6 inches thick, depending on how dense the green waste is, with brown waste between them.
7) When your pile gets to be about 4 feet in diameter at the base and 3-4 feet tall, start a new pile. Take a spading fork and mix around the old pile, to mix up the layers and add some air.
8) Wait a month or two and you can use it as mulch. Wait 3-6 months and it will decompose noticeably and you can add it to your soil like fertilizer in the spring.
12) Resources. The Prepared will be updating the Best Survival and Prepper Books page soon to include a good selection of gardening books. Watch for the revised list. In the meantime, start with How to Grow More Vegetables by John Jeavons if you want to learn more.
-
Best Replies
-
Comments (32)
-