How to sew and repair a leather glove
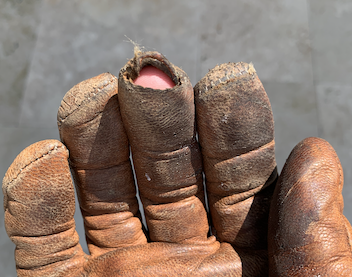
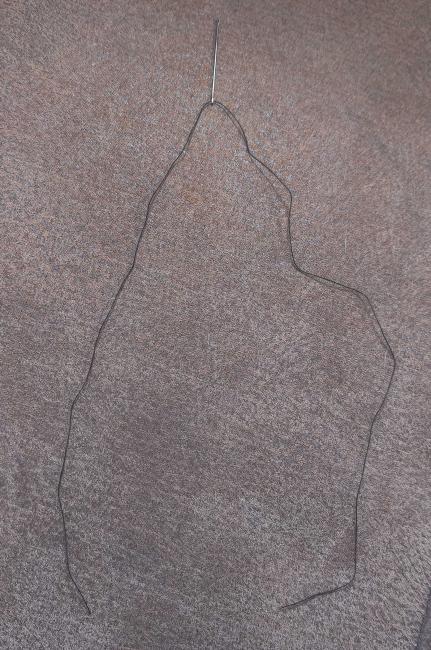
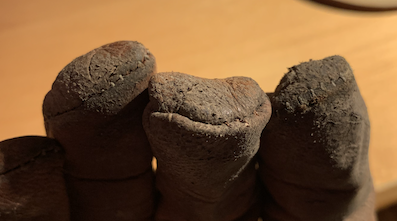
I have a pair of deerskin leather gloves that are fantastic. They have far outlasted any other pair of gloves I’ve owned. However, the stitching on the tip of one finger has ripped:
I want to repair them, and I suppose I could take them to the local shoe repair shop. But I think this is a good opportunity to learn how to fix it myself – I just don’t know the first thing about sewing. Can anyone guide me on how to do this and/or point me to a good YouTube video? (It’ll probably look like Frankenstein’s neck when I’m done, but I don’t care. 🙂
As an aside, the gloves were from the Oregon Glove Company. If you’re looking for holiday gift ideas, these would be a great gift. (And no, I’m not associated with the company in any way – just a happy customer.)
Thanks in advance,
– WS
-
Comments (51)
-
 Barb LeeContributor
- September 25, 2021
Barb LeeContributor
- September 25, 2021
Retired harness maker here. Unfortunately, the leather has ripped, not the stitching. I can see the shred inside the finger. You can try repairing your glove with a “Speedy Stitcher” sewing awl. http://www.speedystitcher.com/ There is a bit of a learning curve, but I see there are lots of YouTube videos on using it. The trick will be to hold the glove still while you stitch. What comes to mind is placing the finger of the glove in a vise, or using a pair of Vise Grips and gripping them between your knees while you’re sitting. The thread is contained in the handle on a wee spool, and threads through the handle and an awl/needle. You push the awl/needle through the leather and withdraw it slightly, which creates a loop in the thread. You pass the free end of the thread through the loop, snug it a bit, then pull the thread to seat the “lockstitch” between the layers of leather. You can practice on a piece of cardboard.
I suspect the leather is going to be quite weak there and the fingertip will always feel funny. But there’s nothing better than a loved pair of gloves.
The other usual hand stitching method involves an awl to punch holes, and a piece of thread with a needle attached to both ends. You pass one needle through the hole you’ve made with the awl, and center the thread in the hole. Make a second hole close to the first, pass one needle through, then the other, from the opposite side, creating a stitch. Repeat. Dental floss makes good thread.
-
Watermelon Samurai
- September 27, 2021
Reading your answer here plus your other responses below, it’s clear you are a wealth of good information! Thank you very much!
Couple of questions:
1) Given the leather is weak, should I be sewing on a small patch (so I can sew into stronger leather) or just stick with mending the tear?
2) If I’m mending the tear, how far back from the edge should I poke the needle through? How much distance between stitches? (Just copy what’s on the other fingers?)
3) Once the stitching is done, how do you tie off the end of the string? A square knot?
I have an unused gift card that’s been waiting for a good use – I think I’ll use it for a Speedy Stitcher.
-WS
-
-
Barb LeeContributor
- September 25, 2021
Hubby used to by work gloves from the factory in Portland.
-
Barb LeeContributor
- September 25, 2021
Another little tip if you decide on the double needle technique. Thread the needle, pulling a few inches through. Then pierce the “long” side of the thread with the needle and pull the thread snug against the eye. This helps you lock the needle onto the thread so that it doesn’t come unthreaded every time you make a stitch.
-
Bob
- September 25, 2021
Good afternoon Watermelon Samuri,
A real good question. I’m not here to even attempt an answer. Dogpatch already did.
I just want to write that for our large umbrella prepper group out of metro Richmond (I’m on the coast) I’ve started a field trip project to visit Jo-Ann’s sewing store.
Sewing and repairing fabrics eg ripstop nylon, is an important – and neglected – prepper subject.
We want our preppers to know about this and have a field sewing kit.
-
Watermelon Samurai
- September 27, 2021
@Bob / @Alisa Felix / @Dogpatch,
What would you recommend to have in a sewing kit that would handle the most likely repairs, e.g. socks, denim, backpacks, work gloves?
Thanks,
-WS
-
Alisa Felix
- September 27, 2021
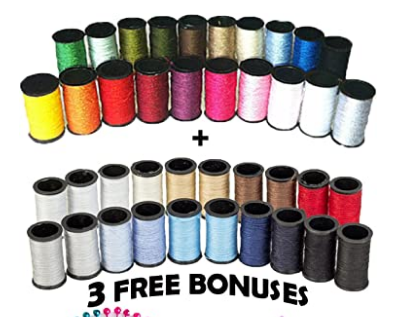
Get a variety of colors in all-purpose cotton thread.
This kit has a good assortment. https://www.amazon.com/dp/B015KM765Y/
The thing I like about this kit is that it has some wacky colors like blue, red, orange, and yellow. Those spools will usually get very little use. But what I like most is that it has a variety of browns, grays, whites, and blacks. Those are your most common colors and having slight variations of those common ones will allow you to match up the perfect color.

Any basic kit will come with a bunch of small and medium sized needles which are good for delicate fabrics, socks, and fine work. For denim, canvas, and leather though you may want a heavier and thicker needle (like the triangle point one I mentioned) and a spool or two of black or brown heavy duty thread. When patching up gear or a work glove, I doubt you will mind too much about the color being spot on.
In short… get a basic beginners kit for your EDC clothing, and then a heavier duty needle and thread for gear.
-
Watermelon Samurai
- September 28, 2021
Thanks!
-
Bob
- September 27, 2021
Good afternoon WS,
For us, besides the basic strong threads that pack easy, eg Gutermann 100% poly 100 m on thin spool ideal for packing,
We need a spool of Kevlar fireproof thread. If garmet, eg gloves are fireproof, so, too, must the repair material be.
Asked the store to show us some XL hooks and eyes fasteners for field needs.
Ditto re some large sew on snap fasteners.
We need a small variety of buttons for field clothes.
The needles must be the easy to thread type … soon will ask ’em to show us some triangle pointed leather needles for sewing leather.
Will check for a small roll of elestic banding and small amount of elestic cord, for eg repair of some clothes and maybe OK for mosquito net field repair.
Will not need eg scissors, already on multi-tool (on some, at least) and no need for thread wax. Bow wax just as good and already carried by some.
Will definitely see that plyers feature of multi-tool can meet requirement of sewing leather w/ triangle pointed needle.
As an aside, asked store to show us a bolt of mosquito netting and one of rip stop nylon.
……
Bottom of kit reserved for mess of threads and buttons. Not too much new under the sun !
……
Footnote: Those sewing machine cases on wheels are prepper-ideal for some loadouts ! They do cost !
-
Watermelon Samurai
- September 28, 2021
Thank you!
-
-
Alisa Felix
- September 25, 2021
Something I can help out with!!
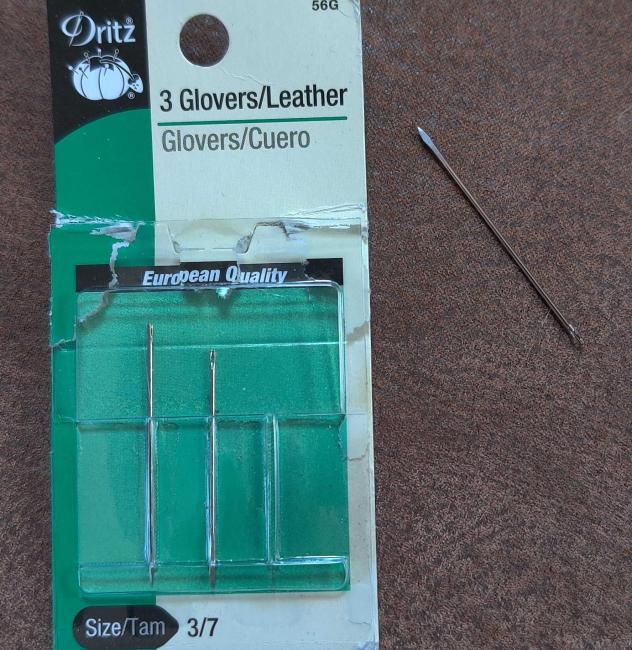
- So first thing is to get a little sewing kit. Can get this at the dollar store probably or any craft store. Should be less than $5 probably. I imagine a normal needle should be able to go through that type of leather, but if you are struggling to push it through, get a special leather or thick material needle from a craft store. These leather needles have a triangular point to go through thicker material more easily.

- I like to double up my thread and make it twice as durable. So unwind and cut off probably two feet of thread and thread your needle through it and place it in the middle of the string.
 Then tie off the two ends together so you have the needle inside of a circle of thread.
  Then tie a few knots at the end to make a smallish ball, that way the ball will get stuck and not be pulled through as you are threading. You now have doubled up thread that will be twice as durable than a single strand.
- See if you can turn your glove inside out. If you sew up the finger from inside, you won’t be exposing the stitching as much to things that can cut it, and it looks nicer as well.
- Just go back and forth with the needle through the two layers of material until you seal up the hole.
- When you are done and want to finish, run your needle through one of the stitches and tie a basic knot in it to prevent it from unravelling. Cut off the excess thread.
- And you are done!
-
Bob
- September 25, 2021
Good evening Alisa,
Will those triangle-pointed needles be typically found at a Jo-Ann’s sewing store ?
Are the new categories of thread types just “marketing” or is there really a difference between and among eg upholstory thread, sailcloth thread, button thread, etc ?
Thanks in advance.
-
Alisa Felix
- September 26, 2021
I bought those triangle-pointed needles from Michael’s craft store, but Jo-Ann’s for sure will have them as well. The staff at these stores are quite knowledgeable and I asked for something to sew up some heavy canvas and they led me to them.
I’m not too deep into the sewing world, but pride myself in being able to repair things that I need to. So take all this with a grain of salt and ask the experts at your local sewing shop. But… there are many different types of threads that are better for some use cases than others.
There are types such as: All-purpose thread (what 99% of us probably have), Heavy duty thread (thicker and maybe even UV resistant. This would be a good prepping thread for repairing gear), upholstery thread (thicker and more durable than all-purpose), and lots more.
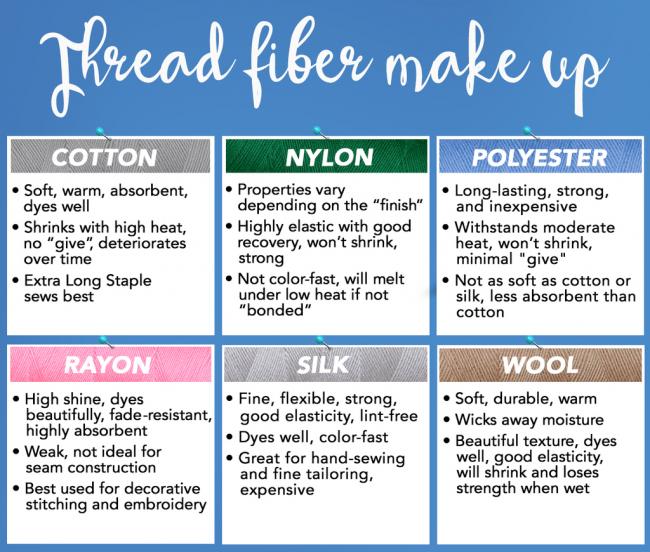
Thread comes in a variety of different fibers and even blends at times. Some thread is thin, some thick, and some even has durable synthetic line through the core and then a cotton overtop. I did a search and found a guide on different materials used in thread, hope it is helpful.

-
Bob
- September 26, 2021
Good afternoon Alisa,
This is appreciated. Thank you.
We’ve got Mitchel’s here. Will check on return.
Above chart clarifies much for me.
-
Barb LeeContributor
- September 26, 2021
Bob, in the US Tandy Leather is the go-to for all things hobby leatherworking, Including how-to books on hand stitching techniques, needles, thread, awls. The retail leatherworking division of Weaver Leather is a source for stitching supplies, nylon web, BioThane, big rolls of Velcro and all sorts of hardware. In the UK, Abby Saddlery is a source, although I believe it’s wholesale. They’d know where to help non-pros source materials though.
Anything about pushing a needle through material and creating a stitch that applies to leather would also apply to nylon web, BioThane, canvas, etc. (I refer to “creating a stitch” because actually preparing leather for stitching usually involves a few more steps than webbing or synthetic materials.)
Absent an awl, be sure to have a pair of pliers on hand to drive even the recommended needle through even upholstery leather. Those deerskin gloves last long for a reason.
Polyester thread predominates in equestrian goods, followed by nylon, and traditional waxed linen trails. JoAnn I believe, offers an outdoor gear thread that would be suitable for mending gloves. If you’re buying from some place like Tandy, #138 nylon or polyester would be as heavy as you’d want to go for gloves. The “waxed” feature of these threads is for the benefit of the heavy duty stitching machines, to my knowledge it has no impact on durability of synthetic threads.
-
Bob
- September 26, 2021
Good afternoon Dogpatch,
This is great info for us.
Yes, pliers. My thimble to push through needle had beena Lowe’s wooden paint stirer.
Thanks for this info. Will develop soon.
-
Watermelon Samurai
- September 27, 2021
Step-by-step instructions (with pics!) that even I can follow – thank you!
Are there any general guidelines for how far apart the stitches are made, and how far back from the edge of the fabric stitch should go? (Yes, I asked Dogpatch the same question, but I’m thinking – perhaps wrongly – that fabric and leather would be treated differently?)
I wanted to ask about thread too, but I think you answered that below. I should use a heavy duty polyester thread – is that correct? Or is doubling up the all-purpose thread good enough?
-WS
-
Alisa Felix
- September 27, 2021
The closer the stitches are together, the stronger it will be. Too close however can cause there not being enough fabric to grab onto though. 2mm apart should be good. Just like follow the distance of the stitching that you can see in your pointer finger of that glove picture.
Don’t sew right up to the edge of the fabric, or you will quickly learn that the very edge is weak and isn’t enough to grab onto as well. So go 1/2 cm down either side of the glove.
Adding a patch will add strength, but may cram your finger inside the glove.
I’ve actually never used heavy duty thread and always just double up the all-purpose thread that I have. And if it ripped open yet again, then oh well and then I can go buy some heavy duty thread. Usually it’s not my thread wearing out that is the issue after a fix, but the surrounding material giving way yet again.
-
Watermelon Samurai
- September 28, 2021
Makes sense – thanks.
When you put the stitch back from the edge, do you fold the fabric back on itself and include the folded part in the stitch?
I picked up the triangular tipped needle you recommended (and a thimble) and I will try that. I think it will work. If not, I’ll use the speedy stitcher when it arrives.
Hopefully I won’t make the finger on the glove the same length as the thumb… 🙂
-
CR
- September 30, 2021
Hi Watermelon Samurai! I’ve done a fair bit of sewing on various types of leather goods including some lovely elk skin projects using both hand and machine stitching. Note a significant difference between stitching leather and cloth is that cloth has a weave that the needle slips between, but with leather you are creating a new hole on each stitch for the needle. That means that the closer you place your stitches the more you weaken your leather material. If those were my beloved gloves, I would swipe a half finger off a less loved pair & slip it over that damage, then stitch it on flat between my finger joints. It looks as if the damage has left a thin weak edge that wouldn’t support much stitching, and you won’t want to trim your finger to the new shorter length after all. 😉
-
Watermelon Samurai
- October 13, 2021
Good advice – thank you! I don’t have another pair of gloves to sacrifice, so I’m going to try to carefully sew the edge back together & see how well that lasts. (Hopefully I’ll get at least a little more use out of the gloves.) But if I ultimately wind up needing a new pair, I’ll keep this pair for repair material.
- So first thing is to get a little sewing kit. Can get this at the dollar store probably or any craft store. Should be less than $5 probably. I imagine a normal needle should be able to go through that type of leather, but if you are struggling to push it through, get a special leather or thick material needle from a craft store. These leather needles have a triangular point to go through thicker material more easily.
-
Thekaren
- September 26, 2021
In a pinch (depending on what you use these gloves for) you could use a leather needle and some waxed dental floss and darn it.
-
JB
- September 26, 2021
If I had a container of waxed dental floss and another of unwaxed dental floss, would one be better than the other for an emergency repair?
-
Barb LeeContributor
- September 26, 2021
It shouldn’t make any difference. Prior to synthetics, linen thread was waxed to give it some rot-resistance. Nylon and polyester threads are waxed to help them slip through sewing machine mechanisms. I think floss is similarly waxed to make it glide over tooth enamel, but I doubt it adds any durability to dental floss for “off label” applications. I am sure there are differences in strength/quality between brands of floss, but don’t have a recommendation there.
-
Bob
- September 26, 2021
Good evening Dogpatch,
Had good time reading above. This coming weekend will be doing so volunteer traffic – parking lot work with the first “free” statewide dental clinic since the quarantine.
Will be having meals and coffee breaks with the dentists and they will talk about specifics of dental floss – and ribbon – tapes like we discuss products here. These discussions are better than community college classes or prepper lectures. Will learn of stuff never even contemplated.
……
Am trying to develop a sewing / fabric repair (eg mosquito netting) field kit for individual prepper use. List starts off with Gutermann brand long axis thread spools. Besides thread quality (With Guttermann it’s still a win-win situation) weight, volume and packability important matters for development.
Next month will R&D triangle pointed needles.
……
For reasons unbeknownist to me started thinking about the 20 mule team Borax commercials and their famous logo of yesteryear. President Reagan did some B type movies sponsored by them.
A harness for a team of 20 mules must be a big project with a LARGE account receivable !
-
Barb LeeContributor
- September 26, 2021
Hello Bob,
This is hardly prepper material, but since you’ve “encouraged” me, I can’t help myself. Perhaps you would enjoy this video of these replicated borax wagons and 20 mule team hitch. https://www.youtube.com/watch?v=S_Thvbp0rPoThe man who built these wagons is probably America’s preeminent wheelwright and a darned nice guy. He did some restoration work on my beloved antique carriages for me. As for the harness? Not in this lifetime would I have tackled a job that big. My biggest project was a logging harness for a team of Percherons. Five sides of heavy harness leather.
-
Bob
- September 27, 2021
Good afternoon Dogpatch,
I’d argue that it is an important example of field stiching repair involving a real situation: a mule wearing harness.
A great film; fond memories !
-
Barb LeeContributor
- September 27, 2021
Copper rivets are easier than stitching for harness field repairs – lap pieces, punch holes, apply rivets. Most work harness is farm-fixed that way. Rivets also work with synthetics (webbing, etc.)
-
Barb LeeContributor
- September 27, 2021
I used to have this booklet. Not exactly gloves, but info on repairing straps etc might be interesting. http://reader.library.cornell.edu/docviewer/digital?id=chla7032063_8253_003#mode/1up
-
Bob
- September 27, 2021
Yes, good for field work.
I’ve used small nuts and bolts to repair thick cotton canvas in the field. Sewing probably impractical.
Used #6-32 x 1″ oval head Phillips. I remember it was fast repair.
Copper rivets sound like an ideal solution.
I teach vehicle evacuations and just about always there are those attending telling that they evac by horse, mule, etc.
Also have to know about evacs by snow mobile and boat.
Am partial to animals.
-
Alisa Felix
- September 27, 2021
I read a funny quote by Reagan as he described the hippie culture at the time.
“A Hippie is someone who looks like Tarzan, walks like Jane, and smells like cheetah”
-
Watermelon Samurai
- September 27, 2021
Great idea – I never would have thought about using dental floss!
-WS
-
-
Ralph McDowell
- September 27, 2021
Well, your gloves really look like if they have taken real beating at work. Here is what I recommend as far the repair task: while you get them repaired (re-stitched), just ensure that edges aren’t sewed too close together because that could cause discomfort to your finger.
Best of luck,
Ralph McDowell.
-
Ralph McDowell
- October 7, 2021
Deerskin lasts longer than the stitching – this is a common issue with the work gloves. I would use different types of gloves before becoming a prepper but now though I pay strong attention to the leather quality as well the stitching. The best ones that I have thus far are the ones by American Fur. I have been using a pair of these gloves for over a year and I am pretty sure (from the strength they have shown so far) that the stitching is not going to give up any time soon. And, the (deerskin) leather, it seems and feels the most durable of all.
-
Henry Tubbs
- October 7, 2021
Thanks for the company recommendation. I have been wanting a decent pair of leather gloves, and these should hold up much better than something from Home Depot. They even have 3M thinsulate and regular non-lined gloves depending on the time of year.
-
-
Alisa Felix
- October 7, 2021
Did you sew your glove yet? How did it turn out?
-
Watermelon Samurai
- October 13, 2021
Unfortunately, not yet. I have been traveling and I was sick for several days as well. But I will get it done this week, and report back!
-
Watermelon Samurai
- October 19, 2021
Ta-da!

…and I only stabbed myself with the needle once! 🙂
Alisa – your pictures and instructions were just what I needed. Thank you! I picked up the same needles as in your picture, as well as some brown nylon upholstery thread and a thimble. I folded the glove inside out and stitched across the split-open area and then back again for good measure, double knotting the thread at the beginning and the end. The length of the finger did get shortened a little bit because – as CR pointed out – the leather was thin at the tip and I needed to move the hole back down into thicker material. But the change wasn’t enough to matter.
The leather was difficult to push the needle through, and it was particularly difficult to get the needle to come out where I wanted it to. So my stitching does look like Frankenstein’s neck, but I have a working pair of gloves again and that’s all that matters. Thank you to everyone who helped me with this.
– WS (who’s no longer a sewing noob! 🙂
-
Barb LeeContributor
- October 19, 2021
Fantastic job!!
-
Thekaren
- October 19, 2021
It wouldn’t have counted to get you into the Menders’ Union if you hadn’t made a blood sacrifice. 😀
-
Watermelon Samurai
- October 21, 2021
ROTFL!
-
Barb LeeContributor
- October 21, 2021
When I was making harness, I never considered a job finished until I’d shed some blood on it. I finished everything.
-
Alisa Felix
- October 19, 2021
That looks better than perfect! Congratulations on joining the sewing experts club. We are going to see a full on quilt from you next week right?
Glad it turned out so well.
-
Watermelon Samurai
- October 21, 2021
I’m pretty sure the Mender’s Union requires a lot more blood to be spilled before they qualify you to do quilts…. I think I’ll “graduate” to something simpler – like repairing the torn strap on my shop apron. 🙂
My grandmother was an expert sewer. She did some exquisite embroidery: you actually couldn’t tell the top side from the bottom.
-
CR
- October 20, 2021
Great job! Those good gloves helped you learn a new skill! 😄
-
Carlotta SusannaStaff
- October 20, 2021
Looks great!
-
GB
- October 21, 2021
Looks great WS! Good job! How it looks on the inside isn’t important – you have a perfectly functional pair of gloves and you learned a new skill. Win-win!
As a long time maker of clothes, I am well rehearsed in the ritual blood-letting required by the sewing gods. As in, if you don’t bleed on it, not only doesn’t it count as a project, but it also just won’t work. 😛
Bearing in mind I come at this from sewing cloth and have no experience at all of sewing leather, waxing any thread before you hand sew it into your fabric helps the thread glide along as you go. Friction caused by passing the thread through the cloth can weaken the fibres of the thread and therefore weaken the whole thread. I haven’t yet experienced any residue bleeding into the fabric from the small amount of beeswax used.
My personal rule of thumb is to use smaller lengths of thread, say from fingertip to elbow, glide it over some beeswax, swear mightily while trying to thread the needle because my eyesight isn’t as good as it used to be, eventually start sewing the thing (a hem, re-attach a button, close up a hole in a sock, etc), admire the fact I’ve finally got one thing done from my mending pile, put away my sewing stuff and promptly forget that I need to buy needles with a bigger eye until the next time I need to sew a thing!
-
-
Dalton07
- March 27, 2023
Hi everyone, I want to ask the way to restring a baseball glove. I have old gloves and want to repair them.
-
Jimmy
- December 16, 2024
Hi
I am a leather glove maker.
It’s not difficult to repair, just need to turn the inside out and cut off the broken leather of the inner side of finger from the middle of the first joint and second joint. Purchase a small piece of touch screen leather online and cut the shape. You can sew it by hand or go to a sewing shop, they can help to make it up.
You will get a new finger with touch screen function.
-
 Then tie off the two ends together so you have the needle inside of a circle of thread.
 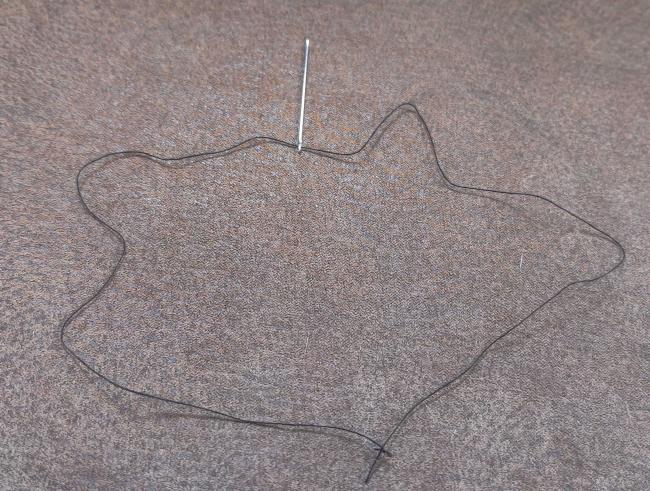 Then tie a few knots at the end to make a smallish ball, that way the ball will get stuck and not be pulled through as you are threading. You now have doubled up thread that will be twice as durable than a single strand.
- Whats going on with this site - 2 months ago
- Mylar Bags - February 27, 2026
- Shot Show 2026 recap - January 22, 2026
- News for the Week 2026-1-12 - January 12, 2026
- News for the Week 2026-01-05 - January 5, 2026
This forum is heavily moderated to keep things valuable to as many people as possible. Full community policies are here. The basics:
- 1. Be nice to each other.
- 2. Stay focused on prepping.
- 3. Avoid politics, religion, and other arguments.
- 4. No unfounded conspiracies, fake news, etc.
- 5. Debate ideas, not people.