Share your knowledge & learn from experts
Because prepping and community go hand in hand
How to sew and repair a leather glove
I have a pair of deerskin leather gloves that are fantastic. They have far outlasted any other pair of gloves I’ve owned. However, the stitching on the tip of one finger has ripped:
I want to repair them, and I suppose I could take them to the local shoe repair shop. But I think this is a good opportunity to learn how to fix it myself – I just don’t know the first thing about sewing. Can anyone guide me on how to do this and/or point me to a good YouTube video? (It’ll probably look like Frankenstein’s neck when I’m done, but I don’t care. 🙂
As an aside, the gloves were from the Oregon Glove Company. If you’re looking for holiday gift ideas, these would be a great gift. (And no, I’m not associated with the company in any way – just a happy customer.)
Thanks in advance,
– WS
Read More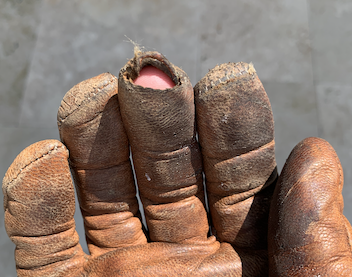
Skills >> Gucci Gear
Wanted to make this post mostly pertaining to firearms as I’ve seen a lot of people on here asking questions about purchasing their first gun, but this advice can also be applied to just about anything prepping related. Keep in mind when going to purchase a firearm, or any piece of gear for that matter, that no matter how nice the gear may be, no matter how many cool features it may have, it is nearly useless in the hands of an unskilled operator. This mainly relates to firearms in the fact that far too many people get swept up in the game of trying to find “the best” weapon or optic or accessory out there and lose sight of what actually matters; Shooting the weapon. Sure that $2,000 LMT rifle looks super cool, runs like a racehorse, and has a ton of features, but if you can’t hit a 12″ silhouette at 50yds then it may as well be a pawn shop trade in special. What I’m saying is don’t assume that you can just buy skill with a weapon. Yes I love my Gucci ARs as much as the next gun nut, but if I blow my entire budget on a super expensive rifle setup and have no money for ammo to train with then it means nothing. Now I know right now circumstances are a little rough if you didn’t stockpile ammo before all this began, but the good news is there is still a way to hone your skills without ever firing a round. It’s called dry fire. Thomas and I touched on this in a previous thread, but dry fire is a wonderful way to build skills and muscle memory that are critical to fluid gun handling, particularly for handguns. The internet is full of videos of dry fire drills you can run at home without a single bullet fired that will greatly improve your speed, skill, and overall familiarity with the weapon. I’d be glad to post some of my personal routines if anyone is interested as well. Just running simple dry fire drills will help you begin to master the basics of sight acquisition, trigger press, grip/shouldering techniques, and weapon manipulation. It may feel silly at first, pretending to fire and reload your weapon with no ammo, but I can promise you the more dry fire reps you do the work for, the more it will pay off on the range and in real situations. Dry fire is no substitute for live ammo practice, as there are still fundamentals that can only be learned with live rounds, but it is a fantastic skill building supplement, especially for new shooters. No matter what caliber of shooter you are though, dry fire drills can and will help keep you at your top proficiency levels.
So let’s wrap things up:
1. Don’t buy a weapon so expensive you can’t afford ammo to train with it. I’m not saying don’t buy gucci guns if you have the disposable income, just don’t put yourself in a position where you have a high class weapon but you’re a low class shooter because you couldn’t afford to train with it.
2. Dry fire. A lot. Especially in times like these where ammo is scarce and priced like precious metal
3. Don’t get caught up in the hype about a certain weapon or optic or upgrade etc thinking that it will magically make you a better shooter. Higher quality gear allows good shooters to push their performance, but the increase is skill-driven, not gear-driven. Save up, buy ammo, train, and then once you have acquired a level of skill and confidence in your shooting begin looking for ways to enhance your performance.
I hope this was helpful to a lot of you good folk just getting in to the world of firearms, don’t be afraid to ask if you have any questions or would like any advice. I’m no master marksman but there are a lot of people on here with a lot of great knowledge who are glad to share it. The US has had a massive amount of new gun owners arise here in the past few months and it’s our job as experienced shooters to help educate and inspire them the best we can. If anyone would like links to videos of how to get started training or good dry fire drills to run just let me know, I would be happy to post them in the comments section.
And as always,
This is the way
Read MoreBurning Candles
This probably seems like a grade-school level subject, but I’ve tended to have a lot of difficulty burning candles efficiently. Boredom with the bad weather has encouraged me to relieve my ignorance. It turns out there’s a lot more to burning candles than just lighting the wick. And there are lots of articles on the internet about how to burn and maintain candles for optimal light and burn time, not to mention safety practices.
One of the main points (there are many!) is always trimming the wick. As I was reading an article, I was burning an Amish stearic acid carriage lamp candle (really!) in a little kerosene lamp that I converted for the candle. This candle was burning flawlessly (my last try with the candle that was just open to the air was a failure, yet these candles burn handsomely in carriage lamps!). To my surprise, when I looked up from reading about burning candles, the candle (which had been burning about an hour) was really “chugging” and smoking a bit.
So one of several rules about burning candles is that depending on the candle, it’s going to need its wick trimmed during extended burn times. After burning an hour the wick was about 3/4″ long! This candle looks like it needs attention about every hour.
I’d encourage folks who have a stash of candles for emergencies, but never actually gave a thought to burning them, to look up the many articles on burning them safely and correctly. This is a pretty good place to start.
Read MoreTurn old bed sheets into durable waterproof tarps
The following video shows how to take old bed sheets and turn them into durable waterproof tarps.
The reason I am sharing this project here is because it looks to be a more durable tarp than the plastic tarpaulins you would buy at the hardware store and isn’t that expensive for what you get. A cheap tube of silicone caulk is about $5 and the gallon of Naphtha is $10.
From the video it says to find the volume of your bed sheets and use 3/4 of that volume in solvent (naphtha). Then using a ratio of 5:1 (Naphtha:Silicone) combine until the silicone is dissolved into a maple syrup consistency and soak your bed sheet in it. Hang to dry for a day and you have a waterproof fabric tarp.
To be honest I am tired of the UV rays of the sun and wind beating up my cheap plastic tarps and may try this out. This will probably hold up longer durability-wise and I don’t see it losing it’s waterproof ability like some fabrics do because it isn’t just a topical coating that can be rubbed off and silicone is a strong synthetic material that won’t break down as easily or quickly like bees waxed canvas would.
Read MoreRecipes for cooking with only non-perishable food
I was wondering if anyone could share some recipes for cooking with only non-perishable ingredients? I’m thinking canned fish and chicken. Thanks in advance 🙂
Read MoreHam Radio Protocol
Hello. I’ve got a decent ham radio plan/protocol for my family. (My wife and I have our Tech licenses). Just curious if anyone out there has a clever idea or resource as to developing a frequency rotation? Thank you
Read MoreGames that teach survival skills
What games have you found that teach survival skills in a fun way? I’ll include some of my favorites as comments and encourage others to do the same.
Read MoreFood preservation – it makes sense from a survival standpoint
While watching old episodes of Little House on the Prairie (great series if you haven’t seen it before!), something caught my eye that I never had really put too much thought into before. I saw that their sod house out back had baskets of apples and potatoes that just sit there and look to be fine all winter long, yet I struggle to keep apples and potatoes in my house for more than 2-3 weeks without them going bad. Granted this is a TV show, and those apples are probably fake, but it got me thinking about food preservation lately.
Correct me if I’m wrong here, but our ancestors would plant in the spring, grow all summer, harvest in the fall, and then preserve the food in the winter. From a survival perspective, this makes sense. You work hardest during the spring and fall when temperatures are moderate, when it is hot you mostly just let your plants sit there, and then when it is too cold to even go outside you sit inside and work on food preservation. This formula is set up for maximum calorie preservation. You can even go so far of thinking about the fire and heat produced from the canning and other preservation methods blends well with the need to keep the house warm during the winter. I just thought it was a beautiful balance that we may not realize today with tropical fruit shipped in from all over the world every month of the year.
I feel like food preservation is kind of a lost art for many, and most (myself included) were just taught that putting things in the fridge will make them last longer, and putting them in the freezer will make them last even longer. I no longer want to be apart of that crowd though. Call me a rebel, a food preservation rebel! I want to learn how to preserve food without refrigeration like millions before us knew how to do before the invention of the refrigerator. And sure, even on Little House on the Prairie it shows Ma putting some milk in a cold box, and they have the town ice house, but still they knew how to preserve things.
So, smart people of these forums, teach me about food preservation. What kinds are out there? I’m aware of dehydrating and canning, but please teach me about it. What can I preserve using different methods, what gear is involved, how long do things last with each method, etc…
I wanted to get my feet wet in this field, and so I went out and bought a dehydrator. In the comments below, I am going to tell my story of making some homemade beef jerky and some dried blueberries. I want this thread to be mostly teaching me about food preservation, but still wanted to share one of my successes!
Read MoreWhat are your softcore preps?
Even though flashy crises are more fun to talk about, a prepping mindset has a big impact on day to day life. Do you have any creative everyday/non-SHTF prepping that you’re particularly happy about?
For example, I finally got tired of never being able to find new heads for my razor (yay supply chains), and I am not shaving under my arms with my Leatherman, so I started to use a metal razor. It can use any razor blades (which can be resharpened) instead of proprietary ones only, it means I have a pile of spare blades (safely) stored, and I’m not worried about it breaking anytime soon.
I’ve also moved towards wearing more durable and easily repairable materials like leather and using mechanical pencils and refillable pens instead of disposables. This won’t save anyone’s life, but moving away from disposables feels like prepping to me because it increases resilience both materially and financially in the long run. In the short run, they’re just nicer to use.
Even in the more traditional EDC, my bike (hex key) multitool sees more use than my Leatherman or Swiss Army Knife, but that’s probably because I’m still in the Ikea stage of life.
All that said, do y’all have any creative softcore prepping tips?
Read MoreDYI Air Purifier for Wildfire Smoke
Facing the worst air quality in recorded history (and my air purifier temporarily inaccessible in storage) I built my own today using Eric’s COVID Air Defense System kit, also known as a Corsi-Rosenthal Cube. It works for wildfire smoke as well as for Covid.
I followed these instructions to build it: https://encycla.com/Corsi-Rosenthal_Cube
I was able to have the MERV 13 filters delivered the same day by Instacart so I didn’t have to leave my apartment.
Read More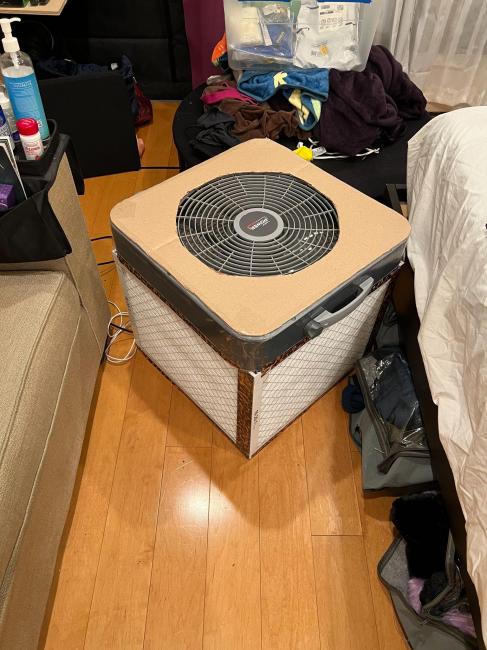
Do you include a Communication Board/Cards in your prep?
I’ve been thinking about adding communication board or cards in my Level 3 first aid kit. Does anyone have any experience with them, and if so, what are you using?
Read MoreEvaluating information – a prepper skill
Evaluating information is a really important prepper skill! I would love to see The Prepared do an in-depth article on it. Would anyone else like to see that? While I’m not the person to write it, here’s an outline of what could be covered just to get the idea out there!
WHY IT MATTERS: There are many threats and crises where correctly evaluating conflicting sources of information can be vital. Is this a real threat or hype? Is this rumor or fact? What sources can I trust? How reliable is this recommendation? Do I believe this politician, or this government agency, or my cousin on Facebook? Do I act on this information or should I wait?This is the case in particular for situations that develop over time, like a pandemic, economic or political crisis, civil unrest or war. During these times misinformation and rumor are everywhere, and trust in institutions declines. But even in very fast moving situations (“Is the fire heading my way or not?”) it can be very relevant.
BEING AWARE OF COGNITIVE BIAS. Understanding things like normalcy bias and confirmation bias and how they affect our own thinking are very important. Be aware of our own ways of tripping up and recognize when others around you are doing it.
MEDIA LITERACY. Understanding the reliability of different sources, how to fact check, what the motivations of different sources are (are they invested in journalistic integrity, or are they sensationalist), being willing to look at sources from opposing views and different countries, and also seeing the limitations and biases of traditional journalism. Social media literacy is an important subset – understanding its strengths and weaknesses, the motivations of those who spread misinformation and how and why fake news spreads faster than the truth.
SCIENCE LITERACY. Understanding how science builds knowledge (peer review, it’s not about one study, and it can be slow in response to a fast moving situation), that studies can be flawed, that science-y language doesn’t make it science, what cherry-picking is, that expertise is real and the serious limitations of “doing your own research”.
TRUSTING INSTITUTIONS. We are in an era of increasing mistrust of institutions (the government, the police, the CDC, journalism). These are all reliable sources of information to varying degrees but none are at all perfect, and it is valuable to have a nuanced understanding of their strengths and weaknesses. Examples are the slowness with which they react because of bureaucracy, the challenges of messaging, the mission to communicate correct information but also shape public behavior (e.g. avoid panic), and the influences of politics and profit.
WHEN AND HOW TO RELY ON FAST INFORMATION. Science and journalism take time and in a fast moving situation, sources like early scientific studies, Twitter, and first hand accounts may give you an essential edge if you can evaluate them correctly.
UNDERSTANDING POLARIZATION. The more politically polarized we are, the more misinformed we tend to be. When we are politically or culturally at war, we distrust anything the “other side” says simply because they said it, we believe everything “our side” says without question, we believe everything bad about the other side and good about our side because it feels right and we are emotionally invested, and things that ought to be neutral somehow get drawn into it when they become vaguely associated with one side or another. All of this can lead to being poorly informed and vulnerable to blind spots, misinformation, and conspiracy theories.
SHORT CUT RECOMMENDATIONS. It’s great to learn all the above stuff about evaluating information but it is a lot of work. An article like this could conclude with some shortcut recommendations on specific trustworthy sources and strategies.
Those are my thoughts!
Read MoreUK Manchester Arena Report
At the moment I am working my way through part two of the Manchester Arena Inquiry report, and to put it mildly, it is uncomfortable reading, especially in profession.
I am often employed as part of the medical staff in nightclubs and events. I knew before the Manchester attack that medical help was not minutes away, and it would be self / bystander help that would save the lives. But like many I got complacent.
As I have not finished reaping the report (something like another 700 odd pages to go) I am still working on personal changes to both my CPD and additions to my equipment. But my initial thoughts are plan for a minimum of 3 hours before professional help gets to you.
Read MoreStop the Bleed Online Course
The in-person class is better if you can find one near you. But this is a great way to get started if an in-person class is not available OR to review your skills AFTER taking the in-person course.
https://www.stopthebleed.org/training/online-course/
Read MoreI am new, advice?
Hey everyone! I just turned 18 and I am learning about the prepper community. I have always been interested, but never really started “prepping” until recently. Does anyone have an advice for me?
I am looking to have a good stock pile, but I am not sure where to buy from (that will be effective and relatively inexpensive). I am not really sure how to use this site either, but I am trying to learn as much as possible. Any advice, recommendations, warnings, etc. would be infinitely appreciated.
Read MoreThe new techniques and advice on how to save someone from choking
Has anyone ever saved someone from choking? What steps did you take to do so?
2500 people die from choking in the US each year. With Thanksgiving coming up this week and everyone stuffing more food into their mouths than they should I wanted to research and learn about the best techniques to save someone from choking.
Side note, did you know that Thankgiving is the deadliest holiday in regards to automobile accidents? Don’t drive drunk, and be careful when you travel.
If someone says they are choking, they probably aren’t too bad because they are able to talk. If they can breath and say things, than keep an eye on them and tell them to try and cough it up.
If they can’t speak, are having difficulty breathing, if their skin and lips are turning blue, or they lose consciousness then they do have a full on choking incident and you need to step in ASAP.
Have someone call 911.
The American Red Cross has changed their advice on choking techniques in 2006 to first start out with back blows. If that doesn’t work, then you switch to the abdominal thrusts (also known as the Heimlich Maneuver)
For abdominal thrusts, stand behind the person and place one foot between their two. Lean slightly back. You are setting up this position for the chance that they lose consciousness and fall. When you are in this position you can more easily support their weight and not fall over with them.
Wrap your arms around the waist, make a fist with one hand and aim the point of your thumb into the area between their belly button and under the sternum. Grasp your fist with your other hand and in sharp firm squeezes thrust upwards like you are trying to lift the person up.
Variations: For children you may have to kneel down to get to their level and instead of using both arms, just use your fist and with one hand thrust upwards if they are fairly small. For babies use 2-3 fingers when thrusting. See the above picture for positioning.
If you are related to Darth Vader and will be seeing him this Thanksgiving, try and avoid sensitive topics such as his deceased wife or sand. There’s not help saving you from that kind of choking.
Read More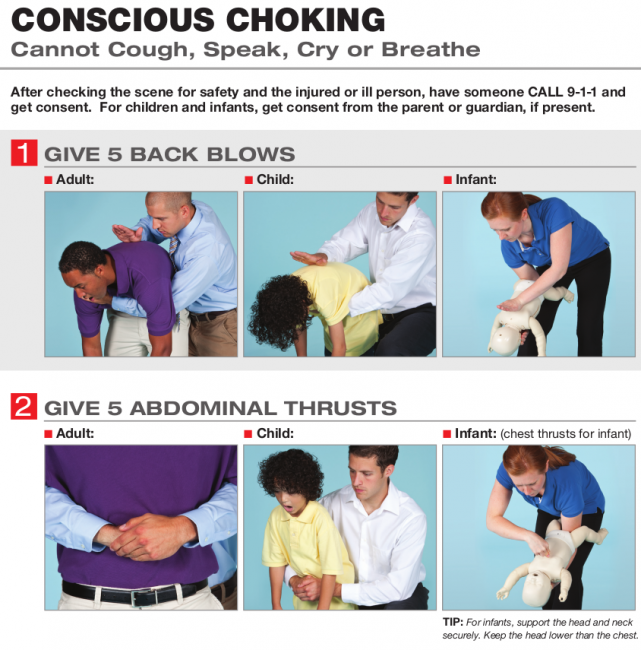
Old hand saw restoration guide
In preparation to restore some old hand saws, I assemble a guide drawing on multiple sources. I was motivated to do this as sources that I read disagreed with each other at times or left out useful tips mentioned in other guides. Thought it might be something y’all would be interested in. At the end of the day, hand tools are a necessary backup to power tools, and they just don’t make hand tools like they used to. At least, not without them costing an arm and a leg.
Here is the following information in PDF form: https://drive.google.com/file/d/1DgQ4nlBfFcQm8T27keedkXwqPXeqdfZJ/view?usp=sharing
Apologies that the formatting is not the most pretty here, it is better in the PDF. Also in the PDF, all the sources have hyperlinks to the website for easier access.
Also, does anyone have any experience with restoring saws or other old hand tools? I’m particularly interested in saws, axes, chisels, and hand planes.
Old Hand Saw Restoration Guide – Noah Holkeboer – March 2023
Goal
To take old, rusty, dull hand saws and restore them aesthetically and functionally. Also aiming to preserve any etchings on the blade and/or carvings on the handle.
Approach/Overview
Acquire saw → Disassemble → Clean pins → Remove rust and grime → Enhance etching (optional) → Sand or clean handle → Protect handle → Reassemble → Sharpen → Set teeth → Protect and maintain
Materials
Old saw to restoreBench viceScrewdrivers Wood mallet Punch for pinsSandpaper (80-600 grit)Sanding blockRubbing Alcohol (for etchings)
WD-40™Steel Bluing Agent (for etchings)Boiled linseed oil Wood finish (if desired)Oil or wax for protecting steelSaw filesSaw tooth set toolWood for cut testing
Protocol
1) Examine the saw. Look for a maker’s mark and etchings on the blade by viewing it from different angles in the light. Medallions on handle pins are also worth examining. Note carvings on the handle. These observations could help you determine the age of the saw, and they will also inform how the saw is restored. See the bibliography for references to help with determining the age of antique hand saws (von Sneidern, 2009; Clark & Dima, 2019).
2 Remove the handle from the saw blade. Loosen the saw nuts and medallion. Use a large screwdriver that fits snuggly, so as to avoid stripping or marring the nut, as these are often made of soft brass. Old saws might have “split” saw nuts, and require a special driver or a flathead screwdriver modified by filing a notch in the center. If the nuts are stuck, spray some WD-40™, wait a few minutes, then try again. Then push out the rest of the saw nuts. You can try to just push them out with a pencil, but they might need to be gently tapped out with a hammer and punch. Make sure to record which nut came from which hole, as over years the holes can become uniquely conformed to each nut (Farnsworth, 2022). Carefully slide the handle off of the saw plate (blade). If it does not come off easily, secure the plate in a vice and pull it off or tap it off with a mallet. Consider using WD-40™ to lubricate. If restoring a back saw (tenon saw) that has a rigid steel or brass back, do not remove it, as the blade might bend out of shape after removal (Farnsworth, 2022).
3) Clean the saw nuts. Saw nuts can be cleaned and polished in multiple ways. For grime that is really stuck on, you could consider soaking the brass nuts and medallion in a 1:4 solution of laundry detergent overnight before scrubbing off grime (Foster, 2021). However, the effectiveness is probably dependent on the type and concentration of laundry detergent, which Foster does not specify. Avoid anything that would have negative effects on the metal. After the soak, proceed with cleaning and polishing as described below. In most circumstances, this soak should not be necessary. Use fine steel wool (#0000) and a brass polish such as Brasso™ to clean and polish them (Farnsworth, 2022). Wipe off any excess polish with a rag.
4) Remove rust and clean the saw plate. Some guides suggest removing rust with a solvent or acid, while this can work effectively, it can go too far. In the process of removing rust, the acid can remove an etching, darken the color of the blade, or leave pits in the metal. For the best restoration, these products should be avoided. Manual removal of rust and grime is usually sufficient, though it does take a little more work. However, some do recommend these products for saws with a lot of rust, even those that have etchings (T, 2016).
Large pieces of gunk and rust can be removed with a razor or scraping tool. Filing the corners of a razor blade can prevent it from leaving lines (Foster, 2021). If the saw does not have an etching, rust can be sanded off more aggressively. However, caution should be exercised unless it is obvious that there is no etching, as grime and age can hide a faint etching. To remove rust and clean the blade, use wet dry sandpaper, starting with more coarse grit and moving to more fine grit. 400 grit followed by 600 grit seems to be a common recommendation (Foster, 2021; Farnsworth, 2022), although starting with 120 grit has been practiced when there is no etching (Eoin Reardon, 2022). When sanding, using a solvent such as WD-40™, mineral spirits, or Simple Green™ is recommended. Using a sanding block helps to keep the depth of the sanding consistent. After sanding, using a surface cleaner and a cleaning pad can help remove dirt from areas that sanding can reach (such as teeth and pits in the metal).
5) Enhance etching if present on the plate (optional). If there is an etching present on the blade, you can consider attempting to enhance it. The results may not be dramatic, but it is possible to increase the contrast of the etching. To enhance an etching, start with a clean saw plate. Some recommend that the metal is polished before enhancing the etching (Enhancing a saw etch, n.d.). The blade is further cleaned and degreased by wiping it down with a solvent. Mineral spirits or acetone has been recommended (Enhancing a saw etch, n.d.), as isopropyl alcohol (T, 2016). Wipe down the blade and let the solvent dry before proceeding.
Next, apply a bluing agent like Perma Blue™ gun blue paste. It can be applied only to the area with the etching or can be applied to the whole blade. It will darken the color of the steel but can be sanded to your preferences. If only applied to a spot on the blade, it will change its reflectiveness, leaving a “halo” when viewed from certain angles in the light (Enhancing a saw etch, n.d.). After applying the blueing compound, one guide recommends letting it sit for “a minute or so”, then washing it off in cold water (T, 2016). Another guide suggests that the bluing agent should be allowed to dry “thoroughly” and “completely” (Enhancing a saw etch, n.d.). Either way, the bluing agent should not be touched while it is setting, as it could lead to inconsistent bluing. Next, the area of the etching is carefully sanded, only a few strokes at a time. Sanding is stopped when the etching is revealed and the background is an appropriate color. Just a little too much sanding could destroy the etching forever. The area around the etching and the rest of the blade can be lighted with additional sanding. Use a sanding block for this to avoid sanding unevenly. Use 600 grit or finer sandpaper (Enhancing a saw etch, n.d.). It has been suggested that this process could be repeated two or three times to improve the results (T, 2016).
6) Clean or remove saw handle coating.In many cases, the restoration will involve sanding the wooden handle of the saw. However, one should consider not sanding the handle, and only cleaning it for two main reasons. First, old saw handles that have seen lots of use can have a desirable patina due to years of exposure to the oil in a worker’s hands, which can be aesthetically pleasing and very comfortable to hold (Farnsworth, 2022). Second, if preserving the saw as a historical object is of interest, irreversible restoration processes, like sanding, should be avoided. Gentle use of #0000 steel wool and mineral spirits can be used to clean a wooden handle without removing the patina (Farnsworth, 2022).
For saw handles that will be sanded, thick layers of varnish may be able to be scraped off first with a razor blade scraper, this can be eased by heating the handle. If varnish must be removed from the small groves of decorative handle carvings, a chemical stripper like CitriStrip™ may be the only option (Foster, 2021). If a chemical stripper is used, clean the handle with mineral spirits and steel wool afterward to remove traces of the chemical before sanding (Foster, 2021). Sanding the handle down to bare wood can start with 60 or 80 grit sandpaper, especially if there is still varshish on the handle. The handle can be made smoother by using progressively fine grit sandpaper, up to 220 grit (Foster, 2021).
Saw handles with minor damage can be repaired (The Write Biz, 2013). However, badly damaged handles might need to be replaced entirely.
7) Protect saw handle.If desired, a staining finish can be added to the handle wood. Alternatively, the handle can be protected with an application of boiled linseed oil for a more natural look. Be careful with used rags, as apparently than can self-combust if not laid out to dry or intentionally burned (Foster, 2021). To apply either, wipe on evenly. Boiled linseed oil may warrant additional applications over time. In any case, refer to the instructions for the product being used.
8) Reassemble saw. Reattach the handle to the saw blade, putting the pins back in the same hole they came from, in the same way they were if possible. Do not over-tighten the nuts.
9) Sharpen saw. Sharpen the saw to your preference. Most saws are set up as either rip-cut or cross-cut saws by changing the shape of their teeth. After teeth are sharpened, they are set if it is necessary. This is done using a tool to slightly bend the teeth outward, alternating between sides. Other guides and videos exist detailing how to sharpen saws in various styles (Paul Sellers, 2013; Eoin Reardon, 2022; Farnsworth, n.d.).
10) Protect and maintain the restored saw. The metal blade of the saw can be polished with metal polish if desired. It can be protected by applying wax or oil. Boiled linseed oil can be reapplied to handles treated with it for continued protection. With use, the saw will need to be resharpened, and eventually, the teeth will need to be set again.
Bibliography
Clark, Joshua., & Dima, Barry. (2019). A buyer’s guide to antique handsaws – finewoodworking.
FineWoodworking. https://www.finewoodworking.com/project-guides/hand-tools/buyers-guide-antique-handsaws
Enhancing a saw etch. (n.d.). Loon Lake Tool Works.
https://loonlaketoolworks.com/pages/enhancing-a-saw-etch
Eoin Reardon. (2022, July 4). Restoring A vintage tenon saw [Video]. YouTube.
https://www.youtube.com/watch?v=veMpOcKXtVE
Farnsworth, Joshua. (n.d.). How to sharpen hand saws for woodworking | wood and shop.
Wood and Shop.
https://woodandshop.com/how-to-sharpen-hand-saws-for-woodworking/
Farnsworth, Joshua. (2022, February 4). How to restore an antique back saw. Wood and Shop.
https://woodandshop.com/how-to-restore-an-antique-back-saw/#types
Foster, Joe. (2021, February 28). How to restore an old hand saw, A complete guide | growit
buildit. Growit Buildit. https://growitbuildit.com/restoring-saw-remove-rust/
Paul Sellers. (2013, May 6). How to sharpen a woodworking handsaw | paul sellers [Video].
YouTube. https://www.youtube.com/watch?v=UA5DixEaaUo
T, Jay. (2016, January 26). Hand Saw Restorations – How to bring back the detail of an etch.
TimeTestedTools. https://www.timetestedtools.net/2016/01/26/hand-saw-restorations-how-to-bring-back-the-detail-of-an-etch/amp/
The Write Biz. (2013, January 13). Repairing a vintage handsaw handle. Hand Tool Journey-A
woodworking show of hands. https://handtooljourney.wordpress.com/2013/01/13/repairing-a-vintage-handsaw-handle/
von Sneidern, Erik. (2009, January). Online reference of disston saws — the medallions.
Disstonian Institute.com — Online Reference of DisstonSaws. http://www.disstonianinstitute.com/medv2.html
Read More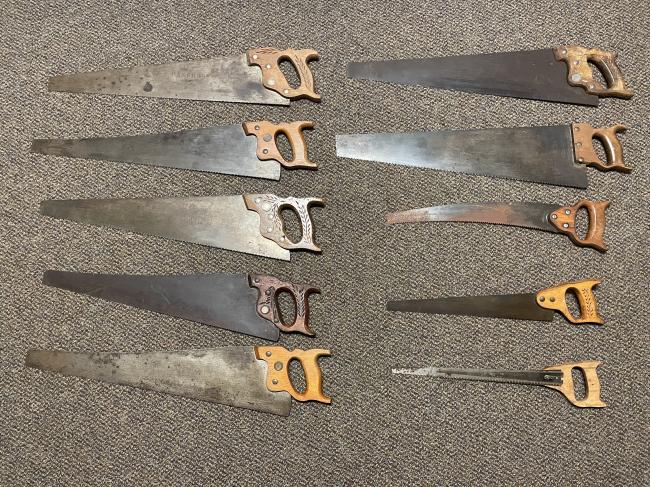
How to make stock and render fat
I’m on a beef stock making mission right now, primarily because of the great beef stew recipe I shared in the thread recipes-for-cooking-with-only-non-perishable-food/ . That recipe served the two of us three generous meals. The last one was a little skimpy so I poured the stew over freshly made biscuits. That meal was probably the best of the three!
I used ten pounds of beef ribs to get roughly four quarts of stock, and I canned it according to USDA recommendations. I’ve just started another stock pot. I browned the ribs in a 400F oven, covered them with a lot of water, added some apple cider vinegar, and will now simmer the bones slowly for 24 hours, then “reduce” the stock before canning.
There’s a big bonus in this process. I got about a pint of snowy white beef fat, which after rendering, is shelf stable. I measure it out and freeze it in silicone molds, and once wrapped it will keep virtually forever in the freezer, but it will last for months on the shelf.
Here is an article that explains the basic how-and-why of rendering fat I’ll add some additional notes.
Fat should be slowly heated to 255F to insure that all moisture has been driven off. Carefully dip the clear liquid off the top and strain into clean containers (sterilized canning jars are good!). Fill all the way to the top because the fat will contract quite a bit while cooling. Chill as quickly as possible for a fine grained product. Cap and store in a cool, dark place.
Air, light and moisture can cause the product to go rancid or sour. If all moisture is removed and the product chilled thoroughly before capping, there will be no souring.
The notes on rendering lard are taken from the book “Stocking Up” by Rodale Press.
Read MoreForaging for cooking fuel and haybox bean soup
Everywhere I look I see fuel!
I went foraging for fuel for my new EcoZoom rocket stove a couple of days ago. I hauled in a long, skinny maple branch that had fallen a couple years ago in an ice storm. Brought it into the shop and cut it into 1 ft lengths with hubby’s miter saw, then split (as best I could) the thicker end into kindling. Everything’s wet from the recent rain so I hauled my treasure into the house to dry out (there is no part of the house that is off limits to my projects!)
I got the brilliant idea that the rocket stove and the hay box were a match made in heaven. Since I needed something more challenging to cook with both, I decided to make a pot of bean soup.
It took 30 minutes to bring the room temperature ingredients and cold ham hocks to a boil from the time I started the fire in the stove. About 8 quarts. Rushed the pot to the haybox (which was about 40 degrees to start!) and let the soup cook for three hours. It was 165 degrees. At that point I needed to add veggies, so I prepared the food, started the stove again, dumped the veggies in the pot and heated it to boiling again before putting the pot back in the box. It’ll simmer for another hour or two to cook the veggies.
So, except for a flick of the lighter, there was zero energy cost to slow cook a giant pot of bean soup. (don’t remind me about using the miter saw! LOL!) And I barely skimmed the top few sticks off the top of the fuel box.
There are worse things than tending a fire on a cool, cloudy Fall day.
Edit to add: After two more hours in the haybox, the carrots and celery were cooked al dente, the beans were perfect and the ham hock meat was falling off the bone. This is really a delicious recipe and the “alternative” cooking devices did not disappoint!
Read More![20221210_084421[1]](https://theprepared.com/wp-content/uploads/hm_bbpui/100714/fwrevdanwfb3shirlqrho1w5q720td5i.jpg)
Developing a fireless oven for retained heat baking and roasting
The fireless oven is an extension of the haybox concept, except it strives to roast and bake via heat-radiating substances instead of boiling everything in a relatively large quantity of water. In the 1910s, the heat radiating substance was soapstone.
Several months ago, I bought two soapstone fire bricks to experiment with but for prepping purposes, I didn’t have a sensible method of heating the bricks. That seems to have changed with the “free energy” rocket stove.
This morning with the outdoor temperature at 40F degrees and sunshine, I wrapped a room temperature soapstone brick (about 1 1/4″ thickness) in aluminum foil to prevent soot buildup and placed it on the cold rocket stove.
The 1913 book, The Fireless Cook Book by Margaret Jones Mitchell advises to heat new soapstone radiators slowly the first time, after which they are safe to heat more rapidly, so I built my little fire up in the stove accordingly.
The test to know when your soapstone brick is ready for baking is to sprinkle a wee bit of flour on the surface. When the flour begins to brown, the brick is hot enough.
This occurred in 25 minutes of lighting the first twigs and gradually building the fire. The top surface of the brick registered about 469F degrees.
The energy cost to heat the brick was zero. Possible downside is that you have to feed small fuel into the stove fairly continuously. For me, that was amusement, not a downside.
Finishing this project won’t be particularly cheap as unlike the haybox or Wonder Bag, the insulation has to be non-combustible. So for that I’ll go with ceramic wool furnace insulation, but it’ll take me awhile to get where I can actually bake with bricks! I must say I am motivated!
One last note. We have a cooking option that Ms Mitchell did not – Reynolds Oven Roasting Bags. I put a 3lb chuck roast and veggies in a bag and submerged it in a large quantity of boiling water to make a pot roast in the haybox the other day. The roast cooked in its own undiluted juices and came out perfect.
I checked the safety of the bags. No toxic chemicals are released into the food from the nylon Reynolds bags.
Read MoreSmoking some fish. Yum!
Smoking meat is a great way to preserve it. It also is extremely tasty. Today I smoked some sockeye salmon and some black cod (sablefish). Both are high in those healthy fish oils and are really healthy to eat. Both are my favorite fish to eat using all sorts of techniques, but today we are smoking to have as an appetizer for a family get together tomorrow.
I’ve had a small electric smoker for many years. It uses very little wood and makes smoking a breeze. First I brined the fish using 2 parts brown sugar to one part kosher salt. I then drizzle on some maple syrup. I brine for about 5 hours or so, rinse off the fish well, pat dry and place on drying racks in the refrigerator overnight. Putting in the refrigerator for a few hours allows the pellicle to form. Pellicle is a thin, sticky film that forms on the surface of the meat. The sweet smoke sticks to this pellicle and gives a much better smoked flavor than cooking without creating it. I smoked for about 4 hours until the internal temp of the thickest part reached 140 degrees. Today I used some alder wood and some apple branches from the orchard.
Brining the fish adds some flavor but it mainly pulls moisture out of the fish. This way you don’t end up with mushy smoked fish.
Read More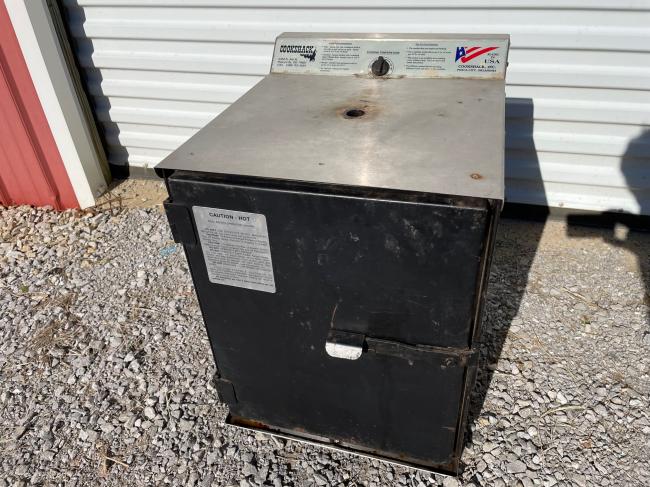
Experiments with home dehydrated strawberries
Hi folks, thought you might enjoy the results of “playing with my food” experiments this week. Definitely falls into the “Using only shelf stable foods” category.
I decided to dehydrate a four pound bag of (grocery store) frozen strawberries yesterday, thinking they might be good to snack on. Actually, I didn’t like them too much. Commercial strawberries are usually tasteless and dehydrating them didn’t improve them. However, there’s more!
Preliminary information:
16 oz of fresh, hulled, sliced strawberries yielded 1.5 ounces, or about 3/4 cup, dehydrated berry slices. (Not freeze dried.)
Four pounds of dehydrated strawberry slices fit snugly in a quart mason jar.
What I decided to do with them was make some sort of jam or spread. The problem being, it would be hard to figure out the exact amount of water and sugar to add to get them fully hydrated and the correct sweetness without using excessive water. I decided to treat them like reconstituting dehydrated tomato paste, to make a spread.
The first task was to powder the berries in a coffee grinder. I have learned that powdering veggies (and now berries) works best if the dehydrated produce is first very cold, otherwise it’s leathery and tends to gum up the grinder. A short spell in the freezer did the trick. Something to do before the power goes out.
I used a recipe for medium syrup for canning/freezing fruit, which was approximately 1 cup water to 1/2 cup sugar. I brought this to a boil on the stove, which took the briefest time. Hot tap water would probably do to dissolve the sugar.
I powdered 1/2 cup dehydrated berry slices, which produced about 1/4 cup berry powder.
To the powder I added about 3 Tablespoons of the syrup. (Might have been 1/4 cup, start conservatively).
The resulting berry sauce was at first taste, a little too thin and had a “wet powder” mouth feel. HOWEVER, after allowing to stand a few minutes for the powder to absorb the liquid, the mixture thickened to perfect spreading consistency. Spread on buttered toast, it delivered a HUGE strawberry flavor that wasn’t boiled to death and full of commercial pectin.
This amount made enough strawberry spread to smear on 3-4 pieces of toast! No refrigerating a partially used jar of jam!
You could go with a little higher amount of sugar in the syrup if you like your “jam” sweeter. Or, you could add enough extra syrup to make a berry syrup for pancakes etc.
If you were going to powder berries (or tomatoes) BEFORE the power ever goes out, I’d strongly suggest storing the powder in vac sealed Mason jars with a silica gel pack, which I don’t have, but am going to order right now. The stuff will cake.
Maybe a person could make individual packets of pre-measured dehydrated berry powder and sugar, then “just add water”. Needless to say, that’s the next experiment!
And of course there’s always just making leather out of pureed berries.
Read MoreHow to prevent and survive a home invasion
There are 8,000 home invasions in North America every day. Your home is probably the place you spend most of your time, followed by work or perhaps school. It is also where you let your guard down and feel most safe. A home invasion not only is devastating, with the possible physical damage to yourself and possessions, but can also leave you with horrible mental and emotional trauma. After a home invasion, you may never feel completely comfortable or safe in your home again, and have many sleepless nights of anxiety long after the initial crime was committed. Don’t let this ever happen. Take the steps now to protect yourself and your loved ones from this horrible event that does happen.
While the elite crew of trained mercenaries cutting phone lines and executing a months-long plan to invade and hold you ransom does happen (and I’ll talk about that), most home invasions are from burglaries. 1 out of 5 homes will experience a home burglary. Every 30 seconds, a burglary takes place in the US. That’s 2.5 million per year. The majority of those occur during the day, and 25% are when someone is home. SCARY!
I have enjoyed reading, learning from, and taking steps based on the home-hardening articles on this site. They offer many solutions that are affordable, easy to install, and offer a lot more protection than your standard-built home. That is my first recommendation, harden your home using those guides to prepare against the most common form of home invasion, burglary.
But let’s say a burglary does happen when you are at home, here’s a possible scenario and what to do about it:
Scenario #1 – A break in or burglary in progress.
In this first scenario, you are either in your bedroom asleep or in the living room with your feet up watching a movie with your family to wind down for the evening. Let’s say you are watching the movie National Treasure with America’s national treasure Nicolas Cage. Both are situations where you are relaxed and feel safe and comfortable in your home. You hear a noise coming from across the house or in the garage.
It’s not wise to run out of the home every time you hear a noise and get spooked. Especially if you have pets or family members are not aware of their location, it most likely would be them accidentally dropping a glass or shuffling things around. If you think it through a little and come to the conclusion that it could be something dangerous, then dial 911 from a nearby phone and tell them you think someone might be in your house. It’s better to have the police aware and on the way than to be staring down the barrel of a gun by a home invader. You can always call back and apologize later that it was your cat if that was what it was. Calling a close neighbor is a backup if you really are hesitant to call 911, just do something to have another person come to assist you and be aware of the situation.
My first tip is to have some sort of weapon in every room to grab and respond to disturbances. Even if you carry a gun, you probably are not wearing that with your pajamas. Pepper spray is a good one that can be bought in bulk and easily distributed to hiding places throughout your home without taking up too much room. Improvise if you don’t have anything. A lamp or rolled-up newspaper is better than nothing. Take a couch pillow or jacket wrapped around your arm as an improvised form of body armor that could give some protection against a knife.
If you confront someone in your home, tell them to get out. If they stand there with a knife and act threatening attempt to talk them down, offer them cash from your wallet, or say “Take that then you can go free.”. A few bucks are worth deescalating the situation and avoiding an altercation. Be on guard though. Fight for your life if you need to.
My friend experienced a situation like this before when he was watching TV and a young burglar hopped up on drugs broke into his home. He used a commanding voice to tell the person to leave, but the burglar charged him, forcing my friend to at the assailant. He was justified but still lives with the guilt of taking a life. Again, harden your home to deter and reduce the risk of anything like this from ever happening.
While this next scenario is less likely to happen, it’s good to be aware of and at least think of.
Scenario #2 – A professional home invasion
If you hear a loud noise and try and call 911 like in the above scenario but are met with a cut phone line or even jammed cell phone then you could be facing a much greater threat than the teenage punk trying to steal some stuff to pawn. In this case, you have multiple points of evidence that you are facing a home invader. Get out and don’t investigate or confront them. Even if you have a gun and feel confident that you would be okay, they could have larger and more guns than you. And even if you were able to take them out, you now have to live with that for the rest of your life and now have a mountain of legal issues to worry about that probably will bankrupt you.
If you see people outside your home, they could attack as you try and flee, so even the get out advice isn’t a hard rule. Be smart about the situation you are in.
Most professional home invasions and kidnappings follow the following steps:
Stalking – they watch you, and know your routine Entry – they surround your house, cut off escape routes, and enter your home most likely fast, loud, and with a lot of guns to surprise and have the upper hand. Control – They will try and establish control over you and the situation by showing force or separating you from your children or spouse. Event – They will use you as their key to get what they want. Kill hostages – If they kill one of you or reveal their faces, they might show they have nothing left to lose and could easily kill the rest of you. Escape – The home invaders will try and escape after getting what they want.If this occurs at night, turn off the lights and stay away from windows that will silhouette you. You know your house and the layout, they don’t. Have the upper hand.
If you are out numbered, act passive and non-threatening. The kidnappers/home invaders have elevated adrenaline and want to maintain control, especially in the early stages of the event. During the control phase, don’t try and reason with them, talk with them, or even look at them. Follow their orders because if you fight, they will try and exert even more control and dominance. Use this time to gather as much information as you can. Remember any names they mention, look for tattoos, how many are there, etc. This intel will be valuable for when you escape.
During the control phase, they will likely hold your spouse or children separate from you as leverage. They know that we are less likely to make an escape or fight back if we know we will leave a loved one behind or in danger. If you are presented the opportunity to escape however, you should. The ability to get away, secure your safety and call the SWAT team will leave you in a better situation than being left alone with the home invaders and the guns.
One way to create a diversion is to hit the panic button on your car’s key fob if you have your keys on you. Once they leave to check out the disturbance, you can try and escape. Do not run, it creates too much noise, move swiftly and quietly.
If you can get out of the house, be aware that professional home invaders may have additional men outside to keep an eye on things like police or you escaping. If you are caught again, expect to be met with extreme violence as they try and regain control and show you who’s boss.
Watch for patterns your captors exhibit. Do they send a text message or call the other kidnappers who are holding your family every 10 minutes to let the other person know that everything is going to plan? If you need to attack and subdue them, know that if they don’t get that phone call at that prescribed time, your family might be at risk. You would want to attack right after they make that call so you have at least 10 minutes to locate your family before things go bad.
Thanks to Ubique for sparking the idea of this forum post. She had posted scenarios last year that I have saved and finally am getting around to thinking about more, researching, and sharing my viewpoint on the subject. Here’s her first post that details out a home invasion scenario, and then in a followup forum post goes over the various things that could have been done to prevent and change that situation from happening. Your homework is to read those two and think about what you would do.
Read MoreCooking in a haybox – a fuel efficient way to slow-cook your meals
This has been discussed a little before, but I’ve got a “new” resource to share in the form of a 1909 online booklet: https://archive.org/details/firelesscookbook00mitc/page/n7/mode/2up “The Fireless Cookbook”. The Haybox is a type of thermal cooker that only requires fuel for the initial boiling of the food. The container of boiling food is placed inside a box filled with hay or other insulating material and allowed to slow-cook for a few hours. I’m just about ready to give it a try. Bought an excellent heavy duty box from the UPS store and have a supply of hay. Just need the time to get all set up. I’ll start with some dry beans, which are notorious for their long cooking time/fuel consumption.
I’m pretty interested in this method because most of our power outages occur in foul weather and my cooking resources would otherwise all be mainly outdoors.
Read MoreLong-term wilderness survival skills
Could I survive long-term in the wilderness? Probably not. I’m trying to study these skills anyway. If I can develop the skills to make it even a month or two, surely those skills will also be useful for more short-term emergency situations.
I’ve bee reading Thrive, a long-term survival guide by Alone S9 participant Juan Pablo Quiñonez. (Thanks for the book giveaway, TP!) He clearly knows what he’s talking about, and is also an excellent teacher. He says in the introduction: “If one had to live in the wild for up to one year with only a single book, what would it contain?” I think he succeeded in writing that book, and I’ll be keeping it in by BOB until I’ve read it enough times to not need it anymore.
Chapters include preparation, mindset, clothing, travel, water, fire, shelter, food/foraging, edible plants, fishing, trapping, hunting, bushcraft, winter, health, electronics, and natural hazards. Topics are clearly explained and seem to work well both for learning and for reference.
What do you think about the role of long-term wilderness survival skills for emergency preparedness? Are there other books or resources that you like for learning these skills?
Read More