Old hand saw restoration guide
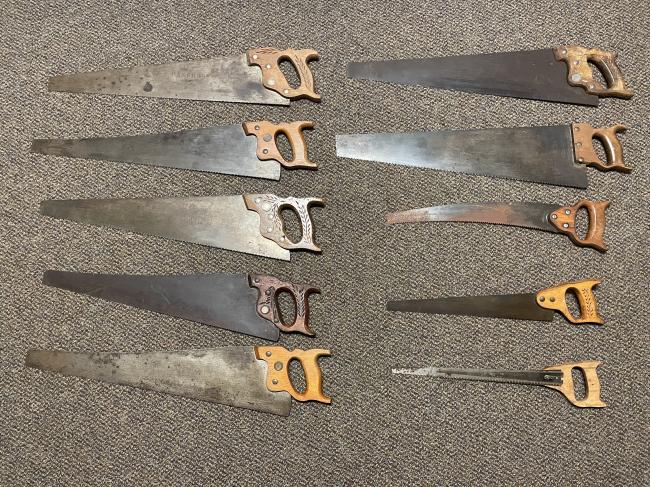
In preparation to restore some old hand saws, I assemble a guide drawing on multiple sources. I was motivated to do this as sources that I read disagreed with each other at times or left out useful tips mentioned in other guides. Thought it might be something y’all would be interested in. At the end of the day, hand tools are a necessary backup to power tools, and they just don’t make hand tools like they used to. At least, not without them costing an arm and a leg.
Here is the following information in PDF form: https://drive.google.com/file/d/1DgQ4nlBfFcQm8T27keedkXwqPXeqdfZJ/view?usp=sharing
Apologies that the formatting is not the most pretty here, it is better in the PDF. Also in the PDF, all the sources have hyperlinks to the website for easier access.
Also, does anyone have any experience with restoring saws or other old hand tools? I’m particularly interested in saws, axes, chisels, and hand planes.
Old Hand Saw Restoration Guide – Noah Holkeboer – March 2023
Goal
To take old, rusty, dull hand saws and restore them aesthetically and functionally. Also aiming to preserve any etchings on the blade and/or carvings on the handle.
Approach/Overview
Acquire saw → Disassemble → Clean pins → Remove rust and grime → Enhance etching (optional) → Sand or clean handle → Protect handle → Reassemble → Sharpen → Set teeth → Protect and maintain
Materials
Old saw to restoreBench viceScrewdrivers Wood mallet Punch for pinsSandpaper (80-600 grit)Sanding blockRubbing Alcohol (for etchings)
WD-40™Steel Bluing Agent (for etchings)Boiled linseed oil Wood finish (if desired)Oil or wax for protecting steelSaw filesSaw tooth set toolWood for cut testing
Protocol
1) Examine the saw. Look for a maker’s mark and etchings on the blade by viewing it from different angles in the light. Medallions on handle pins are also worth examining. Note carvings on the handle. These observations could help you determine the age of the saw, and they will also inform how the saw is restored. See the bibliography for references to help with determining the age of antique hand saws (von Sneidern, 2009; Clark & Dima, 2019).
2 Remove the handle from the saw blade. Loosen the saw nuts and medallion. Use a large screwdriver that fits snuggly, so as to avoid stripping or marring the nut, as these are often made of soft brass. Old saws might have “split” saw nuts, and require a special driver or a flathead screwdriver modified by filing a notch in the center. If the nuts are stuck, spray some WD-40™, wait a few minutes, then try again. Then push out the rest of the saw nuts. You can try to just push them out with a pencil, but they might need to be gently tapped out with a hammer and punch. Make sure to record which nut came from which hole, as over years the holes can become uniquely conformed to each nut (Farnsworth, 2022). Carefully slide the handle off of the saw plate (blade). If it does not come off easily, secure the plate in a vice and pull it off or tap it off with a mallet. Consider using WD-40™ to lubricate. If restoring a back saw (tenon saw) that has a rigid steel or brass back, do not remove it, as the blade might bend out of shape after removal (Farnsworth, 2022).
3) Clean the saw nuts. Saw nuts can be cleaned and polished in multiple ways. For grime that is really stuck on, you could consider soaking the brass nuts and medallion in a 1:4 solution of laundry detergent overnight before scrubbing off grime (Foster, 2021). However, the effectiveness is probably dependent on the type and concentration of laundry detergent, which Foster does not specify. Avoid anything that would have negative effects on the metal. After the soak, proceed with cleaning and polishing as described below. In most circumstances, this soak should not be necessary. Use fine steel wool (#0000) and a brass polish such as Brasso™ to clean and polish them (Farnsworth, 2022). Wipe off any excess polish with a rag.
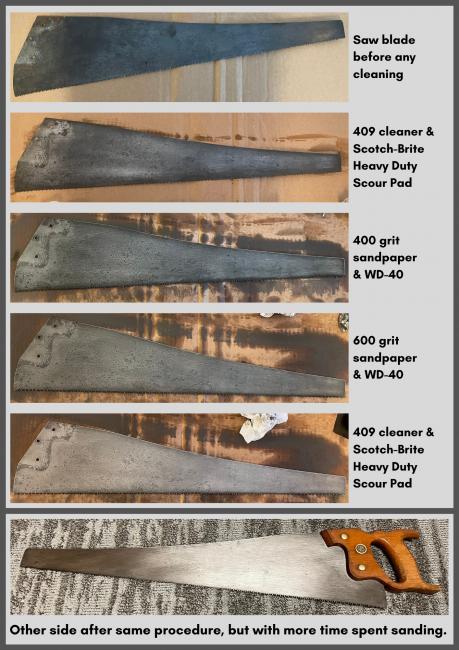
4) Remove rust and clean the saw plate. Some guides suggest removing rust with a solvent or acid, while this can work effectively, it can go too far. In the process of removing rust, the acid can remove an etching, darken the color of the blade, or leave pits in the metal. For the best restoration, these products should be avoided. Manual removal of rust and grime is usually sufficient, though it does take a little more work. However, some do recommend these products for saws with a lot of rust, even those that have etchings (T, 2016).
Large pieces of gunk and rust can be removed with a razor or scraping tool. Filing the corners of a razor blade can prevent it from leaving lines (Foster, 2021). If the saw does not have an etching, rust can be sanded off more aggressively. However, caution should be exercised unless it is obvious that there is no etching, as grime and age can hide a faint etching. To remove rust and clean the blade, use wet dry sandpaper, starting with more coarse grit and moving to more fine grit. 400 grit followed by 600 grit seems to be a common recommendation (Foster, 2021; Farnsworth, 2022), although starting with 120 grit has been practiced when there is no etching (Eoin Reardon, 2022). When sanding, using a solvent such as WD-40™, mineral spirits, or Simple Green™ is recommended. Using a sanding block helps to keep the depth of the sanding consistent. After sanding, using a surface cleaner and a cleaning pad can help remove dirt from areas that sanding can reach (such as teeth and pits in the metal).
5) Enhance etching if present on the plate (optional). If there is an etching present on the blade, you can consider attempting to enhance it. The results may not be dramatic, but it is possible to increase the contrast of the etching. To enhance an etching, start with a clean saw plate. Some recommend that the metal is polished before enhancing the etching (Enhancing a saw etch, n.d.). The blade is further cleaned and degreased by wiping it down with a solvent. Mineral spirits or acetone has been recommended (Enhancing a saw etch, n.d.), as isopropyl alcohol (T, 2016). Wipe down the blade and let the solvent dry before proceeding.
Next, apply a bluing agent like Perma Blue™ gun blue paste. It can be applied only to the area with the etching or can be applied to the whole blade. It will darken the color of the steel but can be sanded to your preferences. If only applied to a spot on the blade, it will change its reflectiveness, leaving a “halo” when viewed from certain angles in the light (Enhancing a saw etch, n.d.). After applying the blueing compound, one guide recommends letting it sit for “a minute or so”, then washing it off in cold water (T, 2016). Another guide suggests that the bluing agent should be allowed to dry “thoroughly” and “completely” (Enhancing a saw etch, n.d.). Either way, the bluing agent should not be touched while it is setting, as it could lead to inconsistent bluing. Next, the area of the etching is carefully sanded, only a few strokes at a time. Sanding is stopped when the etching is revealed and the background is an appropriate color. Just a little too much sanding could destroy the etching forever. The area around the etching and the rest of the blade can be lighted with additional sanding. Use a sanding block for this to avoid sanding unevenly. Use 600 grit or finer sandpaper (Enhancing a saw etch, n.d.). It has been suggested that this process could be repeated two or three times to improve the results (T, 2016).
6) Clean or remove saw handle coating.In many cases, the restoration will involve sanding the wooden handle of the saw. However, one should consider not sanding the handle, and only cleaning it for two main reasons. First, old saw handles that have seen lots of use can have a desirable patina due to years of exposure to the oil in a worker’s hands, which can be aesthetically pleasing and very comfortable to hold (Farnsworth, 2022). Second, if preserving the saw as a historical object is of interest, irreversible restoration processes, like sanding, should be avoided. Gentle use of #0000 steel wool and mineral spirits can be used to clean a wooden handle without removing the patina (Farnsworth, 2022).
For saw handles that will be sanded, thick layers of varnish may be able to be scraped off first with a razor blade scraper, this can be eased by heating the handle. If varnish must be removed from the small groves of decorative handle carvings, a chemical stripper like CitriStrip™ may be the only option (Foster, 2021). If a chemical stripper is used, clean the handle with mineral spirits and steel wool afterward to remove traces of the chemical before sanding (Foster, 2021). Sanding the handle down to bare wood can start with 60 or 80 grit sandpaper, especially if there is still varshish on the handle. The handle can be made smoother by using progressively fine grit sandpaper, up to 220 grit (Foster, 2021).
Saw handles with minor damage can be repaired (The Write Biz, 2013). However, badly damaged handles might need to be replaced entirely.
7) Protect saw handle.If desired, a staining finish can be added to the handle wood. Alternatively, the handle can be protected with an application of boiled linseed oil for a more natural look. Be careful with used rags, as apparently than can self-combust if not laid out to dry or intentionally burned (Foster, 2021). To apply either, wipe on evenly. Boiled linseed oil may warrant additional applications over time. In any case, refer to the instructions for the product being used.
8) Reassemble saw. Reattach the handle to the saw blade, putting the pins back in the same hole they came from, in the same way they were if possible. Do not over-tighten the nuts.
9) Sharpen saw. Sharpen the saw to your preference. Most saws are set up as either rip-cut or cross-cut saws by changing the shape of their teeth. After teeth are sharpened, they are set if it is necessary. This is done using a tool to slightly bend the teeth outward, alternating between sides. Other guides and videos exist detailing how to sharpen saws in various styles (Paul Sellers, 2013; Eoin Reardon, 2022; Farnsworth, n.d.).
10) Protect and maintain the restored saw. The metal blade of the saw can be polished with metal polish if desired. It can be protected by applying wax or oil. Boiled linseed oil can be reapplied to handles treated with it for continued protection. With use, the saw will need to be resharpened, and eventually, the teeth will need to be set again.
Bibliography
Clark, Joshua., & Dima, Barry. (2019). A buyer’s guide to antique handsaws – finewoodworking.
FineWoodworking. https://www.finewoodworking.com/project-guides/hand-tools/buyers-guide-antique-handsaws
Enhancing a saw etch. (n.d.). Loon Lake Tool Works.
https://loonlaketoolworks.com/pages/enhancing-a-saw-etch
Eoin Reardon. (2022, July 4). Restoring A vintage tenon saw [Video]. YouTube.
https://www.youtube.com/watch?v=veMpOcKXtVE
Farnsworth, Joshua. (n.d.). How to sharpen hand saws for woodworking | wood and shop.
Wood and Shop.
https://woodandshop.com/how-to-sharpen-hand-saws-for-woodworking/
Farnsworth, Joshua. (2022, February 4). How to restore an antique back saw. Wood and Shop.
https://woodandshop.com/how-to-restore-an-antique-back-saw/#types
Foster, Joe. (2021, February 28). How to restore an old hand saw, A complete guide | growit
buildit. Growit Buildit. https://growitbuildit.com/restoring-saw-remove-rust/
Paul Sellers. (2013, May 6). How to sharpen a woodworking handsaw | paul sellers [Video].
YouTube. https://www.youtube.com/watch?v=UA5DixEaaUo
T, Jay. (2016, January 26). Hand Saw Restorations – How to bring back the detail of an etch.
TimeTestedTools. https://www.timetestedtools.net/2016/01/26/hand-saw-restorations-how-to-bring-back-the-detail-of-an-etch/amp/
The Write Biz. (2013, January 13). Repairing a vintage handsaw handle. Hand Tool Journey-A
woodworking show of hands. https://handtooljourney.wordpress.com/2013/01/13/repairing-a-vintage-handsaw-handle/
von Sneidern, Erik. (2009, January). Online reference of disston saws — the medallions.
Disstonian Institute.com — Online Reference of DisstonSaws. http://www.disstonianinstitute.com/medv2.html
-
Comments (6)
-
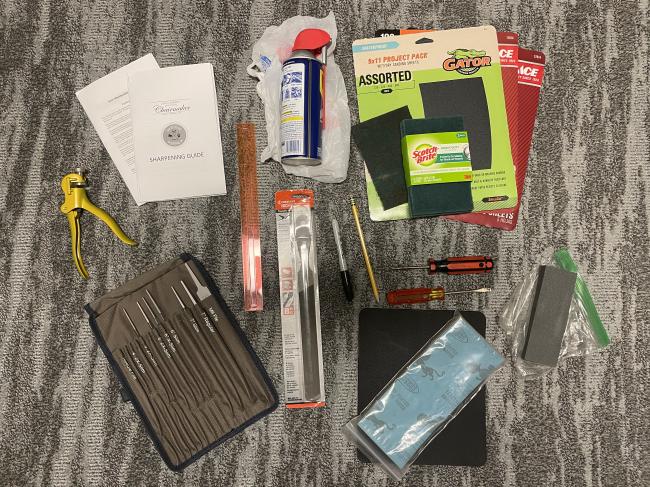 On a related note, this is my current tool sharpening kit, minus a few things. I also have a small pocket sharpener and a paddle strop with chromium oxide compound, but I don’t have as much experience with that yet. Shoutout to The Prepared sharpening class, which I really liked! I definitely recommend it. Although, I do wonder if it might ever get an update to include saw sharpening, given how important of a tool saws are.