Share your knowledge & learn from experts
Because prepping and community go hand in hand
Practice, simulations and drills
When we actually practice with our preps, or run drills and simulations, we take the visualization component out of prepping. There is a lot of mental work in prepping. This creates a shift into real time, hands on practice. For simulations and drills, there is still some imagination required, but you are still in engaged in doing rather than planning or acquiring.
Practice with our preps can build confidence and take some of the stress out of preparing.
Familiarity with our gear and preps becomes a new skill acquired, and more than just putting items into storage or onto a shelf.
Running a drill or simulation is also a way to know that you can handle certain items comfortably and with skill. Is the knife you bought right for you after repeated use? Or, do you need a different one that you can handle better? Do your boots cause discomfort? Do you remember how to purify water safely? Can you bake a loaf of bread?
What about various scenarios as drills? How about a no tech weekend challenge in your home or apartment? Survive with manual or non powered items only. Candles. Navigate with a map. Cook as if there is no power. Try to do everything as if you are off grid.
Take it outdoors, whether you live in the city or a rural area, and practice your covert skills. Challenge yourself to find the most undetectable ways to navigate to certain areas or places that you might need to get to.
Drill down on survival. Earthquake. Now. Go. Get to a designated point. How long did it take you? Did you discover any challenges on the way?
You can make that challenge more difficult by throwing yourself a curved ball in the form of a route closure or other obstacle necessitating the need to navigate differently. Some preppers have items that were purchased long ago. Are those items still relevant? Or, are there better items now available?
Try running a health impaired simulation. Eye injury and vision impaired. Someone was careless and broke a leg. First aid required. Now you have to manoeuver on crutches or you are one person down.
Or, someone is ill with the flu complete with all the symptoms. You have to care safely for them. You need to set up a clean room to prevent the rest of the household contracting the flu. You have your duct tape, plastic and zip strips to create a door in the plastic ready, right?
I knew people who practised that scenario for a weekend. It was an eye opener for the caregiver and for the person in the role of patient. We are lay people. Nurses are trained to care for the many needs of patients. It’s not as easy as they make it look because of their training.
Ease of use is not just the realm of the aged. People of any age can develop tendon, joint or muscle conditions or injury like carpal tunnel or arthritis.
I developed osteoarthritis young, as did some other family members. All of us had to learn how to adapt to living with it. What if you suddenly developed arthritis in your hands? How are you going to get that pail of rice open? Carry water? Imagine severe pain in your hands and wrist, now how are you going to accomplish your goal?
Even strained, sore muscles, from activities from chopping wood or other physical labour can affect how well you can use other items in your preps. The right tools can help you during those times.
There are longer types of practice such as grow a small raised bed garden in your back yard. Or, if you are in an apartment, challenge yourself to grow some food items.
I grew tomatoes on my balcony in BC. I wanted to see how much I could grow and if it would be successful with the light conditions. It worked great, except for the neighbours calling the police because they thought my tomato plants were something else.
Do you have your local edible plant book yet? Scenario: long term disaster. You now have to forage for food. Where do you go? How do know what to pick? Twinkies at 7-11 don’t count for this one.
Then journal or make notes about your experiences. What did you learn from it? Are there red flags about your preps or skill sets that need to be addressed? How did you fare in non physical ways? Do you need items or training to manage issues like stress or anxiety?
I enjoy doing drills and practice because I learn something valuable each time. How about you? Do you do regular drills and practice or run simulations? What has your experience(s) been like? What did you learn?
Read MoreEmergency deep open wound : washing and stopping blood
was wondering if pouring liquid styptic on a deep open wound is a good thing to do before applying pressure to stop the bleeding? Then using saline or clean water to wash?
Read MoreAn introduction to threat modeling
Preface
This isn’t an ‘ultimate guide’ -not by any stretch of the imagination. It is a work in progress and, as I see it, the concept of threat modeling underpins all we discuss here on The Prepared’s forums. I welcome any and all comments and constructive criticisms. Okay, here we go. Here’s my conversation starter about threat modeling.
An Introduction to Threat Modeling
Although it has its roots in IT security, threat modeling is, at its core, the foundation for the mindset that you and I call prepping.
The purpose of a threat model is to examine your preparedness by identifying assets, threats, defenses, and vulnerabilities. In short, the process answers the questions, “What am I preparing for?”, “What do I have?”, “How can I protect it? “, “What could go wrong?”, and “What am I missing, overlooking, or not seeing?”.
As we identify the various aspects of threat modeling -this way of thinking and prepping- use this opportunity to re-examine your planned scenario and responses. Take this opportunity to correct any potential issues, shortcomings, or vulnerabilities.
Identifying Assets
Assets are people, places, property, equipment, skills, and other resources you have access to or at your disposal. An asset might the med kit you have in your GO bag; it could be the pistol you keep at your side; an asset can be a person with a specialized set of skills (eg., medical training, combat experience -who can be a member of your team or can train you); an asset could also be place such as a bug-out location, a series of fallback positions; egress routes and transportation; or assets can be your significant stockpile of rations, water, weapons, ammunition, skills; or, items for trade and barter.
Identifying Threats
Threats are people, places, events, or conditions that have the very real potential to impact, disrupt, obstruct, impede, undermine, injure, maim, damage, or destroy assets and objectives. Below are some sample categories and their corresponding threats, which I’ve drawn from a few of my personal models. By specifically identifying threats, we can better bolster our defenses while help us to prepare smarter, not harder.
Natural: earthquakes, tsunamis, tornadoes, fire, flooding, landslide, blizzard, stellar flare, etc. Biological: injury, illness, disease, outbreak, pandemic, abuse, rape, murder Environmental: polluted resources, water scarcity, breathable air Infrastructure: electricity, water, gas, cellular communications, gps Chemical: pollution from manufacturing, plant accident/failure Socio-Economic: financial collapse, civil unrest, theft Radiological: fallout, power plant accident/failure Political: discrimination, inequity, inequality, polarization, radicalized ideologies Wartime/Insurrection: biological, chemical, & nuclear weapons, munitions, artillery, unexploded ordinance, terrorism, dirty bombsThreats EVERYWHERE
Thinking about threats can be especially easy if you have a low threshold for what you might consider a threat. It can also be downright daunting -almost to the point of paralysis- if you’re not careful. Threats can be found everywhere, if you look hard enough. The trick, as it were, is to abide by the sane prepper mantra and be sane and rational. Prioritizing is additional way to mitigate a runaway list of threats.
Prioritizing Threats
Probably the simplest way to keep yourself sane and from being overwhelmed by all these threats is to put them into one of two basic categories: low-risk or high-risk. Some of you may decide to go with risk levels that resemble something like our current Terror Threat Levels. How you prioritize is ultimately up to you, just do it. Doing so will force you to closely examine situational reality versus possibility and probability.
For example, those living on the west coast of the US (or along the ring of fire) are right to consider earthquakes, tsunami, or volcanic activity (along with the threats to life, safety, and infrastructure that come with those events) high risk threats. Although it’s not out of the realm of possibility, someone living in the middle of the US (for example) might not consider these high-risk threats. Instead, they’d likely list tornadoes.
By prioritizing threats you can prioritize your preparedness and, when that threat appears, you can prioritize your response(s).
What does a threat model look like?
A threat model can be as simple as simple as a Word document, as complex as spreadsheet, or as visual as an illustration. In creating an actual model, not only do you get it out of your head, but you can share this information with members of your household, trusted team, or community.
Below are a few examples of threat models to help familiarize you with the concept of threat modeling:
[See? Even Batman has a threat model. Classic IT security threat modeling. A sample of my consolidated threat modeling spreadsheet (a perpetual work-in-progress).]
That’s All I’ve Got
The time you invest in developing, understanding, and evaluating your threat model(s) is time you’re investing in your own preparedness and, ultimately, your success.
Read More
Creating a suture kit
Im creating a suture kit. I have noticed that the absorbable sutures are very expensive, but the PGA absorbable dental ones are very affordable. So I’m wondering if the dental sutures will absorb/dissolve for outside skin?
Read MorePeople who have taken a course from the prepared, was it worth it?
I’ve been eyeing the courses that The Prepared has been putting out and am interested in taking them. But before I do, I want to make sure it is worth the money.
Has anyone taken the knife sharpening or water course?
Did you learn something new that you didn’t know before or was it things that most people know about?
Do you feel like you got your money’s worth?
Read MoreHow to start a fire
My parents burned wood throughout my childhood and I’ve heated with wood most of my adult life. I use about one box of matches per year. So from age 20 to age 80 (that’s where I am today) is 60 years. And 60 years @ 1 box = 60 boxes. And 60 boxes @ 250 matches = 15,000 fires. Not sure how precise that estimate is but how many thousands of fires have you started?
Here’s what it’s come down to. If I need to start a new fire from scratch, I skip the kindling wood and newspaper and all that, stack up my wood, and insert a cloth soaked in kerosene into the stack. One match and I have a fire.
Here’s a link to the “Azerbaijani Lady” (with 3 million views) cooking outside. At 4:08 to 5:08 she is shown starting a campfire with one match sans kindling or newspaper. Gee, I wonder how she does that? The Azerbaijani Lady does all her cooking outside and has dozens if not hundreds of videos showing either herself or her husband lighting a fire in similar fashion. Sometimes you can glimpse the kero rag but mostly they hide it. https://www.youtube.com/watch?v=BOfhIny0pi4
My other fire-starting scenario is where, in this morning’s ashes, I have some glowing coals left over from yesterday. In general terms, I gather the coals together, put some kindling on top, and blow some air on the coals using bellows.
To gather the coals together I use a 6-inch stainless steel strainer. I scoop up some glowing red coals mixed with ashes, shake the strainer to get rid of the ashes, and dump the coals in a little pile of their own. Leather gloves give my hands better traction. The handle of the strainer is a bit slippery.
For bellows, I don’t use old-fashioned blacksmith bellows. I use a BBQ Fan that runs on one D-cell battery. Try it. You’ll like it. And that’s what you search for on eBay: “BBQ Fan.”
One of the more amusing things I’ve ever had happen to me is to be camping with friends at a provincial park in Canada and have a 15-year-old boy kneel down next to me at the fireside and ask (with a touch of awe in his voice), “How do you know so much about fires?” It takes a lot to impress a 15-year-old.
Read More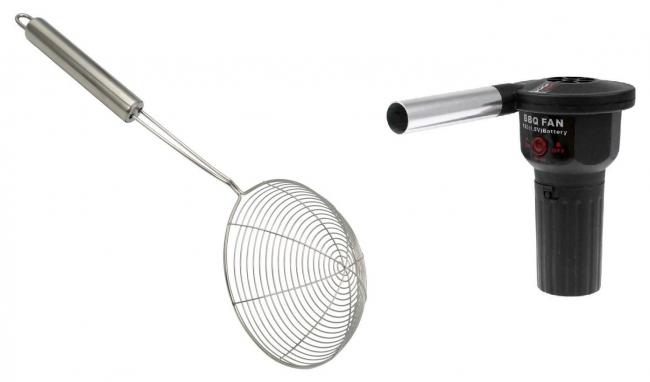
Cool form of passive indoor lighting during the day
I was browsing on Facebook when I came across this YouTube video of how people used old soda bottles and turned them into a bright light source for their homes.
You cut a hole in a galvanized steel roof and slide in a water bottle completely filled with water and bleach. (I imagine the bleach will prevent algae growth) They then seal up the area around the bottle to keep the roof water tight.
This method provides the equivalent of a 50W incandescent light bulb and doesn’t use any electricity. The team, Liter of Light, have installed 350,000 of these light bulb water bottles in 15 countries.
I thought this was incredibly cool. If I had a little shed with a steel roof I would like to try this and see how long the bottle and water lasts before needing to be replaced. I find passive forms of energy use so interesting.
Another form of passive energy use that I thought was genius is the soup can solar heater. You take a bunch of old soup cans and spray paint them black to attract as much heat from the sun as you can. Place these in a box and the sun will heat up all the air inside. The air is then pumped out using a small computer fan and reaches temperatures of 140 degrees. Another super smart idea to add to a shed or something like a greenhouse. I imagine it would keep a shed from dropping below freezing and you could run the computer fan off a $10 solar panel.
I think it is smart to know about things like this and even build and try them so if something like an EMP hits and we lose power for years, we still have ways to recycle trash into light and heat. But like I said above, these could be great ways to provide light and heat to an off-grid shed or greenhouse even during good times.
Read More
What are some good preps that don’t require you to buy something?
Some things I can think of are fitness, knowing how to cook, being able to do maintenance,…
Thought if I had a good list of preps that I can do for free, that I’ll have no excuse to keep prepping even when money is tight.
Read MoreAnyone have a nicely formatted 4×6 template for printing information?
Hey all!
This is sort of an oddball question, but here goes. I have lately been very in to printing out hardcopy explanations of things around the house, and laminating them. Think “Here is the writeup for how to hook up the generator with pictures and stuff, so my wife can figure it out if I am not around” or “Here is the manual for that heater, printed out on 4×6 cards, and laminated and attached to the heater with a zip tie” or “Here’s that nice printout of the ham bands in color, laminated and stuck on my FT-991a in case I forget, or get stressed”.
So originally I was printing things out on 8.5×11 paper, and doing full laminations. But lately, I have moved more towards 4×6 cards, because they are big enough to see, but small enough to carry with you, or stick in the glove box, or whatever.
So, my question is, does anyone have a nicely formatted (think, nice border, and place to put information in boxes and stuff) template for 4×6 printing? I am not a very good designer, and I’d love to have something I could plug different kinds of info in to for printing.
4×6 is sort of a weird size, so Word doesn’t have many templates for this. Thanks in advance if anyone has this!
Read MoreHow I built a trellis for grape vines
IMO, grapes are a great choice for home gardeners and especially for preppers. In the warm areas of the country, such as where I live in North Mississippi, the grape of choice is the muscadine. Below is how I built my trellis a few years ago. First I set my treated posts, where I use 6×6 posts on the ends and 4×4 posts down the line. To attach and tension the 12.5 gauge high tensile wire, I use the Gripple product, which in this case includes the wirevise, the wire joiners, ground anchors and the tensioning tool. With this product, you feed the wire into a slot & the wire can only keep going forward. It can’t be pulled back out, like Chinese finger traps. Makes tensioning the wire exceptionally easy… especially with their tool. You can purchase the product from Amazon but I get my orchard supplies from Orchard Valley Supply. https://www.orchardvalleysupply.com/…ons/trellising
I drilled a hole thru the 6×6 end posts, slid in a wirevise on the outside of the post & fed the 12.5 gauge high tensile wire thru the wirevise, then tensioned from one end & then attached stainless guides on top of the 4×4 line posts. I’m holding a wirevise so you can see how it looks.
Even though all posts are set 2 1/2 – 3 feet deep with concrete, you want to brace the end posts to keep them from leaning under the tension of the wire… especially when the wire is loaded with fruit and vines. On this end, I’m using Gripple earth anchors. They are driven, in this case, 3 feet into the ground, until the loop just barely sticks out. You then pull the drive rod out, slide it thru the loop and then pull up. This causes the anchor to pivot underground and then lock in place. When done the loop is now about 6 inches above ground.
Ready to pound the anchor deep underground.
This is where you pull up the rod, slide it thru the wire loop & pull upward until the end rotates & locks in place.
I then use the end post kit, which includes the Gripple wire joiner & the galvanized wire with a loop on one side, to tension the end post to the ground anchor.
One trellis now fully tensioned and braced.
Three trellises wired, tensioned & braced by myself in about 1 1/2 hours. You can’t get any easier & anytime it needs to be tightened, you simply attach the tool to the end of the wire.
Two years later, here is a variety called Supreme.
And here is Magnolia.
Read More
I am an experienced outdoorsman with an eye for conservation and sustainable land use
Besides being a writer and researcher for The Prepared, I consult in the outdoor industry and work as a precision rifle instructor. I am an experienced hunter and angler and have spent thousands of hours in the outdoors catching fish, hunting, bird watching, and exploring planet Earth.
Here to answer any questions about hunting, angling, or general outdoor activities. Questions related to gear selection, ethics, game recipes, stalking, training, mindset, and hunt preparation are welcome.
Here are a few photos from a recent mule deer hunt in Central New Mexico.
A tripod is an excellent tool in the woods.
Approaching with caution and reverence.
Solid kit. Mystery Ranch pack, semi-custom Remington 700 rifle, Athlon scope.
Read More
Growing rice
I really don’t know why, but I’ve never grown rice before. It is usually an integral component of most prepper’s long term food stores… it sure is for me. I like to grow items that could help me become self sufficient during a SHTF crisis, and I don’t see why rice shouldn’t be near the top of the list. I especially like items that store easily and rice surely does that. So I’ve ordered some seed and will try it next year.
I think the main reason I never grew it was because of images in my mind of rice grown in Asia and actually over in Arkansas, with these large perfectly flat fields that need to be flooded. I was considering doing that but as I researched rice, I found out there are two main types. Lowland rice is what I was thinking of, where the rice grows in flooded fields. But I found out there is a type called upland rice, which grows like any normal crop. It does not need flooding but does need an inch of water a week… similar to corn. This rice can be grown all over the US, including the far north, such as Maine. There are a bunch of varieties available. I’ve ordered Loto, which is a risotto type of rice.
Been doing a bit of research. Seems upland rice produces about half the yield of the flooded lowland rice. I’m reading where the lowland rice average yield is around 7000-8000 lbs per acre. So obviously half of that would be say 3500 lbs per acre. Now being realistic, growing during a crisis with limited resources, I’d count on maybe 1000-2000 lbs per acre for upland rice, to be on the safe side. One pound of uncooked rice has around 1600 calories. So just looking at rice, which I understand is not a balanced diet, someone would need around 1 1/2 pounds of rice per day. Multiply that by 365, you get around 550 lbs per year. That tells me an acre of rice could feed two people for a year… and probably more. That is rather impressive.
Now of course I grow more food and one needs more balance, but still, in my book that is great news. My main go to survival crop is amaranth, and just those two would provide a lot of nutrition. Mix in the three sisters (corn, beans & winter squash), which I store lots of seed, and you have a very healthy diet. Then of course other things can be made from rice… such as wine (sake) and flour.
I will test this next year & report back. Anyone here grown upland rice?
Read More
Garden experiments with hard soil
I had a pretty good garden last spring, but my hard, rocky clay required a lot of mechanical intervention to be workable. I decided to take the fall to experiment with making fixed beds with handtools like my broadfork and pointed hoe.
My goal was to make the nice borderless raised beds you see in books by Steve Solomon and John Jeavons. That just doesn’t seem to be possible with this soil. I’m experimenting with heavily amended narrow strips, which are easier to dig out. I’ve made a video showing some of what I’ve tried.
David the Good has posted a video from a friend of his with a similar soil profile to mine, who tried the lasagna gardening method. She piled on straw and woodchips and let it rot for a couple of years. In theory, this builds a new soil layer and softens the soil underneath. While she got that nice upper layer, the soil underneath is still hard as bricks and limits the size of her vegetables. She’s now trying to break that layer up with a broadfork.
I’d be curious to hear if anyone has had success gardening with hard soil. If my strip plan doesn’t work, it looks like I either need to buy a tractor or construct raised beds.
Read MoreTrapping
I didn’t see anything on trapping, but it’s smart to have some on hand in a SHTF situation. Trapping is a silent way to hunt and much easier than trying to find and shoot game. I have 5 small game traps and 5 fish traps. As a test, I put one out last week (I live in a small suburb in S.C.). Within a few days, I caught a possum, two squirrels, and a feral cat. Released them all, but I know it works.
A few on my garage wall.
Below is my next trap. A hog trap from Tractor Supply. I checked it out; it’s very well made. I hope to get one sometime in the near future.
Read More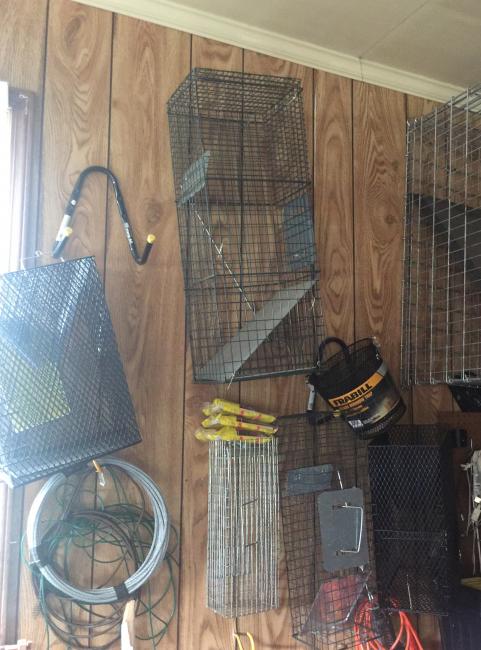
The beginnings of a food forest…
I have a big empty hill behind my house. It’s too much of a pain to go up there every day, but I wanted to use the land for something. I decided to start starting a food forest.
The concept is pretty simple: you plant food-bearing trees together to create a forest and then put low-maintenance crops in between them. So you might have a large nut tree surrounded by apple and pear trees, with strawberry plants in between them. (Amaranth would also be a good addition).
It’s what Nassim Taleb would call an “anti-fragile” system. A traditional garden has to be cultivated, weeded, and watered regularly, but once a food forest is established, it can be left to its own devices. The book Gaia’s Garden is a good reference for starting a food forest.
Yesterday, I received the two one-year-old Dunstan Chestnut trees I ordered over the summer. The chestnut tree is a great resource of both wood and food and was once a key resource to Appalachia. Unfortunately, the American Chestnut was wiped out in the early 20th century by a fungal blight. If you try to plant one now, it’ll die from blight within a few years. However, a single blight-resistant American Chestnut was found and piece of it were grafted onto blight-resistant Chinese chestnut trees, creating the Dunstan Chestnut tree.
I already had my tools and other gear in my truck ready to go. I started by using my scythe to make a clearing in the tall grass and weeds and then used a string trimmer to eliminate as much grass as possible in a large circle.
I then used my Root Slayer shovel to dig a hole for the tree. I love this shovel. The saw teeth on the sides make it easy to dig into the hard ground here. I really needed it yesterday, because some sort of tree has started to root in my field. I cut through the roots and ripped out all the tree roots I could find.
I put the tree in the hole, covered it up, and then slid a tree tube over the top, which acts as a miniature greenhouse and protects the tree from deer. I fixed it in place by zip-tying it to a piece of bamboo.
Finally, I watered the tree in with liquid compost, put some compost around the tree as mulch, and then dumped some saved kitchen scraps around the tree. They’ll also serve as mulch and will feed the tree as they break down over time.
Next, I’m set to receive three mulberry trees. They’re cheap and should start producing berries within a year. I’m also going to put in some apple trees this fall.
Hopefully, within a couple of years, I will have a steady supply of food that will require no work other than just walking up and taking it.
Read More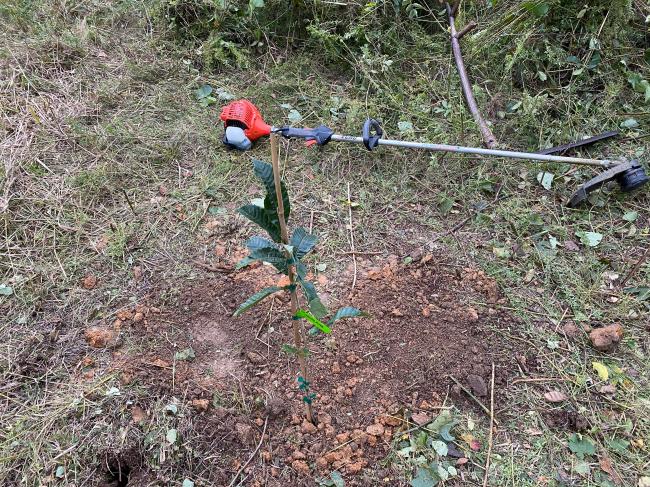
Chucknuck – The ultimate char cloth?
Was looking at reddit today and saw that someone made something called a chucknuck. I had never heard of it before, so the adventure began! But first, I want to explain what char cloth is.
Char cloth has been one of the most effective ways to start a fire using flint and steel or a ferro rod. If you are unfamiliar with char cloth, you cut up an old 100% cotton t shirt and put those strips into an Altoids tin. Punch a small hole in the top of the Altoids tin and then throw the entire tin into a campfire. The heat from the fire will then convert the cotton shirt into char cloth through a process called pyrolysis. In layman’s terms it burns the shirt inside the tin, but not fully because it is slowly burned in an oxygen deprived environment. What remains looks exactly like your shirt pieces, except black. This char cloth is extremely fragile because it is just made up of carbon. The benefit of this new creation is that if a single spark of a flint and steel or ferro rod touches it, the char cloth will hold onto that spark and it will grow. You then transfer that piece of char cloth to a tinder bundle and is a fast and easy way to start a fire.
The one downside of char cloth though is how brittle it is. Even today, I tried to pull out a piece of from my zip lock baggie of char cloth in my fire kit and I couldn’t pull out the whole piece, it always breaks into a smaller piece. If you do not store it well, when you go to use your char cloth it could just be powdered ashes because it got agitated too much in your pack.
A chucknuck is supposed to be the more durable solution to a char cloth. Below is my experience making one today.
I started off with an empty .223 and .308 win casing. Any rifle casing should work.
I then made my first mistake and I cut through the extractor groove. I thought this would be a good place to put my saw blade and keep it from slipping all over as I started cutting.
The issue is that it did cut off the rim, but I thought it would open me up into the inside of the casing. Instead I just opened up access to the primer well. Next time I will cut right above the extractor groove, and it should be alot less cutting and less steps.
To fix my little mistake, I just drilled out the bottom of the casing.
The finished product is a casing that has a large opening at the bottom.
I then took a roll of cotton twine that I got from the dollar store and laid out multiple strips a bit longer than a foot long. I fed the twine through the casing.
I wanted the end product to be a foot long so that extra length helped out when I tied off the end.
WE ARE DONE! But what is it!?
Well, you are supposed to burn/char the end of the rope sticking out of the tip of the casing. This creates a small piece of char cloth that you then can retract into the casing to protect it by pulling on the longer end of the rope. Whenever you need a piece of char cloth to catch a spark, you can push the rope back out through the tip of the casing and expose that area.
Did it work? No, not for me. I think I have some cheap junk twine and should find a better quality cotton string. The tip wouldn’t accept a spark, and was even hard to light with a lighter. Char cloth won this round against my chucknuck. I do want to go out and buy some quality cotton rope though and give it another shot.
I did a little research after my failure and found that this guy on YouTube was able to make a successful chucknuck. And I was right, he used some good looking rope, so I think it should work if I get some.
What do you guys think? Are you going to give this a try? How do you like to start your fires? If you do make one, PLEASE share it here and show me up! I want to see a working model.
UPDATE WITH WORKING MODEL BELOW!
Read More
Getting started in gardening
Developing a successful garden requires some preparation and basic knowledge, but no complex skills. It’s fun – especially if you love cooking or have kids – and it’s pretty cheap, especially if you focus on growing things from seed instead of buying plants from a nursery and if you compost instead of buying fertilizer. Even if you have no tools at all, you can get started for less than $100 (assuming you don’t buy a wheelbarrow). If you own the basic tools, you can get started for $25 or less. A small garden won’t make you food self-sufficient, but it will add variety to your table and it will give you the skills you need to expand your garden rapidly if you do want or need to grow more of your own food at home.
I’m writing this post in mid-July, when many people might think they’ve missed the window to start. Good news: you haven’t. There is a fall gardening season starting in a few weeks. Start preparing now and you’ll be ready.
I’m writing this post as a Quick Start-style guide. I’ll give you the major points and some details on why they are important and how to do them. I may update and expand it or add supplemental guides as I have time and as the seasons change. Other experienced gardeners should feel free to chime in with their advice. Novices should feel free to post questions.
Here are the main steps, each of which are explained in detail below:
1) Pick a sunny spot big enough for two 4×8 foot beds
2) Order your seeds
3) Prepare your soil using double dig or hugelkultur methods
4) Plant seeds
5) Water frequently until seeds sprout, then less often
6) Mulch heavily
7) Thin seedlings as necessary
8) Manage your weeds
9) Harvest or prepare crops for overwintering in the ground
10) Put your beds to rest for the winter
11) Compost
Obviously, these are my personal opinions, based on my experiences and reading. I make no claims of professional expertise. Use at your own risk.
Quick Start Guide to Gardening
1) Pick a spot in your yard that is sunny all day long and convenient to check on. It should be big enough for two 4×8 foot beds with a 3 foot row between them.
Too many people (including myself when I started) assume that the garden will be unsightly or will somehow offend the neighbors, so they try to tuck it into some far corner of the yard where no one will notice. Don’t do this.
You need to pick a spot that gets as much sunlight as possible each day. Go out at 7am, 10am, noon, 3pm, and 5pm and look at how the shadows move across your yard. Find the spot or spots that get maximum sunlight. Gardening guides talk about a minimum of 7 hours, but you don’t need to count. Just find the spots that get the most sun.
Also, your garden will do best if you visit it every day. Some plants, like peas, actually bear more heavily if they are picked often. Some vegetables, like okra, get tough and inedible if left on the plant too long. So when choosing among your sunny spots, try to put your garden someplace where you will see it and walk by it every day.
If you don’t live somewhere with a strict HOA, consider a front yard garden. Most front yards have fewer trees and so more sun, and you’ll see it whenever you open your front door, get the mail, or get out of your car (assuming you’re driving anywhere these days). Yes, the garden can get unruly, especially in summer, but the flowering plants are often beautiful and kids absolutely love a garden, especially if you plant things like sorrel or snow peas that they can pick and eat. It’s a like a treasure hunt for edibles. It will become a conversation starter with neighbors, and may inspire some of them to start gardening too.
You may also consider drainage. Being toward the bottom of a hill, where the soil is continually moist, can be good, but don’t pick anyplace that is constantly muddy or gets big flows of water during rainstorms.
Select at least two rectangular patches of about 4×8 feet. If they’re side by side, leave at least 3 feet between them to walk and kneel. If you are very ambitious, you can add a third patch, but I would suggest starting modestly and adding beds over time because preparing beds is a lot of work.
2) Order seed. Focus on fall vegetables like carrots, beets, turnips, kale, collards, radishes, mizuna, and green onions.
I put seed ordering second on this list because you need to make sure that you actually have a suitable space to garden before you order seed and you may choose to order more if you decide on a bigger garden.
As a very rough rule of thumb, a typical packet of seed will fill at least half of one of your 4×8 beds. (We’ll talk more about plant spacing below.) You’ll also want some variety, so with these things in mind I would suggest buying 4-5 packets of seeds for two beds.
The key things to consider here are your frost date and time to maturity. You want plants that will produce food before the first frost in your area (you can look this up online ‘first frost in [zip code]’). When you start browsing seed, you will find in the seller’s description (if shopping online) or the seed packet (if you are in a store) a ‘time to maturity’. For most root crops and greens, this is the typical time from planting the seeds until the plant is ready to eat. Pick things that can be ready at least a week or two before your expected frost.
A word of caution: things get more complicated if you are growing crops where you eat the fruit of the plant – things like tomatoes or okra. Then date to maturity means the date when the plant starts to produce food. If you want a good harvest, you’ll want another 2-6 weeks or even more to regularly harvest the produce. Also, some plants, like tomatoes and peppers, are typically started in a greenhouse or indoors under grow lamps. (Often the description/packet will mention something about starting indoors.) In that case, ‘time to maturity’ begins from when the juvenile plant is brought outside and planted in the garden. For your first fall garden, I don’t suggest trying anything you need to start indoors, and you will save money if you don’t buy whole plants from a nursery.
What to plant? I suggest things like carrots, beets, turnips, radishes, mizuna, kale, collards, or green onions. All of these are fairly simple to grow and come in multiple interesting varieties. I suggest having some fun and picking things you don’t always see at the grocery store (at least where I live): Chioggia beets, Lacinato kale, French breakfast radishes, red carrots, etc.
Some people grow legumes as a fall crop, but you may need to build a trellis, so I don’t recommend it for your first garden. You might try garlic, especially if you want to eat the immature green garlic in the spring, but I won’t cover the details here, so you’ll need to find a guide online. Choose hardneck varieties so that you can eat the garlic scapes.
Where to buy seeds? You can order from a big nursery company, like Burgess or Gurney. Buying seed packets from your local nursery or big box store is fine too. But far and away, I have had the best results with ordering from Seed Savers Exchange (SSE), which sells heirloom, organic varieties. Their shipping and handling can be higher, but their seed prices are reasonable.
3) Prepare your soil using the double dig method, which will create frameless raised beds.
There are many, many ways to prepare garden beds. I like the double dig method because it’s effective, it uses simple hand tools, and it creates raised beds without having to build framing. You can find out more about its benefits here: http://www.growbiointensive.org/FAQ/FAQ_DoubleDigging.html It does require some sweat and effort, but you don’t have to do it all at once. You can do part of the project every day until it is done.
I’ve also included a note about hügelkultur (building sharply raised beds over dead tree trunks or branches) below.
If you are physically unable to dig or have contaminated soil (e.g., you live in an urban neighborhood where the houses were painted with lead), you can look into bag gardening and straw bale gardening as easy ways to get started without the expense of building framed beds and filling them with clean soil. I don’t recommend using a rototiller. It breaks up the soil structure and doesn’t get deep enough.
The double dig method works like this:
1) Read this list all the way through. If you are going to skip step 7, mow your grass really short on the selected patches. If these instructions are unclear, see if you can get a copy of How to Grow More Vegetables by John Jeavons – your library probably has a copy. It has illustrations.
2) If you don’t have them, buy:
a. D-handled, square bottomed spade (basically a square-tipped shovel)
b. D-handled spading fork (looks like a pitchfork, but isn’t)
c. Large plastic watering can (cheap and durable) or a sprinkler and hose
d. Optional: Tape measure (you can get by using string or a garden hose or a ruler)
e. Optional: Hard rake (bow rake or level rake, not a leaf rake)
3) Water thoroughly the space you have selected for your beds or wait for rain. You want moist soil (moist like a good cake), not mud. If you pour water on the spot and any standing water is not absorbed into the soil within 2 seconds, stop watering.
4) Wait a day, so the water can soak in
5) Use the spade to cut the edges of your rectangle. Go all the way around your 4×8 foot bed, just driving the blade in and taking it out. You can use a tape measure to make sure the dimensions are correct, but I wouldn’t too much worry if it is exactly square; the edges won’t be perfect anyway if you’re not building a frame. (If you really do want it square, you’ll need 4 stakes – scrape wood or sticks work fine – and some string. Use a measuring tape and your eye to get a 4×8 shape (make sure you have two 8’ sides and two 4’ sides), tying the string around each stake so that the lengths of the sides can’t change. Then measure corner-to-corner, diagonally across the bed. Adjust the stakes until the diagonals are equal. Now your bed should be square.)
6) Use the spading fork to break up the top layer of soil. Start about 12” from the short side of the bed, touching one long side. Step on the fork to drive the tines all the way in, and then pull backwards on the top of the handle until the tines come almost out of the ground. Then lift low on the shaft, just above the tines, to pull the head out of the soil.
Work sideways until you have gone all the way across, then step back 12” and repeat. Work backwards until you have forked all of the bed. You always work backwards to avoid compressing the soil. Note that you are just loosening up the soil, not ‘turning it over.’
7) Pull up all of the grass clumps. (Truthfully, I don’t always bother. Sometimes I just cut the grass really short with the mower before I start and leave it there. You may have to deal with more weeds later (grass in the garden = weed) but it saves time and effort at the start.) Set aside the clumps to compost.
8) Dig the bed. Start again at the short side of the rectangle:
a. With your spade, dig out one 4 foot row of soil, putting it some buckets or wheelbarrow.
b. Take your fork and stand in the trench you have created. Fork over the soil at the bottom of the trench. The goal here is to loosen it up to make it easier for plant roots to penetrate. Don’t worry if it’s still a bit chunky.
c. Move over 12” and start again. Shovel the dirt from this new row into the trench from the first row. Don’t turn over the soil. Just let it slide off your shovel in way that helps it break up and fluff up a bit. Once you have an open trench again, fork the bottom.
d. Repeat until you get to the end of the bed. After you fork the bottom of the last trench, fill it in with the soil from your bucket or wheelbarrow.
9) Use a hard rake to level the top and shape the sides of the bed. All of that forking and shoveling will have added air to the soil (which is good), and raised the soil level 3-6”. Also, if you skipped step 7, raking may let you get out some clumps of grass.
10) Water the soil lightly and let it settle for a day before planting.
Alternative method: Hügelkultur
Hügelkultur involves using dead wood (preferably green) as a source of nutrients and moisture retention for your vegetables. It can work well anywhere, but I think it is especially good on gently sloping ground, where it can make de facto terraces. Be aware that these are much less attractive than traditional garden beds, especially if you are doing a front yard garden. Here are your steps:
1) Use a spade to outline a space about 2×8 feet. On a hill, make this perpendicular to the slope. You can even make the shape a very gentle ‘U’ or arc, so that water running downhill will be caught in the belly of the U.
2) Dig out the trench about 12” deep. Try to keep the top grass layer together. You might try cutting the grass out and putting it on one side of the trench and digging the soil and putting it on the other.
3) Fill the trench with green wood from recently cut trees, until the wood is slightly higher than the surrounding soil. Whole tree trunks are great – they don’t need to be split. Branches with leaves still on them are great too. The wood acts as a nutrient source for the plants and a sponge that soaks up and releases water. You can use woodchips, but they will decompose faster, so you’ll lose the special properties of a hügelkultur bed after a couple seasons.
4) Put the grass upside down on top of the wood.
5) Put all the extra soil on top of the upside-down grass
6) Dig out a shallow trench (about 6” deep) on the uphill side and dump the dirt from that on top too. The trench will help catch water, especially if you built your bed in that gentle arc.
7) When you are done, your bed will have a tall, almost pointy shape, like a miniature mountain range. The dirt will have probably run down the sides, making the bed closer 3×8 or 4×8.
8) Give the soil a day or two to settle before planting. You can plant on the peak of the bed and along each side, especially near the top.
4) Plant seeds. Time your planting so that the plants will mature at least 2 weeks before frost. Use the ‘space between plants’ directions for your seeds for the space between plants AND the space between rows. Don’t walk on your beds.
How late you can plant your fall garden depends on your climate zone. Find your frost date and then use the time to maturity information on your seeds to figure out how early you need to plant. Hedge your bets by adding 1-2 weeks to the time to maturity.
Plant your bed while kneeling on the path next it. Don’t walk on the bed. It will undo your hard work in the double-digging. If you absolutely must walk on the bed for some reason, put down a board and stand on it to distribute your weight.
The instructions that come with your seeds (or are found on the website where you ordered them) will give instructions for space between plants and space between rows. The spacing between rows assumes that you are growing a large, conventional garden rather than a densely planted raised bed. Ignore than number, and instead space your rows just as far apart as you space your individual plants. This will make better use of your garden bed space and, as your plants grow up, their leaves will help shade out weeds and trap moist air close to the soil. For plants with wider spacings, stagger the rows to make better use of space.
You can make spacing easier by finding a piece of scrap wood and marking common planting spacings on each edge. Adjust where you start the markings on the second edge, to create staggered rows. Another option is to make a cardboard triangle with each side the length of the desired distance between plants. If you put a seed on both bottom edges and the top point, you’ll get two staggered rows as you move it along.
Plant seeds at the depth specified on the package. If you are working with very small seeds, you can try making a little chute out of a folded scrap of stiff paper, putting some seeds in it, and then shaking them off the end one at a time. If you get too many seeds in your row, don’t worry. You can thin later.
Not every seed you plant will germinate, so many plants suggest a dense planting (e.g., every 2”) followed by a thinning (e.g., thin to 4”). For the best harvest possible, you should follow this. However, if thinning sounds like a tedious chore (and it can be), you can plant seeds at the thinned spacing (e.g., every 4”) and just accept that you will have a smaller harvest if 20-30% of your seeds don’t germinate.
5) Water. Water as soon as your seeds are in the ground. Water frequently (at least every other day, unless it rains) until your seeds germinate. Soil should be moist, not muddy. Then water less often but monitor soil moisture regularly.
Once your seeds are in, water gently. A watering can or sprinkler will work.
To know if you have given enough water, spray or pour out a bit of water and count how long it takes for the soil to absorb it. If the standing water is gone quickly, keep watering. If it is not absorbed after 2 seconds, stop watering.
Keep the surface of the soil moist until your seeds sprout. Moist means like the inside of a good cake, not mud. Feel the soil with your hands; don’t just look.
Once your seeds have sprouted, they will still need regular watering or rain. To know if your soil needs water, push your fingers into the soil about 2”. If the soil is getting dry 2” down, it’s time to water.
Aim for fewer, more thorough waterings. This encourages root development.
6) Mulch. Mulch is the key to efficient gardening. It suppresses weeds, adds nutrients to the soil, and traps moisture.
Mulch is almost any organic, weed-free medium that you can spread over your soil. You can use leaves, grass clippings (preferably mixed with leaves), or wheat straw [see Josh’s post below, however, about buying these things]. My favorite is partially decomposed compost.
Mulch keeps weed seeds from reaching the soil, reducing the amount of weeding you need to do. It also traps moisture and keeps the soil from drying out. This reduces the need for watering and also makes your soil a friendlier place for helpful creatures like earthworms. The mulch will break down over time and the worms will incorporate it into the soil, making it healthier.
When you have seedlings, spread your mulch between the rows. After you thin your plants (if you are doing that) you can spread your mulch further so that it surrounds every plant. It can touch the plants – that’s fine. Just make sure that it is lower than the lowest leaves.
As your plants grow, deepen your mulch. 3-6 inches deep is ideal, but you’ll get plenty of benefit out of just 1-2”. Make sure to add more as your mulch decomposes.
7) Thin seedlings. If you planted anything that needs thinning, use scissors to snip off unwanted seedlings just above the soil. If the mature plant has edible greens, put the thinnings in a salad.
8) Weeding and pest management. Weed as necessary. Don’t let weeds take over your garden. You probably don’t need pesticides.
Weeds compete with your plants for sun and nutrients. With close plant spacing, you will have fewer weeds once your plants mature. Mulch will help too. But do take the time every few days to pull whatever weeds you find. A hoe can be helpful, especially if you have trouble bending over, but you can also pull weeds by hand. If you have neglected things and need to remove a lot of weeds, a hand cultivator (looks like a large, bent fork) or similar tool will make things faster.
Pest control is tricky to advise on, since things vary by region. Research organic solutions online if you’re having a serious problem. I use almost no chemicals in the garden and rarely have problems (I’ve used neem oil a few times). Cool fall weather means fewer bugs and the larger crops you’re planting mean that a little damage is more tolerable than if slugs eat one of the only 3 pepper plants in your garden.
9) Harvest. Research which of your crops can overwinter in the ground. Research best ways to store. Use all of what you harvest.
If you are checking on your garden regularly, you’ll get a sense for when things are close to being ready to harvest. Don’t worry if things seem to start small or grow slowly. Your plants will grow faster as they get larger and develop more leaves and roots.
You can check your root crops by brushing away some mulch and soil and checking the diameter of the top of the bulb. Cover it back up if it’s too small, although recognize that your garden vegetables won’t always be as big as what you’re used to at the supermarket (especially conventional produce grown with fertilizer).
Not every plant will be ready at the same time, and you can also start using some things when they are on the young side, to have a continual flow of fresh produce into your kitchen.
Not all crops needs to be pulled when they are mature. Some plants will overwinter in the garden depending on your climate. Kale can overwinter in some places. Carrots can stay in the ground even in some cold climates, if you mulch them really heavily so that the ground doesn’t freeze around them. Research your crops and your climate.
You’ll also need to do research on storage techniques. Many greens freeze well if blanched in boiling water first. Many root crops store well in the fridge (or even outside it, if you have cool, dark space). Perhaps someone else can create a guide and forum on food storage to provide help.
Lastly, make sure to research how to use all of what you harvest. Radishes can be roasted and pickled, not just eaten in salads. Radish greens are edible and beet greens and turnip greens are delicious. You don’t often see them attached to the roots at the store, but don’t reduce your crops to their supermarket brethren. Use all of what you get. A little online searching will yield numerous recipes.
10) Put your beds to rest. Any beds without overwinter crops should be heavily mulched.
Clean any plants or weeds out of your beds (including the roots of any greens you have harvested) and then put down a thick layer of mulch. This will protect your soil until spring. This can be as simple as blowing the leaves from your yard over your garden bed.
11) Compost. Collect your kitchen scraps and yard waste to enrich your garden in the spring. You don’t need a special bin, but you do need to alternate layers of ‘green’ waste (fresh grass, weeds, or kitchen scraps) with ‘brown’ waste (leaves, straw, or dry grass).
Compost is just decomposing organic matter that breaks down, over time, into a rich humus. Added to your garden, it will restore nutrients, loosen up your soil, and introduce beneficial organisms. It is far, far better for your soil and plant health than chemical fertilizer, and you can make it at home for free.
If you layer your compost properly, it will, well, compost instead of rotting and will not be particularly smelly.
A lot of science has gone into studying how to get the most soil nutrients out of your compost pile. It is worth reading some of that information, but a lot of that literature assumes you are building a whole compose pile at once, and so can layer it in a fairly scientific way. Most people don’t have enough waste on hand to do that. Here is what you can do instead:
1) Pick a good spot (most people go for someplace out of the way, but others like to put the pile right in their garden, so that it enriches the soil underneath it).
2) Loosen the soil under the pile with a spading for and then put down a 1-2 inch layer of brown material about 3 feet in diameter – leaves, straw, dry grass, old corn stalks, etc. Basically anything from your yard that looks brown and dry and isn’t a twig. If you blow your leaves, blow them into a pile next to where you compost pile is to have on hand. You can buy a bale of straw from your garden center if necessary [but see Josh’s caution in his post below] and use a few handfuls from that if you have no brown waste in your yard.
3) Get a compost bucket for your kitchen. You don’t need to spend any money. Go to the bakery at your grocery store (if you are still going into stores) and ask them if they have any old frosting buckets. Get a bucket with a lid. I find that a smaller one (about 1.5 gallon size) can hold a week of kitchen waste. It’s better (less smelly) if you empty it more often, but you may not have the time.
4) Put in your compost bucket everything that is not oily, meat, or dairy. Some people skip egg shells out of fear that they’ll attract rats, but I’ve never had that problem. Collect vegetable scraps, coffee grounds (with the filter), tea bags and leaves, white napkins, etc.
5) When your bucket is getting full or you have the time, take it to your compost pile. Dump it out (may be quite smelly if it has been a while since you last emptied it) and use a stick to spread it into a layer (more or less, no need to be precise). Throw leaves or other brown material over the top to get at least a 1-inch layer. Tip: if your bucket is really smelly, rinse it out and then pour a half-inch of white vinegar in the bottom. No need to empty it; just start collecting your next batch of waste on top of the vinegar.
6) If you do weeding or mow the lawn and bag the grass, put that on the compost pile too. If it is a large amount, break it into several layers 3-6 inches thick, depending on how dense the green waste is, with brown waste between them.
7) When your pile gets to be about 4 feet in diameter at the base and 3-4 feet tall, start a new pile. Take a spading fork and mix around the old pile, to mix up the layers and add some air.
8) Wait a month or two and you can use it as mulch. Wait 3-6 months and it will decompose noticeably and you can add it to your soil like fertilizer in the spring.
12) Resources. The Prepared will be updating the Best Survival and Prepper Books page soon to include a good selection of gardening books. Watch for the revised list. In the meantime, start with How to Grow More Vegetables by John Jeavons if you want to learn more.
Read MoreBuilding raised garden beds
(Another short guide, for those getting started in gardening)
When people talk about ‘raised beds,’ they usually mean soil that has been raised about 6” above the surrounding ground by a frame of wood, stone, or cement blocks. If you have read the forum about getting started in gardening, you will know that you don’t actually need a frame to make a raised bed. However, having a frame makes it easier to maintain your bed (the sides don’t erode), helps keep your mulch in place (especially if you are topping your beds with dried leaves in the winter), and can let you make a higher bed. There are also plenty of aesthetic benefits. You can paint your beds to match your house, use stonework to add visual interest to your yard, or just keep things looking neat. If you have the time and energy, it can be worth doing.
Here is some guidance to get you started. These are based on my own experiences and reading. I’ve framed beds with untreated lumber, scrap cedar, and stone, and I’ve used logs and cement block in other landscaping projects. I claim no professional expertise. Your experiences may vary.
Before we start, I want to make one thing clear. Sometimes people see raised beds (i.e., beds with frames) and assume that you build the frame and then fill it with soil. You can do that – it is actually at the heart of the Square Foot Gardening method – but it’s expensive and usually unnecessary. What you want to do is prepare an unframed raised bed by fluffing up the soil with a good double-dig and maybe adding some compost, and then put the frame around your bed.
With that in mind, the key steps to building a raised bed are:
1) Dig the bed
2) Choose your materials (wood or stone/cement block)
3) Obtain your materials
4) If using wood: prebuild your frames
5) Install your frame
Skill level needed is minimal and it decreases if you don’t care about the aesthetics.
1) Dig your Bed. See the instructions in the Getting Started with Gardening forum or borrow a copy of How to Grow More Vegetables from your local library. Double dig your bed.
2) Choose your Materials
Your two main options are wood or some form of stone or cement block. I’ll discuss each in turn.
Wood:
The main benefits of wood are that it is cheap, easy to work with, and can be painted (if you choose). The main drawback is that most wood rots when in contact with the ground. You have three main options (as I see it) to deal with this:
a) Use regular, untreated wood to build your beds. If you use 2×10 pine from your local big box store, your bed will probably last several years before needing to be replaced. I have gotten 4+ years out of untreated wood.
b) Use cedar or another variety of wood that is naturally resistant to rot and bugs. You probably won’t be able to find large enough sections of wood at a big box store (at least I haven’t), but if you go to a local lumber yard and explain to someone what you are doing, they can probably point you to locally available, rot-resistant varieties. The drawback is that it is expensive. As an aside, I live in an area where many houses have cedar siding, and I have obtained scrap siding from siding repair jobs. It works okay for garden beds. It is a little weak and needs more support and it still breaks down over time. But it works and it’s free.
c) Use treated lumber. Pressure treated wood is impregnated with chemicals to prevent rot. The current varieties made in the US are no longer treated with arsenic (technically chromated copper arsenate) and at least one manufacturer claims that their product is safe for vegetable gardens. Nonetheless, I personally choose to avoid it for growing food.
All of the above assumes that wood = cut lumber. You can also use tree trunks (laid horizontally) if they are thick enough or logs (set vertically) if you have enough of them. In my area, a large log may last 3 years before rotting to uselessness.
Stone or cement block:
If you have free access to large stones (at least the size of Tom Clancy novel or kids’ soccer ball), they make a great border. They are easy to install (even easier than wood, albeit heavier), look cool, and even retain heat to help your plants grow. I would advise against using smaller stones, especially if you need to stack them to get the height you need. They will fall over, look messy, and not do the job. (For the same reason, I wouldn’t use regular sized, un-mortared bricks.) In general, the bigger the stones you use the better (within reason of course). Just be careful moving them.
Cement blocks are essentially like big, regular stones. I haven’t tried them for garden beds, but I have used them for retaining walls and they are easy enough to work with. For a 4×8 garden frame, I wouldn’t recommend you go through all the steps you need for a proper retaining wall, but I would dig a trench 1” or 2” below the soil level, level the trench, and tamp the bottom. This will help things look neater and make your blocks less likely to move. More on that below. I would suggest 6” high blocks, although you could try 2 courses of 4” high blocks. You may have some problems with the 4” blocks moving, but probably not as much as you would with small rocks if you get blocks that are fairly wide (front to back). Many are made with some sort of interlocking shape (usually a lip at the back) or a pin system, which should help even more.
A final note:
I have recently seen a block-and-wood combo where you buy large cement corner posts that have slots molded into them to accept wooden boards (https://www.lowes.com/pd/Oldcastle-Planter-Wall-Tan-Retaining-Wall-Block-Common-6-in-x-8-in-Actual-5050-in-x-7-75-in/1001156396). I haven’t tried it yet, but I may do so when my current wooden beds rot out. It looks like a good option, especially if you can replace rotted boards without moving the corner posts. It would really reduce the labor cost of using untreated wood. If you try it, maybe post below on the experience.
3) Obtain your materials.
Free is best, but you also want materials to be clean so that nothing toxic enters your garden. You may be able to source scrap wood from building projects in your neighborhood or get tree trunks or stone from your own land or friends’ yards. Cement block can be purchased (including ordered for delivery) from landscape centers and big box stores.
If you are buying lumber, I would suggest buying 2×10 (which is actually 1.5”x9.5”). The edges may be a bit higher than your soil, but the extra lip will help keep your mulch in place. For each bed, I would buy three 8-foot lengths and then have the store cut one of them in half. They’ll usually do it for free. Depending on how you assemble your bed, it will be either 3” shorter or 3” narrower than 4×8 feet, but it doesn’t matter. Just make sure you do all of your beds the same way. Buy some cheap 2×4 (e.g., stud lumber) to reinforce the corners. You can ask the store to cut it into 9” lengths (four 9”pieces for each bed), but they may charge you a few dollars because it’s more cuts. If you have the tools, you can do it at home. You’ll also want a box of 2.5” construction screws.
4) For wood only: Prebuild your frames.
Build a 4×8 wooden rectangle, reinforcing the corners. I could write detailed instructions on how to do this, but if you have basic woodworking skills you don’t need me to and if you don’t have basic woodworking skills, you probably need pictures (which I don’t have, since my beds are already done).
That being said, if you want to learn basic carpentry, this is a great project to start with. If you have the wood pre-cut at the store, all you need is a tape measure, a pencil, a drill, a small bit for piloting holes, and a driver bit for putting in screws. (A square for marking things and a clamp to hold the reinforcing blocks would help too, but aren’t totally necessary.) The driver bit may even come free with your box of construction screws. The process is straightforward, and you’ll feel pride every time you see your beds.
Build your beds out on your driveway or in your garage. It will be much easier to get the corners flush and square. A 4×8 frame made from 2×10 pine will be a bit heavy, but should be easily moveable with the help of a friend. Especially if the corners are reinforced, you can carry it without it breaking.
Maybe someone building their own beds can post a step-by-step photo guide below to the carpentry. Yes, I checked Instructables for a good link, but most of what was there had either bad dimensions, was too deep (you’d need to fill with soil), or was actually an elevated bed (picture a garden bed built on top of a table; these can be good for gardeners with mobility challenges).
5) Install your beds
For wood (i.e., frame you’ve pre-built):
a) Use a hard rake to pull the soil in from the edges of your raised bed.
b) Use a shovel to scrape the ground flat all the way around the bed. If your yard is not level, I recommend digging downward on the uphill side(s) so that your bed will lay flat.
c) Position your frame
d) Check that the frame is level front to back and side to side by putting a bubble level on the boards. (If you don’t have a bubble level, you can buy a cheap 9” torpedo level for less than $10.) If it’s not level, move the frame and dig downward on the high side(s) or prop up the low sides with rocks. If you prop up the low sides, make sure that the bottom of the board is still at or below the level of the surrounding soil. You’ll also need to back fill and tamp down the dirt in that area to that the frame doesn’t shift and settle later.
e) Backfill as necessary against the outside of the frame (i.e., if you cut a wider trench in the soil, fill it in around the frame) and rake the interior level. You’re done!
If you are using tree trunks, I would just dig a trench deep enough that when you lay the trunk in, there are no large gaps where dirt from the garden bed can leak out underneath. If you are using logs, lay like stone or block, below.
For stone and block:
a) Use a hard rake to pull the soil in from the edges of your raised bed.
b) Use a shovel to dig a narrow, straight trench, as wide as your stone/block, 1-3” deep. 1” is probably enough, but if you have wide, flat stones you may want to ‘plant’ them vertically, in which case a deeper trench will make them more stable.
c) Whether you level your trench is up to you. I don’t think it matters much with natural stone, but you may feel that block looks better when it is properly level. To level your trench, lay a piece of straight lumber (any straight, long piece of 2×4 will do) and put a bubble level on it. Dig or fill as necessary. For a level block wall, make sure to tamp down the bottom of the trench after digging.
d) Lay your stone or block.
· For laying stone, it will become a bit of a jigsaw puzzle as you try to get the pieces to interlock. To make things easier, lay all of your stones out near you in the yard, so that you can easily test fit pieces until you find the right one.
· If you are laying block, you may wish to stretch a string between two stakes on each side to show where the front of your blocks should line up. Most blocks come with angled sides. To avoid needing to cut any blocks, I would dig out a little bit of your bed at the corners, and use the angled sides of the block to angle the wall around. It should only take one angled block to turn the corner, so you shouldn’t lose much bed space.
e) Backfill. If you are laying stones, backfill with dirt on the outside and inside with a hand trowel as you go. Tamp the dirt down with the handle of your trowel or a fist sized stone to prevent the rocks from shifting. If you are laying block, I would lay everything first and then use a string or piece of scrap wood to make sure that all of the stones are in a straight line (if you haven’t done so already) and at an even depth. Adjust as necessary. Backfill the outside and the rake the interior level. You’re done!
Read MoreLearning to fish
At the risk of embarrassment & shame, I’m going to admit this in front of all of you who have awesome outdoor skills: I don’t know how to fish.
But I want to learn.
Now that I have my confession in the open, let me ask my questions. 🙂
– There are a zillion “how to fish” videos on YouTube. Can anybody help me pair it down & recommend some of the better videos, as well as any other sources? (Unfortunately, I don’t have any local friends who can teach me.)
– What is a good, basic set of fishing equipment (rod, reel, tackle, etc.) for inland, freshwater fishing? It seems like half of the local sporting goods store is dedicated to fishing equipment, and I’m sure most of it is stuff I don’t need.
Thanks in advance.
-WS
Read MoreSkills >> Gucci Gear
Wanted to make this post mostly pertaining to firearms as I’ve seen a lot of people on here asking questions about purchasing their first gun, but this advice can also be applied to just about anything prepping related. Keep in mind when going to purchase a firearm, or any piece of gear for that matter, that no matter how nice the gear may be, no matter how many cool features it may have, it is nearly useless in the hands of an unskilled operator. This mainly relates to firearms in the fact that far too many people get swept up in the game of trying to find “the best” weapon or optic or accessory out there and lose sight of what actually matters; Shooting the weapon. Sure that $2,000 LMT rifle looks super cool, runs like a racehorse, and has a ton of features, but if you can’t hit a 12″ silhouette at 50yds then it may as well be a pawn shop trade in special. What I’m saying is don’t assume that you can just buy skill with a weapon. Yes I love my Gucci ARs as much as the next gun nut, but if I blow my entire budget on a super expensive rifle setup and have no money for ammo to train with then it means nothing. Now I know right now circumstances are a little rough if you didn’t stockpile ammo before all this began, but the good news is there is still a way to hone your skills without ever firing a round. It’s called dry fire. Thomas and I touched on this in a previous thread, but dry fire is a wonderful way to build skills and muscle memory that are critical to fluid gun handling, particularly for handguns. The internet is full of videos of dry fire drills you can run at home without a single bullet fired that will greatly improve your speed, skill, and overall familiarity with the weapon. I’d be glad to post some of my personal routines if anyone is interested as well. Just running simple dry fire drills will help you begin to master the basics of sight acquisition, trigger press, grip/shouldering techniques, and weapon manipulation. It may feel silly at first, pretending to fire and reload your weapon with no ammo, but I can promise you the more dry fire reps you do the work for, the more it will pay off on the range and in real situations. Dry fire is no substitute for live ammo practice, as there are still fundamentals that can only be learned with live rounds, but it is a fantastic skill building supplement, especially for new shooters. No matter what caliber of shooter you are though, dry fire drills can and will help keep you at your top proficiency levels.
So let’s wrap things up:
1. Don’t buy a weapon so expensive you can’t afford ammo to train with it. I’m not saying don’t buy gucci guns if you have the disposable income, just don’t put yourself in a position where you have a high class weapon but you’re a low class shooter because you couldn’t afford to train with it.
2. Dry fire. A lot. Especially in times like these where ammo is scarce and priced like precious metal
3. Don’t get caught up in the hype about a certain weapon or optic or upgrade etc thinking that it will magically make you a better shooter. Higher quality gear allows good shooters to push their performance, but the increase is skill-driven, not gear-driven. Save up, buy ammo, train, and then once you have acquired a level of skill and confidence in your shooting begin looking for ways to enhance your performance.
I hope this was helpful to a lot of you good folk just getting in to the world of firearms, don’t be afraid to ask if you have any questions or would like any advice. I’m no master marksman but there are a lot of people on here with a lot of great knowledge who are glad to share it. The US has had a massive amount of new gun owners arise here in the past few months and it’s our job as experienced shooters to help educate and inspire them the best we can. If anyone would like links to videos of how to get started training or good dry fire drills to run just let me know, I would be happy to post them in the comments section.
And as always,
This is the way
Read MoreHow do you (safely) access the water in your water heater in case of outage?
When talking about water preparedness I always hear that we should take into account the 30 or 40 or however many gallons of water stored in our water heater. I mean that if the water goes out we can drain the water heater for drinking, washing, and whatever other vital uses. But for a person like me, who’s not very handy or knowledgeable about repairs, I have no idea how to drain my water heater except in the normal way, by running the hot water in my faucet. Can anybody provide any guides or links to guides where I might learn?
Read MoreHobby farm or homestead?
My wife and I have been talking about “doing something else” for a couple years (she quit her job, mine seems to be reaching a natural point of exit). The time seems to be ripe for actually following-through! I have convinced her we should add hobby farm/homestead to the mix.
Assumptions…
1. Want to move north. Like, New England. Would consider upstate NY part of the acceptable geography.
2. One of us will continue to work for income, benefits, etc.
3. We have a 6 year old. No homeschooling. So, proximity to town/schools, etc. is still going to be important. (i.e. not too remote)
4. I enjoy, but have no allusions about adopting, the mythology displayed on all those Alaska shows (I’m pretty grounded as to the reality of small farm operations)
Questions…
1. Any tips on finding a property? Anything specific to look for (or not) up north?
2. We aren’t young… I mean, we’re young enough to have a 6 year old but we’re not 20 or 30 somethings. Does our age matter in terms of actual labor required? In terms of finding a property that is “turnkey” vs “needs work”?
3. Any key indicators to look for? Anything you wish you’d known before? Or that you would do differently?
4 How ridiculous an idea is it? Dick Proenneke is good inspiration, for the challenge he took on as a middle-aged person. But to be clear, we are definitely not going all remote-cabin-in-the-woods.
Read MoreGood guide from WHO for making your own hand sanitizer
I read the blog post about the Force Of Nature machine that makes disinfectant at home. So I started googling for similar gadgets that could make hand sanitizer. There are a ton of low-effort posts around the web because of covid. Found this one from WHO which seems to be trustworthy and easy, thought I’d share (PDF):
https://www.who.int/gpsc/5may/Guide_to_Local_Production.pdf
Read MoreVideo series on butchering a hog
Found these videos on Reddit that show how to butcher a hog at home. Not for the faint of heart but it’s something worth knowing how to do the right way. Especially if the meat shortages are going to last a while.
I couldn’t figure out how to put one of the videos here but they’re all on the page if you scroll.
https://www.rusticmillingandcraft.com/blog/categories/home-butcher-educational-videos
Read More