10

Chucknuck – The ultimate char cloth?

Was looking at reddit today and saw that someone made something called a chucknuck. I had never heard of it before, so the adventure began! But first, I want to explain what char cloth is. 

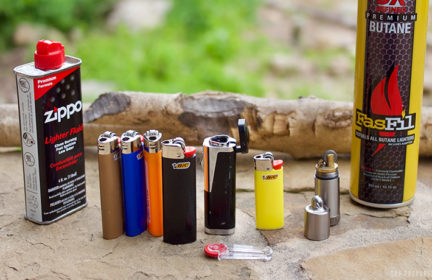
Char cloth has been one of the most effective ways to start a fire using flint and steel or a ferro rod. If you are unfamiliar with char cloth, you cut up an old 100% cotton t shirt and put those strips into an Altoids tin. Punch a small hole in the top of the Altoids tin and then throw the entire tin into a campfire. The heat from the fire will then convert the cotton shirt into char cloth through a process called pyrolysis. In layman’s terms it burns the shirt inside the tin, but not fully because it is slowly burned in an oxygen deprived environment. What remains looks exactly like your shirt pieces, except black. This char cloth is extremely fragile because it is just made up of carbon. The benefit of this new creation is that if a single spark of a flint and steel or ferro rod touches it, the char cloth will hold onto that spark and it will grow. You then transfer that piece of char cloth to a tinder bundle and is a fast and easy way to start a fire.

The one downside of char cloth though is how brittle it is. Even today, I tried to pull out a piece of from my zip lock baggie of char cloth in my fire kit and I couldn’t pull out the whole piece, it always breaks into a smaller piece. If you do not store it well, when you go to use your char cloth it could just be powdered ashes because it got agitated too much in your pack.

A chucknuck is supposed to be the more durable solution to a char cloth. Below is my experience making one today.

I started off with an empty .223 and .308 win casing. Any rifle casing should work. 

IMG_20201009_114146

I then made my first mistake and I cut through the extractor groove. I thought this would be a good place to put my saw blade and keep it from slipping all over as I started cutting.

IMG_20201009_114218

The issue is that it did cut off the rim, but I thought it would open me up into the inside of the casing. Instead I just opened up access to the primer well. Next time I will cut right above the extractor groove, and it should be alot less cutting and less steps.

IMG_20201009_121804

To fix my little mistake, I just drilled out the bottom of the casing. 

IMG_20201009_134753

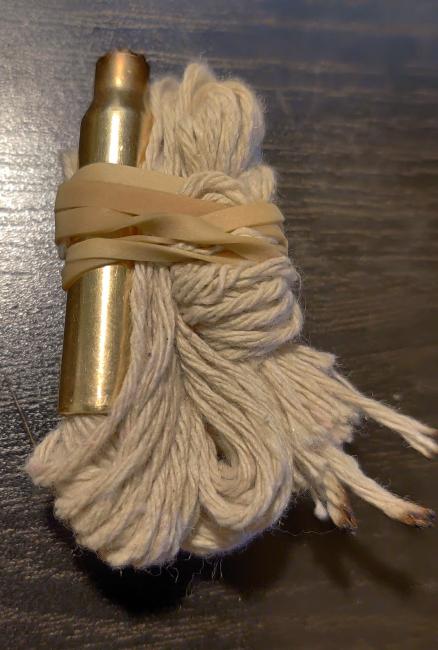
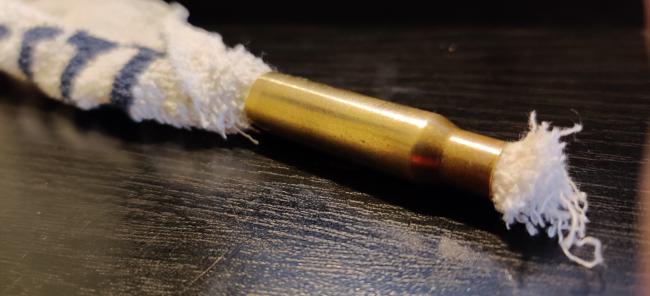
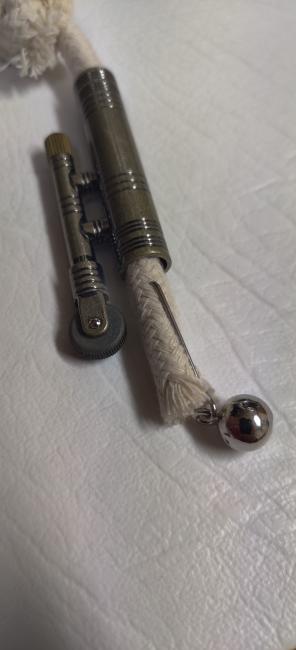
The finished product is a casing that has a large opening at the bottom.

IMG_20201009_141644

I then took a roll of cotton twine that I got from the dollar store and laid out multiple strips a bit longer than a foot long. I fed the twine through the casing.

IMG_20201009_142942

I wanted the end product to be a foot long so that extra length helped out when I tied off the end.

IMG_20201009_143021

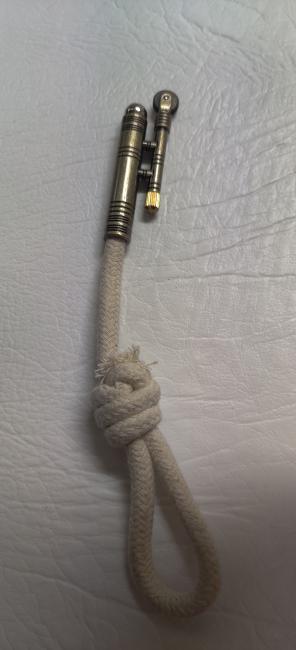
WE ARE DONE! But what is it!?

Well, you are supposed to burn/char the end of the rope sticking out of the tip of the casing. This creates a small piece of char cloth that you then can retract into the casing to protect it by pulling on the longer end of the rope. Whenever you need a piece of char cloth to catch a spark, you can push the rope back out through the tip of the casing and expose that area.

IMG_20201009_143258

Did it work? No, not for me. I think I have some cheap junk twine and should find a better quality cotton string. The tip wouldn’t accept a spark, and was even hard to light with a lighter. Char cloth won this round against my chucknuck. I do want to go out and buy some quality cotton rope though and give it another shot. 

I did a little research after my failure and found that this guy on YouTube was able to make a successful chucknuck. And I was right, he used some good looking rope, so I think it should work if I get some. 

What do you guys think? Are you going to give this a try? How do you like to start your fires? If you do make one, PLEASE share it here and show me up! I want to see a working model.

UPDATE WITH WORKING MODEL BELOW!

5

  • Best Replies

  • Comments (5)

    • 7

      Thanks for sharing! When you want to protect the charred end by pulling the string back inside the casing, is there still enough friction between the rope and casing to hold everything in place during storage? Or does it feel like the casing will slip off?

      • 5

        Great question! The more rope and material you pack into the casing, the tighter and harder it is to the pull rope in and out. So if you will make one, definetly try pulling it in and out multiple times to make sure it is nice and secure in there.

        Here is a quick solution I came up with to make it even more secure though. Just fold the excess string next to the casing and secure it all together with a rubberband.

        IMG_20201012_105900_1

    • 9

      UPDATE!!!

      So I kept up my journey of making a working chucknuck. I went to three hardware stores, a dollar store, and asked friends and family and could not find a cotton rope that I thought would work. I found an old washcloth with a tag saying 100% cotton. So I thought I would give that a try.

      Here it is inside the chucknuck, but it didn’t work at all.

      IMG_20201014_115801

      I also tried an extra shoe string that I had, but turned out to by polyester and just melted.

      One idea I had was to go to a craft store, but I haven’t had the chance to go to one yet.

      I went back to that YouTube video listed above of a guy with a working model and looked in the comments of the video. I saw a comment of a guy talking about a trench lighter. He said that this was a length of rope impregnated in saltpetre which would create a live ember. This was so that soldiers could light their cigarettes without lighting a match and creating a large light source that would give away their position. So I did a google search of a trench lighter and I found some results!

      This is a common tool, not only known as a chucknuck but also as a sailor’s lighter, trench lighter, rope lighter, or a shepherd’s lighter.

      I found an old instruction sheet for the military trench lighter. I would love to own one of these, but they are considered vintage and are over $50 because they are collectible now.

      dunhillfoxholeltrsterwwiiinstr

      There is a commercial version for sale and it is only $5 on ebay or $8 on Amazon. This commercial version is even better than the DIY version I was trying to make. It has a built in flint wheel striker, and also a retractable ball that can be used to snuff out the ember, protect the tip, and prevent the rope from being pulled out the wrong way. But most importantly, it has real 100% cotton rope! The bane of my journey!

      Here are some pictures of the Amazon model:

      IMG_20201016_173323

      IMG_20201016_173338

      Here is a video of the rope lighter working

      And to prove that my chucknuck works and it was just the rope holding things back from working, I took the rope and put it in the chucknuck. And now it finally works!

      Summary:

      I had fun learning about this fire starting method. I think it is superior to charcloth and I am going to have one of these in my fire kits.

      I don’t recommend people making their own as it is a lot of work, and is not as good as the commercial version. But if you do want to make your own and want a working rope, you can buy replacement rope for the commercial version and then just put it into your bullet casing chucknuck.

    • 6

      Seems like a lot of work.  I greatly prefer cotton balls impregnated with petroleum jelly.  It is quick & easy to make, lights quickly from a fire starter and is waterproof.  You can soak one in water, fluff up the cotton a bit & it will light right up.  The cotton ball will stay lit for like 4 minutes too.  I keep several in the storage compartment of my Gerber Bear Grylls fire starter… which I love.

      bfde832f-aefa-4639-8e30-39c7c7560e42

      • 5

        I totally agree! A BIC lighter or firesteel with petroleum jelly cotton balls would be so much easier. 

        Guess I have just been watching a lot of the Discovery TV show Dual Survival and watching Cody Lundin make a fire from a small ember and I wanted to do something similar. This is more of a bushcraft skill/novelty. Kind of fun to do though.

        That is an awesome firesteel! Thank you for sharing. I need to get a new one. Mine is held together with hot glue haha