Share your knowledge & learn from experts
Because prepping and community go hand in hand
Preps for people with physical disabilities and limitations or who aren’t in great physical shape
I’d like to start a thread where we can discuss how to best get prepared if you or a loved one is dealing with physical disabilities or limitations or isn’t in the best physical shape. I’m particularly interested in discussing scenarios where we have to bug out. I know it’s desirable that person be in good shape for physically strenuous activity in case of the need to evacuate, but let’s get real. Some people just aren’t. Life happens; age happens; disability happens. We all do our best. I see physical fitness as an important goal to have in mind for health and safety reasons, but not something we should feel bad about falling short of.
I have very personal reasons for starting this thread. I am in my 50s, not in great fitness shape, although not horrible. I have some repetitive usage disabilities and long standing foot problems and now some knee problems. Nothing extreme, but I’m pretty keenly aware that hiking out of Dodge with 25 or 30 lbs on my back would wear me out pretty darned fast. Honestly, I don’t know if I’d even make it a mile on foot. I also have a mother who is much MORE disabled, living part time alone after having a stroke two years ago.
I want to be practical so am looking for ideas of what I can do at my current size and shape and fitness level to prepare.
Read MoreThe sun ☀️ is our greatest survival ally
During some morning meditation and reflecting, I thought about what an incredible resource the sun is to the survivalist. Here are some of my thoughts on how the sun helps us and if we study each method and learn how to capitalize on it’s ability, then we can become better prepared to survive. Feel free to add to the list if you have any thoughts.
Generating electricity through the use of a solar panel Cooking food with a solar oven Heating up a house by opening the blinds Disinfecting water that is placed in a clear bottle Providing vitamin D through our skin to keep us healthy Telling time by using a sun dial or just looking up in the sky for a general sense according to it’s position Helping us navigate. Rises in the East and sets in the West Brings life to our gardensThank you sun!
Read More
What’s worth canning?
I’d like to ask a question (ok, 2 questions) to the folks who are experienced with canning fruits and veggies:1) What fruits & vegetables do you prefer to can and what do you prefer to freeze? (Set aside the issue of the power going out and the freezer defrosting…)2) What fruits & vegetables have you canned that you won’t can again – because of the effort involved, change in color/texture, shift in taste, equipment needed, etc.
Thanks in advance!
-WS (a canning newbie)
Read MoreCreating a prepping team
No man is an island and no one can succeed in a disaster alone. Mad Max, The Omega Man, I Am Legend, even The Road had guys going it alone against the post-apocalyptic hordes. But that’s not realistic. A truly prepared individual will surround themselves with like-minded others who have diverse skill sets.
The question I have is how? How do we find these people? I’ve been looking. I’ve joined groups, I’ve been on other forums. I want to enlist the people in my community, but do so without coming on like a desperate weirdo or paranoid gun nut.
Where do y’all go to find others?
Read MoreKnowing who has what skills
So this is a new forum, and it could be a lot of different things, depending on what we make of it.
One thing that I think might be very useful is to have an idea of what the assembled skills and expertise of the members are. If I have a general idea of who knows/is good at what, I know who I can ask for advice on various topics, or ask to weigh in on a thread, etc.
I’m not even sure a thread is the right format for this in the long-term (it might get unwieldy to sift through with size/age), but just as a proof-of-concept, I thought I’d start it in this format. I’ll make an example post under this one.
Read MoreBug Out: All you need to know
For who have paying attention to news, all of you certainly know about the war between Russia and Ukaraine, yesterday I saw some of the refuge fleeing from their home in news, some are carrying duffel bag, while some using travel case with wheel, I can only shake my head for this one, despite living in a country that has high chance for war to happen, they are not prepared for the Bug Out, so I guess I will share my knowledge here for those who need.
This article is not intended to replace this post: Emergency kit / bug out bag list , but as a supplement to it. Bug Out means to leave your home and go to some place for better survival rate.
1. To Bug In(Stay at your shelter) or Bug Out:
Now first and most important, know if you should bug out. For example:
When hurricane heading your home = bug out
When war started and you are in the city = bug out
When your house is on fire = bug out
Civil unrest = depending on your country, and where you live
Food price rising = bug in
Power outage = mostly bug in if you have supply in home, otherwise bug out
As you can see, bug out is the last resort to take, that means its either you have no supply at home or staying at home would make your life in danger, otherwise you should always bug in.
2. Vehicle
One of the most ignored and most important, when bug out, you will want to leave as fast as you could. Most people, despite prepared or not, will bug out when noticing danger is coming (hurricane, bombing, etc), and most will bug out in four wheeled vehicle, which make the traffic jam happen. So the best choice is to bug out with motorcycle or bicycle, or just with your foot.
3. Location
If you are bugging out, certainly you will want to go to a safer place. In most natural disaster, the bug out location is hotel, or your parent’s/grandparent’s home, but there are also chance where these place are not accessible and you need to settle in abandoned building woods (there will be more about this later)
4. Bug Out Bag Content
Now after all the important parts, its time about the things you want to carry when you are bugging out:
Water: Water is one of the most important things for our survival (beside air of course), you will only need three things, a stainless water bottle, water filter, and collapsible water bottle.
Stainless water bottle is important since you could boil water in it, which kill the virus and bacteria. (You can also do this in mineral water bottle in emergency, it might be bad for your health, but its better than dying in thirst)
Water filter could make dirty water able to drink without boiling (which is important if you can’t light a fire due to some reason), I always choose water filter that could filter out bacteria, chemical (heavy metal), and virus. If you stay in a city you might not be able to find water from stream to purify it, but if you happen to find a small water puddle, you can still use the filter to purify it, so don’t ditch the water filter even if you planned to stay in the city.
Collapsible water filter are used to collect dirty water so the filter could purify it, however most filter could work with normal soft drink bottle.
Tools/Entrance Tools: One of the most important things in the backpack, which include a knife, multitool, tungsten glass breaker, small axe/tomahawk/machete(big knife), folding saw.
Knife is important for a lot of things, a survival knife in your pack should be around 3-4inch, full tang and made with durable material.
Multitool is essential for a bug out bag, simply because it have so much function. One of it function is bolt cutter, which might be useful if you need to break enter an abandoned building.
Tungsten glass breaker, usually located on a tactical pen or as addon to a multitool, can be used to break glass, which might be useful if you need to break enter an abandoned building.
Small axe/tomahawk/machete(big knife), depending on your location, is important if you are bugging out into the woods/rain forest. In some country like US which could become very cold during winter, axe or tomahawk is very useful to produce firewood even if you are not bugging out into the woods. Machete(Big knife) is important for tropical environment since there are thick under bush in the rainforest.
Folding saw is very useful if you want to cut furniture into firewood, or simply want to cut hardwood, using saw for hardwood save much energy compare to axe or machete.
Shelter: Depending on where you want to stay, you will need different things. If you are bugging out to hotel or friend’s/parent’s house, you could skip this. If you have no choice, you could either stay in abandoned building, or just bugging out into the woods. Please keep in mind that you will not live happily forever in the woods like some preppers imagined, you only stay in abandoned building/woods until the disaster/war is over in your area. If you are staying in the woods, you will need a tarp to keep rain off your head. But tarping is not easily mastered without practice, especially if you are alone, so remember to try setting up tarp when going outdoor, or just at your backyard.
Food: While human can survive longer without food compared to water, food is also essential to provide energy for every day work. I only recommend ration block, while they are not that tasty, they last long, provide multiple day of energy, while being small and not so heavy.
Example: Datrex ration, which could last 3-7days, weight is between 700-800 grams
Clothing: There are 2 type in this category, normal clothing and extra clothing.
Normal clothing: What you currently wear and are comfortable to you, pack a pair of extra into the bug out bag.
Extra clothing:
Gloves: Important to prevent blister in heavy work suck as splitting wood, or just keep your hand warm.
Shoes: Assuming you have your shoes nearby, you won’t have to pack extra in the bug out bag.
Rain gear: Being wet could cause cold which is deadly in disaster, you will need a rain gear to keep your self dry, Most people use Gore-Tex jacket these day, but I keep a tarp poncho in my bag which work to keep me dry while also work as shelter, just choose whatever work for you.
Winter/Cold Jacket: If your region is very cold during winter, remember to wear one if you are bugging out during winter, otherwise keep one in your backpack.
Medical: Medical supply is also important, but don’t just buy a medical kit, they are lots of useful article which tell you how to build an IFAK, while they are true, the most used item in a medical kit is normal pills for common illness, or some plaster and bandage, be sure to NOT overlook these simple content while building your IFAK.
MISC:
Lighter: Your average BIC Lighter should do, just bring 2-3 of these.
Paracord: Any rope are just as useful as your knowledge, paracord is also useful for setting up tarp, just bring 50-100ft of this.
Light: Headlamp is better than torch since you don’t need to hold it in your hand, if your headlamp is aa/aaa battery powered, remember to bring extra battery.
Toilet paper: Mostly you will use water, but just incase if you couldn’t find water.
Sharpening stone: Keep your tools and knife sharp, I personally use Fallkniven DC4.
Toothbrush: Even without tooth paste, could brush off leftover from your teeth, wont make your mouth smell fresh but at lease you wont have cavity.
Spork: Utensil is important since you won’t have much water to wash your hand.
Nail clipper and ear spoon: Stay outdoor for 2 weeks and you will know how important these things are.
Duct Tape: Very useful when you need to fix or make something.
Pen and paper: Useful to write down your plan or leave note for others.
Battery: Depending on the situation, a 10000-20000 mAh power bank should do for your headlamp and phone, if your headlamp use aa/aaa battery, don’t forget to bring extra.
Mood booster: During hard times, its important to stay sane so you could make right decision, some people bring card or board game, some bring photo of their loved one, whatever you choose, keep it light and simple.
5. Weapons
In disaster, you will need a way to defend yourself, just remember you will need to practice with what you choose.
Guns: Pistol, shotgun, riffle, whatever you choose, make sure you know how and are prepared to use it.
Spear: Always choose gun if it is legal in your country, otherwise simple spear is the best as long as you have the space to wield it.
What not to choose:
Sword: Require so much practice only to be defeated by spear.
Knife: I stab you, you stab me, then we are both dead. While knife is a useful tool, it should not be used to fight unless you have no better option.
6. The bag itself:
The bag should be the last item you buy, so you could know how much space you need. Your bag should be very durable, so it would not fall apart when you need it the most. Keep it mind that your bug out bag should be able to keep on your back COMFORTABLY, that means no duffel or any wheeled case. Also don’t choose camo color as it would make you look like a military unit if you are in a war region.
My Golden standard: Cordura 500D (or Nylon 1000D) and above, YKK Zipper, good carrying system, good hip belt.
I personally use Tasmanian Tiger backpack because its simple and works, other brands like 5.11 and Mystery Ranch also meet my standard. Just choose what you like and are comfortable to you. Even you want something lighter (my backpack weight 2.1 Kilograms without anything), anything 400d nylon with YKK Zipper, good carrying system and good hip belt should do, but keep in mind you are sacrificing durability for weight. Don’t worry about the greyman tactics unless you choose camo color, you wont be much different than the bugging out crowd.
My backpack which carrying everything I need.
Feel free to give some suggestion and if you have any questions, just ask below.
Read More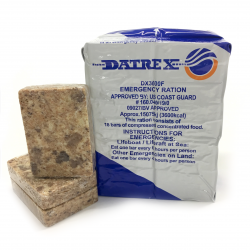
Poison ivy, oak, and sumac – how to identify, treat, and a fun little game
When hiking, bugging out, or working in your backyard, you may come in contact with a poison plant. There are many poisonous plants but I am going to focus on the three that everyone knows but may not know how to identify. Poison ivy, oak, and sumac.
Why am I writing this?
Because I was wanted to learn about these plants myself and the best way to get information to stick is to teach it to someone else.
Where do these plants grow and how do I identify them?
POISON IVY grows throughout all of the US states except California, Alaska, and Hawaii. It likes to grow near disturbed ground like along hiking trials. They grow as ground cover, shrub, or a climbing vine. Leaves are in clusters of three (“leaves of three let them be”), they are green in the summer, red in the fall, and have grayish-white berries.
POISON OAK isn’t as common as ivy, but is still prevalent in the US sticking to the west coast and the south eastern states. The leaves look like poison ivy but with more rounded edges, look like little oak leaves, and also grow in groups of three. It too likes growing along disturbed ground, grows as a shrub in sunlight, or climbs up trees as a vine in search of more sunlight. Leaves will be bronze, bright green, yellow-green, or red in the fall. The berries of poison oak are a greenish-white or tan.
POISON SUMAC is found in the eastern US and grows as a shrub that looks like a tree as tall as 20 feet. Luckily these plants like to stay to swamps or peat bogs so you may never run into these. These don’t grow in groups of three and instead have 5-13 leaves per stem. Stems are red in the spring, and brown in the fall and winter. They have oval-shaped berries that are white-gray in color.
In summary:
————————————-
Let’s play a game. I will show various pictures of poisonous plants and you have to guess what they are. Comment below with your guesses and I will respond in a week with the answers.
A)
B)
C)
D)
E)
F)
G)
H)
I)
J)
K)
L)
How to avoid exposure?
The sap of these plants contain a toxin called urushiol oil. The good thing is that this sap is on the inside of the plant and touching the leaves doesn’t necessarily mean you are going to start itching. However, undamaged plants are rare and most have had the sap leak on leaves at some point be it from an animal brushing against it or if you are clearing some land and break the stem open. This oil can transfer to your shoes, clothes, pets, or tools, like if you were hiking and stepped on a plant, you then later touch your shoes to take them off and the oil transfers to your hands.
When out hiking, wear long pants, boots, and gloves. If you know there are poisonous plants in the area, wear disposable gloves when removing this clothing. Wash these clothes separately than your other clothes with soap and hot water to displace the urushiol oil.
What happens if I come in contact? Will I die!?
In extreme circumstance you may have an entire body reaction where your eyes swell shut and your body swells up. If this happens go to the ER immediately, but for most people it will just be uncomfortable and irritating.
The oil will cause redness, swelling, itching, and blisters within 12-48 hours. (it may not appear for 7-10 days for people who have never been exposed to it before) Avoid touching and itching the area because you may just spread the oil to other parts of your body, hard to do though when it takes so long for it to show up.
Urushoil oil is absorbed by different parts of your body at different rates so it may appear that it is spreading.
Do not burn these plants to get rid of them because that oil will get in the air and can get in your lungs and affect you from the inside.
How do I treat if I touch it?
Rinse the area off with rubbing alcohol to displace the oil. Then rinse off with water to try and get off as much as possible. And lastly after that wear disposable gloves and use soap and warm water. The soap and water step is last to avoid spreading the oil to other parts of your body during the lathering stage.
The rash, blisters, and itch will disappear in about two weeks without any treatment. Applying a cool compress, topical or oral antihistamines, topical hydrocortisone cream, or topical anesthetics can help relieve the pain. If you have oozing blisters (that’s a nice thought isn’t it), applying baking soda, or calamine can help dry out the blisters.
In conclusion:
To be honest, I’ve never looked for any of these plants when out hiking. Most of them look just like any other random plant that I might walk by and never notice, so it will take some effort to slow down and be observant.
Have any of you ever come in contact with any of these plants? Share your story.
Also, remember to share your guesses to the identification quiz down below. I’ll share the answers in a week.
Read More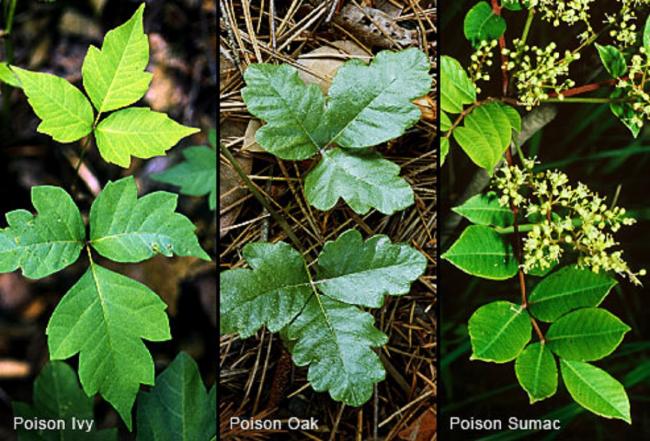
7 things to prepare before it’s too late
I’ve been thinking about TEOTWAWKI or The End of the World as We Know It. To be clear, I believe that there are many other more likely scenarios to happen before this, but if you plan for the worst you will be prepared for the rest.
As part of my family’s plan I wanted to make a list of the things we need to get in order before it’s too late. They are in no particular order and is just a very short list of things we need to do. I am planning on expanding my description of and notes for each point once I finalize the list. What do all you preparedness experts think of this list and what would you add or change?
1) Have ways to collect, treat, and store water
Water is life, we all need a lot of it not only for drinking but cleaning, cooking, and hygiene. Not having it will quickly lead to disease, dehydration, and death. Not only is storing clean water important, but have ways to collect and clean more.
2) Store food and ways to cook it
Start with a week of food, then a month, then three, then six if possible. Have ways to cook and prepare multiple recipes with the food we store and don’t just do beans and rice every day.
3) Learn basic first aid and have a supply of medical supplies
Be able to treat wounds, sprains, cuts, and breaks. Store medications and don’t forget about dental and eye health. Store more than we think we will need.
4) Have backup sources of energy
Have alternative ways to stay warm, cool down, modes of transportation, and power the various devices and appliances in our home.
5) Fortify our homes and self
Secure our home against nature, humans, and animals. Learn personal self defense and carry some defense tool with us at all times if possible. No use preparing if we get our stuff stolen or die.
6) Create a reference library and practice various skills
The internet may not always be available, have some paper reference material and practice skills so we aren’t trying new things during the disaster.
7) Work with other preppers
We want to create a network of other like minded individuals and have goods and skills ready that can be used for trade and bartering.
Read MoreAn experiment in growing mushrooms
A couple of years ago, some large trees fell in my neighbors’ field. I had meant to chop the logs, but never got around to it and they started to rot. Then I got the idea from Ben Falk’s The Resilient Farm and Homestead to use them for growing mushrooms.
If you haven’t grown mushrooms before, they’re different from growing plants. Instead of growing them in soil, you grow them in a substrate, usually some sort of wood like logs, sawdust, or wood chips. Instead of seeds, mushrooms are planted with spore-inoculated wood, either plugs or sawdust depending on the type of mushroom.
While it’s doubtful you’ll live exclusively on mushrooms, there are some compelling reasons to grow them. Primarily, they’re pretty low maintenance once they’re established and will return season after season. Some will come back for longer than others and some take longer to start growing than others.
For our experiment, I ordered 25 golden oyster plugs from Etsy for $10. The golden oyster mushrooms are reportedly easy to grow and easy to identify. You can find much bigger deals on larger packs of plugs, either of one type or a variety. I wanted to keep our initial experiment focused and cheap.
I should say up front that we didn’t do things exactly by the book. Here’s how you’re supposed to plant mushroom plugs:
Cut down a small-diameter tree. Soak the log or logs in water. Drill holes in the log(s). The pros inoculating a lot of logs recommend an angle grinder with a special attachment over a drill, as it’s faster. Drive the plugs into the holes with a hammer or mallet. Coat the holes and each end of the log with melted wax to hold in moisture and keep out competing organisms.I didn’t use a fresh log, but there wasn’t any visible fungi growing on it. And I wasn’t concerned about moisture because it’s in a shady spot next to a creek and practically dripping with moisture. So I opted out of using wax.
I took my oldest son out with a drill, a hammer, and the plugs. He cheerily used the claw end to knock bark off the log while we took turns drilling holes and hammering in plugs.
Read More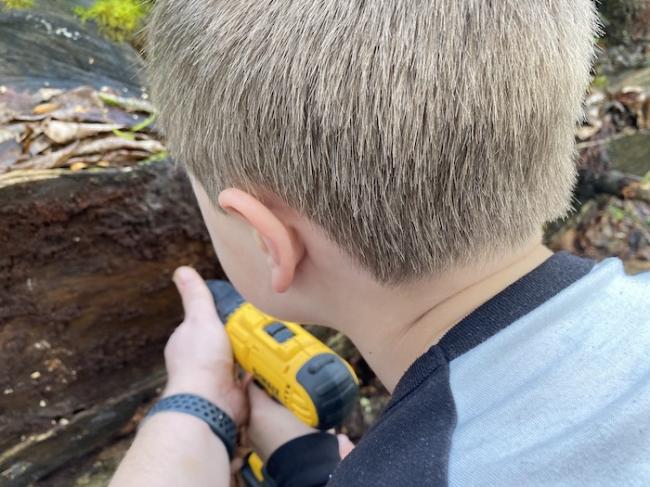
Sending text messages over ham radio with JS8Call
Winter Field Day is coming up in the ham radio world, which invites ham radio operators to take their gear outside and get some hands-on experience with emergency communications. We’ve talked about sending email with Winlink, but I’ll show you another trick that lets you send SMS text messages over JS8Call, which is a lot easier to use than Winlink.
We last discussed JS8Call when I participated in an AmRRON exercise to track the grocery supply chain. I went into deep detail on the setup and how it works in that post and won’t repeat everything, but here’s a quick rundown:
JS8Call is like a chat room that works over ham radio. Think IRC or Slack.It works over HF, which means you’ll probably want a General license to take advantage of it (but Technician-class operators have data privileges on 15 meters). It requires a real-time clock, either provided by an Internet time server or through GPS via a GPS USB dongle, which lets you operate off-grid.
JS8Call is one of the best digital modes to learn, as it’s relatively user friendly, let’s you automatically exchange status messages with other operators, and lets you relay messages so you can reach operators you couldn’t otherwise.
But JS8Call has another superpower: it can tap into the extensive APRS data network. APRS is short for Automatic Packet Reporting System, a radio data network that’s been around since the ‘80s.
Well before cell phones were popular, hams could use APRS to send text messages, get weather reports, and track object locations. These days, APRS is tied into the SMS network.
APRS works over short-ish range VHF/UHF, but thanks to the JS8Call integration, you can tap into it from anywhere in the world.
To send an SMS text message over APRS, send a message in this format:
@APRSIS CMD :SMSGTE :@NUMBER MESSAGE
The format must be exact. Note that there are three spaces between :SMSGTE and :@NUMBER, and yes, you must put the “@” before the phone number.
If you hear about this on YouTube or elsewhere, you may see a different, older format that has since changed. The one above is now the correct format as of January 2022.
Screenshot of how it looks:
It takes a few seconds for the message to send, and then around another 30 seconds until the recipient receives it.
One thing to know: when you do this you’re sending a cell phone number over public airwaves. Also, it will be logged in the APRS system for all to see. Finally, the recipient has no way to respond to your message.
However, if you have a power or telecommunications outage, JS8Call gives ham radio operators a simple way to contact loved ones even if they aren’t hams themselves.
Read More
How to defend against marauders after a disaster
After a significant disaster occurs, those who are unprepared or less prepared will start to get hungry, thirsty, or cold. If there isn’t relief provided in enough time they will go into that survival mindset and think that the only option is to take from others or die.
We try and prevent ourselves from ever getting in that mindset ourselves by stockpiling food, water, and other supplies. Maybe we even stock more than we need so that we can give to others and prevent them from getting desperate.
But take a minute to think about your situation and what you would do if you started to hear about marauders raiding houses in your neighborhood. What are some of the steps you would take to fortify your home, defend your possessions and family, and deter them from coming around? Try saying more than “got my guns n’ ammo, I’m good…”.
Read More
Maintain a sustainable food source with the prepper’s garden
In dire straits, many preppers imagine trapping rabbits (beware tularemia and SAS doesn’t recommend relying on rabbit) or hunting (you would be surprised how quickly deer populations can be decimated leaving nothing to hunt). That also applies to fish.
In The Great Depression, resource rich Canadian prairies were virtually hunted and fished out. In the best of times, not everyone hunts or they hunt and fish responsibly. In a crisis, people forget stewardship and why hunting and fishing limits exist.
You would also be surprised at how many people wound deer, don’t track the animal (inhumane and wasteful), and then keeping shooting and wounding more animals. Guess how quickly those fools can decimate the deer population in an area? I’ve seen it.
I grew up with venison, wild ducks and geese and prairie chicken on the dinner table. But, I also remember the “bad” years when Dad, who was a crack shot, couldn’t get a deer. When you hunt you deal with nature not Safeway.
This is why I believe that that the ability to grow food needs to be part of prepping.
The ability to grow food is a part of being sustainable. It is worth it to try to grow a garden and challenge yourself to learn a new skill.
It’s easy to learn the skills or study the subjects we have an interest in, but crisis and disaster call upon preppers to wear many hats and use a variety of skill sets. That means learning skills that are not interesting to some, but very necessary to all.
You may not become a master gardener, but with hands on experience, you will develop a feel for what it takes to produce food. Who knows you may even discover that you really like gardening.
Start simple. Get a good reference book. Try a simple raised bed garden or a balcony garden or use grow lights if in an apartment without a balcony. There are also community gardens in some areas.
We could discuss this year’s gardening efforts and share tips or brainstorm problems. Is anyone interested in doing this as a part of prepping?
Read MoreA story of survival – surviving 72 days in the snowy mountains after a plane crash by resorting to cannibalism
Summary:
In 1972 a small plane crashed in the Andes mountains of Argentina carrying a rugby team and their friends and family due to an inexperienced co-pilot. Out of the 45 passengers and crew aboard, 8 died instantly from the crash and many more soon after from their injuries or the cold temperatures. At 11,710 ft they were pretty high up there in the mountains.
They were finally rescued when the weather cleared up and two survivors climbed a 15,260 ft mountain peak for 10 days without gear and traveled 38 miles until they found help. They then were able to send a rescue crew to the crash site and 16 other survivors were rescued. Their amazing story went on to produce multiple books, movies, and songs.
Lessons I learned from reading about this story:
Search and rescue flew over the crash multiple times but couldn’t see the white plane against the white snow. The survivors did try and write SOS with lipstick they found in luggage among the wreckage but they ran out of it. A lesson to create as much contrast as possible.
Two first year medical students were on board and attended to people’s wounds.
A man named Enrique Platero had a piece of metal stuck in his abdomen. When it was removed it brought out a couple inches of intestine with it. He was actually recovering well though he later died in an avalanche.
None of the passengers with compound fractures survived.
The surviving passengers used broken seats, debris, luggage, and snow to make a wall and shut out the cold inside a portion of the broken fuselage.
They were able to obtain water in freezing conditions by using a piece of sheet metal that was under the seats and placing it out in the snow. They would sprinkle some snow on top and the solar radiation would heat up the metal enough to melt the snow.
They made improvised sunglasses out of sun visors from the pilot’s cabin, wire, and a bra strap to prevent snow blindness.
The seats were gutted to make clothing to protect against the cold and improvise as snow shoes.
The captain of the rugby team on board assumed leadership. A lesson to find a leader to direct people.
All of the of the remaining survivors had never seen snow before and had always lived by the sea. So they were not used to this high elevation and cold temperatures.
Temperatures dropped to -30C / -22F at night.
They found a small radio in the wreckage and improvised a long antenna using electrical cable from the plane. They heard the disheartening news that their search and rescue was called off after the 11th day. That would have been horrible for moral but would give valuable intel to not just stay put and you have to do something about your rescue.
There was very little food on the plane that only lasted a week after extreme rationing. No natural vegetation or animals lived at that altitude either. They tried eating the cotton insides the seats and leather but got sick from eating those.
Those still alive knew that search and rescue had been called off and that they would eventually die from starvation. They all agreed that the others could consume their bodies if they died. This was a very hard decision as they would be consuming the bodies of their dead relatives, and close friends.
Survivor Roberto Canessa described the decision to eat the pilots and their dead friends and family members:
Our common goal was to survive — but what we lacked was food. We had long since run out of the meagre pickings we’d found on the plane, and there was no vegetation or animal life to be found. After just a few days, we were feeling the sensation of our own bodies consuming themselves just to remain alive. Before long, we would become too weak to recover from starvation.
We knew the answer, but it was too terrible to contemplate.
The bodies of our friends and team-mates, preserved outside in the snow and ice, contained vital, life-giving protein that could help us survive. But could we do it?
For a long time, we agonized. I went out in the snow and prayed to God for guidance. Without His consent, I felt I would be violating the memory of my friends; that I would be stealing their souls.
We wondered whether we were going mad even to contemplate such a thing. Had we turned into brute savages? Or was this the only sane thing to do? Truly, we were pushing the limits of our fear.
Still, some refused or could not keep down the human meat. They dried the meat in the sun and it made it more palatable. They initially were so revolted by the experience that they only could eat skin, muscle, and fat, but as the supply diminished they resulted in eating heart, lungs, and brains.
17 days after the crash, an avalanche struck the aircraft while they slept killing eight more people including the team captain who had been the leader. This was even more discouraging for them. They were buried inside the aircraft under 3 feet of snow and used a metal pole from the luggage rack to poke out a ventilation hole once air was running out. They dug out the next morning to find themselves in a horrible blizzard and decided that they had to go back down into the buried plane for shelter.
They tried to get the plane’s radio working to signal for help but with the voltage differences it didn’t work out.
They realized that they needed to climb the peak to find help and improvised a sleeping bag out of insulation, copper wire, and waterproof fabric from the air conditioning. One man had been taught to sew as a child and used a sewing kit found in the wreckage. He taught three others how to sew and they took turns making the sleeping bag.
During the expedition to find help, they wore three pairs of jeans and three sweaters, and four pairs of socks rapped in plastic shopping bags. The thin oxygen and softened spring snow making them sink down to their hips made the trek hard.
On the summit, one member told another, “We may be walking to our deaths, but I would rather walk to meet my death than wait for it to come to me.” The one agreed. “You and I are friends. We have been through so much. Now let’s go die together.“
The two who went out for rescue came to a river and found some men on the other side of it. The river was too loud that they couldn’t yell across but one of the men wrote a note on a piece of paper, wrapped it around a rock with string and tossed it across. The two survivors then responded back on the paper and threw it back.
A rescue crew was sent out by helicopter to rescue the remaining people at the wreckage.
Upon being rescued, they didn’t want to admit to cannibalism and told people that they had just eaten some cheese and other food they found. Rumors started going about though and the survivors received public backlash for resulting to cannibalism. After they explained all they had to go through, people were more understanding and let up on them.
This was an incredible story and I’d encourage you to learn more about it. This is just a very brief summary of what stood out to me, but they had many other examples and experiences of smart thinking and good survival skills.
Read More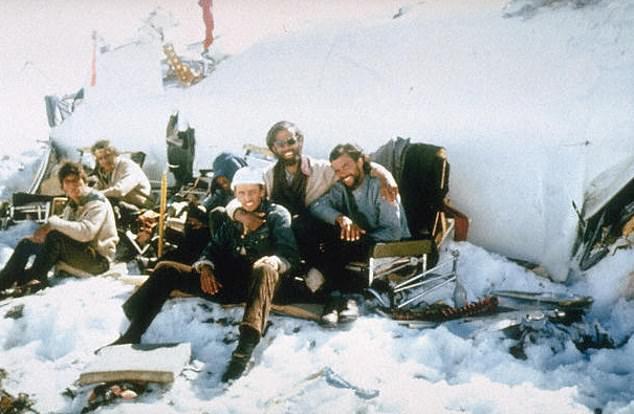
Best online first aid course?
I just took an online first aid course from the Red Cross called “Adult, Child and Baby First Aid/CPR/AED Online” for $35 and found it very informative. In addition to the material mentioned in the title, it also covers some of heat stroke, hypothermia, bleeding, diabetic emergency, and other stuff. It’s an interactive course where you work through scenarios and click on the screen to apply pressure, perform CPR, etc.
Have y’all found any other courses you’d recommend?
I also recently took First Aid for Severe Bleeding Online ($30), which was brief and not as interactive but still informative. Next up I’m planning on First Aid for Opioid Overdoses Online ($11) because I regularly interact with IV drug users, and I’m scheduled for REI/NOLS Wilderness First Aid ($245) in June (with 4 fully vaxxed buddies). My final plan is to take REI/NOLS Wilderness First Responder ($765) after WFA.
The Red Cross courses described what is useful in various scenarios, but did not get into how to carry the gear in an EDC so that you have it when you need it. I’ve been doing that part myself, with substantial assistance from this site! I’ve got stuff for bleeding (shears, tourniquet, quikclot, etc.), various pills (aspirin for heart attack, diphenhydramine for anaphylaxis), and other stuff like an emergency blanket in case of shock, all in an EDC that I take whenever I leave my home. See: https://theprepared.com/forum/thread/what-do-you-carry-with-you-every-day-and-how#reply-52254
Read MoreLearning to bake without an oven – some suggestions
One of the standard items in food storage is lots of flour or wheat for grinding. I was thinking the other day, “Great, I have all this flour, the power goes out, I have no oven, it’s howling and sleeting outdoors. What am I supposed to do with all this flour?”
So I’ve been keeping extremely amused, learning how to circumvent the need for an electric oven to bake – INSIDE – not outside where the usual utensils; Dutch oven, barbecue, grill, campfire, propane cooktop can pick up the slack in a power outage that occurs in fine weather.
So far, I have learned how to steam muffins, pressure cook yeast bread, fry corn pone and “bake” biscuits in the skillet. I suppose a pan of cornbread is next on the list. My chief taste tester says I must continue to hone my skills as he’s more than willing to keep his job!
It will be awhile before wood stove weather arrives and I can test my new skills on a less steady source of heat than my electric stove top. However, I’m finding that I don’t need nearly as much heat to bake these goodies as I would have thought. Top picture, pressure cooker yeast bread, bottom picture skillet biscuits.
Read More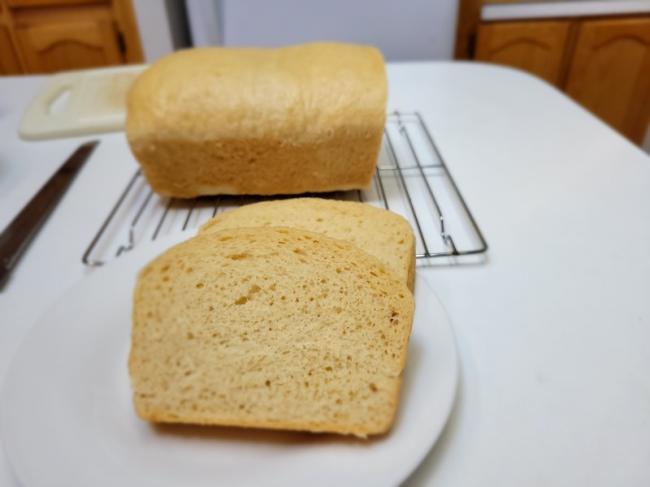
Navigating and estimating time using the sun
Two little tricks I learned in Boy Scouts have stuck with me and I use quite often to help me gain my bearings and know how much sunlight is left in the day.
For navigation, if you live in the northern hemisphere, point the hour hand of your watch at the sun. Then figure out the halfway point between the hour hand and 12:00, that is South. The opposite then is North.
If you are in the southern hemisphere, you point the 12:00 at the sun and half way between that and the hour hand is North.
If you have digital watch or just your cell phone with the time, note what time it is and imagine you are wearing an analog watch and then do the above calculations.
This won’t be very accurate for orienteering, but it can help you at least know which direction you need to go in. For example if your friend says to meet them on the west side of the building and you don’t know where west is, this will help you.
Picture taken from this website.
The next little trick is how to tell how much sunlight is left in the day. This will help if you are needing to know how much time you have left to build a shelter, find food, or gather firewood by before it gets dark. Or even in our every day lives of when it will get dark and you should start heading home.
You stretch your hand out in front of you and place the sun at the top of your index finger. Every width of finger is going to be 15 minutes of sunlight. So if the sun is only two fingers away from the horizon, you have 30 minutes before it goes below that. Chubby or skinny fingers may add or minus a few minutes 😉
Picture taken from this site.
I hope these two little tricks will help you in your everyday life and also as you are camping, bugging out, or surviving.
What other sun tricks do you know about?
Did you know about either of these?
Read More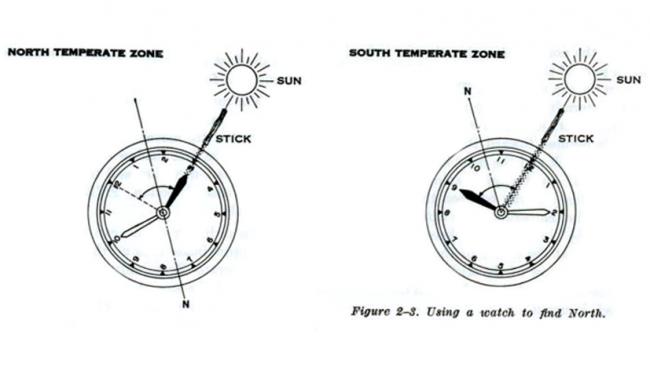
Washing machine broken, might want to try something non-electric
What would you use to wring out clothes, that *does not hurt your hands*? The washing machine just broke. Maybe I can get it fixed, maybe not, but it occurs to me to have something for backup. My hands can’t really do the wringing on their own at all any more, although I have done it in the past. I see some hand wringers (mangles) online, and would like to avoid something that is going to break.
Read MoreVacation traveling and bugout bags: How do you pack to stay prepared?
So I’m about to travel back to the US for the first time in almost three years to visit my family. I’ve got all the paperwork in order, checked and tripled checked every detail and cleaned the house, I’ve even got everything laid out in order to pack my bags days ahead of schedule. But while doing that, the same question that I ask (and answer) every time I travel pops into my head: “Should I take my Bugout Bag?”
Usually the answer is always yes, and I find myself making room for a BOB taken apart and placed in a suitcase and carry-on, only for it to be reassembled at the destination. This takes time, space, and weight, all of it I end up paying for one way or another. And even though I am asking for advice in this forum, I know that my need to keep telling myself to stay prepared will eventually result in my mind rambling on and on. “But what if you need it? It’s crazy out there, you never know what might happen…that’s why you keep this thing!…”
So, here’s my question and plea for advice: How would you pack your Bugout Bag for travel via commercial airlines? Do you have a bag that is already perfect for checking, and it only needs you to remove any sharp objects or other contraband? Or do you just take it apart and put it all into your checked bag and carry-on. Or, do you have another system all together. Do you just leave it at home and travel light, or do you opt to not travel at all? Or am I just crazy and paranoid? That might actually be the case.
Any advice would be much appreciated! Even if you’re just telling me I’m crazy and need to calm down. 😉
-Crysis
Read MoreUtilities shut off – Do you know what to do?
Recently I came across a video that demonstrated how to shut off the water at the street using a street key. It reminded me that I should have that capability. What about other utilities?
Water – We have city water which has the meter inside and two ball-type shut-off valves. Every six months, I take my family down to the basement and let them turn off/on the water to the house (they are not mechanically inclined). As far as the shutoff at the street, the city will be marking where the street shutoff is and I will be purchasing a street key to allow me to shut the water off at the curb if a disaster struck. I’ll probably also get a silcock key that I could use to get water at a business in an emergency. Gas – I know they make specific tools for gas shutoff, but what cheaper alternatives would you suggest? I suppose I could use an old crescent wrench, but interested in other ideas. Electricity – I have a 4-pole breaker to shut off the power to the house. From the outside, I suppose I could pull the meter head.I also have labels for all of the shutoff valves throughout the house (mostly in the basement).
Do you know how to shut your utilities off? Do others in your household know?
Read MoreWhat is the best practice for starting a fire?
So, I have the fire starting gear that TP recommends — flint fire starter and some tinderquick. But I’ve never actually started a fire from scratch and kept it going. A friend is going to teach me in the fire pit in her back yard. Now I’m wondering what materials to use for the actual fire? What is a realistic scenario for emergency situations? Are we talking twigs? Logs? Something else?
Read MoreAustere First Aid video course trailer + 50% off preorders are live
Excited to share that we’ve just released the trailer and preorders for the Austere First Aid online video course we’ve been working on the last few months!
Check it out and preorder for only $59. Similar in-person courses cost $300-500 and take 5-7 days. Includes 90+ lessons, 7+ hours of video, downloadable references, and lifetime access with free future versions.
It’s the only online course of its kind, and there just aren’t many classes anywhere that teach you how to handle medical emergencies when you can’t depend on professional help to save you.
Is this something you’re interested in?
Full course will launch later this summer.
Read More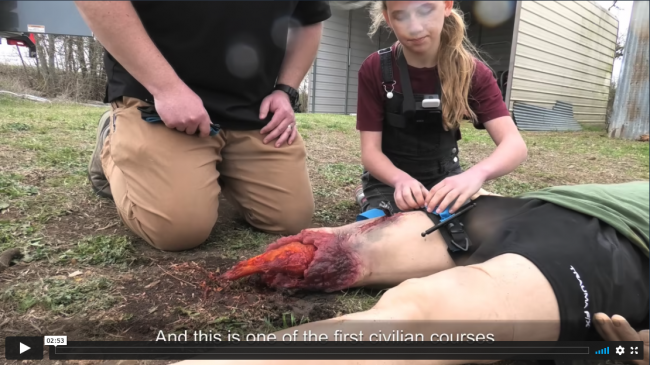
Spiders – the insidious attack insects
https://survival-mastery.com/med/health/spider-bites-treatment.html
Read MoreDo you fish?
We just published a guide to fishing.
Do you fish? Have any tips or experiences you’d like to share?
Read MoreLessons from my 2021 garden
I offer a lot of gardening advice on this site, so I think it’s important that I share how things have worked for me. Here are some of the lessons I learned from my summer garden:
Raised Beds
A while back, I wrote about how I switched to raised beds. Some are no-till, one was double dug, but all have done pretty well. I’ve grown cucumbers, peppers, sweet potatoes, basil, marigolds, amaranth, lettuce, tomatoes, green beans, and sweet potatoes. Yields weren’t just fantastic, but we had a baby this summer, so I greatly scaled back my ambitions.
But the raised beds still produced a good amount of food and I didn’t break any machinery or myself in the process, so I think it’s been a big success.
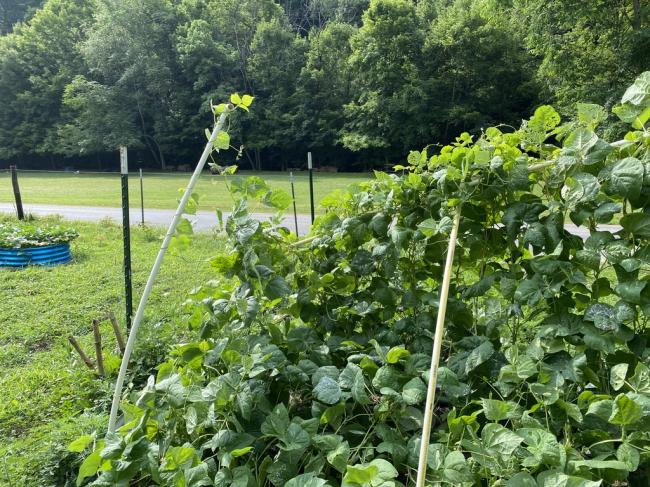
Trellising
I posted a forum thread on how to make trellises with PVC pipe and string. I got the idea from Brett Markham’s The Mini Farming Bible. Unfortunately, they didn’t hold up well at all. My pole beans regularly broke the trellis, so I had to support it with a metal t-post. The tomatoes (which did amazing) completely overtook the trellis and everything around it.
Future trellises will be made of t-posts and cattle panels.
Squash and Melon Pits
The squash crop was a disaster. A rabid possum ate everything in the melon pits, including the dirt, so I had to buy bagged soil and start over. Squash germinated well enough but produced very little. My neighbor also had trouble, which he blamed on blight. I think next year I’m going to just grow winter squash in raised beds and trellis them.
Melon pits aren’t without value. David the Good had great success with them this year.
Mulch
Since I planted so intensively, I made a point of deep mulching. I have a bagger on my pushmower so I just threw down grass clippings. The beds stayed moist except during the worst dry spells.
Tomatoes
I don’t specify tomatoes as a survival crop, but my wife canned a ton of them last year and we’re still using them, so I put five tomato plants in the ground that I started from seed (German Pink from Baker Creek). They did almost too well. I put them at the north edge of the bed and they ended up taking over their bed and the one next to it. And of course they totally overwhelmed my trellis.
The tomatoes had no disease and were barely bothered by pests. I attribute that to planting them in a bed that was double-dug two feet down, plant them about a foot deep in the ground, and I put a Tums at the bottom of the holes for calcium. I’ll repeat all that next year, but I’ll put them in the center of the bed, dedicate the entire bed to the tomatoes, and properly cage them.
One mistake I made: picking tomatoes when they were too green. The right time to pick them is just when they start turning red. If I wait for them to get fully ripe, the bugs will eat them.
Sweet Potatoes
I haven’t harvested them yet, but the plants have done really well in a foot of compost. The leaves make great rabbit fodder. The leaves have perfectly shaded the bed so I almost never have to water it and there are very few weeds.
Green Beans
I went all-in on pole beans this year (Kentucky Wonder), but I kind of wish I hadn’t. They produced well, but it took them two months before I got anything. Next year I’m going to mix bush beans with pole beans. Bush beans produce faster, pole beans produce more.
Cucumbers and Peppers
I grew these because my son likes them. Poor yields from both. Too much cucumber disease and the peppers just didn’t produce. I think they were spaced too closely. But I have two big mason jars full of fermented pickles that are quite good. I saved a bunch of cucumber seed to see if the second generation is better adapted next year.
Amaranth
I grew two varieties: “Chinese spinach” and Golden Giant. The Chinese spinach ended up being bug fodder, which is okay because I didn’t stress the garden this year. I’ve been harvesting the Golden Giant for seed when the heads are dry and putting them in large paper bags so the seeds can fall out. I’m not sure how useful it’ll be, but I grew it as an experiment.
Lettuce
I made it a goal to grow a decent amount of lettuce this year, with some success. The problem is it gets so hot here so fast that lettuce gets bitter. There are a number of things I could do to mitigate that, but I’m not sure it’s worth the effort.
What I may do next year is grow just a couple of heads at a time, planted a couple of weeks apart. Harvest one head, replant, and then harvest the other head a week or two later. Or maybe I’ll just buy it locally and focus on survival crops that take less work.
Garlic
I had two beds of garlic in the ground. Garlic is easy to grow, so it produced okay, but the heads were kind of small, I think due to hard soil. I’m going to fill a raised bed with garlic in a few weeks.
Other Observations
Spinosad and neem oil work okay against bugs, but I think diatomaceous earth works better. An irrigation system of some kind would be really nice, but I want something that isn’t dependent on city water. I’m planning to set up a water collection system next to my workshop and I’ll work from there. Next year, I’m going to focus more on survival crops, like potatoes. I’ll have more beds built then and I’ve sort of learned the hard way to not plant things just because the kids say they’ll eat them. Read More