-
Comments (69)
-
 Isabel
- September 26, 2022
Isabel
- September 26, 2022
You can try plugging what you have into websites like myfridgefood.com of supercook.com.
On those websites you tell them what you have, and they link you to recipes you can make with those items.
-
JBinAZ
- September 27, 2022
I’ve got a couple of recipes for you that we like. I’ll post them, tomorrow, as it’s bedtime for us, now.
-
Barb LeeContributor
- September 27, 2022
It could be that your best outcome would be to experiment with conventional recipes that you like and substituting shelf stable ingredients. I haven’t found a really useful source of recipes that would interest me, even from the food storage experts.
During the pandemic I got real interested in dehydrating foods, but found the food to be useless without knowing how to convert the food back into “fresh” amounts. So I created my own table of fresh-to-dehydrated weights so that I could convert regular recipes. I use canned chicken in soups and casseroles, hamburger in – um – Hamburger Helper and chili, chunk canned beef in soups and stews, or other dishes, canned Italian sausage in spaghetti sauce (bottled). I have shelf stable broth, pasta, rice, tomatoes, veggies, all of those can be substituted for fresh ingredients in ordinary recipes.
Oh, there’s also dehydrated eggs, my favorite being Ova Easy, that are excellent for baking and for eating as scrambled eggs. I actually like Spam better than grocery store ham. Canned corned beef and diced canned potatoes in hash.
Edit edit edit, I keep thinking of things. I have on hand, dehydrated Worchestershire sauce, dehydrated lemon juice, and dehydrated vinegar. They’re quite acceptable. I use all these things to make up meal “kits”. Haven’t found an acceptable powdered sour cream.
I’d be a lot more advance on the subject if I liked to cook…
Maybe we should all get together and contribute recipes and techniques for a Great The Prepared Survival Cookbook.
-
RedneckContributor
- September 27, 2022
When someone says non-perishable ingredients, my first thought is rice & beans… the true staples of a prepper’s pantry. So I suggest making sure you know how to properly cook both, using fuel sources available in a crisis. You might still have your utilities or maybe you won’t. Once you can cook those properly, then try adding some ingredients you will have on hand, such as canned meats. I keep lots of Spam in storage for such uses.
The one food I expect to eat most when using my prepper stores is stew. It allows you to use whatever you have available plus whatever you can grow, hunt or scavenge. It also provides plenty of water to your diet. Stews also retain 100% of the nutrition from the foods you add, as opposed to say grilling. So try making stews out of your stores. And of course, you can add rice and/or beans to a stew.
-
JBinAZ
- September 28, 2022
…and lentils, too!
-
-
Amy S.
- September 27, 2022
Hi Adriaan — I have been collecting recipes for a couple years and have created a google doc of recipes using shelf stable foods. I haven’t tried them all — but am slowly cooking the recipes to test them. Here’s what the beginning of the doc looks like.
“Tuna Noodle Casserole: Cook 8 oz of egg noodles according to the package. Add a can of drained tuna, a can of creamed soup (mushroom, chicken or celery) and a can of drained peas or green beans. Heat through and top with crushed cornflakes or chinese noodles or panko or crushed ritz crackers.
White Beans with Vegetables: Cook some garlic in olive oil for about 30 seconds. Add 4 c. of vegetable broth, a can of drained and rinsed white beans. Spice it up with whatever you like, some red pepper flakes are good and perhaps 1 t. of italian herbs. Bring to a boil and add ½ c. of some small pasta. When the pasta is tender, add a can of vegetables.
Tortellini Soup with Chicken and Greens: Cook dried cheese tortellini in chicken broth. When tender, add a can of canned chicken and a can of drained greens, such as kale or spinach.”
If this seems of interest to you, please advise if there’s an easy/safe way to share the recipes — the doc is currently 17 pages long in its rough format so it’s too long to cut and paste into this Forum thread.
I love the idea by Barb Lee: “Maybe we should all get together and contribute recipes and techniques for a Great The Prepared Survival Cookbook.”
I volunteer to help organize this document if others are interested. I recall Stephanie posted some recipes in the past??? (I remember making a pear cobbler that was delicious from her recipe.)
-
Adriaan
- September 27, 2022
Thank you, that’s perfect. I would like some more recipes for when you really can’t go anywhere and all you have is what you have 🙂 thanks, all!
-
Courtney
- September 28, 2022
In that case you just get creative with what you have!!
-
Barb LeeContributor
- September 27, 2022
Put me down for a copy!
-
Carolyn
- September 29, 2022
Sign me up! I can contribute lots of backpacking recipes, so they are relatively light weight.
A cookbook under The Prepared imprint sounds like just the start to a whole series.
-
M. E.Contributor
- October 7, 2022
I have lots of recipes to contribute, too! And while you’re waiting for mine, may I suggest “Mrs. Lehman’s Canned Meat Cookbook” (the download should be free; I can’t check right now!)
One super-simple one: Sprinkle your drained canned chicken with garlic powder and a squeeze of lime (if you want to go all preppy and use shelf-stable lime, this works too) and fry a little in a pan. Ta DA! Excellent filling for chicken tacos or burritos, which you can make using shelf-stable Maseca flour (available in most groceries, and SO easy and SO good).
-
Gideon ParkerStaff
- October 7, 2022
What are some of the parameters for a The Prepared Cookbook? What will make this prepping cookbook unique and useful? Doesn’t make a lot of sense to just include someone’s favorite pizza recipe or something else really complicated.
I’m thinking something that could be used with non-perishable food like the topic of this post is about, or maybe things cooked in unique ways like over an open fire or cooking bread without an oven.
We could have different sections, off the top of my head these could include-
- What type of cookware for home and bug out bag preps
- How to spice up that freeze dried meal
- How to cook without gas or electricity
- Substitutes in recipes. eg. maple syrup instead of honey, apple sauce instead of sugar.
- And then various sections for different recipes either by meal (breakfast, lunch, dinner, dessert), location (at home, bugging out), things like that.
-
Alicia
- October 7, 2022
There are backpacking recipe books already – I have one from the Sierra Club. I think you’re spot on here. It should focus on what TP has recommended for prepping – at home and BOB. Recipes for shelf stable non-perishables – as they are. And how to convert recipes for fresh ingredients to use shelf stable equivalents – when that works and when it really doesn’t. I also like your list and your thoughts on how to use alternative cook methods. Also how to make a meal more tasty – doesn’t have to be gourmet, but also that it CAN – check out that clam sauce from Little Bear’s Mom! When you’re sheltering in place, there’s a LOT of shelf stable items we don’t think about in Prepping like wine, vinegars and the full complement of dried spices that are already there. And when Bugging out, a bit of salt and herbs could make that freeze dried meal much more palatable. The only one I’ve actually eaten (25 years ago while backpacking) was so bad we wouldn’t eat it even though we were hungry, cold and exhausted – when food tastes its best.
-
M. E.Contributor
- October 8, 2022
I think it should have different sections based on the type of emergency. For example, recipes to make when you first lose your power (how to cook up all those things in your fridge/freezer, quickly). Recipes for when the power has been out for ~72 hours or more. Recipes for when water is scarce (should require less water for both cooking AND cleaning – like one pot recipes).
A section on maximizing nutrition (I have great recipes for that section). A section on maximizing comfort (S’mores are mandatory in this section!) A section on maximizing flavor. (I have an amazing stash of great spices, that I’ve now learned to use extensively.)
And overall a strong focus on shelf-stable items. I learned to make all kinds of awesomeness during the pandemic – partly because I stocked up so much as the pandemic was starting that I had to start using all the stuff. I can make a fabulous seafood stew with all the canned seafood I stocked up on for protein purposes (the recipe for which I will contribute to the cookbook).
Having said that, in a way it could be good to have “forgiveness” for recipes that are best with refrigerated items. Wouldn’t that go a long way to get others to prepare? I know I now save a TON of money on groceries because we always have something in the house now (rarely happened pre-pandemic) that we can throw together, instead of going out to eat. And most recipes are better with “real” butter (vs. Ghee), real cream (vs the powdered stuff), etc.
This was kind of a stream-of-consciousness answer but I for one would be very excited about a gourmet recipe book with foods people really like to eat, vs. all rice and beans (which is what most prepper cookbooks seem to be – and beans and I just do not get along. But I love, love, LOVE rice!)
Oh and also a section on how to grow fresh herbs in harsh environments. It’s AMAZING what a little fresh basil or rosemary will do for an otherwise bland dish.
-
Barb LeeContributor
- October 8, 2022
Yeah, I like your first paragraph about using up the stuff in the fridge/freezer. When I really got into “shelf stable” I was looking down my nose at the freezer…until I started realizing the freezer’s there for a reason. I’ve been “stockpiling” some things like beef chuck and hamburger, but in the case of a chuck roast, it takes a lot of fuel to cook one (unless in a haybox, but still, you have to bring it to a boil first – fuel fuel fuel) So now I’m focused on DOING something with the meat before just stuffing it in the freezer, i.e. cook up that chuck roast, portion it out, vacuum seal, THEN put in the freezer. Same for the gravy. Wallah, “blue plate special” that only needs to be simmered, bag and all, in a pot of water for a fresh meal. So I’m slowly trying to convert my frozen ingredients into as many “blue plate specials” as I can. More things like, corned beef and cabbage. When you’re freezing leftover corned beef, quarter up a cabbage and blanch it, then freeze it hard and vacuum seal, to be simmered and served with the corned beef. I don’t know how many times I’ve passed over the corned beef because I didn’t have a fresh cabbage!
Oh, and you can use the simmer water for whatever, because it is free of food.
-
Barb LeeContributor
- October 8, 2022
One of the things that seems very difficult to access is how to convert dehydrated foods to fresh equivalents so they can actually be used in any recipe. There is probably a lot to be said for preparing each type of storage food. Beans, for instance, take a lot of resources like water and fuel for cooking. Enter heat retention cooking. A section on carbon monoxide safety probably seems like a no-brainer but when your indoor options are limited, someone might not think about that toxic gas. I’ve read that trying to live a week on prepackaged freeze dried foods, or MREs can be quite constipating, which for MREs is apparently deliberate due to the effect of high stress. Does anyone store psyllium husk powder? Critical need for Vitamin C. A friend of mine in Aust. taught preparedness classes. He found that many people stored wheat, but had no way to grind it. The danger of food burnout…I keep trying to add in more veggies to our diet and find I can only stand so many salads. I’ve read that a constant diet of beans and rice may cause people to not eat enough because of burnout/aversion. Didn’t you write an article on “rabbit starvation” or something like that? Pioneers dying from lack of sufficient fat, etc. Oh, and making up meal “kits” by packaging and/or storing shelf stable foods together. Kind of like home made Mountain House or better. I do “kits” for spaghetti sauce, soups, casseroles, chili, etc. That way you have all the ingredients on hand and pre-measured.
-
M. E.Contributor
- October 9, 2022
I love the meal “kit” idea! One thing I had mentioned in another thread was stocking up on Penzey’s “trial bag” spices. They are already packed in mylar and so easy to store. Some of them would be perfect for the kit idea, like storing a trial bag of Pasta Sprinkle with the pasta. Would certainly help with burnout. Right now I have all my supplies stored alphabetically, but I might reconsider that and put some of them together in “kits”.
I also love the idea Barb Lee mentioned above about pre-cooking the meats before freezing. It seems obvious now, but I didn’t even think of it until she mentioned it! Would certainly save a lot of fuel when power is at a premium. In fact, especially for those areas with rapidly rising power prices (which is most area now, sadly), it could be a great idea to cook some of that meat with solar when the sun is shining and then freeze.
To avoid burnout, I buy at least one of every canned thing I can find in my local grocery, and try it when I can. Things I like, I buy more of. I discovered I love canned mung beans, for example, and I use canned mushrooms much more frequently than I would have thought. Canned milk? I never use it, and it goes bad too quickly, so I have dehydrated instead.
-
Alisa Felix
- October 10, 2022
That does make a lot of sense to cook meat before while you have the power. Then you just need to thaw and slightly heat. It would save quite a lot of energy.
Pretty brave of you M.E. to try various things, but seems like it paid off well for you and you found some new favorites.
-
prep_in_Germany
- October 9, 2022
I’m also in favor of the idea of a “The Prepared” crowd-source cookbook! I’d also like to see some recommendations of how much spices one should store per pound of beans or lentils.
What apps or methods do some of you use for storing your recipes? I like the Paprika app for storing mine, since I can edit the ones I grab from websites and they’re stored offline on my phone, but I’d like to hear what other people use.
One comment regarding rice is that I just learned that for indian-flavored meals, you can cook your rice with some whole cardamom pods, coriander, and black pepper, and it’s a lot more delicious when it already has some flavor.
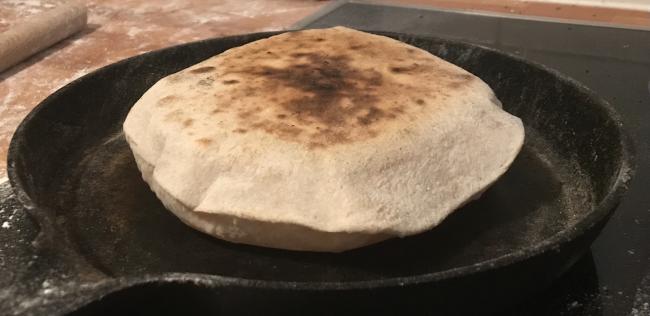
My current favorite only-food-storage recipe is sourdough pita bread. It takes some practice and to get it to turn into a real pita, but when you succeed you have a great pocket that you can fill up with whatever you have, or just use as a wrap, and it’s a bit crunchy in the center and chewy on the edges. It’s not as energy-efficient as cooking several large loaves of bread in an oven, but if I had to use alternative energy sources it would be easier to cook in a fry pan on a camping stove than try to set up an outdoor oven.

-
Gideon ParkerStaff
- October 9, 2022
Holy cow that pita bread looks heavenly! My wife types up all her recipes using the same formatting and style, saves a copy digitally and prints off a copy for her book in the kitchen.
As for how much spices to store, I would keep track of how much you use in a month or two and then calculate how long you want to be prepared for. If you use 1/4 jar of salt in a month, then you know to store 3 jars for an entire year of not buying salt from the store. Or if you are doing it per one pound of beans and lentils, like you asked for up above, make up 1/4 pound of that meal and see how much spices you use and multiply that by four to get your answer.
-
prep_in_Germany
- November 5, 2022
Sorry for not replying earlier, but thanks for your input! I think it makes more sense to store salt+spices relative to the quantities of other foods, and plan to order more soon and package them into mylar bags.
A couple of additional food storage-based (and also travel-friendly) recipes:
Tuna and rice:
Cook some rice, add tuna, salt, dried dill, and powdered onion
Tuna mashed potato patties:
Prepare a package of instant mashed potatoes (~2 cups worth), by adding onion powder, salt, and boiling water (if you have dehydrated milk you could add some of that too). Mix in an egg (fresh or dehydrated+more water, black pepper, and a can of tuna fish, and fry in a bit of oil.
Potatoes, beans, and olives:
Prepare instant mashed potatoes, and eat with canned kidney beans and canned olives. Hardly a recipe, but tastes pretty good (to me), and is convenient as travel food since it’s fine to keep it out of the fridge for a while.
I think that instant mashed potatoes and dehydrated eggs are really useful items to keep in food storage, since they taste good, are foods we’re used to eating, and don’t require much time and energy to prepare.
-
JBinAZ
- November 8, 2022
Wow, I sure would like a how-to on that sour-dough pita bread!
-
Alicia
- October 7, 2022
Confirming that the PDF version of Mrs. Lehman’s canned meat cookbook is free to download. it definitely is expecting non-shelf stable items like dressings and frozen items. Still inspiring.
-
-
Courtney
- September 28, 2022
One easy one is to cook some rice, then add canned salsa, corn, and beans (or could add chicken instead). Top with cheese if you have it!
-
Robert LarsonContributor
- September 28, 2022
My wife makes that with some ground beef and calls it mexican mash-up. It’s really simple, fast, and good.
-
Isabel
- September 29, 2022
I had something like this last night but with some barley, carrots, and canned tomatoes.
-
Amy S.
- October 3, 2022
I make one like this too! Chicken Barley Chili
1 (14.5 oz) can diced tomatoes
1 (16 oz) jar Salsa
1 (14.5 oz) chicken broth
1 c. Quaker Quick Barley
3 c. water
1 T. chili powder
1 t. cumin
1 ½ t kosher salt
1 (15 oz) can black beans, drained and rinsed
1 (15 oz) can corn, drained
1 1/2 lbs canned chicken breast
In a large pot, combine the first 7 ingredients. Bring to a boil, cover and reduce heat to low. Simmer for 20 minutes, stirring occasionally. Add beans, corn and chicken pot. Increase heat to high until chili comes to a boil. Cover and reduce heat to low. Simmer for another 5-10 minutes or until barley is tender. If desired, top with shredded cheese. -
Alisa Felix
- October 7, 2022
That sounds amazing!
-
-
Little Bear’s Mom
- September 29, 2022
We keep canned clams on hand to make linguini with clam sauce. Boil the pasta, and reserve a bit of the water when you drain it. Separately, heat the clams in a large skillet with a little olive oil and garlic (fresh is best and we keep a lot of it on hand, but dehydrated would also work). Season with salt if it needs it. Add a little white wine if you’ve got it, but skip that if you don’t. Add the pasta to the clams, toss, use a little of the pasta water to loosen it if you need to. Serve. Voila – a gourmet shelf-stable pantry meal.
-
Isabel
- September 29, 2022
That sounds heavenly! And totally something that could be done with food storage.
-
-
AT
- September 29, 2022
We use a lot of rice and beans as well. We don’t really do long-term food storage but usually have several pounds of rice and beans in the pantry that we slowly cycle through. I like recipes that have a lot of flexibility. Fried rice is basically rice and soy sauce but you can add a lot to it. The timing of everything takes some work, but there are a million recipes online to start practicing. Chili is another favorite. We use a mix of black and pinto bean, an onion or two, and chili powder. You can then add just about anything based on what you like and what’s available. We also keep garbanzo beans because I like to make hummus. I’m experimenting with falafel. It’s just ground garbanzos, seasoning, and some flour. Making something edible from it is pretty easy, although really good falafel eludes me. I think it’s well worth your time to be comfortable cooking rice and dried beans.
-
Little Bear’s Mom
- September 29, 2022
Fried rice is a very smart idea. We keep shelf-stable tofu on hand (the kind sold in the Tetra Pak type of packaging) and that’d be a good addition to fried rice if you want a protein. The only thing with that tofu is that it only lasts about 6 months in the pantry, so we use it and swap it out pretty regularly.
And if you do master the falafel, please share your recipe!
-
RedneckContributor
- September 29, 2022
I think it’s well worth your time to be comfortable cooking rice and dried beans.
I couldn’t agree more. We eat a fair amount of dried beans and a lot of rice in our daily diet. This Saturday, I’ll be cooking up a big gumbo pot full of red beans. My daddy was raised in south Louisiana, so I grew up eating red beans & rice almost weekly. Like my dad, I cook up a big pot, have a great meal, and then put lots of containers in the freezers for future quick meals.
We eat a lot of fish and always have rice as a side meal. I purchase 25 lbs of Jasmine rice at a time. One container on the counter here in the office holds about 20 lbs. The cannister in the kitchen holds the other 5 lbs. I also just brought in 20 lbs of Minnesota wild rice. We eat a lot of that too.
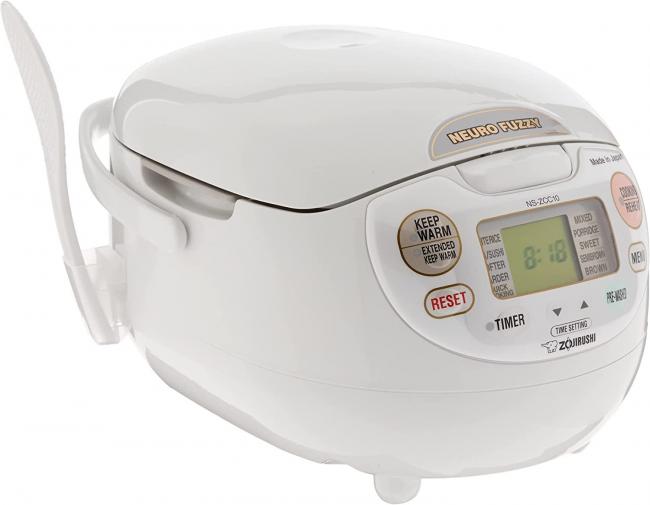
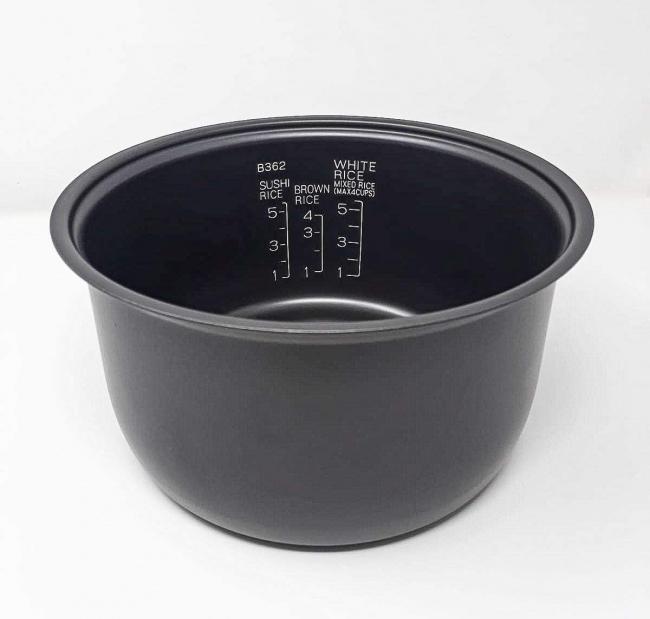
For most of my life, I always used minute rice as I didn’t think I could cook “real” rice without screwing it up. That changed when I purchased a Zojirushi 5.5 cup rice cooker. It is probably the most expensive rice cooker at $214 but it is usually rated as the best one on the market. You can get great rice cookers for a fraction of that but since we eat so much rice, and I could afford it, that is the one I use. It comes with its own measuring cup, which is actually holds about about 3/4 of cup. For a normal meal, with enough for leftovers, I put 2 of those cups of Jasmine rice in its removable, non stick bowl. I then take that to the sink & rinse the rice about 5 times, to get rid of the extra starch. By doing so, your rice will not be even a tiny bit sticky. The first rinse looks almost like milk. After that, I put the bowl back in the unit and add liquid to the 2 line printed inside the bowl. You can just use water & salt, and in less than an hour you will have absolutely perfect rice. It has an automatic keep warm feature, so you don’t have to be there when it finishes.
You can also add extra flavorings. I often add 2 Tbs each of sake, mirin & soy sauce. If you add soy sauce, you really don’t need to add salt to the rice. Sometimes, I also add some minced ginger. If you have dashi packs, then you can use dashi instead of water for even more flavor. Point is, you can add what you want, be it mushrooms or other veggies. They recommend laying the mushrooms or other additions on top & not mixing them into the rice until the rice is done. I believe mixing them in messes with the proper cooking of the rice.


-
Gideon ParkerStaff
- September 30, 2022
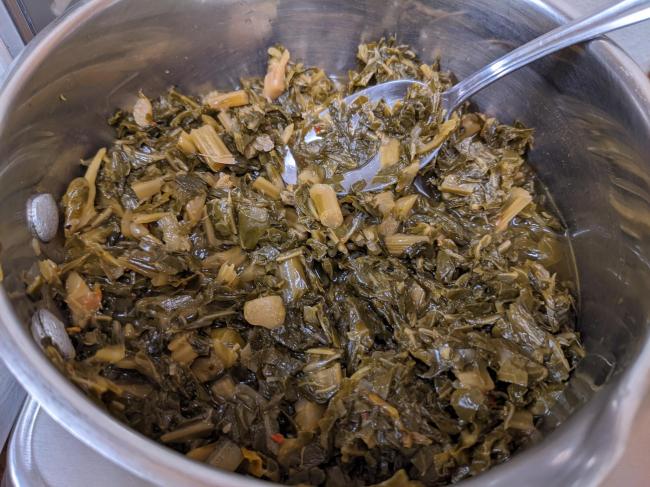
Hey Redneck, you talking about cooking reminded me that the other day I finally opened up that can of collard greens I bought because I wanted to see if they were as good as you said they were in a post months ago.

Well, I can say that collard greens aren’t that bad, but do not get them in a can. I could differentiate the flavors and could tell the greens could be good if seasoned and cooked properly, but the the canning process and the junky seasoning the company put in it made it quite nasty.
-
RedneckContributor
- September 30, 2022
The only canned food I eat is green beans, and that is only when none are in the garden or the freezer. Canned collards? YUK!!!
Actually, I plan on planting collards tomorrow. You really need to grow some and this is the perfect time of year to start them.
-
Barb LeeContributor
- September 30, 2022
Up here in the PNW, end of August is about the last planting date for collards and related. I grew them one fall/winter. They were prolific and boldly flavorful.
-
Alicia
- October 3, 2022
I found an Instant pot also does rice well – and fast. We’ve done both Jasmine or extra-long grain Basmati at least weekly during and since the pandemic. The Instant pot is probably not quite as flawless as your Zojirushi, but also is more flexible.
Both would only work when there’s power for me. Cooking with my emergency setup would be the boiling method either on the side burner of my propane grill or a camp stove.
Regardless, would you share your Louisiana beans and rice recipe? I’m sure having different flavor options would be useful here as well. The southwest version, the TexMex version, the Louisiana version, the polynesian version,…. how many versions of rice/legume can we get?
-
RedneckContributor
- October 4, 2022
Yes, there are much cheaper machines for making quality rice and all only work when there is electricity. But I still suggest getting a machine and getting used to eating real rice at least once a week. That could include wild rice, which is not actually a rice, but still does wonderfully in a rice cooker.
My red beans recipe is rather simple & nothing written down. So I soak the beans overnight. In the morning when I get up, I drain all the water & refill. I will do this at least one more time before cooking this afternoon. This will help reduce the gassy nature of beans. Another way to reduce it is to add kombu to the pot while cooking. It is a dried seaweed that adds flavor and really reduces gas. Kombu contains enzymes that help break down the raffinose sugars in beans and those sugars are what make the gas. Once those sugars are broken down, your body can now absorb more nutrients from the beans. I get my kombu from Amazon or a specialty Asian store in Memphis. BTW, kombu is a basic ingredient in dashi, which is the main broth used in Japanese cooking. I use lots of dashi in my cooking. Goes great as the liquid when cooking your rice.
This afternoon I’ll put my 4 lbs of soaked beans in a big gumbo pot. I’ll cover the beans with low sodium chicken broth but you can certainly just use water. Then I will add the trinity, which in Louisiana cooking is onions, bell peppers & celery. I will be chopping up 2 whole heads of celery, 4 large onions & 4 bell peppers. I do a rather large dice, as I want to be able to see the veggies in the finished product & I like the texture when using a larger dice. Then I add my meats. I will add 4 large smoked ham hocks, about 2-3 lbs of diced ham & 3 lbs of sliced Cajun sausage… for me andouille. To finish, I add maybe 8 bay leaves.
I bring to a boil & then reduce to a simmer. It cooks for about 3 hours, or whenever the beans get nice & tender & start to pop. Popping is a good thing, as it makes the liquid taste all the better. I actually will help the process along by smushing beans on the side of the pot. You will note the liquid getting thicker & browner.
When done I remove the bay leaves, kombu if used, and the ham hocks. I then pull the meat off the hocks & put back in the pot. The proportions of the ingredients is not critical. Some will use less veggies and some will use different meats, or none at all. With my basic recipe, I add no additional seasonings. The veggies, smoked ham hocks, diced ham & Cajun sausage cook down to release all the flavor you need. I’m doing 4 lbs of beans because I also cook for an elderly lady from church, plus I want lots in the freezer for future meals. For a normal meal, one lb of red beans is all you need, then just reduce the added ingredients somewhat proportionally.
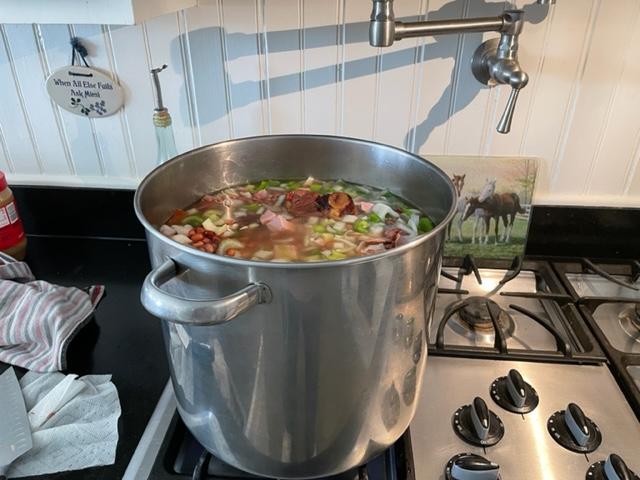
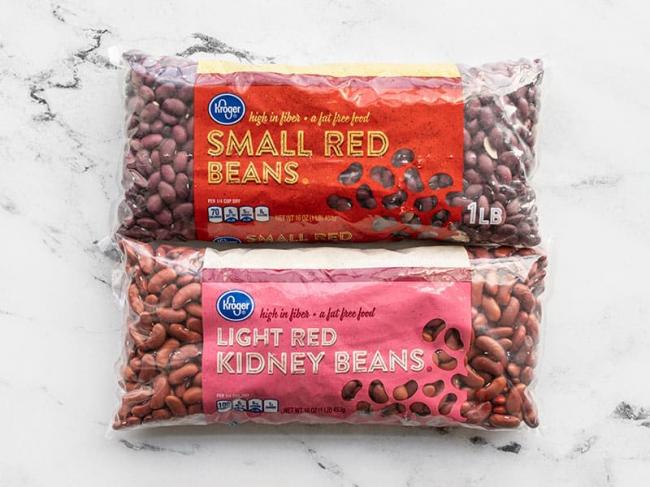
Also, important to actually get red beans, and not red kidney beans. They look different and are different. The beans are now on the stove.

-
Alicia
- October 7, 2022
That is much more than rice and beans! It sounds and looks scrumptious.
-
RedneckContributor
- October 8, 2022
Yes it is but this is a typical recipe for red beans. I was hesitant to post the recipe in this thread, but you asked. However, in a crisis, nothing but dried beans, water & rice will make a healthy meal. In my case, I live in the country, have a catfish pond & gardens, so I would still add veggies & meat of one form or another to the pot. I keep hundreds of cans of Spam in storage, so at a minimum I would add that to the pot.
-
Alicia
- October 11, 2022
Indeed I did! And glad to have the details. I’m just learning your local term for red beans.
-
RedneckContributor
- October 11, 2022
Actually, it is not a local term. Red beans are a variety of beans all their own. Some folks think red kidney beans are the same, but they are very different. Since red beans are a southern staple, especially in Cajun or Creole cooking, maybe they don’t offer them in stores in other parts of the country? Most stores, but not all, offer them here in the mid south.
-
Alicia
- October 13, 2022
Oh, sorry. I meant that your recipe for red beans is so much more than just red beans. Where I grew up ‘red beans’ would be beans and probably some spices. I actually just purchased that exact package of small red beans tonight before I saw this post – with thoughts of making your recipe. You’ve inspired me.
-
RedneckContributor
- October 14, 2022
In Louisiana, Monday is considered red beans day. Lots of restaurants put them on special on Mondays. Goes back to the 1800s, when Monday was the traditional wash day. The woman of the house would put a pot of red beans on the stove to simmer all day, while doing her wash chores. Even with the added ingredients, it is a simple one pot meal and doesn’t require any tending if cooked on low all day.
-
Liz Klein
- October 15, 2022
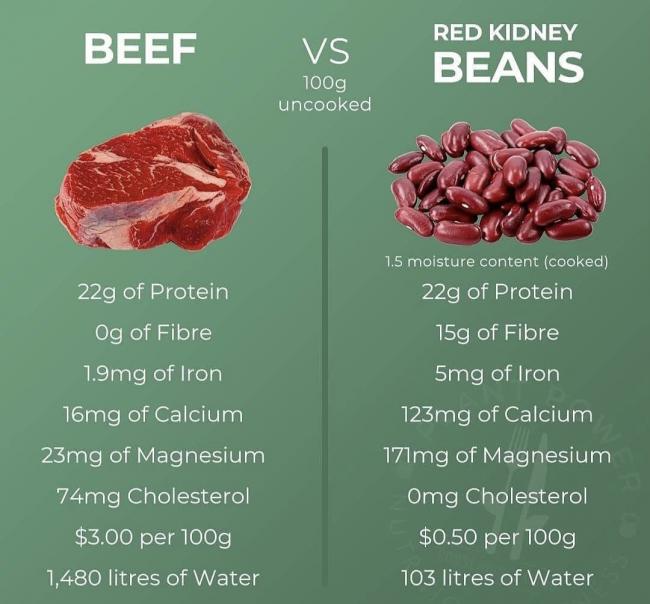
Red kidney beans are not only shelf stable but are more nutritious than beef. But… beef does taste a whole lot better.

-
RedneckContributor
- October 15, 2022
And, when you eat your beans with rice, which is also nutrient packed and long term shelf stable, you have one very filling and healthy meal. That is why the foundation of any emergency food storage is rice & beans. You can buy them in bulk at say Sam’s Club and pay very little for something that can store for 30+ years. Too many folks, me included, start their prepping using commercial goods, such as dehydrated or freeze dried packaged meals. Those only last a few years and are incredibly expensive per calorie.
-
-
Alicia
- October 7, 2022
Growing up, there were shredded chicken sandwiches that I really loved. A local soft serve ice cream stand sold them and people made them for get togethers and sold them at ball game concession stands. It’s basically cooked chicken cooked in cream of chicken soup, crackers (saltines, ritz, etc), seasoned salt to taste in a bun. It holds well over a long time in a crock pot or steam table.
Dump undrained canned chicken into a pot, add half as much cream of chicken soup and a bit of water. Cook on medium heat until thickened and done to your likeness (the longer the better). Shred the chicken with a couple forks. Season to taste with salt/seasoned salt – careful as the next step may be salted. Add crackers or other bread type of filler until it’s clumpy enough to stay on a bun. Serve on hamburger buns or in prepping over cooked rice. Here’s an on-line recipe that has more options and starts with fresh chicken. Whoah! It points to a really local set of recipes site. Those are authentic!
-
Magic 8 Ball
- October 11, 2022
I actually saw a Reddit post on the preppers subreddit called Easy Recipes Made Of Only Shelf Stable Ingredients. Sounds like what you were looking for.
It has some recipes, but also alternative ingredients like using chickpeas instead of butter.
-
Kaleb Harper
- October 18, 2022
Hi Adriaan there are hundred of recipes if you google here is one which may excite you https://www.thetrainingroom.com/blog/corporate/april-2020/easy-recipes-to-use-with-non-perishable-foods-chef-knife
-
Barb LeeContributor
- October 24, 2022
This is a recipe I came across on the internet recently. We’ve tried it twice and it is delicious! Spicy but not really hot. Mostly canned ingredients and dehydrated spices. I have converted fresh ingredients to home dehydrated (not freeze dried) to make it all shelf stable. Both fresh and dehydrated amounts are listed.
Southwestern Chicken Soup
Fresh “Shelf Stable Equiv” Ingredient
1 1/4 lb Abt. 1 Pint Canned Boneless Skinless Chicken Cut Up
1 Qt Same Chicken Broth
1 lb 1/4 Cup Dehy Frozen Corn (1 can drained)
1 Can 1/2 C Crumbled Dehy Diced Tomatoes (14.5 oz can)
1 Med 1/4 Cup Dehy Chopped Onion
1 Med 1/3 Cup Dehy Green Bell Pepper, Chopped
1 Med 1/3 Cup Dehy Red Bell Pepper, Chopped
1 4oz Can 3 TBSP Diced Green Chiles (Mild)
1 Can Black Beans, Drained (Use what beans you have)
1 1/2 tsp Salt
1/2 tsp Garlic Powder
1 tsp Chili Powder
1 tsp Ground Cumin
1/8 tsp Cayenne Pepper
Rehydrate veggies (skip this step if using ingredients from the “Fresh” column): My favorite way to rehydrate veggies is to fill a jar about half full of veggies and cover the veggies with hot/boiling water. Screw the lid on tight. Occasionally invert the jar so that any veggies that are out of the water are submerged. Continue to soak until the veggies are soft. Add more hot water if necessary. If you don’t have a whole lot of soak water left over you can throw it in the soup. Otherwise, drain excess. Note: Do not add salt to soak water.
Brown fresh chicken, skip step if using canned. Place all ingredients in a pot, bring to boil, reduce heat to simmer, cook about 15 minutes. (Dehydrated veggies aren’t “cooked” so they benefit from some cooking time.) Ready to eat.
Simple, short cooking time, very hearty soup.
-
Gideon ParkerStaff
- October 25, 2022
Great recipe and thanks for taking the time to chart all the ingredients so well in your post.
This would be a great recipe to add to TP’s community cookbook 🙂
-
-
Mark J. Myers
- October 27, 2022
Instead of canned chicken I would recommend buying a large bag of frozen chicken breast. Just thaw it in the refrigerator for 12-24 hours before cooking. Frozen chicken is just as good as fresh, and it’s very inexpensive . You can buy chicken this way from Sam’s Club, Costco, or even from the local grocery store if they have a good deal on it.
-
Barb LeeContributor
- October 27, 2022
Trying to stay with the shelf-stable theme.
-
-
helena
- October 28, 2022
I’m really lazy when it comes to cooking, and I’ve found that eating fish right out of the can is about all the work I can muster for eating. so which fish is the best for you? so far I’ve had regular tuna, albacore tuna, salmon, sardines, and anchovies…
anchovies seem to be the worst, sardines 2nd worst, then i can’t really differentiate among tuna, albacore, and salmonsalmon tastes kinda weird, especially with the bones and skin in it, but it’s cheap and it has omega3 fatty acids
tuna also seems pretty good, high protein low fat…
-
Alisa Felix
- October 28, 2022
I’ve found that the more expensive sardines like this one by Season or this one from WildPlanet taste less fishy and are more like tuna than the strong sardine smell. Also sold at Walmart.
-
Alicia
- October 28, 2022
I can also recommend the Wild Planet brand. The Albacore tuna is good.
-
Barb LeeContributor
- October 28, 2022
Second. Tuna Guys is great too.
-
-
Amy S.
- October 30, 2022
Two part comment:
1. I have been giving lots of thought for how a cookbook could work. I think it might be a good idea to have a cookbook of recipes that use only shelf stable foods — and then in the notes below the recipe we would add quantity substitutions for fresh meat, fresh vegetables, fresh eggs/dairy (realizing there will be some people who have some of these on hand, perhaps because you grow/raise those foods, or perhaps the power only recently went out and you still have them to use up). Similarly, we could add to the notes below the recipe advice for alternative cooking times (for example, haybox or solar oven). I am personally focusing on finding recipes that use one pan (to save water in the recipe and for washing up after). Do others like this rough organizational principal?
2. As I have been collecting and testing some recipes, I have noticed quite a lot of them have a low fat content. For example, lots of them have canned chicken, carbs and vegetables — and in a non disaster situation, for example I might add grated cheese. But absent calling for velveeta or jarred queso or other processed ingredients that I don’t tend to buy or use, I’m now realizing that many of the shelf stable recipes are short on this macro nutrient, presumably due its perishability and expense. (I am now examining labels for higher fat content, and for example I discovered that canned refried black beans are quite high fat.) If anyone has recipes that use higher fat ingredients — please share!
-
M. E.Contributor
- October 31, 2022
In general I like the idea of this organizational structure, and I wonder if we shouldn’t just decide to make it electronic from the outset, with the opportunity to select the equipment we plan to use and then print the recipe desired? That way if someone has, say, a haybox, they could print out that version but those of us with solar ovens (yay me!) could just print out that. I do see the potential drawback in that this is supposed to be a manual for when we might not have electricity or connectivity! So a printed version with all options makes sense also.
As for fat, I just made an AMAZING soup (more of a stew, really), using powdered cream that has 4.5 grams of fat per tablespoon. I can’t speak to the shelf life except to say that I’ve had it in my pantry for probably a year and it still tastes great despite being opened most of that time.
The Rabbit Starvation thread has great insights about fat as a macronutrient. I would share the soup/stew recipe but truth be told I was just very hungry and threw a bunch of stuff in a pot and ate it, so I didn’t measure anything. Ingredients were chicken broth and then dried beets, carrots, zucchini, pumpkin, sweet potato, butternut squash and three tablespoons of that powdered cream plus some cloves and pumpkin pie spice. At the end I threw in a handful of hazelnuts, whirred it in a blender (which was a preference, not a necessity), and then topped with pumpkin seeds. SO yummy, and perfect for Halloween!
I was not aware that the canned refried black beans were high in fat, but it makes sense because – fried. In general I find digesting beans very unpleasant (yes, I’ve read all the tricks – my body just does not like beans of any kind) but I might store some for others in my family given that information. My backup fat source is a whole lot of frozen Crisco plus a fridge shelf full of coconut oil. Will it last forever? Who knows. Will I eat it in a SHTF situation? Absolutely.
-
-
Sheilah
- November 2, 2022
Brunswick stew can be made easily out of only canned goods and pantry items,a big pot, a long handled spoon, a heat source, and a can opener. Canned chicken, corn, lima beans, I add canned peas and butter beans as well, tomatoes or canned or dried tomato product or ketchup, dried onion, and let it cook down a while or eat right away and you have a very tasty stew. There are a million different versions of Brunswick stew- it started out as a “whatever is on hand” kind of dish, but this is the version I used to make as a poverty stricken student. Canned goods got a bad rap because of salt content and 1950’s cooking, but they are relatively cheap, last forever unless the foods are acidic, are canned when the vegetables are very fresh, and low salt versions exist or rinse the vegetables in cold water to reduce salt if you are on a restricted salt diet. I ate peas from a 17 year old can last year by accident. They were still tasty and I had no ill effects.
-
Barb LeeContributor
- November 6, 2022
This morning, while the temp is steadily dropping and it’s snowing unexpectedly at our elevation, I’m going to make some pancake and waffle mixes. I’m not a big fan of commercial baking mixes and need something to do with my stored whole wheat berries anyway, right? If you need some bread and baking yeast bread is out of the question, having a premix for quick bread beats the heck out of groping around with a flashlight for individual ingredients! This would all be from shelf stable ingredients, except I’m using fresh ground whole wheat and buckwheat (50/50) flour, so I’ll go ahead and store it for now in the freezer, but the mix would be shelf stable for a long time. I’ve calculated the added water to rehydrate the egg crystals and powdered milk.
WAFFLE MIX
4 TBSP Ova Easy Egg Crystals
2/3 C Powdered Milk
2 C Flour (or 50/50 Wheat/Buckwheat)
4 tsp Baking Powder
1 TBSP Sugar
1/2 tsp Salt
Store in container of choice. Makes one recipe
WHEN READY TO MAKE:
Add 1 1/2 C water (adjust to desired batter consistency)
1/2 Cup Oil
PANCAKE MIX
2 TBSP Ova Easy Egg Crystals
1 C Flour (Wheat or 50/50 Wheat/Buckwheat)
1/3 C Powdered Milk
1 Tbsp Sugar
3 tsp Baking Powder
1/2 tsp salt
Store in container of choice. Makes one recipe
WHEN READY TO MAKE:
Add 1 C water (Adjust to desired batter consistency)
2 TBSP oil
-
underprepraccoon
- December 12, 2022
Fry bread, Atole and Jamaican porridge. Probably fideo.
Fry bread uses flour, salt, water and powdered milk, depending what you want. Fried in oil but I’m sure they could be dry cooked or even ash baked. Navajo survival food.
Atole is Mexican porridge, uses corn flour, salt, piloncillo or brown sugar, cinnamon sticks, I’ve managed to adapt it to using canned coconut milk with a bit of water, I was using powdered until I ran out, add vanilla extract. Very nice on cold days but takes a long time to thicken.
Jamaican porridge is similar but with a different flavor profile. Still the corn flour, but integrates bay leaves, vanilla and coconut milk, plus some condensed milk for sweetness, nutmeg and more condensed milk for topping.
I consider onions a bit shelf stable at least short term, like a couple months, and fideo is made with some fideo pasta, a little oil, salt, the onions and a can of tomato sauce with water.
Someone mentioned it but backpacking recipes can get close to using all shelf stable, like, I’ve seen someone make pasta carbonara with powdered eggs, pre made bacon, I think packets of parmesan, garlic powder, pepper, salt and just regular noodles. It’s decent with powdered eggs.
Also, someone mentioned not enough fat in recipes, just adding like, olive oil, like the back packers do, to like everything adds calories and fats. Not sure the self life on that though. I would personally stay away from shortening, I just don’t trust it to not have trans fats
-
Barb LeeContributor
- December 23, 2022
Yankee Red Flannel Hash (adapted from 1972 Better Homes and Gardens Cookbook Recipe)
Husband tested and approved.
1 Large onion, chopped and sauteed (or use dehydrated if you must!)
1 Can corned beef (such as Hereford brand), chopped
2 Cans potatoes, chopped
1 Can beets, chopped
Saute the onion, throw everything else in the skillet and mix. Brown the bottom if you’ve got the fuel. Otherwise, you could probably eat it cold.
If you don’t like beets, leave them out and you have plain old hash. Some other veggie on the side is fine.
3-4 servings.
-
Barb LeeContributor
- February 6, 2023
BEEF STEW
I have tweaked this recipe to the greatest satisfaction of my taste buds, and more importantly, my husband’s! It is adapted from my old 1970s Better Homes and Gardens Cookbook and has always been my go-to recipe for making stew with fresh ingredients. The seasonings are subtle and of course you can use whatever flavorings you prefer. Also, I used conventionally dehydrated vegetables.
The one thing I can’t stress enough is…use home made stock if you possibly can. I think grocery store beef stock/broth tastes awful. But you can always try it. I couldn’t eat much of my first “experiment”, made with organic boxed broth.
Also feel free to halve the recipe. This makes a good 4-6 servings.
INGREDIENTS
1-2 Pints bottled beef chunks (2 pints is a lot, 1 is probably adequate)
1 Quart bottled beef stock
3 Ounces dehydrated potato slices
1/4 Cup dehydrated onions
1/2 Cup dehydrated carrots
1/2 Cup dehydrated peas
1/4 teaspoon Worchestershire Sauce powder
1 teaspoon garlic powder
1-2 bay leaves
1/2 Tablespoon salt
1/2 teaspoon paprika
1/4 teaspoon black pepper
Dash of allspice
1 teaspoon beef bouillon (optional, if your stock isn’t rich enough)
1/2 cup white flour
METHOD
Rehydrate potatoes, onions, carrots and peas (include any other dehydrated veggies that you wish!). My favorite method of rehydrating is to put veggies in a quart Mason jar (this recipe requires two jars), fill the jars to the shoulder with simmering water. Screw lid on tight. Periodically invert jars so veggies on top are submerged. Give the veggies a couple of hours to rehydrate.
Put stock in pot. Drain veggies, add to stock along with all other ingredients except flour, Bring to boil, reduce heat and simmer about 15 minutes, until veggies are tender.
Make a slurry with flour and about 1/2 cup of water. Shake vigorously in a tight jar. Bring stew back to gentle boil, gently stir in flour/water (pour through sieve to strain out lumps if desired). Bring back to gentle boil, and boil for about a minute.
If you can get home made stock to make this recipe, I guarantee you will never eat Dinty Moore again!
This recipe should be ideal for making up “kits”, where you package measured ingredients according to how you’re going to add them, and “stage” the mixes next to the bottled ingredients so there is virtually no preparation time involved in making it.
-
Akhilash
- February 9, 2023
1. Beans and Rice: Cook one cup of white rice according to package instructions. In a separate pot, heat up a can of black beans with garlic powder, cumin, chilli powder and oregano for extra flavour. Combine the cooked rice and beans together for a delicious meal.
2. Spaghetti with canned tomatoes: Bring a pot of water to boil then add spaghetti noodles and cook according to package instructions. Meanwhile, heat up some canned tomatoes with onion powder, garlic powder, parsley flakes and oregano in another pan over medium-high heat until heated thoroughly. When the noodles are done cooking strain them then combine them with the heated tomatoes for an easy pasta dish!
3. Creamy Macaroni & Cheese: Preheat oven to 350F (175C). In an oven-safe dish mix together 1 cup macaroni noodles (cooked according to packet instructions), 1 can evaporate milk mixed with 1/4 teaspoon dry mustard powder plus 1/4 teaspoon garlic powder plus salt & pepper as desired, 2 tablespoons melted butter mixed in thoroughly before adding 2 cups grated cheese (any type you like!). Bake uncovered for 30 minutes or until cheese is golden brown on top – creamy macaroni & cheese is ready!
4. Tuna Melt Sandwich: Mix together one can of tuna fish drained well in a bowl along with mayonnaise or plain yoghurt, celery stalk diced finely plus other desired seasonings such as dill weed or paprika into it until combined well into a spreadable consistency; light toast two slices bread per sandwich; layer tuna spread on each slice followed by shredded cheese before topping each sandwich off with a second slice of bread that was lightly toasted – place sandwiches onto a skillet over low-medium heat and cook until bread is nicely crispy on both sides while the cheese melts inside – enjoy hot tuna melt sandwich!
-
Eric
- April 2, 2023
Rice and Beans
I recently found a recipe that’s easy, healthy, inexpensive, and delicious. I’ve made it every dinner for a week. All ingredients are non-perishable. There’s only about 3 minutes of work to prepare this meal, but there’s a full hour of unattended cooking.
1 cup Iberia yellow rice Spanish style
2 cups water
1 tablespoon olive oil
1 can Bush’s Best Sidekicks beans
Combine rice, water, and oil in ricecooker and press “start”. It will cook for an hour unattended. After rice is ready, microwave the beans for a minute. Place hot beans on a plate, spread some rice over the top, and serve.
This recipe makes enough for my wife and I to have a meal together and still have some leftovers for later. Any unused rice should stay in the rice cooker which will keep it warm for later.
There are four varieties of Bush Sidekicks. I switch varieties every time I make this. The rice and beans are both pre-spiced which is why this recipe is so easy.
-
thomasdiel
- May 31, 2024
You can cook this dish: canh cà tím
-
thomasdiel
- May 31, 2024
You can cook this dish: canh cà tím
-
- Whats going on with this site - 2 months ago
- Mylar Bags - February 27, 2026
- Shot Show 2026 recap - January 22, 2026
- News for the Week 2026-1-12 - January 12, 2026
- News for the Week 2026-01-05 - January 5, 2026
This forum is heavily moderated to keep things valuable to as many people as possible. Full community policies are here. The basics:
- 1. Be nice to each other.
- 2. Stay focused on prepping.
- 3. Avoid politics, religion, and other arguments.
- 4. No unfounded conspiracies, fake news, etc.
- 5. Debate ideas, not people.