Share your knowledge & learn from experts
Because prepping and community go hand in hand
Bye bye landlines? Now how do we connect when there’s no power?
Hi, everyone. I posted this on the Discord discussion but since I know that some people aren’t on that I’m also posting a duplicate question here. My question is about landlines (or more appropriately their alternatives in an emergency.) I LOVE my landline. First, because I talk a lot on the phone and my cordless phone has great sound and is comfortable all around. But also because in a power outage I’ll have connectivity — via a corded phone I have stashed for that purpose. But now it seems like the day is finally coming when the major phone companies will discontinue their copper wire services. What to do? I know that VOIP is available in most areas. I’m not really optimistic that the sound or reliability will be as good as my land line. But the other thing is that VOIP will go down if the power goes down. Even battery backups last only something like 12 hours. Not good in an extended power outage. I’m wondering what folks are thinking in terms of connectivity with remote loved ones or other things we might need to use a phone for if there is no power. I do have a cell phone, but reception in my house is not great.
Read MoreNerd out on everything you ever wanted to know about batteries
I came across a website called Battery University. https://batteryuniversity.com/articles has tons of articles on various battery types, best ways to charge batteries, how to prolong battery life, future technology, and so much more.
It seems like everything we own relies on batteries. Phones, laptops, watches, ham radios, flash lights, power tools, and even our cars.
The articles are in basic English that all of us here should be able to understand and comprehend, but does require a bit more focus than it takes to read a Facebook comment.
Here are a few nuggets I’ve read so far and have been translated into Facebook comment easy reading –
It’s better to slow charge devices than to use an ultra-fast charger. Have a slower charger (1 amp) by your nightstand for slow charging over night. And a faster charger (2 or 3+ amp) in another location for those occasions when you need a quick top off. It is better not to drain a battery fully but charge it more often. Lithium-ion batteries new from the factory start out at 100% capacity and lose their ability over time. Lead acid batteries start out at 85%, and actually gain more capacity as they age, but after hitting their peak will start to decline. Avoid aftermarket batteries and chargers to save some money. They might not have as much capacity or performance and are a safety hazard that take work arounds of knowing when to stop charging. Keeping lithium-ion batteries topped off at 100% actually stresses them out and causes them to decline and age. Keep batteries between 30-80% charge for longest life. This also means though for prepping that it’s important to have ways to charge devices without the grid. Elevated temperatures are one of the biggest contributors to battery decline.Table showing how temperature and battery charge affects capacity –
One last note from myself. Don’t just throw away any electronics or your batteries. Electronics contain precious metals such as gold and silver, and other toxic materials like lead or acid. Best Buy recycles old electronics, or take things to your nearest Apple store for free recycling or they will even pay you for old devices, not just Apple products. https://www.apple.com/shop/trade-in
Read More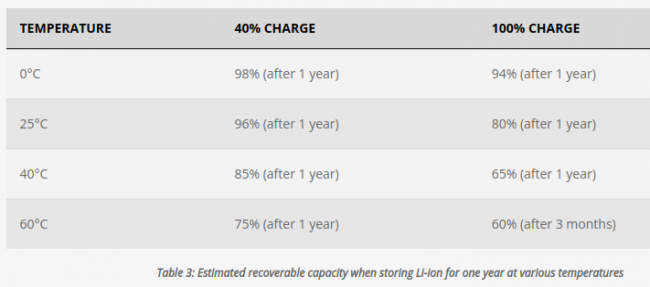
My experience of using a WaterBob during a personal disaster
Recently, on another thread, Advice for a new prepper – hurricane/flood scenario in Florida, I spoke about actually using one of our water preps (for a family of five), a WaterBob.
Biggest Pro: An opportunity to add 100 clean gallons of potable water in minutes without leaving the home. This water is safe to store/use for up to 16 weeks.
Pro: The unit cost of $35-$40 is fairly reasonable. Buying 40 one gallon bottles takes up a lot of space. The WaterBob takes up a small amount of space and can be stored for years and only used during an emergency.
Con: Once filled, the WaterBob is not reusable. If you don’t use it, it will need to be thrown away and another WaterBob purchased to be placed in your storage.
Pro: If you think you may lose tap or well water: Hurricane, public health warning, possible wildfire evacuation, PSPS (California acronym for a Public Safety Power Shut off), or a broken water pump that has to be shut down for repair, this box can be pulled from under your bathroom sink, put in the bathtub, filled with 100 gallons of potable tap water.
Con: Yes, you lose the use of the bathtub. But, perhaps baths/showers aren’t a best idea if you’re short of potable water. One could always take out a few gallons from the WaterBob, heat it on a stove and take a spit bath.
Pro: WaterBob comes with a hand pump included. The hand pump does work. (However, if one doesn’t have strong hands, a new, $12-$14 liquid transfer pump that requires two D batteries is much easier than the included hand pump.)
My personal experience: Family of 5 in rural San Diego county had a broken water pump. In the 3 weeks until that pump could be repaired, we used the 4 WaterBobs from our preps to fill all 4 bathtubs in the two homes on the property. We also used a lot of our stored 16 oz. bottles, 1 gallon water bottles, and 5 gallon water containers for donkey/goat/dogs and to flush the toilets. Showers and washing clothes was done at the home of a nearby family member, and the empty 5 gallon containers were also re-filled at the nearby family member home to be used again (and again….) until the crisis was over.
Even being careful, we used nearly all of the 400 gallons available in the WaterBobs. We were grateful for the much easier battery-powered liquid transfer pumps vs. the hand pump. After the pump was repaired, we actually tried to see if the WaterBobs could be dried and reused, but after 3 weeks of use, it was not feasible, so I purchased 4 more for $140. Even at $140, this was still cheaper and easier all round than getting 400 potable gallons any other way. (Trust me–we explored ALL of our many water redundancies first!)
Feel free to provide your own pro/con statements. If anyone else has actually used a WaterBob for any reason, please tell your story.
Read MoreAdvice for a new prepper – hurricane/flood scenario in Florida
I am a new prepper currently getting ready for a hurricane/flood scenario ( I live in Florida). Any advice, particularly on handheld water filters, which I don’t know if I can trust
Read MoreNuclear disaster and water purification
So, obviously we have quite a bit of water for emergency use, but at some point the stored water runs out. Does anyone have some good information on the best purification of water after nuclear disaster. I have read a combination of reverse osmosis and carbon filtering….
we have 2 wells on the property but one has an open holding tank 1500 gal which is great for most other disasters, but nuclear disaster would contaminate this one. We do have another and a well bucket, but concerned water would be contaminated by pulling it up or even through the ground.
Read MoreDressing up ramen
I’m looking for ideas on how to dress up Ramen to make a healthy meal. So far I’ve tried an eggs with a little sauerkraut. Anyone else?
Read MoreThe grape trellis analogy
I was thinking about Redneck’s muscadine harvest and tried to think how it relates to being prepared.
Correct me if I’m wrong, but grapes, muscadines, beans, and other climbing plants won’t do very well if you plant them in a flat bed with nothing to climb on. They need something called a trellis. This could be something orderly and fancy like this picture, or even a chain link fence.
Because this sturdy scaffolding provides stability and direction for the plants to climb, they can grow healthy and strong and produce lovely produce for us.
This picture is from Redneck’s post, linked above. It’s a great example to me of a bountiful harvest.
We are the grape plant, and if we try and just go off and prepare on our own, we won’t grow very well. We need a good trellis, a good piece of scaffolding to give us direction, and something to lean on. I have tried prepping on my own and I often make mistakes, waste money on bogus products, and try to climb onto things I shouldn’t. The Prepared has been that trellis for me. It has been a source of stability, rational thinking, and good product reviews and the results have been a healthy strong plant/prep and delicious fruit/being prepared. And because I now have delicious fruit, I can share that with others who then will plant the seeds from that fruit and start their own prepping plant/journey.
Thank you to all the wonderful staff here at The Prepared who have been master gardeners. You have built a strong trellis for me to climb on, and through the forum have shaped, pruned, and watered me to grow my best.
Read More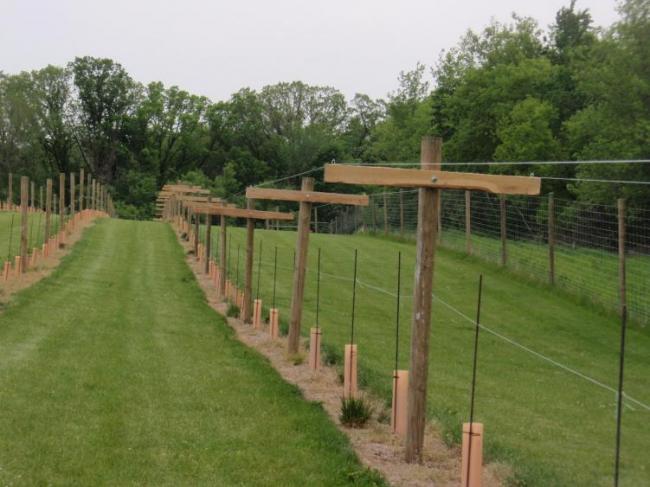
(small) Ebola outbreak in Uganda
https://www.nature.com/articles/d41586-022-03192-8
tl:dr 64 people infected, 30 died, epidemic is 1 month old, different strain of ebola than the big epidemic in west africa 2013 to 2016. We’ve developed vaccines for this strain and tested them for safety, but we don’t know if they work or not and we don’t have many doses.
Hope to god it doesn’t spread. Hope at least one of the vaccines works.
I really thought we dodged a bullet with the big epidemic some years back. At the time, I was very worried that if it spread out of the region in any meaningful numbers it would be impossible to stop and would kill tens of millions or more globally. Having seen just how badly our societies and governments have dealt with covid, I think the hazards were in retrospect, even worse.
Worth keeping an eye on.
Read MoreArticle about “Best Before” dates
I hope it’s appropriate to post here, but I think that as preppers, we probably pay particular attention to those “use by” dates – I know I do. I review my inventory according to “use by” or “best by” dates, but I’ll certainly be more reluctant to toss foods that are beyond those dates. best-before-labels-scrutinized-food-waste-concerns
Read MoreI just love watching Canadian geese fly over!
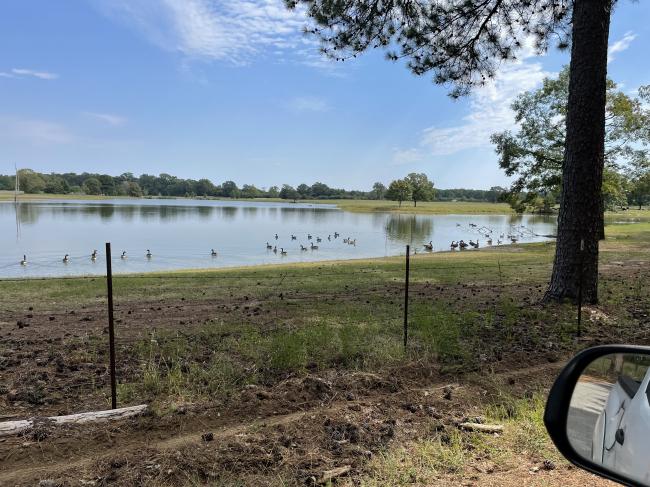
It seems out house is on the local Canadian geese flock’s flyway between a neighbor’s lake and maybe their feeding grounds. Every day, the geese fly directly over our house on the way to the lake. I assume they use our house as a beacon to locate the lake. They fly over all during the day, from morning to evening.
I find the Canadian geese to be beautiful & graceful in flight. I love listening to them honk. This morning, while working in the garden, a larger than normal flock flew over. Made my day! I took a picture of part of the lake that they head to, which is just a couple of hundred yards from our house, on our lane.
Read More
Switch replacement amperage
I have a nilight lightbar which I have wired to my starter battery. The rocker switch that it came with is a 12v 20amp switch but that switch does not fit in the dash- and I don’t want to custom install it. I found a switch that fits perfectly in the blank spaces but it is a 12v 16amp switch. My question is how do I determine if the 16amp switch is sufficient for the application?
Read More10/4/22 Great price for Life Straws
Costco has LIFESTRAWS on super sale now – 4 pack for 40 bucks!!
That’s cheaper than the price we got for them as a retailer…….
A great stocking stuffer or party favor?? 😉
Why all the bottled water?
I am seeing news stories, featuring people buying cases of bottled water – in my opinion, an unnecessary expense….
Granted, potable water in THE basic necessity, but I have never had problems with tap water, properly stored and at times, I have used raw water, properly treated ( usually boiled). Commercial water is a waste of resources.
Right now, I have about 17-25 gallons of jugged tap water, ready for thee next earthquake or whatever.
Read MoreCan you just use bleach for safe long-term water storage?
I have a question,
I have a few water totes and barrels. Can a guy just use bleach for long-term water storage, keep it out of the elements, and how long will that last? Do you have to use aquamira?
Read MoreIphone case with camera cover?
Hey Folks,
Has anyone come across a decent phone case that has built in sliding front and rear camera covers? I now there are a few on amazon but the reviews don’t look so good and it seems that the covers break rather quickly with limited use? The little sliding stick on covers are okay for the front but suck for the rear cameras.
thanks,
Jesse
Read MoreHow long would white flour last?
Hi y’all. I live in a country where it costs a ton to get cool prepping stuff (like oxygen absorbers and vacuum sealed bags and such) so I’m trying to think through extending the shelf life of white flour using what I have. Let’s say I fill a food-grade bucket and lid with 5-pound bags of flour, each sealed inside a gallon ziplock bag and then closed the bucket with the lid and kept it at room temperature out of direct sunlight. The expiration date of the flour is 6 months from its production date, but how long do you reckon it’d last in the situation I just described? Thanks!
Read MoreComplications an HOA brings to prepping
Where I am looking to buy a house either has areas without a Home Owners Association and the neighborhood is pretty run down or houses in an HOA that are nice and well kept. Looks like HOAs attract certain people and do their job at keeping up the curb appeal.
Now I am a person who will keep up their house. It will always be sharp and clean looking, HOA or not. And I want to live in a neighborhood with like minded people who feel the same way. BUT…. from what I am seeing, HOA’s also bring with them some not so friendly rules that would make me feel restrictive and also not allow me to prepare how I would like.
I asked my realtor to pull the HOA rules for two properties I was looking at. And just for an example, both site that only domesticated animals were permitted, which means I cannot have backyard chickens. And one said you cannot erect a tent on the property. I get it, no having loud and messy animals or turning your house into a dump with bunches of tents and temporary shelters. I see why they said those things, but at the same time that means I cannot even go practice camping in my backyard?
For those who live in an HOA, do you find it restrictive to your normal life and also to your prepping life?
Read MoreBackyard fitness activities for weight loss
Aerobic gardening
Aerobic exercise is considered the most effective way to lose weight, and aerobic exercise for half an hour to an hour a day is very effective for fat loss. People rarely associate aerobic exercise with gardening, but the truth is that the role of gardening is not limited to beautifying the backyard, there is much more. According to authorities, being active in the backyard for 30-45 minutes can burn up to 300 calories.
Digging. Digging up dirt in a garden or greenhouse tent is one of the most common tasks for every gardener. But it’s hard to think that sustaining half an hour of digging will cost you 186 calories, roughly equivalent to the calories spent on skateboarding or cycling.
Weeding. When you do weeding tasks, you can add some strength training, such as doing proper squats and lunge exercises to exercise your core. You can also exercise your triceps by the way. For every half hour of weeding, you’ll burn 172 calories, which is the same number of calories you burn for doing aerobics.
Backyard Trampoline
If you think a solo backyard workout seems too boring, invite your family to join you! Trampolines are great for exercisers of almost all ages, and they’re so popular that no one can resist a sport that makes people look cool.
The beauty of trampolining is that you won’t find it boring, and, well, you’ll grow to love it!
Even if you’re just having fun on a trampoline, you can still burn a lot of calories. If you jump on a trampoline for ten minutes, you burn roughly the same number of calories as if you were running for 30 minutes.
A person can burn 500 calories in one hour of jumping on a trampoline, which is more efficient compared to walking and running.
Read MoreHow to prepare for jury duty
I just went through the jury duty process and wanted to share my experience and the things I wish I had known before that would have made it a much smoother process. This is all based off of my experience for the court that I went to and things may be different for you in your area.
Getting your summons. When you get your jury duty summons in the mail, look at the date and make sure you are able to attend. If you have a trip to Europe booked or a surgery scheduled around that time you may want to request a postponement. In my state, you can submit a request to postpone jury duty for another time period within the next 6 months, but you do have to show up that day and can’t postpone again. After that, inform your employer of your scheduled jury duty date so they have proper coverage during that time.
The night before. In my area, you are supposed to call the courthouse the night before your scheduled appearance and an automated system will then inform you if you are to come in or not. One time I called in and it was canceled, so I didn’t have to go after all. Get to bed early and lay out your clothes, breakfast, and a lunch you can bring. In the picture up above, everyone is nicely dressed, but in the jury duty I went to people were in normal casual street clothes. My recommendation is to dress nice, but comfortably.
The day of jury duty. When you arrive you will show your jury duty summons (your ticket to get in), and go through metal detectors. Make sure you left your knives, pepper spray, guns, and whatever else at home. Bring a book to read. After I arrived they had us wait for about three hours before they got started. You could dabble on your phone, but in general they don’t like phones on in courts because they are distracting, you could be looking up information on the case, or you could be recording the proceedings. All of these could get you in trouble and the judge can give you a contempt of court charge or the entire case might go into mistrial. Turn your phone off and bring a book or newspaper to read. Also bring a jacket. Even though it was in the 90’s outside, they cranked up the air conditioning inside and everyone was freezing, including myself. In the courtroom I went to I was permitted a closed water bottle, but no food. So leave your food in your car and have that during the lunch break, and only sip on the water, because they do give you bathroom breaks, but if you really have to go, you don’t want to hold up the entire court if they are in the middle of something.
Jury selection. There were about 100 of us selected and eventually that gets whittled down to 12 jurors and 3 alternative backups. They will ask you a series of questions to see if you are going to be a good choice to be on the jury and will be fair and impartial. If the upcoming trial is only going to be a day or two, they probably won’t ask a lot of questions but the trial I was scheduled for was going to go on for three weeks because it was a pretty serious crime. So voice any issues you may have of sitting in on a jury during that time period. Things such as being a member of law enforcement, being a victim of a similar crime, or even being a single mother of five children with no options for child care could get you excused.
Pros and cons of serving on a jury. Most likely if you are reading this you are a citizen of the United States and are subject to receiving a jury summons. The Constitution gives us this great privilege to be judged by our peers and not just a judge. So being able to serve my community in this way was something I was looking forward to. There are some hardships that come with it however. In my state, your employer is supposed to pay you for the first three days of jury duty, but after that the court will give you $50 a day. If I had been selected for that three week trial then that would have put some serious hardship on my family if I only made $50 a day. Have some emergency savings that you can live off of if you have to go through a trial like this. If you are a business owner, set procedures in place to have various shifts covered if one of your employees has to go through this. One poor lady there had previously served on a federal jury for 18 months! I don’t know how if payment was different for her, but could you live on $50/day for 18 months? That’s when tapping into savings and food storage would be helpful.
Read MoreAny ideas for how to fit solar panels for solar generators in a small back yard?
Hello, everybody. I’m back on TP after a LONG absence. I just bought solar panels for solar generators. They arrived today. Kind of exciting. This is my first venture into trying to recharge my sogens from the sun. I got these two panels:
Now I have my next problem. I didn’t realize the solar panels would be so big. Each of the two Allpowers is 7 ft long. The only place I have to put them is my back yard, but my back yard is small and there is some obstruction from trees and other plants. I don’t know if I can fit two of these things side to side. I’m wondering if there’s a way to arrange them in a more compact way? Perhaps one set of panels on some card tables and the other one on the ground underneath? Are there any frames or something out there I might get to stack these so they both get sun?
Another problem is security. My back yard has a chain link gate that’s a little under 5 ft tall. Even with a lock someone in good physical shape could climb it pretty easily. And the fences on two sides of the yard are pretty see through. Now, I’ve never had theft on my property, despite it being a very urban neighborhood, and my back yard is removed from the street. But if someone spots two large solar panel arrays, plus a generator sitting out there, what’s to keep them from hopping my fence and stealing them? These are some of the most expensive items I own!
Read MoreFlood preps & emergency raft recommendations
Seeing all of the flooding over the last week has moved prepping for floods to the top of my list of missing items. We are in a flood zone and have insurance. Our house was also built with the first floor 8 feet above the 500 year flood maps and flood vents in the foundation. We have a large stack of pre-prepped sand bags too. Along with power outage, food and fresh water supplies.
However, our location is surrounded by roads below flood level and they are they only exit from our area. High ground is several miles away as the crow flies.
We have an axe for the attic and life vests for the kids. (Life vests for us are on our list.)
One thing I know we’re missing is an emergency raft and paddles. Any recommendations for that? Preferably in the under $200 range?
Any other items specific to flooding, especially flash flooding, that you can think of?
We live in the vicinity of two powerful rivers (one of them dam fed approximately 80 miles upstream) multiple creeks and holding ponds. Good chance for significant debris, chemical, and sewage in flood waters. With enough notice we would evacuate pre-flood. If our home is habitable, we would shelter-in-place. So, for the raft and attic supplies, they would be last resort/caught by surprise/no other options.
Read MoreLate summer means it is muscadine picking time!
I love this time of year. It is still hot and for some reason, the past month has been exceptionally wet. My gourds and pumpkins are growing nicely, the rattlesnakes pole beans are finally producing now that those extremely hot days are gone, the okra needs picking every 2 days… and the muscadines are ripening. Oh, the flavor & sweetness packed into those grapes is almost beyond belief. My wife is gonna make a batch of jelly with the ones I picked today.
Muscadines are a great crop for warm, humid climates. It requires no spray and disease isn’t an issue. You do need to prune each winter, as grapes are born on new growth. I have around 100 row feet of muscadine trellises and they bear lots of huge, juicy grapes. About half are the bronze variety, called scuppernongs which I actually prefer a bit more than the black (very dark red), but my wife prefers the dark red in making jelly because it makes a nice red jelly.
Read More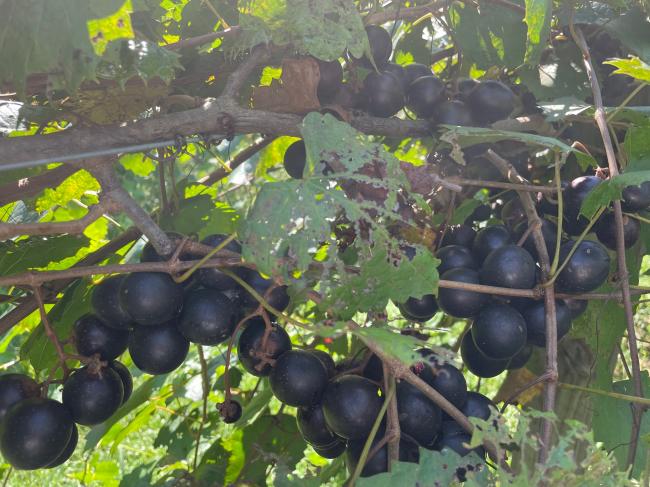
Potential large scale nation-wide Railroad Strike this coming week
I just found out from a close friend—who works for the railroad—that there is a scheduled nation wide union strike beginning September 16 if their demands aren’t met. They are asking for a much needed pay raise, and to change the draconian work laws that only guarantee them 4 days off every 3 months (otherwise they are constantly on call and required to go when called).
If it’s transported on land, it’s probably transported by railways — trucks typically only do the shorter hauls. Think about what you may need and maybe prioritize it early this week. We’ll be grocery shopping, topping off fuel tanks/cans, and restocking animal feed. Historically these strikes are quickly ended by Congress, but even a delay of several hours impacts thousands of trains and the supply lines are already struggling. (An analogy would be if all the nations airports closed for several hours or longer — how long would it take to catch back up?)
I did some research and found this article (there are more):
https://www.hklaw.com/en/insights/publications/2022/09/rail-strike-could-cause-supply-chain
(I also posted this on Discord — but I’m not “Discord fluent” yet and it seems like things get lost or quickly passed over there if you’re not staying on top of them. Probably just me.)
Read MoreLightweight and cheap hand saw for your bug out bag
In a forum post that I can’t seem to find now, a member shared the World’s Lightest Backpacking Saw. Coming in at only 3.95 oz (112g) this minimalist collapsible saw would be a great addition to throw in a bug out bag. However, this commercial product is no longer being made. So if I wanted one, I was going to have to make one myself.
I am going to share two designs that I came up with so this type of saw will be accessible to those on a tight budget with no tools to work with or if you want some additional features, you can take it to the next level. Video of completed product at the end of this post.
Design #1 – Cheap, quick, and minimal.
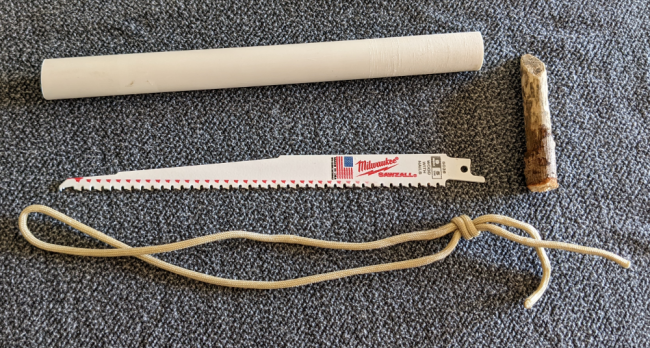
For this first model, you will need to get a 9” or 12” sawzall blade from the hardware store ($4-$8), a 9.25” long ½” diameter PVC pipe ($3) (they can help you cut it at the hardware store or you can use your saw blade), a piece of paracord, and a small stick the length and diameter of your finger.
This is really easy. Thread the paracord through the hole in the saw blade, stick the paracord through the pipe, tie a knot at the end, thread the stick through the hole of the paracord knot and twist until the blade is firm in there.
That’s it!
Design #2 – Slightly more expensive, requires more tools, but has more features
This design does require a bit more work, but is far superior in my opinion. One of the things I didn’t like about the commercial product and Design #1 is that you had to store your blade next to the handle and it had potential for cutting up other gear in your pack. I wanted a larger diameter tube in Design #2 to be more comfortable in the hand, and offer a storage space for the saw blade inside.
With the larger diameter tube however, the saw blade would just slip through. To fix this, take a ½ inch diameter 1” long piece of PVC pipe, sanding down the outside until it fits snuggly inside the ¾” pipe, and apply some PVC glue to keep it secure. By doing this, it creates the necessary diameter for the saw to sit in while still maintaining the ability to store the saw inside the handle. An additional modification that I did with Design #2 is to cut slits in the ½ inch pipe so that the blade has a secure slot to sit in and won’t spin around when you are tightening down the rope.
You can just stick with threading the paracord through the hole in the blade, or go with the cotter pin attachment that the commercial version uses. I don’t really see the benefit of the cotter pin besides being able to remove the rope without having to untie the knot, or maybe distributing the tension between two points instead of one. I probably wouldn’t bother buying the cotter pins again, but if you want to I’ll show you how to bend and use them.
Get some ⅛” X 1” cotter pins ($1.25/pack of 5) in the nail and screw aisle of the hardware store, thread it through the hole of the saw blade, pinch slightly up on the cotter pin with some pliers and bend the legs of the cotter pin over the pliers teeth.
The finished product will look like this.
Another modification I made with Design #2 is to sand little ridges in the base to lock in the stick better than a smooth surface. The commercial product gets around doing this by just really cranking the line until it won’t move and holding the stick while you saw, but I like the grooves better. You can recreate this by wrapping a pencil in sand paper and running it back and forth over the end of the pipe.
Comparing the DIY version with the commercial product.
To be honest, I like the PVC pipe version much more than the commercial product because of the low cost, and additional features.
Comparing Design #2 to the top recommended hand saw in The Prepared’s Best survival handsaw article, the Silky Gomboy costs and weighs three times as much and doesn’t have cheap easily replaceable blades.
The commercial product uses a better rope called Zing-it that is lighter weight, stronger, and doesn’t have any stretch. I couldn’t find Zing-it anywhere cheaper than $27 for a roll and the paracord works perfectly for me, so I am sticking with that.
For $1 more, I could have gone with the superior saw blade that the commercial product uses, the Diablo carbide teeth blades. The reason I went with the Milwaukee blade is because that fits inside the ¾” PVC whereas the Diablo blade was just slightly too wide. In the future, I would like to get the Diablo blade and grind down the wide spine so that it will fit inside the handle. The commercial product also went with a long 12” blade which is much faster at cutting with its longer draw length, but for this compact version I stuck with a 9” blade. Here’s a short video showing what the Diablo blade can do compared to a similar sized Fiskers saw.
There is enough room inside the handle of Design #2 where you could have both a wood and metal saw blade. Perhaps you have this in your bug out bag and use the wood blade to cut firewood or build a shelter with, and the metal blade could be used to cut a chain link fence or padlock if you are stuck somewhere and need to get through during SHTF.
Video of completed Design #2
https://youtu.be/ltvS1SPyACc
Read More