Share your knowledge & learn from experts
Because prepping and community go hand in hand
Tips for pets? – Pet Preparedness
What are peoples plans and more importantly tips to dealing with pets in a situation where bugging out is prudent? We have two cats, both are leash trained and very easy to get into their crates. Travel by car is a non issue for them. We also have a gallon bag of food for them in my bag. I am worried about having to ditch the car though. Any hints on supplies we should have, training we should do, or any other things?
Read MoreDisaster Burnout – How to recognize it and what to do about it if it happens to you or the people in your group
Life in a state of global pandemic has taught us all a thing or two about stress, boredom, frustration, fear, anger, and grief.
In the early stages of the pandemic, people mounted shopping campaigns to secure as much toilet paper as possible. Frenzied shoppers scrambled to buy the last 20 pounds of flour and hoped there was still yeast left at the end of the grocery aisle.
Job hours were cut back or entire days trimmed from schedules until finally people were laid off for lack of work.
As the year wore on, people used credit to pay for expenses. Savings accounts were raided and left empty. Some countries offered financial assistance, but that assistance was finite. Those at the end of the pandemic financial programs stood on the precipice of a big, black void. What next?
When would this pandemic finally end and life would go back to normal?
Stress set in as the financial pressures mounted. Domestic relationships imploded under the weight of pandemic stress. Was it financial? Was it from spending just a little too much time together?
Or, were relationships failing because the pandemic had changed people? Partnerships are hard to maintain when the people in them turn inward and away from the other.
People had lost loved ones and were unable to even visit in the hospital as their family member lay dying. Proper funerals weren’t allowed and the associated community support for grief that comes with the ritual of a funeral.
The preppers who were better prepared at the onset of the pandemic still had to cope with many of the issues non-preppers faced, like job loss and grief.
I was prepared for pandemic and increased my preps before it was declared. It was nice to have PPE’s and a very well stocked pantry including non food items and I am grateful for that preparation.
But, today I am as weary of the pandemic as everyone else. When the pandemic was declared, we were all given a new set of rules about how to live. Masks and social distancing became the equivalent of little bubbles around us, invisible boundaries never to be crossed. We lost the ability to connect with each other in a spontaneous and joyful way.
When was the last time you were truly, spontaneously happy and carefree?
Even a visit with a generous supply of preps doesn’t perk me up.
I feel like the kid in the back of the car: “Are we there yet?”
Burnout is present when you go to sleep knowing that the next morning will probably not be much different.
Burnout is knowing that other people feel the same way and they are as powerless to change the pandemic as you are.
If the pandemic were a bus, I want to get off now, please.
One definition of burnout is physical and mental collapse.
Whenever I peer over the edge into these dark corners of prepping that are easier to ignore, I learn something that makes me a stronger, wiser prepper.
I don’t hide from the mental and emotional aspects of disaster because if I did, then how could I recognize burnout and the need to address it?
I feel my emotions and ride through the difficult ones so I can learn to manage them better when unpleasant situations provoke them.
So, here’s what I’ve figured out about burnout during this journey through a pandemic.
Any prolonged disaster is going to eventually provoke burnout. We are human and there is no point pretending that it won’t happen to us. Everyone will arrive at burnout sooner or later and want off the bus, too.
Remember the footage of the end of World War II from various countries? People were hugging and kissing and jumping into each other’s arms. Some were dancing in the streets. People were ecstatic because the war was over.
If all those people hadn’t been burned out, then their reactions would have been much different. “Oh, really, it’s over. *Yawn* How nice.”
We need to plan for burn out in ourselves or in our group. Burnout looks like depression, hopelessness, and fatigue. A person who is burned out is a jaded person who has had enough of the circus and just wants to go home.
Burnout can cause us or members of our group to make mistakes and errors in judgement that can have dire consequences.
Burnout if not addressed can affect the morale of the person’s group. It adds to their stress.
Every person has a different way of coping with burnout. If it happened to me in a high stress job, I changed jobs, fields and went off in an entirely different direction in order to challenge my brain and skills. It became a way to learn new things in a new environment and shake off the heaviness of burnout.
If the burnout wasn’t from a job, I took up new hobbies and taught myself new things from college level books that I put aside in my library.
If it was a relationship, it got better or I got out. Life is too short to live in a state of burnout, disaster or no disaster.
Burnout comes from working our brains the same way day in and day out. The remedy is to do something different. Change one big thing or a bunch of little things. Get creative.
Take the negative things that happen during a disaster and turn them into opportunities for learning.
Don’t ever completely grow up. Reserve a part of yourself that is free to be a child. This will help you remember how to play and not take yourself too seriously. It is invaluable in a disaster to be able to build a fort in your living room or dissolve into hysterics over a silly joke.
Laughter displaces burnout and drives it away.
My Mom, who survived the long occupation of The Netherlands in WWII, told me how they would laugh and make silly jokes, even during the really bad times. Sometimes, they sang or played games or talked about “some day” when it was over, what would be the first thing that they would like to do.
But mostly, they laughed because when they laughed they felt stronger, in their spirits, an intangible untouchable part of them that no one could steal from them.
Until she died at 86, my Mom was often mistaken for a woman much younger than her years. She still sang and her giggle was infectious. Her spirit was as strong as ever and no one could ever steal it from her.
When the going gets really tough in a long term disaster, I will deal with burnout by remembering her example.
Read MoreWhat’s worth canning?
I’d like to ask a question (ok, 2 questions) to the folks who are experienced with canning fruits and veggies:1) What fruits & vegetables do you prefer to can and what do you prefer to freeze? (Set aside the issue of the power going out and the freezer defrosting…)2) What fruits & vegetables have you canned that you won’t can again – because of the effort involved, change in color/texture, shift in taste, equipment needed, etc.
Thanks in advance!
-WS (a canning newbie)
Read MoreDigital preparedness
Full disclosure: some of the staff here know more about this than I do (I’ll likely link shamelessly to their past affiliated sites…) I realize this is a niche topic but wanted to contribute where I could.
If you think of Preparation along the lines of Maslow’s Hierarchy of needs, digital preparedness might be a bit closer to the top in terms or rarity rather than urgency/importance (The base of the pyramid is *more* important than the top, remember) but in situations that fall short of a full grid-down disaster, information can be critical (you are [probably] reading this on a website, after-all!).
You can also think of Digital preparedness as a meta-prep, along the lines of financial-preparedness (of the mutual fund/savings/retirement account variety, rather than the gold/silver investing kind) – something that might help you along the way in anything short of a full-blown apocalypse.
Nothing will ever take the place of learned skills or reference material on printed paper (some digital media you can print out!), but in situations where you’ve prepared for power outages and have your food/water, shelter, and safety taken care of – information certainly can’t hurt. Even if digital preparedness isn’t essential to your survival scenarios, it can also be helpful for simple organization and maintenance until you have more important things to worry about (similar to financial preparation, where ideally you’ve got savings and retirement accounts in order – and use them as a base to build on your other preps in the event that your savings and retirement accounts don’t exist anymore for exigent reasons).
Password managers If you buy things online, do online banking/investing, pay bills online – You should really seriously consider a password manager. They can be a small pain to set up at first but it also forces you to organize and take stock of things. The better ones will be able to export to standard formats for backup and portability. Good ones integrate with your phone and computer. See more here: https://www.wired.com/story/best-password-managers/ Two Factor Authentication By now it’s common enough that you probably have the option for two factor authetication (gmail, your bank, etc). Enable it. If you enable it you need to also consider redundancy. Some sites that offer two factor also provide one time use reset codes – you have to save these and get a limited number. You can sometimes designate alternate cell phones for two-factor like a trusted family member or friend (or a second backup phone if that’s your thing). There are different types of two-factor such as cell phone, email, software, or hard token. Personally I’m OK with cell phone based but your risk-convenience trade offs may differ (and i use a combination of them). Facebook and Google both have options as well (how much do you trust them though – not saying you shouldn’t just that you should think about it first). For more information: https://www.wired.com/story/two-factor-authentication-apps-authy-google-authenticator/ Identity Protection Credit FreezesI’ve had my personal information breached at least 4 times that I know of (no true identity theft, but it’s out there for the taking). Most identity monitoring services tell you when it’s already happened, to [help] prevent it from happening in the first place consider a credit freeze (in the US). A credit freeze is different from a credit fraud alert – credit fraud alerts are temporary but a credit freeze you control and can turn off/on at your discretion. Want a new credit card? Ask the provider which bureau they use and then unfreeze the relevant one – you can even set them to be temporarily unlocked and re-enabled after a set period of time. It’s not perfect but it may be a deterrent. You will need to record some private pins/codes – make copies and put them someplace safe you will remember, you might only use them a couple times a decade so plan accordingly. For more info (I always look for the ftc.gov in the link): https://www.consumer.ftc.gov/articles/0279-extended-fraud-alerts-and-credit-freezes Credit monitoring
You can pay for credit monitoring if you want (be warned, Equifax had a breach, this is about deterrence, nothing is 100%) but many banks and credit cards offer less-formal credit monitoring options. I have two separate options and I check them each 1-2 times a month, they’re easy to get to and the next best thing to formal paid services. Consider multiple credit cards For the longest time I had one credit card. I also paid for everything by credit card (paid it off in full each month). Once every year or three someone would steal my credit card info and I’d be without a credit card for the 5-10 days it took to replace. I was not prepared. Now I have two, one stays in my wallet and one at home locked up. Also a check card but i avoid using that for my own reasons. Be aware of the impact on your credit score – opening new accounts/cards can cause a hit at first. You want to balance your credit usage and consider not having a completely inactive card – less of a guide more of an FYI/proceed with awareness (FYI – my at-home card is used for car insurance so it gets some mild usage). For your second+ credit card, consider a different bank (you might get different free services, like that free credit reporting). Also if one bank gets breached, all your eggs aren’t in one basket (good for money management too I’m told, but thats another topic) You need to consider not just yourself but also anyone you have a joint account with (you may want to reassess your joint accounts – which may have credit score implications if you close older joint cards). If you are married or have kids, you might want to consider having those chats with anyone you are financially entangled with. Know your public information – If you own property, your name is probably in (multiple) databases linked to your address(es), unless you have an LLC/trust/shell company obscuring your identity. If you sign up for a grocery store “bonus” card they’re probably selling/sharing your data with someone who is aggregating it. Not trying to stoke your paranoia or encourage you to change your legal name – just be aware of what you “give out” for free. Google yourself and see how exposed you really are (sometimes, having a common name comes in real handy, hard to distinguish from all the others!) Data backup/archival Do you have files, photos, reference materials, or personal memoirs on your computer that you want to keep forever? Do you have a backup plan? There is a lot to consider but sometimes a simple external hard drive and a monthly backup is enough. Off-site and cloud storage are other options. Dry acid-free archival quality paper is one of the longest lasting information storage media invented (short of stone tablets?) – but it’s not as portable or convenient. For smaller scale storage, or prep-related storage, you might consider a USB key (think home owners insurance, backup codes for finances, medical records, etc). There are different types with different features, some claim to be quite impressive. I *HAVE NOT* vetted this myself, but if you want an upgrade from a basic USB stick for a go bag – something with encryption and security features might appeal to you (seriously do your homework, I’m interested in this but haven’t researched it yet): https://www.ironkey.com/en-US/ If you care – many social media and communications platforms allow you to export your data en mass for local use and backup (I *think* you can thank EU data laws for that?) – so there are ways to backup all your facebook photos or emails if that kind of thing is important to you (i’d argue a high quality usb stick with a digital family album stored on it weighs less than the real thing if your house burns down). Webpage archival Have you found an article or web page you’ve found helpful and might want to reference in the future? Maybe you’ve saved it in your bookmarks – what happens when the internet goes down or the website is taken down? Saving web content offline can be both easy and frustrating. Dynamic content can be generated on the fly so even if you “save as” to your PC, you might get a blank template when you open it. Luckily there are solutions: A simple but slower solution is to “print to a PDF.” It might take 2-3 steps and can be annoying to organize but it will work offline and you can save to your USB/backup storage of choice if you choose to. Sometimes it messes up formatting but is usually readable. A solution I like (which I *think* can be configured for both offline and cloud based storage) is Apple/Safari Reading lists. Once set up this (in theory) offers me one-click offline storage that (can potentially?) be synchronized across devices. It’s very much an apple ecosystem tool though. Bonus – from what I’ve read safari is better for battery life on Macs! There are a number of built in and third party options for this, some with cloud synchronization options. Too many to research right now, but you have options depending on what works for you. Prep logistics Google “My Maps” (https://www.google.com/maps/about/mymaps/) is basically user-friendly digital cartography for the masses – now if you’re a high profile public figure with a secret underground bunker (a general category not a specific reference) you might want to not share that info with Google. But if you want a list of your friends, family, and locations to consider on the way to a secondary location that are all public knowledge anyway this can be useful. I mostly use this for planning/brainstorming and personal organization (i would not suggest for an emergency but i would suggest to help you make a hard copy map for emergencies). I’m unsure if their printed maps are any good but you might be able to make it work. I believe you can also save these “off line” on your mobile device, even when the internet goes out. Google Docs and Sheets – OK, I’m lazy, there are alternatives for the security conscious but for everyone else, it’s useful to organize. Contact lists with phone numbers for emergencies (to print out!) and put in your bags – and update as needed. Scenario planning if you like to write to help you think, even renovations for your primary or secondary residence (if you have a location to “bug out” to). Supply lists for future purchases. It’s just an organizational tool Accounting – part of the financial meta-prep again. Since most of my purchases are off amazon it’s easy to see what I’ve spent and what it got me. I literally have a spreadsheet tallying my prep expenses over time (useful for reassuring the spouse you aren’t “going overboard”) Surveillance Wireless cameras – I need to do more research here. Arlo cameras look appealing to me but I think they require an internet connection to be useful. Ideally I’d like a wireless-radio camera system, battery powered if possible (even if it uses wifi as the radio mechanism but *does not* require an active internet for monitoring – for scenarios where safety is a concern but you still have power but maybe not internet) Car dash-cams – This was a suggestion off a random prepper site before I settled on The Prepared. There are versions of these that are set up to record while you’re parked using a battery backup if disturbed or simply record while actively driving your car under power. After one too many close calls with bad traffic I invested in this more for proof in case anyone tries to sue me but it might have other applications – I like my BlackVue 1 channel with wifi, but I’ve yet to be in an accident with it, so a little hard to test. Radio/Communications ThePrepared has an article on ham radios that you should read (https://theprepared.com/survival-skills/guides/beginners-guide-amateur-ham-radio-preppers/) – because my particular breed of “preparation scenarios” gears towards government censorship and net neutrality I’m prone to imagining how ad-hoc mesh networks work or trying to figure out what you can do with a HackRF One software defined radio… but hey, we all need our hobbies. Cell Phones Backups – both backup your data and consider having a second phone as a backup. Backing up your phone is fairly easy, you might do it already but you can go to 7-11 and buy a pay-as-you-go cell phone with a prepaid plan in case your cell phone breaks (is stolen, lost) when you *really* need it. Be sure to set it up with relevant numbers. You’ll need to consider battery charge and storage if you don’t use it frequently. While you’re at it, consider memorizing a couple of important numbers – in case you’re ever arrested (or your battery dies) and don’t have your cell phone to look up the number you need for you one phone call you really need to make. Privacy Consider what kind of encryption your cell phone supports. For example, Apple has something of a reputation for privacy of mobile devices (i think?) but other vendors may also. Consider what privacy laws apply to forcing you to unlock your phone. Consider if you trust police or a third party aggressor to honor your rights with regards to fingerprint or face based phone unlock features. Sometimes an old school strong pass-code is better. Warning: politically adjacent link, but it has valid politically agnostic (and up to date) advice regarding technology usage. Please don’t ding me for linking to this! https://www.wired.com/story/how-to-protest-safely-surveillance-digital-privacy/ Devices If you have the means and interest: laptops, tablets, and smartphones are various form factors that are portable. If it is important to you – you might consider having an old one in a tiered go-bag system (again, consider battery charge issues), or at least having one you can grab on your way out the door. ThePrepared has reviewed solar chargers that are appropriate for cell phones (and tablets?) https://theprepared.com/gear/reviews/portable-solar-chargers/ There are other semi-portable (certainly in a car) solar panel and battery options that might recharge a laptop. Again, take care of the base of maslow’s needs first (food, water, shelter, protection) but *if you want* there are options available to you. Read More
How to communicate with out of town family during a grid down situation?
I need to resolve how my family will communicate with my parents and teenage sister who live three hours away should the grid go down. I’m not technical, so it’s not something I know where to start researching. But, my husband is technical enough to set systems up since it’s not my strength.
If cell towers and land lines go down during hurricane season (common where we live in North FL), a possible Russian cyber attack (increasing likelihood given the current global situation), or EMP, how do you communicate with others from a distance?
Having done humanitarian work with refugees in Italy and Ukraine, I know how to use blue tooth technology to communicate when cell towers aren’t available. We don’t have HAM radios and I imagine walkie talkies have a short range. But, if the electric is out entirely? For months?
Are satellite phones dependable during an EMP situation (if stored in a faraday)? What are other options? I’d like to invest in this for all family households, totaling three families (my husband’s parents as well in Kentucky), so I’d like to not break the bank, but if I have to…
This is one of those things that keeps me up at night as we have a toddler and are very close to our families. I’ve only found vague or shallow information on this issue. Nothing that breaks things down with clear directions.
Many thanks in advance for your time!
Read MoreCreating a prepping team
No man is an island and no one can succeed in a disaster alone. Mad Max, The Omega Man, I Am Legend, even The Road had guys going it alone against the post-apocalyptic hordes. But that’s not realistic. A truly prepared individual will surround themselves with like-minded others who have diverse skill sets.
The question I have is how? How do we find these people? I’ve been looking. I’ve joined groups, I’ve been on other forums. I want to enlist the people in my community, but do so without coming on like a desperate weirdo or paranoid gun nut.
Where do y’all go to find others?
Read MoreNuclear power plant failure…options?
So I was perusing the beginner prepper guide and was thinking about things I should start with to better prepare me and my family for emergency situations. I live in Kentucky and happened to see the map for nuclear power plants and wondered about the fallout should the ‘world go dark’ scenario – government collapse etc. So what I was wondering was…how far could you live in a place near a nuclear powerplant and not have to worry about things like fallout or radiation poisoning in the water and air? At least not enough to have to move… I’ve included an image that shows the current location of nuclear power plants and the link (Global Map of Wind, Weather, and Ocean Conditions) to a website that shows the real-time wind/weather patterns (quite beautiful actually). I obviously don’t know much about nuclear power or what their procedure is should they need to power down but I imagine it wouldn’t be pretty if they had to be shut-off permanently? I do know that in the event of a power failure they recommend everything outside of a 100mile radius to evacuate. Any references would be greatly appreciated as I really enjoy a good research rabbit hole but a starting point does help. I guess I’m just not sure how much energy and resources should be spent in a place that would prove unlivable when nuclear power fails and starts affecting the environment.
Read More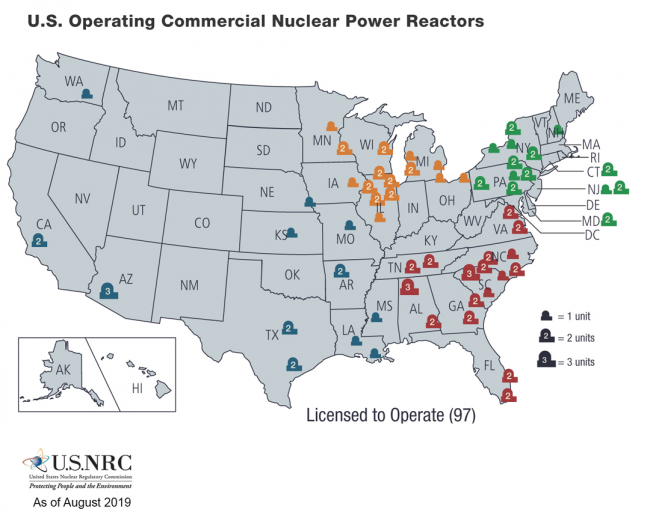
“Reasonable” preparations for a nuclear conflict—picking a place to live…
Hey everyone. Brand new to the forum; really cool to find a site with such comprehensive resources for common sense preparedness.
I’ve been working on some minor preparedness here and there since COVID started a couple of years ago. Events in Ukraine are now causing me to accelerate and take things to the next level. Specifically, and sadly, I am concerned that we have crossed a threshold where the prospect of a global nuclear conflict will be a real possibility for the foreseeable future.
I have two young kids and am determined not to take a passive stance, leaving my family’s fate completely in the hands of the government. I’m also as yet unwilling to go the other extreme (living completely off-grid in a bunker). So I’m asking myself, is there a middle ground?
I’ve started reading Nuclear War Survival Skills by Kearny. I’m finding that there are indeed actionable strategies that any sufficiently determined citizen can take. But the big question I’m grappling with right now is—do I want to relocate my family?
Currently, we live in the southwest corner of the Denver metro. As I understand it, Colorado is a pretty target-rich environment for nuclear strikes. But that brings me to question number one:
Does anyone know of any up-to-date resources available to the public that assess the risk of nuclear strikes by geography? I know that missile silos, air force bases, large civilian runways, etc would all likely be the first targets. Possibly major cities after that. But I’m wondering if any agency or individual has aggregated all these risk factors into one map.
Based on my limited reading so far, it does seem that if one is located outside the primary blast radius, steps can be taken to sufficiently protect against fallout such that one could at least survive the initial strike and the following ~2-4 weeks of heavy fallout. So I’m trying to determine if there are places I’d actually be willing to live that might be far enough from the most likely targets.
Has anyone researched this before? Curious what you’ve found?
Read MoreFood storage/self reliance
I applaud that you are advising (like the Red Cross) to have 2 weeks of shelf-stable food stored, however, it’s rare that disasters occur singly. There are always cascading effects. FEMA, quite quietly, advised a few years ago not to expect them to show up for a week (previously it was 3 days and that’s after state governor declares disaster). So a scenario might be that a disaster happens, then you have to self quarantine for 2 weeks. Or you lose a job and it takes a month or more to find a replacement. Professional searches have been known to go for months.
So building your storage can and probably should be gradual, buying what you eat and eating what you buy.
At the other end of the continuum are the Mormons (LDS church) who take it as part of their faith to prepare to survive for a year (or more) on stored items and have tools to plant during that year for the longer haul.
I’d say 1 weeks worth of self reliance is a good start, but then extend the goal to a minimum of 3 weeks if you have the storage capacity. Shelter in place is often the best strategy for many disaster scenarios.
Read MoreDo I need more than a whole house generator?
I have a natural gas line into my home and a 22kw whole house generator that automatically kicks on when the electricity goes out. It can easily power everything in my home, including my gas furnace (necessity) and my whole house a/c (a nice luxury during a summer outage). The primary worries in my area are winter storms and high-wind storms (including tornados, although I don’t live in “tornado alley.”) My question: “redundancy” seems to be a key concept in prepping, and I’m beginning to wonder if over-reliance on my generator for heat and electricity is wise. Thoughts?
Read More1 gal water containers for storage
I’m new to prepping, and I’m working on water storage. My sister and I live alone together, and we aren’t particularly strong, so we want to store a portion of the water in 1 gal containers. Those will be easier for us to carry and use, especially for short-term emergencies when we might not even need to break into our 5 gal containers.
From reading The Prepared, I understand that we shouldn’t use cheap plastic containers like milk cartons or soda bottles. Would a beverage cooler like this one be appropriate? https://www.walmart.com/ip/Coleman-1-Gallon-Beverage-Cooler-Jug-Blue/23787717? My concern is that it might not seal securely enough for long term storage.
If this won’t work, can anyone suggest an alternative 1 gal container? Thanks in advance!
Read MoreLooking for ideas for nut-free snacks for my backpack
Since long before I got actively interested in preparedness, I’ve been in the habit of carrying around a well-stocked backpack with all sorts of stuff I might need (extra layers of clothing, ibuprofen, bandaids, mylar emergency blanket, zip-seal bags, etc.)
One thing that, for some reason, I’ve never gotten into the habit of carrying, but now think I should, is some sort of food that I could eat either if I’m just out and about and get hungry, or if I get stuck somewhere with just my backpack for some reason.
I have the impression that a lot of people carry protein bars for this purpose. Protein bars generally contain nuts, though, and I have a severe nut allergy (which is all the more reason it would be wise for me to carry food around, since it’s harder for me to find safe food while out and about than it is for most people).
When I do buy snacks, they tend to be things that aren’t really suitable for just keeping stored in my backpack, such as potato chips.
What are some suggestions for snacks I could carry that wouldn’t take up too much space in my everyday backpack?
Read MoreFilling 5 Gallon Water Jugs – From the Tap or Filtered?
Hey all. I just bought a bunch of 5 gallon Scepter water jugs. I feel silly asking this question, but here goes… What is the best way to fill them?
I’ve been searching around and found lots of info about cleaning them. I plan to use baking soda. I’ve seen people recommend bleach which freaks me out: bleach in drinking water?? What am I missing?
Do most people fill these from the bath tub? That thought doesn’t bother me, but my wife is a bit crazy about tap water, is convinced is really bad to drink tap water unfiltered. I explained to her that if we ever need this emergency water, that’s likely to be the least of our concerns. But she was asking if maybe a couple of them could/should be filled with filtered water. How would you all think about that?
Thanks in advance for any suggestions.
Read MoreKnowing who has what skills
So this is a new forum, and it could be a lot of different things, depending on what we make of it.
One thing that I think might be very useful is to have an idea of what the assembled skills and expertise of the members are. If I have a general idea of who knows/is good at what, I know who I can ask for advice on various topics, or ask to weigh in on a thread, etc.
I’m not even sure a thread is the right format for this in the long-term (it might get unwieldy to sift through with size/age), but just as a proof-of-concept, I thought I’d start it in this format. I’ll make an example post under this one.
Read MoreHow to escape 2nd floor bedroom in case of fire
Do y’all have an recommendations for gear or protocol for escaping a second story bedroom in case of a fire between the bedroom and the stairwell that leaves the house?
I searched the forums and didn’t find anything.
I’m thinking a window breaker and some sort of collapsible ladder.
Read MoreWell use without electricity
Does anyone have a good solution for accessing your well without electricity? We live in the country and have 2 wells which is fantastic. We do have a generator and solar power which can feed electricity for the well, but I want an option without electricity. Something that is maybe a hand pump that could be added to the existing wells. Does anyone have a system you like or love? I would love to hear about your ideas and equipment.
Read MoreHow do you label your food storage buckets?
If you’re storing long-term food or staples in airtight containers and 5-gallon buckets, how do you label them? How do you tell which containers hold which food?
For a long while I have been using masking tape and a sharpie – just write the food type and storage date on the tape, and apply new tape as needed. I see some previous threads on this too.
But recently I thought it would be nice to have a more visual element – adding some easy-to-recognize icons and shapes.
I created a quick document using public domain graphics to print icons for different types of food – you can find it here.
https://docs.google.com/document/d/1Hwm0QAT6t3cCjPS1GJ-C3rswFoq1r-Zcw04ZBzApCAM/
Please feel free to copy, edit, or share.
I would love to hear if anyone else does something like this, or if you find this useful.
Read More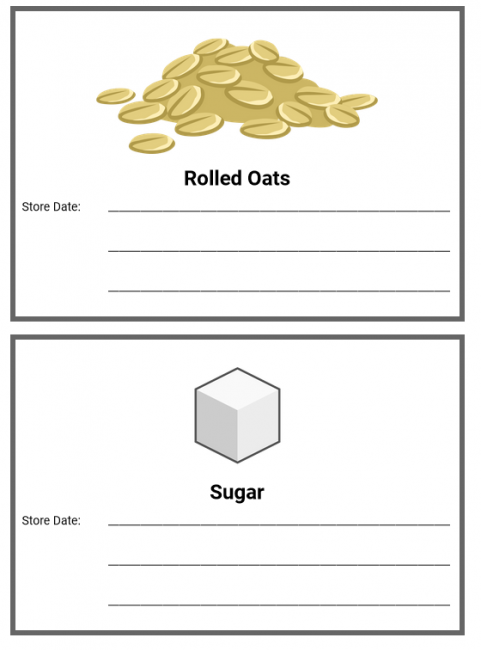
Stop the Bleed course (free)
You may be the very first responder. It’s critical that you know what to do to save a life. A person with a hemorrhaging wound can “bleed out”/die of exsanguination in three minutes.
Check in your community for a free Stop the Bleed course. You may find it online, but it’s better to take in person as you will practice packing a hemorrhaging wound on a realistic model. You will learn when and how to apply a tourniquet.
Also, I was able to get, for free, the basic first aid course for which the American Red Cross charges $100 by joining the county Medical Reserve Corps. About 40% of the volunteers are not medical personnel. Hopefully they will offer it again soon as covid restrictions are being loosened.
Read MoreDIY custom maps for print & reference
TL;DR – it is possible to make custom print quality maps, in some cases very quickly (though your first try may not be quick!). That being said it is also possible to waste a lot of time and money making less usable or useless maps. The following is an attempt at quickly “getting started” for technically savvy but otherwise novice users.
Try at your own risk, for what its worth I probably added more detail than strictly needed, I’m not 100% sure how approachable this guide will be but its offered in good faith, your mileage may vary! Once you have this down its really only 4 [main] steps that can be done in less than half an hour unless you want to do something fancier.But first, what I’ll be showing:
Above, a small “zoomed in” section of the final map as exported to a digital PDF file (the “misaligned” building/parcels are a data issue, not a software issue and acceptable for my purposes)
Roughly the same area on the printed poster for quality comparison ordered via Vistaprint (image darkness more a factor of my poor photography skills). Keep in mind this is less than a 5 inch wide segment zoomed in (it’s smaller than my iPhone 13 mini). The text quality is mildly disappointing compared to the original but otherwise this is actually pretty good quality IMHO, showing the ‘warts’ on purpose to be transparent.Above, a zoomed out view of a 36″x48″ poster sized map with the top/bottom cropped to hide my poor poster mounting skills (Again, I should have changed my photo settings, but photography is not the point of this post).To create your own version, in 5-7 somewhat “easy-ish” steps:
QGIS is an open source Geographic Information System (GIS) application. While this application is capable of a wide variety of tasks, one task it is suited for is the creation of maps for printing. This tutorial is a “simple” crash course in creating a custom map suitable for printing on either a home printer or a commercial service such as a Fedex-Kinkos or Vistaprint poster.
Note: Steps 4 & 5 are strictly optional, OpenStreetMap is often pretty good. Many sub-bullet points are FYI, assuming you leave default settings alone or don’t move/close something by accident this can go pretty fast.
Step 1: Download the application.
QGIS is available for most major operating systems, most users should be able to make use of an easy to use installer though advanced users may want to consider specialty options. Note that as an open source application this software is community driven and supported, including documentation and online help. The user interface may include subtle changes between versions which may result in slightly different workflows. This guide was written for version 3.20.3 on windows but should be broadly compatible with recent versions (users have the option to download older versions at their discretion).
Step 2: Open the application and add OpenStreetMap background layer
Open the application and navigate to the File Menu, select “New”] Make sure that the “Browser” and “Layers Panel” panels are visible If needed these can be added by going to the “View” menu, select “Panels” and make sure “Layers Panel” and “Browser Panel” have checks next to them Note that the panel layout/position can vary and that some panels can have tabs. Panels can be reorganized by clicking and dragging them as desired.Above, an example of “tabbed” panels in case one is not immediately visible
On the “Browser” panel, locate and expand the “XYZ Tiles” option, OpenStreetMap should be a preloaded option available. Double click this option to add it to the map. This should load a streaming map service (requires active internet connection) as a background reference layerStep 3: Navigate to an area of interest
QGIS includes a number of navigation tools such as pan and zoom, these should be displayed by default but if absent can be added by going to the “View” menu, selecting “Toolbars” and then making sure that “Map Navigation Toolbar” is selected Use the pan and zoom buttons to find an area of interest (Pan = first icon, click and drag with mouse, zoom controls are icons 3-10) If your mouse has a “middle mouse button” (oftentimes the “button” is your scroll wheel) you can “pan” while clicking and holding the middle mouse button. You can also scroll with the mouse wheel to zoom in and out. Equivalent trackpad gestures should also work. As you zoom in the streaming Open Street Map reference layer will add more details. Other data sources can be loaded however this is a useful “first step” in many cases.Above, global scale of OpenStreetMap Layer
Above, zoomed in to the same layer with more detail automatically displayed.
Step 4: Add more data (optional)
Note: Steps 4 and 5 aren’t strictly needed if you’re happy with the OpenStreetMap details. Much more data exists for free and you are largely limited only by your time and patience. Feel free to skip to 6.
The benefit of using a curated service, such as OpenStreetMap is that most of the design and display options are preconfigured and are often “good enough.” OpenStreetMap data can be incomplete, out of date, or otherwise inaccurate based on community support for your area of interest. Adding third party data and properly designing and labeling custom data can be very involved as many customizations are possible. These customizations are beyond the scope of this introduction however a partial example is provided to demonstrate basic functionality.
Locate a third party GIS dataset (shapefile format preferred) from any appropriate source such as an internet data portal. Examples of data portals can include: https://hub.arcgis.com/search – ESRI is a commercial GIS company that provides a variety of hosted datasets, many (but not all) will be compatible with QGIS Many federal, state, and local governments will have similar data portals, a google search for “shapefile open data download” and then key words related to your geographic or thematic area of interest is likely to return useful results, for example multiple data portals hosted by the state of Virginia can be found here: https://data.virginia.gov/ (includes non GIS data too) https://vgin.maps.arcgis.com/home/index.html (more specific to GIS data, note the “arcgis.com” domain, many organizations make use of this software to host their data) When searching for data, each website/source may provide a different user interface, the following points are worth keeping in mind Different file formats of GIS data exist, the most basic/universal is called a “Shapefile” and will almost always be compatible with QGIS “Shapefiles” are usually bundled as anywhere from 1 to 8 different files that all share the same name but have different file extensions. The file with a “.shp” extension is technically the “shapefile” file, however if you do not also receive a file with the “.prj” extension (projection information), the data will be virtually useless without a fair amount of extra work. Generally speaking try to avoid changing the names of shapefile and their bundled support files and store them all in the same relative directory. When downloading data you may (but not always) have the option to select the file format, for this tutorial a “shapefile” format is preferred. Most GIS data exists as either point, line, or polygon vector data, when selecting a dataset look for the type and detail you are most interested in. For example, “building locations” can often be stored as either point locations or polygon files. Roads and streams are often provided as line files, but can be provided as polygons as well.Above, an example of download options including Shapefiles, highlighted.
Once a suitable file has been located, download it, extract it if needed (shapefile collections are often provided as zipped collections) and store it at a known location on your computer. Extract the 5 files supporting the shapefile to a known location (note, GIS files can get large), such as “D:\Data\GIS\Tutorial” (your location will vary…)Above, an example of a group of related files, commonly stored in the same place but referred to as if it were a single “Shapefile”
In QGIS, select the “Layer” Menu, then click “Data Source Manager” next make sure “Vector” data is selected, the “Source Type” will be “File” and you will want to navigate to the location where your data is stored. You will see all of the support files for any given Shapefile, select the file with the “.shp” extension and click “Add” Note, large files or slow computers may take a minute Assuming you have all of the bundled support files, most importantly the “.prj” file, you should be able to safely ignore the “options” that are provided After adding the data, click “Close” on the “Data Source Manager” (or simply move it out of the way) and locate the “Layers” Panel, your new layer should be added. If you do not see the layer in the main map window make sure the checkbox to the left of the layer is selected. You can also turn off other layers or click and drag to reorder the layers. You can right click on a layer and select “Zoom to Layer” to zoom to the extent of the layer. When a layer contains very small features spread out over very large areas it may be difficult to see the features, try turning off other layers and panning/zooming as needed.Above, an example of a state wide polygon file using default display settings.
Step 5: Simple Symbology of custom data (optional)
When adding third party or custom data you will likely want to change how the data is displayed. QGIS has many options for this however this guide will only cover a very simple use case. Data symbology can involve many factors including design and aesthetic preferences so it is difficult to provide “one size fits all” guidance.
Return to, or find an area of interest In the “Layers Panel” click-drag the relevant layer(s) to a suitable order. Typically Basemap layers (like OpenStreetMap) should be on the bottom Usually “point” data should be on top of “line” data, and line data in turn on top of “polygon” data, however exceptions can occur. For any given shapefile layer, right click on the layer and click “properties” With the “Symbology” tab selected on the left, you have a number of options and presets for how the selected layer can be displayed. “Simple Fill” should be a default setting, if not available, remove any other options using the red “minus” button and add a “simple fill” using the green plus button, if needed. Click on the shaded color for “Fill Color” and drag the “Opacity” slider to be transparent (0%) Change the “Stroke” color, width, and style to your preferences (for example a light thin gray line) and hit “OK” Repeat Step(s) 3,4, & 5 as needed based on the data you’d like to show and how you would like it to be displayed.Step 6: Preparing a Print Layout
Once data is added to a map, an area of interest is visible, and relevant data has been symbolized the result can be put into a print layout for export such as a PDF file. Many options exist however PDF files are fairly common and support a number of useful print options.
From the “Project” menu select “New Print Layout” and provide a meaningful name if many layouts are expected. A new window will open, leaving the old window accessible as well. From the new Layout Window, right click on the blank canvass (the white square that represents the printable area) and click page properties. In the “Item Properties” panel, under page size select the size map for printing you are interested in. A “custom” size is available “Custom” size unlocks the Width and Height options and a number of units such as mm or inches are supported For example vendors like Vistaprint and Fedex-Kinkos allow for poster prints up to 36”x48” Printing and print proofing is its own sub-discipline, that often includes factors such as the printable area, printing resolution of the printer, paper quality and size as well as other factors. Defaults will be used to the extent possible. From the “Add Item” menu bar, select “Add Map” and then click and drag the approximate size and location of the map you wish to print on the canvass layout Depending on the amount of data and internet connection rendering the map on the canvass may take a moment Once added the map can be resized, and limited repositioning of the map position within the canvass is possible using the “Move Item Content” toolbar tool and click-dragging or mouse-wheel zooming Be sure to revert to the “Pan Layout” toolbar tool once the map content is positioned correctly. Using the wrong tool for switching between the map position and the layout tool can be frustrating so it is usually best to handle with care. Most printers can not fully print to the edge of a piece of paper so it is advised to leave a small border of “white space” For more exact control of the map item’s placement on the printable canvass, right click on the map area (make sure the “Select/Move item” toolbar tool is selected!) and click item properties. Under “Position and Size” you can enter in finer details about your placement. A bit of math is required relative to your printable area. For a 36”x48” canvass the following is suggested (make sure to use the upper left “Reference point” if using these numbers (in inches): “X” = 0.5 “Y” = 1.5 “Width” = 35 “Height” = 44 Traditionally Maps have Titles, credit data sources and other design elements. These can be added from the “Add Item” Menu, for example: From “Add Item” select “Add Label” and draw a label at the top of the page for a title Right clicking a map item and selecting “Item Properties” will expose relevant options such as a text box to add custom text (usually filled with “Lorem ipsum” by default) and options for changing font, font size, font color, etc. From “Add Item” select “Add Label” and draw a label at the bottom right of the page for data credit details Data is often subject to copyright and terms of use. This is especially relevant for any map you might share in a public setting (such as a tutorial!) however public domain data and personal use exemption are quite common for open data sources. OpenStreetMap has a generous but specific copyright and requests language to the effect of “© OpenStreetMap contributors (openstreetmap.org)” should be added In this example Virginia Department Of Transportation is listed as the author of the parcel data used and has a custom license that does not specifically claim copyright but rather a disclaimer that amounts to “use at your own risk” As a rule of thumb most data provided by governments will either be public domain or have generous terms of use, though aggregating quality data does take time and money it’s often provided as a public good (your taxes at work!). Exceptions do apply, for example it is technically possible (though probably illegal) to stream Google Maps imagery tiles into QGIS. Just because data is accessible doesn’t mean it should be accessed. Adding a scale bar is recommended for printed maps. Export PDF for printing From the “Layout” menu bar, click “Print…” and note the warning about streaming services, however this option appeared to produce a usable PDF file while testing.Step 7: Printing large format maps
If you select a normal 8.5”x11” canvass and have a home printer you should be able to print following your normal printer procedures. PDF files can usually be opened by web browsers or free software. In fact starting with smaller maps on a home printer is advised to get a sense of print-related issues prior to spending more on larger formats.
Large Format maps can be obtained from retail printing services that produce poster style products. For example both VistaPrint and Fedex-Kinkos have online tools. Some print vendors may have additional options that allow for oversize prints that are non standard.
As previously alluded to, printing and print proofing is a sort of subdiscipline of its own. VistaPrint provides a “Digital Proof” that attempts to be more representative of actual print quality but you should be aware that a print vendor will simply print the file they are provided. If you provide a file that is low resolution and highly pixelated, to the point of being unusable, you will probably not get a refund. There are steps you can take to mitigate this, for example PDF files can support vector based graphics and text meaning that the hypothetical upper limit of the print quality should be dependent only on the hardware rather than the data file but determining how to most effectively make use of these features is beyond the scope of this guide. As demonstrated the PDF export and resulting print may not always be 1:1 perfectly representative.
All this is to say: be careful, you might spend $60 on a map that looks good as a PDF but prints terribly based on a setting during export.
That being said, this is something I’ve been wanting to do for myself for ages and since I finally found a good/easy enough way to do it, I thought I’d share here.there is a lot of online help available, I may be able to answer a few questions if something I wrote above is unclear but keep in mind I don’t necessarily check here daily.
If you do try this and find it useful, I’d be mildly curious about what other use cases are out there. If someone has a good idea I might be inspired to do a follow up (no promises though!).
Read More
Survival playing cards
I went looking for these thinking there would be many good options. I wanted something inexpensive that contained some useful survival/first aid information on the faces. Everything I found was either very expensive and/or had terrible reviews. Does anyone know of a good option that I haven’t found?
I did come across multiple printer shops that would print playing cards for you. If I could find free/open sourced/non-copyrighted survival tips and diagrams then doing it myself could be an option.
Read MoreHospital go bag
When both parents started going into the hospital a couple of times in rapid succession, we put together Hospital Go Bags with items needed for comfort, privacy, and entertainment. The document package stayed in our cars as well. We did use the bags thereafter.
Hospital Go Bag
Leave personal medications and tobacco products at home. Clean out wallet of credit cards and large amounts of cash. Leave jewelry at home. Hospital has no responsibility for stolen valuables. Policies may govern if you can have electronic devices. If you’re uncertain whether to bring a valuable, ask yourself if you’re willing to lose it. If not, keep it at home. With a small amount of money you can buy newspapers, etc.
If something goes wrong with a day surgery, you may be admitted to the hospital for a time. It’s best to plan for that contingency.
Inventory of the bag contents. Date when last inventoried.
Gov’t issued photo ID and insurance card
List of emergency contacts (phone numbers, hard copy), including primary physician, ride home, clergy
Healthcare documents such as personal health history (with allergies, conditions, medications [name, dose, administration times], doctors, immunizations, history of major illness and surgeries), dietary restrictions, Advance Health Care Directive (meds and procedures you either will accept or not accept), Power of Attorney for Healthcare, General limited or durable Power of Attorney, Living Will, optional Do Not Resuscitate (Allow Natural Death) order. Recent reports, x-rays. Bring documents in a single bag or envelop.
Crutches, walker, cane, other assistive devices for use after surgery.
Mobile phone and wall charger, extension cord. Hospitals may have a policy if electronic equipment interferes with patient monitoring equipment. Check before going if possible.
Dental hygiene items (brush, paste, floss)
Personal hygiene items: nail clippers, comb/brush, shampoo, conditioner, skin lotion, deodorant, lip balm, shower shoes (flip flops). Shaving kit. Feminine hygiene products.
Special needs products such as denture cream.
Eyecare (contact lens kit, glasses, cleaning cloth). Glasses may be easier to deal with than contacts.
Eye mask, ear plugs. Contrary to what you believe, you are not in the hospital to get rest. Staff may awaken you at such hours that it is difficult to sleep. Be prepared to complain. They can do better.
Full change of clothes, a couple of changes of underwear
Light robe? Non-slip slippers
Entertainment of some kind, cards, puzzle books, book/magazine to read, religious book
Notebook, pen. Note details of any incident, any verbal instructions that are not documented. Journal?
Photos of family, friends.
For kids, favorite (stuffed?) toy
Any other staff-recommended items for a planned hospital admission.
Read MoreApartment window protection
Hi Preppers, We live on the 7th floor of a pre-war apartment in NYC. My question: Is there a way for us to put protection on our windows on the interior of our apartment in the event of a hurricane (or civil unrest or…)? Even better, if these shutters are not hideous and fast and easy to deploy? Any ideas? Has anyone put up the bolts for hurricane fabric? Thank you!
Read MorePrepping with special needs kids
Hi all,
I’m new to prepping and decided to get sorted after recent covid/ridiculous storm/potential war.
We have 3 aspergers boys who only eat certain foods and certain brands only.
Please note they can detect between tap and bottled water so swapping food item brands is not an option. Neither is ‘when they are hungry they will eat’.. once the three of them refused to eat for 3 days on holidays, to the point we were worried.
This leaves us dependent on the freezer (to store preferred foods). Do I just buy generator? If so, any suggestions (UK)?
Thanks!
Read MoreAnti-nuclear normal apartment in eastern europe – is it a good option?
All cities in eastern europe, even small ones, have been built in the idea of surviving a nuclear attack. Many, probably 30% of flatblocks, also have an underground anti-nuclear room where the family can retreat into in case of a nuclear attack. Even small, 100k enhabitants cities that would not be a nuclear target have them.
What do you think about this kind of apartments? Their location is generally not good because if things go south, that’s where the frontline will probably be. But some ex-soviet countries like Slovenia or Kazahstan are far away enough from the action.
Would such a standard, anti-nuclear soviet apartment be a good option? What would be the best location? I suppose in a city in the mountains, below 300k enhabitants so that it’s not even a target unless all the nukes get fired. Should it be in a NATO country or in central asia? What would be the prons and cons of such an option?
Read MoreBug Out: All you need to know
For who have paying attention to news, all of you certainly know about the war between Russia and Ukaraine, yesterday I saw some of the refuge fleeing from their home in news, some are carrying duffel bag, while some using travel case with wheel, I can only shake my head for this one, despite living in a country that has high chance for war to happen, they are not prepared for the Bug Out, so I guess I will share my knowledge here for those who need.
This article is not intended to replace this post: Emergency kit / bug out bag list , but as a supplement to it. Bug Out means to leave your home and go to some place for better survival rate.
1. To Bug In(Stay at your shelter) or Bug Out:
Now first and most important, know if you should bug out. For example:
When hurricane heading your home = bug out
When war started and you are in the city = bug out
When your house is on fire = bug out
Civil unrest = depending on your country, and where you live
Food price rising = bug in
Power outage = mostly bug in if you have supply in home, otherwise bug out
As you can see, bug out is the last resort to take, that means its either you have no supply at home or staying at home would make your life in danger, otherwise you should always bug in.
2. Vehicle
One of the most ignored and most important, when bug out, you will want to leave as fast as you could. Most people, despite prepared or not, will bug out when noticing danger is coming (hurricane, bombing, etc), and most will bug out in four wheeled vehicle, which make the traffic jam happen. So the best choice is to bug out with motorcycle or bicycle, or just with your foot.
3. Location
If you are bugging out, certainly you will want to go to a safer place. In most natural disaster, the bug out location is hotel, or your parent’s/grandparent’s home, but there are also chance where these place are not accessible and you need to settle in abandoned building woods (there will be more about this later)
4. Bug Out Bag Content
Now after all the important parts, its time about the things you want to carry when you are bugging out:
Water: Water is one of the most important things for our survival (beside air of course), you will only need three things, a stainless water bottle, water filter, and collapsible water bottle.
Stainless water bottle is important since you could boil water in it, which kill the virus and bacteria. (You can also do this in mineral water bottle in emergency, it might be bad for your health, but its better than dying in thirst)
Water filter could make dirty water able to drink without boiling (which is important if you can’t light a fire due to some reason), I always choose water filter that could filter out bacteria, chemical (heavy metal), and virus. If you stay in a city you might not be able to find water from stream to purify it, but if you happen to find a small water puddle, you can still use the filter to purify it, so don’t ditch the water filter even if you planned to stay in the city.
Collapsible water filter are used to collect dirty water so the filter could purify it, however most filter could work with normal soft drink bottle.
Tools/Entrance Tools: One of the most important things in the backpack, which include a knife, multitool, tungsten glass breaker, small axe/tomahawk/machete(big knife), folding saw.
Knife is important for a lot of things, a survival knife in your pack should be around 3-4inch, full tang and made with durable material.
Multitool is essential for a bug out bag, simply because it have so much function. One of it function is bolt cutter, which might be useful if you need to break enter an abandoned building.
Tungsten glass breaker, usually located on a tactical pen or as addon to a multitool, can be used to break glass, which might be useful if you need to break enter an abandoned building.
Small axe/tomahawk/machete(big knife), depending on your location, is important if you are bugging out into the woods/rain forest. In some country like US which could become very cold during winter, axe or tomahawk is very useful to produce firewood even if you are not bugging out into the woods. Machete(Big knife) is important for tropical environment since there are thick under bush in the rainforest.
Folding saw is very useful if you want to cut furniture into firewood, or simply want to cut hardwood, using saw for hardwood save much energy compare to axe or machete.
Shelter: Depending on where you want to stay, you will need different things. If you are bugging out to hotel or friend’s/parent’s house, you could skip this. If you have no choice, you could either stay in abandoned building, or just bugging out into the woods. Please keep in mind that you will not live happily forever in the woods like some preppers imagined, you only stay in abandoned building/woods until the disaster/war is over in your area. If you are staying in the woods, you will need a tarp to keep rain off your head. But tarping is not easily mastered without practice, especially if you are alone, so remember to try setting up tarp when going outdoor, or just at your backyard.
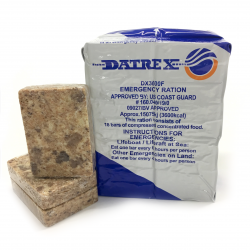
Food: While human can survive longer without food compared to water, food is also essential to provide energy for every day work. I only recommend ration block, while they are not that tasty, they last long, provide multiple day of energy, while being small and not so heavy.
Example: Datrex ration, which could last 3-7days, weight is between 700-800 grams
Clothing: There are 2 type in this category, normal clothing and extra clothing.
Normal clothing: What you currently wear and are comfortable to you, pack a pair of extra into the bug out bag.
Extra clothing:
Gloves: Important to prevent blister in heavy work suck as splitting wood, or just keep your hand warm.
Shoes: Assuming you have your shoes nearby, you won’t have to pack extra in the bug out bag.
Rain gear: Being wet could cause cold which is deadly in disaster, you will need a rain gear to keep your self dry, Most people use Gore-Tex jacket these day, but I keep a tarp poncho in my bag which work to keep me dry while also work as shelter, just choose whatever work for you.
Winter/Cold Jacket: If your region is very cold during winter, remember to wear one if you are bugging out during winter, otherwise keep one in your backpack.
Medical: Medical supply is also important, but don’t just buy a medical kit, they are lots of useful article which tell you how to build an IFAK, while they are true, the most used item in a medical kit is normal pills for common illness, or some plaster and bandage, be sure to NOT overlook these simple content while building your IFAK.
MISC:
Lighter: Your average BIC Lighter should do, just bring 2-3 of these.
Paracord: Any rope are just as useful as your knowledge, paracord is also useful for setting up tarp, just bring 50-100ft of this.
Light: Headlamp is better than torch since you don’t need to hold it in your hand, if your headlamp is aa/aaa battery powered, remember to bring extra battery.
Toilet paper: Mostly you will use water, but just incase if you couldn’t find water.
Sharpening stone: Keep your tools and knife sharp, I personally use Fallkniven DC4.
Toothbrush: Even without tooth paste, could brush off leftover from your teeth, wont make your mouth smell fresh but at lease you wont have cavity.
Spork: Utensil is important since you won’t have much water to wash your hand.
Nail clipper and ear spoon: Stay outdoor for 2 weeks and you will know how important these things are.
Duct Tape: Very useful when you need to fix or make something.
Pen and paper: Useful to write down your plan or leave note for others.
Battery: Depending on the situation, a 10000-20000 mAh power bank should do for your headlamp and phone, if your headlamp use aa/aaa battery, don’t forget to bring extra.
Mood booster: During hard times, its important to stay sane so you could make right decision, some people bring card or board game, some bring photo of their loved one, whatever you choose, keep it light and simple.
5. Weapons
In disaster, you will need a way to defend yourself, just remember you will need to practice with what you choose.
Guns: Pistol, shotgun, riffle, whatever you choose, make sure you know how and are prepared to use it.
Spear: Always choose gun if it is legal in your country, otherwise simple spear is the best as long as you have the space to wield it.
What not to choose:
Sword: Require so much practice only to be defeated by spear.
Knife: I stab you, you stab me, then we are both dead. While knife is a useful tool, it should not be used to fight unless you have no better option.
6. The bag itself:
The bag should be the last item you buy, so you could know how much space you need. Your bag should be very durable, so it would not fall apart when you need it the most. Keep it mind that your bug out bag should be able to keep on your back COMFORTABLY, that means no duffel or any wheeled case. Also don’t choose camo color as it would make you look like a military unit if you are in a war region.
My Golden standard: Cordura 500D (or Nylon 1000D) and above, YKK Zipper, good carrying system, good hip belt.
I personally use Tasmanian Tiger backpack because its simple and works, other brands like 5.11 and Mystery Ranch also meet my standard. Just choose what you like and are comfortable to you. Even you want something lighter (my backpack weight 2.1 Kilograms without anything), anything 400d nylon with YKK Zipper, good carrying system and good hip belt should do, but keep in mind you are sacrificing durability for weight. Don’t worry about the greyman tactics unless you choose camo color, you wont be much different than the bugging out crowd.
My backpack which carrying everything I need.
Feel free to give some suggestion and if you have any questions, just ask below.
Read More