Share your knowledge & learn from experts
Because prepping and community go hand in hand
Best jacket/outer layer for the BOB?
I am looking for advice for a light-weight, space conscious (and hopefully budget conscious) option for my outer layer of clothing in my BOB. Right now I’m using a ridiculously bulky sweater, which is taking up way too much room. I don’t necessarily need this layer to be waterproof as I’m thinking of purchasing a cape/shelter thing for rain.
Here are my considerations:
I’m a large person. Short, but big around. (and I prefer men’s clothing) I’m in Northern California. Our evenings can definitely get chilly, especially in the winter, but not usually below the mid 40s. Really cold winters have gotten into the 30s. I get hot easily, although in truth these days my temp regulation is kind of wacky and I can also get cold the next minute. But generally I don’t like to get too hot and don’t tolerate heat very well. I’m on a budget. I don’t have a lot of money. I do put aside about $45/month for prepping and I will save up for a more expensive item, but price matter. I don’t have a lot of space in my BOB — which I guess is true for most of us.So, any suggestions?-
Read MoreIf we prep skills, we should also prep to trade them
A post I saw elsewhere got me thinking about this. We talk a lot about acquiring useful skills for a crisis, but if we are really well prepared, we should also prepare to engage in the trade of services (and goods) in a sustained situation. I don’t just mean being available to help others, but actually planning to establish a tradeable service as part of your prep.
People can’t stay isolated forever, and they will need help from others, not just stuff. Plus–as we know from basic economics–trade improves social relations and amplifies human capital in groups. Some examples that have occurred to me:
– Get the most extensive first aid skills you can, and plan to set up a small minor-injuries clinic; have tons of extra medical supplies and something you can set up into an exam table.
– Set up a small daycare
– Offer to clean and break down game for others
– Security services
– Psychological support
– Equipment repair
You could trade these for cash, goods, or other services. I think this is important because you can’t possibly acquire every necessary skill. Since most of us are in cities or even rural areas that aren’t super isolated, should this be something we discuss more? When I started thinking about the services I could offer, I started feeling less worried about all the shortfalls in my current preparedness. I’m interested in your thoughts.
Read MoreHow are you doing? Times are stressful, keep an eye on how you are handling things
How are you doing? No seriously… think about it. Take a moment of reflection of how you are feeling. Put things on scale of 1-10 if that will help you. Think about the various areas of your life, finances, physical fitness, job, family life, hobbies, etc… Are you living balanced or is one area out of wack? It’s important to be in tune with your body and mind, we often get so busy and overwhelmed that the ship might be sinking underneath us (our mental or physical health), but we are so focused on the horizon.
I’ve been struggling lately with everything just being so expensive and there isn’t really any end in sight. It’s making it even harder to save money for the future and my “fun money” for hobbies and recreation is smaller than ever. So I guess my main worry is the economy.
We are all strangers here, feel free to open up and vent to others here on how you are doing. I’m at least here to listen to you if you need it.
Being prepared brings comfort and reassurance. Guess I just need to prepare more. If I had lots of gas and food stored, I might not be as worried about all the rising costs of everything,
Looking back on old forum posts I came across this one with some good advice: Philosophies for good mental health
Read MoreTurn off your WiFi when you don’t need it, and other tips on how to prevent hacking and tracking
A recent article by Bleeping Computer summed up many of the dangers of leaving your WiFi turned on which many people might not be aware of, and the solution of turning off your WiFi before you leave the house is so simple that I thought it inherited a post of it’s own. Check out the article for the full technical explanation but here is my quick and dirty summary:
By default, most smartphones search for available WiFi networks all the time, and connect to them if trusted. About ¼ of the time, your phone searches for a WiFi signal and broadcasts the name of past networks you have connected to which are then stored in WiFi routers you pass. Passwords to previous connected WiFi networks (like your home or work) were also leaked during this broadcast. Having your phone always broadcasting WiFi probes has tracking implications. Your phone is always being tracked by other radios like your cell connection, but why add one more point of tracking? Many stores already use WiFi and Bluetooth probing to track their customers’ position and movement to see what items and areas they are most interested in. Hackers set up fake hotspots with popular network names, like Starbucks, and your phone may auto connect to it and now the hackers can watch all your internet traffic and intercept things you are doing.What to do to minimize your attack surface from easiest to hardest.
The thing you should get in a habit of doing is to simply turn off your WiFi when you are leaving your home. Not only will it save battery by not constantly sending out probes for networks, but it will reduce your attack surface quite a bit. Turn off your phone, put it in airplane mode, or put it in a faraday bag when you don’t need it. An easy thing you can do is to remove previously connected to networks that you no longer use like that AirBnB you stayed at last winter. Disable your device’s ability to auto-join a network. That way it won’t connect to some hacker’s fake WiFi broadcast under the same name as one you have previously joined. Update your device’s operating system. Newer versions have better security and can offer settings which help minimize some tracking. Turn on MAC address randomization. This is your device’s address on a network so your router knows to send that data you just requested to you and not your kids on their device. If your MAC address is the same on every network you connect to, it is easier to track you than if you have your device randomize that address for each different network you connect to. If you do need to use WiFi somewhere that is not your home and can’t be 100% trusted, only connect using a VPN. So even if you connect to a rouge hotspot or it is being monitored, your internet traffic is encrypted.I am glad that I read through this article and then did a self assessment. I usually turn off WiFi when I leave the house, have MAC addresses randomized, and use a VPN. But when I looked at my phone I have collected 9 saved networks that are all set to auto-connect when in range. So these are constantly being sent out and probed for. I was able to delete five of them and turn the remaining four to not auto-connect. It will just involve one more step of clicking on the network name when I get in range and want to connect to it, but hopefully it will cut down on the amount of information I am sending out and not allow my device to automatically connect to networks I pass. I wrote down the deleted network names and passwords in my password manager so I can easily access those if I ever need them without having to ask again for the password.
Read MoreReview: Joyzis 300W battery pack. A lightweight powerhouse
The Good:
Where this little unit shines is that it only weighs 4 pounds making it very easy to travel with or move around if you had restrictions on how much you could lift. I loved the recessed handles that can come up for easy carrying, or be stowed down for a flat surface and expose the wireless charging pad on top.
The Joyzis has a battery capacity of 296Wh, which is about 8X as much juice as a portable power bank, plus you get the ability to power smaller wall outlet devices like a laptop or CPAP machine. With this capacity, I was able to power my work laptop and cell phone solely off of this battery pack for 2.5 days. And impressively, it was able to keep a portable fridge powered for two full weekends of camping.
In another review, the Xtar power station for some reason caused the keyboard and mouse to glitch when I connected my work-from-home setup to it. The Joyzis however was able to power all of this (laptop, monitor, keyboard, mouse, speakers, and USB hub) flawlessly.
Joyzis offers a one-year warranty with this unit, but you can extend that to two years if you register your product with them. If you want this extended warranty, go to this website or email them at joyzis(at)afterservice.vip. Ignore the service.joyzis(at)outlook.com email address on the sticker on the bottom of the unit, I wasn’t ever able to reach a human when contacting them through this address.
This power station comes with a 60W USB C wall charger which will charge from 0-100% in about 5-6 hours, and a car cigarette charger for topping it off on a road trip.
I was worried when I received this unit that they sent me a European version because the outlet is unlike any that I’ve seen here in the States, but both two prong and three prong US plugs still work in this along with various types that seem to be used in other countries. Pretty neat!
The Bad:
Over a year ago The Prepared was sent over a sample power station but during our testing, the unit suddenly stopped being able to be charged. We contacted the company and they sent us over a replacement and this review is on that second unit.
Looking through Amazon reviews, a large percentage of people have received their unit, lifted it out of the box, and the entire top pops off and is broken. So there are some quality control issues here. The good thing though is that most of the reviews say that they contacted the company and were instantly sent a new unit.
A missed feature on the Joyzis is that you cannot charge this unit and power devices off of it at the same time. So if you had it charging by a solar panel during an emergency, you have to wait until it is done if you want to plug things into it. Also, a bummer if you wanted to use this as a UPS (uninterruptible power supply).
Something annoying that I found with the unit is that the buttons stick out quite a bit and the power button is easily clicked on with the slightest touch, making this a poor choice to throw in a bag. All of the other buttons need a three-second hold to activate, I don’t know why the ON button couldn’t have this ability as well. Funny enough you do need to hold that power button for three seconds to turn off the unit.
Instead of using a display like most power stations, which give you valuable information like battery percentage, load, and how much time is left to charge, the Joyzis opted to use four bright LED bars. But this simple display of remaining battery capacity still left me wondering how much each device was draining and if I was close to overloading the unit or not.
The Joyzis does utilize a PWM charge controller that is inferior to MPPT units in higher-end power stations. It gets the job done, but is not as efficient.
Comparing this to other small power stations:
When comparing the Joyzis to the other two power stations I have had my hands on before, the Xtar is nice in that it has recessed buttons that require a three-second hold time to activate, twice the capacity, and can handle surge watts up to 1000, but at twice the cost of the Joyzis.
In a previous post, I made a power station and while it was a fun project, for the same price, the Joyzis has an additional 100Wh of capacity and weighs a fifth of the DIY option. The Joyzis is small enough to fit inside the 50 caliber ammo can that I used for that DIY project, which could be a nice container to store cables and keep it more protected and waterproof.
I haven’t held the Jackery Explorer 240, but comparing specs, the Joyzis is cheaper and lighter, has more capacity, two additional USB ports, wireless charging, and is a much smaller profile. Jackery however, is a much more trusted company and with the large number of quality control issues that Joyzis seems to have, I would pick Jackery to get me through a disaster over Joyzis.
I would love to try out an EcoFlow product as they are known to be very high quality. The River model is similar to the Joyzis in capacity but has a much more powerful engine under the hood allowing for 600 running watts and 1200 surge through 3 AC outlets compared to Joyzis’s 1. However, that amount of power output and ports is overkill in my opinion for a sub 300Wh capacity power station. It just doesn’t make a ton of sense to run 600 watts of devices through a 288Wh station and only have it last for 20 minutes or so.
Summary:
If you want a lightweight power station to keep phones, tablets, and a laptop topped off during a short power outage or on a camping trip, this is a cheap option that can fulfill those needs.
The Joyzis BR 300 power station is listed for $280 on Amazon, but there is always a $90-$150 off coupon right under the price tag as long as you click it.
Read More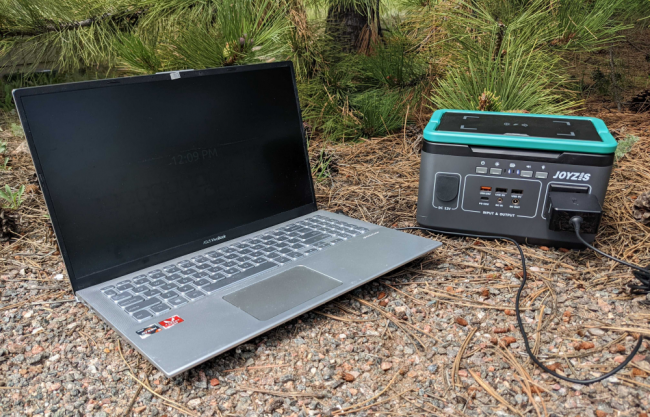
Skills & tools for kids?
Curious what specific skills kids of various ages should know; to promote preparedness/resilience/confidence/etc, without being ‘scary’. Thanks!
Read MoreHas anyone purchased food storage through Rainy Day Foods?
I have never ordered or heard of RDF, but they have a food I want that is unavailable through the other companies that I usually order from (i.e. Auguson Farms, Emergency Essentials, Ready Hour, Mountain House). If you have purchased food storage from them, I would appreciate your feedback. Thank you
Read MorePerpetual gear finds thread
I often come across cool gear and preps online, so I figured I’d make a thread to drop this stuff in vs. just putting it in the company Slack like I normally do.
I’ll kick it off with these small Knipex CoBolt S compact bolt cutters (71 31 160), which are a newly released variant on a set of cutters I already have in my BoB. I have the XL version of these cutters in my bag, but I’m hearing that the new compact ones are insanely capable for the size and weight. So I’m thinking of picking some up (with the recessed edge).
I tend to really go for the Knipex tools because they’re German made and extremely high quality. I use their pliers in my shop, and have a very compact set of their pliers in my wife’s BoB.
(Also, I’m thinking it may be cool to do a perpetual deals thread where we can post sales on preps that we come across.)
Read MoreLow round count drills for measuring your shooting proficiency
Just wanted to post up this page of drills from the guys over at T-Rex arms, these drills are a great way to measure and track your proficiency in different areas without burning much ammo at all. They have a downloadable PDF for every drill that includes the instructions and a scoring chart for determining your hit factor. These are not so much “pass/fail” drills as they are tools to measure your own performance and keep track of your improvement.
All of them require 50 rounds or less, and don’t take very long to run, although they test a wide range of skills during the run and are a very efficient use of training ammo and time. I encourage anyone to give them a try and see how you do, then use those results to help refine what you need to work on and improve for next time.
If you need an area to be able to shoot these drills on, I encourage you to look for WMA ranges or BLM (Bureau of Land Management) land near you. Many WMAs have public shooting ranges that are either free to use with a hunting license or have a very small fee. BLM land is even better to shoot on as it’s often less trafficked and can provide more wide open areas to shoot in. As with anything just be smart about when and where you choose to shoot on public land.
T-Rex Drills
Read MoreNew here – what articles are your favorites?
I’m a new member, I love all the content and commentary… So much good information…wow! That said, can some fellow members please share favorite/important pages to read first? Thank you!
Read MoreFinding your cardinal direction using a sun, stick, and rock
Feeling stir crazy inside my home, I needed to get out and get some sun. While I was out I noticed a stick on the ground and thought back to something I saw online before about using shadows to figure out North, East, South, and West. So I looked it up online and figured out the general principle and decided to put it to the test.
It’s supposed to be more accurate and quicker to tell directions if you have a 3-4 foot stick but I just used a 10 inch one. I stuck it in the ground so it was straight up and placed a rock at the tip of the shadow.
Waiting 15 minutes I looked again and the shadow moved to the side of the rock.
The rock marked West and the shadow moved to the East. Which makes sense because the sun rises in the East and sets in the West and the shadow will move opposite of this. Once you know West and East, you can figure out North and South as well. I compared it with two compasses that I had and it was accurate.
Not the fastest method of rough navigation, but if you were lost while hiking the 15 minutes it takes for the shadow to move is a good time to rest and think through what to do.
Read More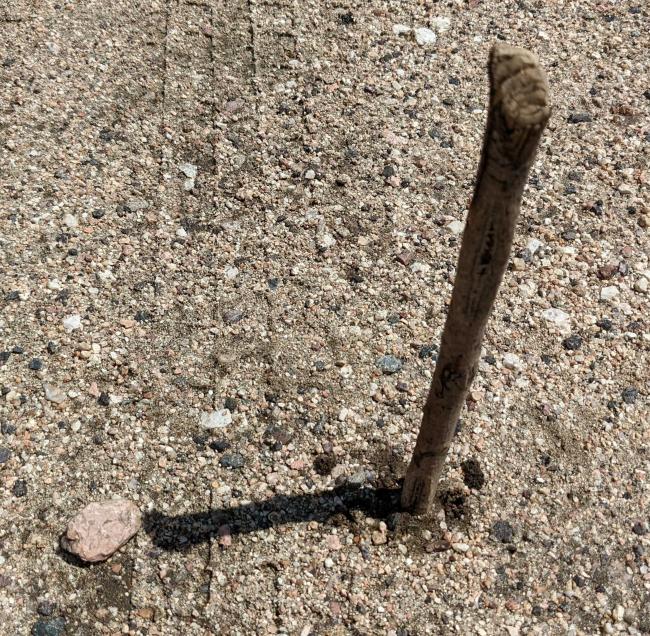
How to prepare to leave the U.S?
I think it’s safe to say that the U.S is approaching some sort of inflection point. I’d rather not be around for that. And even if it doesn’t devolve into lawlessness, I don’t feel as confident that I’ll be able to shield my LGBTQ family members from discrimination.
I’m also not really sure how I would get things in place so that I could take my family and leave. Canada is the most likely place. This isn’t really a “bug-out” scenario where I need to grab my Level 3 bag and leave suddenly. I’m thinking of this as a “5-year” plan scenario.
How would I got about learning how this might work? Has anyone here made this move? What did you have to do?
Read MoreGrowing amaranth– Lodging
As I’ve stated here and other forums before, I think amaranth is the best overall survival crop. First of all, in some varieties, it is a naturally occurring weed. Farmers fight this weed as it reproduces so quick & is exceptionally hardy. In some areas, it is becoming resistant even to Roundup. It needs little water, no fertilizer & comes back if you cut it down. It is EXACTLY these traits that make it, and especially the commercial varieties, such a valuable survival crop.
I’m not going to go into great detail about amaranth, as I have discussed it in prior discussions. Just let it be known, the whole plant is edible. Young leaves & stems make a great, nutritious salad. Older leaves can be cooked like collard greens. The seeds are likewise exceptionally nutritious and can be ground into flour. What I do want to discuss is that the taller varieties seem to have a tendency toward lodging which is the displacement of stems or roots from their vertical and proper placement. After strong, windy storms, which we have had several lately, most of my small test plot of Copperhead amaranth is now knocked over. Just one plant is still standing. For lots of grain type crops, such as corn, this lodging could cause you to lose your crop. But amaranth, being the weed it is, just keeps on growing. Even when the stalks are knocked flat to the ground, the plants reorient their growth, and keep on growing. In the pics below, you can see they are just now beginning to set their lovely, nutritious seeds.
Read More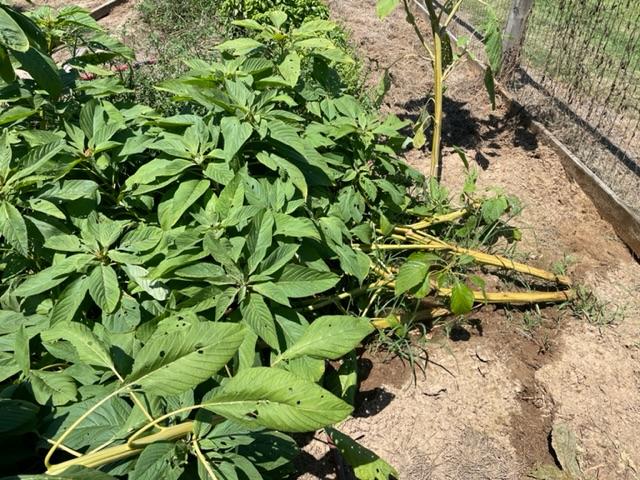
Wake up call – Have cash on hand in case your bank card gets suspended
wake up call
Some friends visited us early this year and had just received news from their bank that their bank cards had just been suspended due some one else trying to use them but do not worry they will receive new cards in a week, so here they are 100 k [65 miles] from home not enough fuel in their car and very little food in their house so I lent them enough cash to fill up with fuel and food and also showed them some of my preps. 2 months ago we visited them and what a difference he showed me the cupboards in their kitchen completely full same with the cupboards in the bathroom and laundry , in the garage was a new chest freezer completely full, in the garden was a new poly tunnel with raised beds to grow vegetables solar panels on roof and much more. They will not be caught out again lesson learnt .
I know during the pandemic cards where more preferred than cash but some people want to do away with cash altogether which to me the above is a good example why we should not .
I know some European countries it is almost impossible to use cash so people have to rely on the banks which to me is crazy who in there right mind would trust banks to do the right thing
keep on prepping
John
Read MoreTwo websites for tracking lightning and thunderstorms in real time
In Florida, we receive our share of thunderstorms. I wanted to share two websites that I use to track lightning and thunderstorms in real time. There is usually a 2-5 second delay between a strike and when it shows up on the screen, but that’s impressive timing still.
Use this to know when to unplug or plug back in electronics from around your house to avoid surges, track storms, and know when it’s safe or unsafe to go outside or swim.
The first site is https://www.blitzortung.org. Click on your nation’s flag on the left side of the page to zoom into that area. All of the green lines that point to each strike are different research stations that see or hear the strike and by adding in the data of multiple sites and locations, they can quite accurately triangulate each strike.
There is also historical data at the top of the screen so see the general direction and intensity of the storm if you are just tuning in. Click on dates and times in the bottom left corner to select a particular date.
The second site is https://www.lightningmaps.org. By default the lines that point to each station is toggled off, but you can enable it using the icon that looks like an antenna in the top right corner. They also have historical data by clicking on the calendar icon near the top.
((Location of icons and buttons may be different on a phone. I was using my laptop when viewing these.))
Hope this is helpful for someone and can be another resource to make us more prepared.
Read More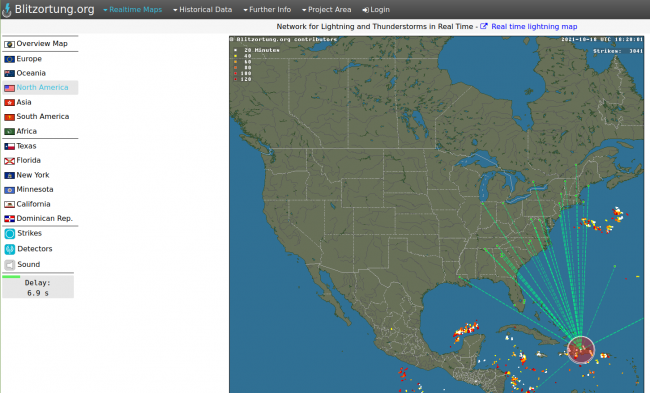
How much would you spend for a greenhouse?
I will be setting up a greenhouse in my backyard right now and I am thinking about a portable greenhouse, a glass greenhouse, or something else.
A portable greenhouse doesn’t seem to cost much. Many portable greenhouses cost less than $300. However, I will need to purchase other equipment such as irrigation, ventilation, etc. I don’t know what is a reasonable budget range.
I’m planting potatoes!
I’m finally doing it and I’m excited!
Background: I got my suburban house 3 years ago (inherited from my mom) and aside from small foundation beds in the front, it was all lawn, a blank slate. Now, I am famously indecisive when presented with a blank slate. I love having people over and I adore flowers, so I wanted ornamentals for my backyard paradise. But as a (low-key) prepper, obviously I want to think about growing food. However, the amount of sun in my yard is marginal for food production, with only a few areas potentially suitable. What to do?
I started one bed at a time, refurbishing the flower beds in the front and starting with a small shade garden with rhododendrons, ferns and hostas in the back. A few tomatoes and cucumbers in pots on the deck. An herb patch we just kind of scratched out of the ground. We got fig trees in containers last year, and expanded the shade garden – it’s gorgeous! The vision started coming together and this spring we replaced the herb patch with an actual raised bed, and just yesterday built another raised bed just below it where we are going to plant potatoes today!! (A little late but the folks at Agway said we’d be fine)
Why potatoes when we don’t even have a real vegetable garden yet? A few reasons. The area only gets about 5 hours of sun, and potatoes are supposed to be among the more shade tolerant veggies. Plus, if we ever really needed our garden for survival or supplementation during lean times, I’d like experience producing a crop that can provide storable calories.
Anyway, the seed potatoes are cut and curing right now and will be in the ground by the end of the day. Wish me luck!
Read MoreHas anyone grown their own luffa?
OK. I guess I’m an idiot. All these years on this planet and until yesterday, I though luffas were sponges from the ocean. I read an article in the current Mother Earth News, and find the danged things are a plant, related to a cucumber. Like cucumber, it grows on a long vine and when young, can be eaten. Once mature, you dry them & peel the skin off, harvest a bunch of seed & now you have your own luffas.
So I ordered me some seed & I’m gonna grow my own luffas. Just curious if anyone has any experience with them. Online, I see where folks say they are incredibly easy to grow & don’t have the disease/pest issues of cucumbers or squash. I’m sure I’ll eat some too.
Read More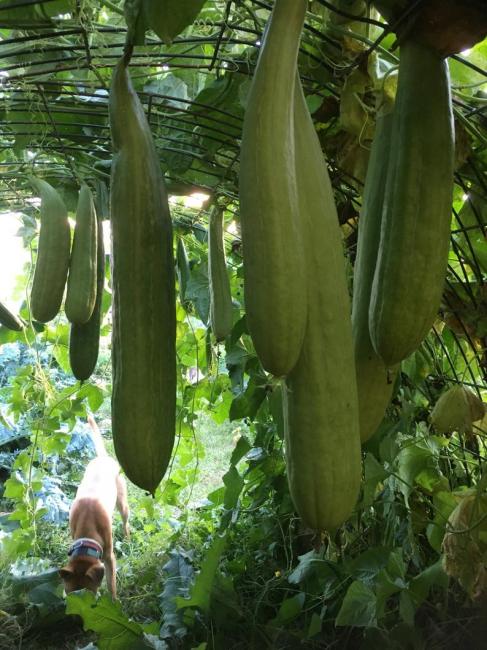
Canned water is $$$$$-What about seltzer, soda, flavored water for long term storage?
The available info on storing water is to rotate anything in plastic every couple of years. It seems far better to buy water for storage in aluminum cans, but still water in cans like Blue Can Water (guaranteed good for 50 years even when stored in hot conditions) is horrendously expensive to buy and ship. Is there any reliable information out there about storing cans of water that have zero to minimal calories that is “Flavored” or “Carbonated”?
On amazon you can pay $11, shipped free to your home with Prime or minimum purchase, 18 cans of, for example: bubly Sparkling Water, Tropical Thrill Variety Pack, 12 fl oz Cans (18 Pack)
There are many examples similar to this that are readily available, cost $.50 (or less on sale) per can, and should theoretically also be good for decades with no downside since it is, basically, water. If you have a Berkey, Sawyer Mini, Lifestraw, etc. you could also plan on filtering out any thing that may turn “bad” over years of storage.
I may prefer high quality tap water from my municipal supplier, but seems that drinking, washing, cooking with Bubly or Perrier in cans that have been stored in my garage for 12 years beats the heck out of drinking from a polluted ditch.
Staff at The Prepared–Any information on this specific topic? Thanks!
Read MoreWant to learn about local edible plants near you? Check out fallingfruit.org
I just came across a really neat website that I am excited to look into more. https://fallingfruit.org It’s a mix between geocaching, foraging, and prepping. So you plug in your location and view various pinned locations of public edible plants near you that might just have fruit that would fall and go to waste.
I am excited to dive into it and see which plants I have just been walking past every day that I could be eating. And as a prep, if I learn better at which plants near me are edible, I’ll have some sort of additional food if I ever needed it.
Community Challenge! — Check out your area, go exploring (even if it’s the tree outside your office building), and report back if the site helped you find a tree or bush you could potentially eat from someday.
Read More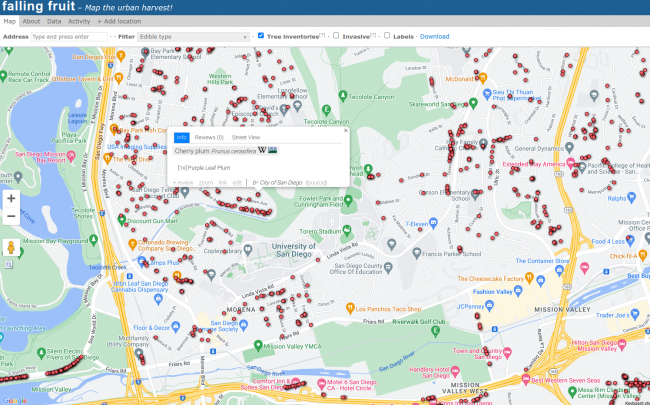
Buying extra supplies as a hedge against inflation and be better prepared
Over the past couple months I have been going through previous articles on The Prepared and updating prices for our product recommendations. It’s probably no surprise to anyone but many products have been discontinued as supply chains have adjusted, some companies (like with freeze dried food storage) cut down their offerings from say 10 products to just their top 3 to keep up with demand and cut down the amount of downtime rotating the machines and such, and the mostly universal thing I am seeing is that the prices for everything are going up and up because of inflation.
For example, in 2020 we reviewed and recommended a #10 can of scrambled egg mix that cost $20 at the time. Now, it is MSRPd at $105. The same goes true for many of the items I am updating such as axes, multi tools, and more. Sometimes it’s just a dollar, other times there is a 20%, 50%, or I’ve even seen things double in price.
I remember reading all these articles when they first came out and had fun day dreaming about using all of the gear recommended. Sometimes I would buy the recommended item, but there was just too much great stuff to buy so I had to put keep adding to my prepping wish list using The Prepared’s kit builder.
For further reading: How to shop for preps without going over-budget or buying fantasy gear
When that food dehydrator I was wanting used to be $250 but now is $325 I can’t help but wish that I had bought it back then. I tell myself though that I am proud that I didn’t overspend at the time or put things on credit, but still… it’s harder to get that same dehydrator now.
It got me thinking though about how I want to adjust my future spending and savings. If a can of scrambled egg mix can increase more than 5X in two years, it might be a good investment to buy more physical items if I have some extra cash at the end of the month, can rotate through things smartly, and have the space to store them. This really is a balance that I need to keep a calm and level head about, I can’t be turning into the hoarder house or having items spoil because I am not using them fast enough, but for some products it might be good to store extra of them.
The first items I am going to work on increasing my stores of are those items we use on a regular basis that are very shelf stable and can sit there for 5, 10, or even 20 years and still be good to use. For example if I spend $10 on a box of 500 garbage bags today and after 10 years of inflation and shrinkflation that company offers a $30 box of 275 bags, I have quite the valuable box there that I use and can tap into. Probably a bad example, but look at the things you usually use such as dish soap, aluminum foil, plastic wrap, toilet paper, air filters, water filters, toiletries, and more and see what would be good to store up. Not only will you have a small hedge against inflation, but if there is panic buying or shortages you will still have some, and if a product becomes discontinued you still have some to hold you by until you can find an alternative.
These are just things I’ve been thinking about over the past few months and I haven’t done all the math or worked out the kinks but wanted to share something I was observing. What are your thoughts, and what items do you store to be better prepared?
Read MoreEndure: A tabletop RPG for preppers
Heya everyone! I wanted to share something cool I found that we could use to test out or even just play around in hypothetical scenarios. It’s a rules-lite, pay-what-you-want Tabletop Roleplaying Game known as Endure. You can find it here!
https://vonbednar.itch.io/endure
The basic idea of it is that you are an average person caught in a Crisis Scenario. This isn’t The Division, where you’re essentially a super soldier putting the world together one city block at a time. No, I’d say it feels more like The Long Dark or The Last of Us. You can also set the game in whatever time period or setting you want, as long as you’re surviving a Crisis.
All you need to play this game is two six-sided dice. No complex character sheets, no battle maps, none of that. I like this because it leaves the game open for Players and GMs to tell the story they want to without being confined to a framework. The only thing I don’t like about it is that combat isn’t explained very well, as they just advise avoiding it if you can. While that makes sense, a little more on the subject would be nice.
Regardless, I hope y’all find this game interesting!
Read MoreAny advice on potato/root storage cellar?
This could be a topic of very narrow interest but does anyone have advice on creating a successful root cellar that maintains 32-40 degrees for most or all of the year? We built an extension on to my house and I added an above-ground pantry/storage area that has no heating on purpose but is still connected to the house. Beneath that I have a 20×20 area accessible by trapdoor and separated from the rest of the crawlspace with insulation but is maintaining a consistent 58* and 85% humidity in our Alaskan summer. My house is very tight and energy efficient and I’m worried this will work against my efforts to achieve a proper under-house root cellar. The temp in my main crawlspace/subfloor is usually about the same at the room temp above due to effective insulation and radiant heat from above. I blocked off this 20×20 area from the rest of the subfloor to attempt to make it cooler but with limited effect thus far. Also very concerned about high humidity inducing mold. I’m considering venting this cellar thru the pantry above and then into the outside with pvc pipe (one in and one out) and inline fans that could draw in cold air during the winter or be completely closed to avoid freezing. Temperature control via small fans that would also release the moisture. I’m sure this will get cooler in the winter but I’m worried the radiant heat from the house will keep it above my ideal storage temp even in the winter. Anyone deal with something similar or have thoughts on this? Much appreciated!
Read MoreSuccess! I finally made a batch of soap that I liked
After some great advice from the wonderful people here on the forum my second attempt at making soap turned out MUCH better than the first time. Check out the comments on this forum thread to see my first failed attempt.
For those who are interested in making soap, I’ll give a brief summary of how to do it.
Shopping list:
Pure sodium hydroxide (lye). I bought 2lb for $16 on Amazon and it came with a free silicone mold. I’d link to the item I bought but it doesn’t seem to be available any longer. Silicone molds. These make the process much nicer and produce a better bar than homemade cardboard molds, so it is definitely worth investing in these. Two small 3-4 gallon buckets Silicone spatula Soap blender Disposable paper cup Kitchen scale to measure ingredients Fat sources. Coconut oil, beef tallow, olive oil, and many other options. Check out the possibilities on soapcalc.net to see what they can help you use. Avoid polyunsaturated fats, I learned this the hard way in my first attempt, which is linked up above. Distilled water Eye protection and disposable glovesA quick and dirty summary of how soap is made is that you take some fat source like olive oil, mix with lye and water, and chemical reactions happen that turn it into soap.
To calculate what recipe you are going to use, go onto soapcalc.net and plug in your various fat sources and how much you have. For this successful attempt I used about 2/3 beef tallow and 1/3 coconut and olive oil. The users on this forum taught me which parameters I should shoot for. I went with an INS of 160, higher than this gives you a harsher soap and having some superfat to offset possibly being off on your recipe and avoiding excess lye that will burn you. Tweak your fat levels until you reach the goals you are going for. Here is my recipe. I don’t know what all this means but I’ve highlighted the things I look at.
According to your recipe, measure out your ingredients. Use a disposable cup for the lye, but the other food grade materials (water and the fats) can be measured into your normal kitchen’s bowls because they won’t touch anything toxic.
Take one of the 4 gallon buckets outside and put on eye protection, gloves, and a long sleeve shirt. Pour in the water first and then the lye and stir with the spatula. It will give off some nasty fumes and heat up pretty hot from the chemical reaction.
Back inside you will heat up your fats to as close to the same temperature as the lye mixture. I just threw it all in the crock pot and melted down the solid beef tallow and coconut oil. If you are doing just oils like coconut oil and olive oil then just heat them up in the microwave.
Combine the lye and oil mixture in your second bucket and mix for 2-3 minutes with the electric mixer until it is very creamy and thickens up a bit.
Pour the liquid soap into the molds and use the spatula to clean out the last drop. Put the molds in a cool dark cupboard and cover with a cloth for it to harden. I gave it a couple days and then pulled the soap bars out of the molds and stood them up on a piece of cardboard to get more airflow. Let them sit for a month to cure and they are ready to use.
The nice bars in the back of this picture were from the mold, and the weird pieces were ones that I broke up from a large chunk in a cardboard mold that I made. I won’t use a homemade mold again and will get more silicone molds because they make it so much nicer.
My soap bars smelt very strongly like beef broth when they were just poured into the molds. By the time a month had passed and they were ready to use they still smelt slightly beefy if you put your nose up to them. When you lather your hands a smell of beef broth can be smelt but your hands don’t smell like anything after you rinse them off. It’s an interesting smell that I don’t particularly like, but my wife has showered with it and said she didn’t smell anything. Maybe I am just more sensitive to it. Next time I make soap, I have some pig lard that I need to use. It probably won’t smell as strongly as the beef tallow, but I still am going to only put in 25% lard because I am not a fan of the meat smelling soap. I also do not want to add essential oils because I don’t want to smell peppermint beef either.
Well, that’s about it. I am extremely new to this world of soap making and if I said something incorrect please correct me. I don’t know how everything works, I just know that if you do steps A+B you get C and that’s what I want. It’s a fun experiment and I feel a sense of self sufficiency. If there was a nationwide run on soap for whatever reason I could make my own and share with others. Soap and cleanliness is very important for health and moral so it is an important survival and prepping skill to know how to make. At first I was scared and worried I wouldn’t get the chemistry right, and I actually didn’t the first time, but once I knew what to shoot for it was very easy to do. It is not a hard skill to learn and there are so many things and variations you can run with from here. I just like plain, simple, cheap survival soap though. Maybe one day I’ll expand into scents, colors and shapes.
Read More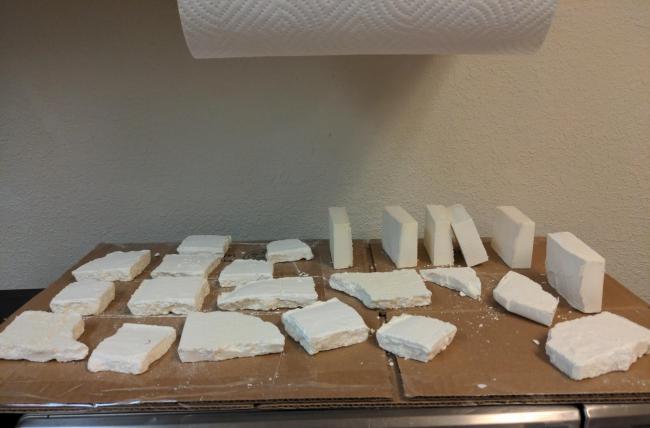
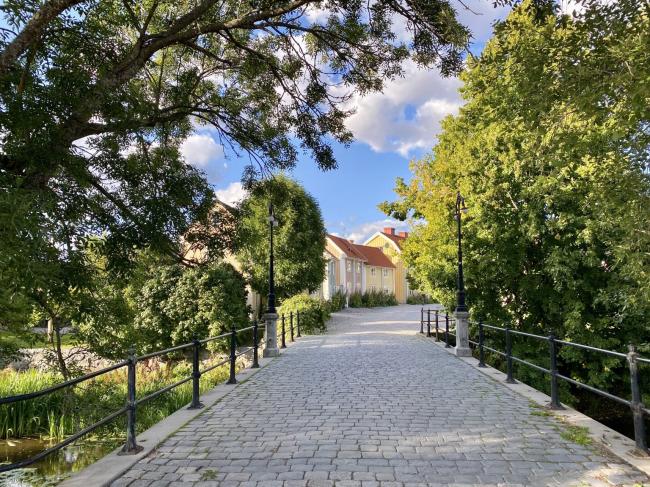
Book Review: “Walkable City Rules”, by Jeff Speck
[The walkable city of Söderköping, Sweden. By WrathOfGnon]
If you’re a prepper in a city, can you make your city itself more resilient and prepared?
The classic prepper goal is to become an independent homesteader – find your own piece of land, and raise your own food and resources.
But what about those who can’t, or won’t?
Can you live in a city and still be an effective long-term prepper? Can you improve the preparedness and resilience of the neighborhood and community around you?
I wanted to research the opposite end of the spectrum and analyze city living from the perspective of emergency preparedness. What useful actions could you take as an individual or a community?
Jeff Speck delivers some answers in his book “Walkable City Rules”. Speck outlines one hundred and one steps cities can make to become more “walkable”, which he equates with being more habitable, resilient, vibrant, and well off. Not everything in Speck’s book is directly applicable to prepping. But I wanted to see how many useful actions I could find.
What is a Walkable City?
Walkability is “an indicator of urban vitality”. Speck argues that the more walkable (and rollable) cities are, the more people they attract, the more jobs they create, and the better livelihoods they can support. Walkability makes cities more livable and successful.
To succeed, walking around a city must be:
Useful. Most aspects of daily life are nearby, and organized enough to get to. Safe. Not just being safe, but feeling safe for pedestrians, which can be harder. Comfortable. Buildings and landscapes shape the streets into “outdoor living rooms” – cozy places that are welcoming. Not just a wide open space. Interesting. Lined with unique buildings, friendly faces, and the signs of human life.Speck has details on the best neighbourhood structure – compact, diverse building types, with well-defined and engaging “edges” between private and public spaces. They contain a wide variety of activities in close proximity. “Good cities are designed and organized in compact neighbourhoods linked together.”
Walkable also means “Rollable”
Speck’s definition of “walkable” also means “rollable” – a city that is good for bicycles, wheelchairs, roller blades, strollers, or whatever wheeled method you use to get around. People who are rolling will be able to access and enjoy the same areas as people who chose to walk – and gain all the same benefits of an improved, interesting space.
Two Books: Read the Second One
Spec has written two books: “Walkable Cities” (in 2012) and “Walkable City Rules” (in 2018). Read the second one – “Walkable City Rules”. It’s updated, clear, and more actionable. It has impactful before/after pictures and diagrams, and includes more detail on fundamental concepts – such as the idea that good urban design focuses on dispersion: where trips are distributed among a large number of parallel streets, so that no street becomes overwhelmed. This means every street receives benefits from people passing through – improved safety from many eyes on the street, more traffic for merchants, etc. As well as discussion on how improving car traffic flow directly hurts all other aspects of a city you might want to improve: density, diversity, walkability, property value, resource consumption, life expectancy, educational attainment, patent creation, GDP, carbon footprint.
Benefits of a walkable city
Speck outlines five areas of benefit: Wealth, Health, Climate, Equity, Community.
1. Wealth. Walkable cities have higher property values, attract talented people to live there, and create more jobs. One estimate translated each Walk Score point (on a scale of 100) adding $2,000 to a home’s value. Since the average American spends 20% of their income on transportation, more walkable spaces can save you money, which is then often spent locally. Speck also discusses the (apparently large) hidden costs of subsidizing roads and cars: “The cost of all parking spaces in the US exceeds the cost of all cars, and may even exceed the cost of all roads”. “America sends $600,000 overseas every minute in support of our current automotive lifestyle”.
2. Health. The more that people walk or provide their own transportation, the more physical exercise they get. This directly translates to healthier communities and citizens. It also lowers healthcare costs for cities – one Iowa study estimated that investing in biking infrastructure could save the state $87 million in health care costs. Walkable cities have fewer car crashes and cleaner, less polluted air.
[Slide by Alissa Walker, Wired Conference 2012: “Let’s have a moment of silence for all those who are stuck in traffic, on their way to the gym, to ride stationary bicycles”.]3. Climate. Speck believes we should measure carbon emissions per person, not per area or square mile. “Places should be judged not by how much carbon they emit, but by how much carbon they *cause us* to emit”. The more walkable we make cities, the less driving is required and the less we pollute. “How we move determines how we live”.
4. Equity. Speck reviews studies that show how cities with more transit choice demonstrate less income inequality and less overspending on rent. They help to give children more independence and extend mobility for the elderly.
5. Community. In walkable spaces it is difficult to spend much time sneaking around without being approached by an inquisitive resident. Where people walk, communities are more self-supervised and have lower crime – two studies calculated that walkable areas are 19% safer for both car crashes and crime. People have more interactions with their neighbours, more opportunities to get to know each other, and more chances to form positive bonds. Walkable communities can build more social capital and gain more civic involvement. People have more time for clubs, volunteering, and community projects when they are not stuck commuting in a car.
In Summary: A city with more cash to build infrastructure, a healthier population (so less drain on the healthcare system), and more connected neighbours that know each other and are more likely to help each other? Sounds like a more prepared city to me.
Where Can You Not Do It?
Speck agrees that this won’t be feasible everywhere: “Most Americans live not in big cities with big public transit systems, but in smaller places that face a dramatically different landscape [around] public transportation”. He focuses on “What changes can be made, in the least time, and for the least cost, that will have the largest measurable impact on the amount of walking and biking?”.
Transit needs to be a convenience, not a rescue vehicle. Focus on opportunities where it can offer a better experience than driving.
Core Concept: Induced Demand
Induced Demand means: Adding more roads makes people drive more. This is a core concept of the book. Speck argues: do not try to “fix” traffic congestion by adding more roads – this only creates more congestion (and pollution). Instead: provide better options.
So what can you do about it?
The book has so much information, but how much of it is useful to prepping? I estimate – perhaps 30%. The book is extremely useful if you are a city mayor, or a town planner with an approved budget for construction. It may also be useful as a *defense* against making your city worse – once you know the concepts in Speck’s book, you can argue against harmful changes with evidence. If you are civically minded or want to engage with your city officials, the book could also be very helpful.
Below I attempt to collect and synthesize several ‘tiers’ of actions and improvements that regular people could make to improve resilience and preparedness for themselves and their community.
Most Impactful Action: Plant More Trees“There is no better use of public funds.”
Speck argues the biggest thing any city can do to improve resilience, walkability, and community is to plant more street trees. Usually: plant these in all medians and boulevards – the space between the sidewalk and the curb.
Trees help in many ways to:
Provide shade Reduce ambient temperatures – sometimes by 10 degrees or more. The US federal government reports that a single mature tree has the same cooling impact as “ten room-size air conditioners operating 24 hours per day”. Absorb excess rainwater, reducing or preventing flooding Absorb car exhaust emissions. Because street trees are so close to the source of cars and tailpipes, they can absorb 10x the amount of carbon dioxide as trees farther away or outside of a city. Provide UV protection Limit the effects of wind Slow down cars, which protects neighbourhoods and people walking and playing Reduce crashes Shape the space and improve the sense of enclosure (makes people more comfortable) Improve health. Several studies have shown that regular exposure to trees prolongs life, aids mental health, reduces asthma, obesity, stress, and heart disease, and makes people happier. Humans enjoy and benefit from being around trees Improve property values. One study showed that street trees in a neighbourhood improved property values by 9%. Cities that invest in street trees may gain back $12 in tax revenue for each $1 spent. Improve retail viability. Shoppes on streets with good tree cover may earn up to 12% more revenue.Spec has details on selecting the correct types of trees (hardy local species; same type through a whole neighbourhood), how to space them, and how to build the correct soil mixture below the sidewalk.
Speck’s second most effective improvement is to correctly add street parking. He argues that it creates a “barrier of steel” between people driving and people walking, which makes pedestrians safer and encourages business at shoppes and restaurants. However, implementing parking may be more in the realm of city planners and officials.
Level One: Actions By Yourself
Prepping actions you can take by yourself, in the city, include the standard set of prepper activities: plant trees for food, shelter, and shade; grow a garden; collect and use rain water; and improve your home to be more passive and resilient.
Beyond that: go for walks around your community and learn your local area. What green areas, playgrounds, and parks do you have? What types of useful or edible plants grow nearby? Do you have sources of water? Perhaps you can mark all of these on a map.
As you travel you could find and rate the useful and interesting locations and streets in your community. Perhaps you can identify green/yellow/red zones that are the most walkable, or could be easily improved to attract more use and more people. Walking around may help you meet your neighbours.
Speck suggests: Houses with front porches, stoops, bay windows, or front-facing hangout spaces create a more friendly community zone and help neighbours interact. Perhaps you can buy or build a house with a porch, or put a bench, bird feeder, or interesting plants and features in your front yard.
Speck suggests using ‘friendly’ lighting – a warm continuous spectrum light, like an incandescent. “Safety comes not from brightness, but from population”, when more people decide to walk in an inviting area.
Level Two: Actions In Your Community
Perhaps you could agree on a tree to plant in a shared area with your neighbour. Walk around your neighbourhood and talk to your neighbours as you meet them. Join or start a community gardening club. Or host a block party. This may be a good way to meet your neighbours and do good in your community. Participate and help to plan local features – parks, playgrounds, etc.
Work to get lowered speed signs in your neighbourhood, to encourage more walking and make it safer. Speeding risks, damage, and deaths rise exponentially, so you want cars driving around 20 mph / 30 kph in neighbourhoods. By his own admission – half of the points in Speck’s book (!!) focus on actions that work to reduce driving speeds and create safe areas for walkers. You can also survey which streets have four lanes and advocate for them to become three-laners with a turning lane and a treed median or parking. These are safer, more useful and walkable, and still serve the same number of cars. Turning multi-lane one way streets into two-way streets offers the same improvement.
Speck encourages the building of “granny flats” – a small, livable space in the same lot, often as a building in the backyard above the garage or as part of the garage. These can be rented out to members of the family to provide income – e.g. to grandparents, or to a child going to college or university. Or they can be moved into while the main house is rented. This “introduces affordable spaces in a dispersed way throughout the city”. It increases neighbourhood density, putting more feet on sidewalks and making transit service and local shopping more viable. The spaces are usually closely monitored to prevent abuse, as the landlord literally lives right close by. You could get involved with your community or city to make sure this type of housing is supported.
Level Three: Actions In Your City
Plant more trees. See if your city has a volunteer tree planting program. If you are more civically minded: get involved in some community planning. Check if your city has ever performed a walkability study, or start one to show how it is done. Encourage the creation of public art that helps to liven up shared spaces. Check if your city has grants or a Mural Arts Program to support this. In the three+ decades that Speck has been learning about walkability, he has honed in many of the phrases and wording that are most successful for change – e.g. “reducing illegal speeding” and “creating a barrier of steel”.
What Is It Lacking
I wish the book had a clear, direct guide on how to perform a Walkability Assessment, including all of the steps, how to score streets and buildings, and how to assess the anchors and “walkability network” of your neighbourhood. This would go a long way toward figuring out which actions could or should be taken, and which items you might be able to do yourself.
As is, Speck provides four sample assessments he did in actual cities in the United States. The links have all died, but I found and collected three of them using archive.org – links at the bottom.
Many of the improvements also feel like they require a high level of civic engagement and interaction, which may be lower on most prepper’s activity lists than the standard, individual steps you can take.
Summary
“Walkable City Rules” is light, easy read. It has many great suggestions for improving a city. All mayors and city planners should read it. From a prepping perspective, it has several good suggestions you can take on your own, and many resources if you want to become more civically engaged. If you do not want to be civically engaged, it may not be that useful.
I learned a lot. I do not feel it answered all of my questions about the potential success of prepping inside of a city. I will keep looking. Perhaps as the idea of “walkability” becomes more popular, cities around the world will just happen to become more prepared and resilient.
Inspiration
For a great mix of beautiful, inspiring images and discussion on how to make cities better – I recommend the twitter feed WrathofGnon . He discusses what makes “good urbanism”. I originally found this book from his recommended reading list. He also has a substack blog with more detailed writing.
Further Resources
WalkScore.com – check your city Sample Walkability studies (PDF) – Tulsa Oklahoma, Lancaster Pennsylvania, Albuquerque New Mexico (web page). To see how the process is done. Wikipedia – Mural Arts Program “Tactical Urbanists’ Guide to Getting It Done” (has link to downloadable PDF). For those interested in improving their city or learning about other options. Tactical Urbanism v2 (not downloadable)(edit: note that Söderköping is in Sweden, add link to homestead review)
Read More