Share your knowledge & learn from experts
Because prepping and community go hand in hand
Home heating sans electricity?
Hello, and thanks again to all the awesome people who make this website possible. It truly is a wonderful resource.
I am researching various methods/options for heating my home in the case of an extended power outage. I have a traditional masonary fireplace that I never use because it’s so innefficient, but am considering a fireplace insert or other options. I’m curious if anyone has gone down this road and has words of wisdom to share.
A fireplace insert would be nice, but they’re also spendy, and outside of an emergency and/or the occasional holiday-time fire, I would likely rarely use it, so I am also eager to find safe alternatives, if there are any.
Read MoreDo You Know How a Home Well Works? – Might Save Your Life To Know.
IMO, the following knowledge could be priceless for many preppers… even if you don’t have a well. Are you planning on bugging out into the country? Out there, most folks will have home wells. You might say, what good is that for me? Let me let you in on something. 99.9% of folks with home wells have no way of accessing their water when the power is out. Do you think maybe if you came with the tools & knowledge to access that water, that you might have made friends? Being friends with a landowner might be the difference between surviving… or not.
Many, if not the vast majority of rural homes & farms get their water from a well, which is nothing more than a pvc pipe in the ground with a submersible pump sitting under the water and a pressure storage tank below the frost line. At my farm, my submersed pump is around 125′ down. This all works fine as long as you have electricity but what happens when there is none… and won’t be for weeks if ever? I live on a farmstead, with a well, & have plans to get to that water during such a crisis. Sure I have my personal water filtration devices but for me that is short term. You really want to live on hot, stinky, filtered pond water? Why use such when cool, pure water is so close by… if you know how & are prepared to get to it?
So this submersible pump hangs in the well from the pitless adapter, which is a two part device (male & female). One part stays in the well casing & the other part is what the well drop pipe attaches to. This device is what keeps the water from freezing in the winter as it redirects the water 90 degrees, so that the water stays underground, below the frost line for the area.
The top of the adapter has female threads, used to pull the pump & attached riser pipe out of the well. DIY folks, like me make a simple tool that allows you to attach to the pitless adapter & pull everything up. Mine is a T made from 3/4″ threaded metal pipe, which anyone can buy the sections in a hardware store. You simply need two short pieces for the handle, a threaded T & a longer piece of threaded pipe to reach the pitless adapter, which will be maybe 2-3′ down inside the well casing… deeper the further north you live. From what I understand, most pitless adapters accept 1″ NPT thread, so I have a series of adapters to go on the end of my 3/4″ pipe. I have 3/4″ – 1″, 1″ – 1 1/4″ and 1/1/4″ – 1 1/2″ just to be safe. All these piece screw together to make the T so obviously can be taken apart & not take up much space.
I’ve never done this before but from what I understand a strong man can pull the pump by himself if it is not real deep, otherwise you will need help and/or some lifting device such as a block & tackle. Once the pump & pipe is out of the way, you now have access to the water & just need rope & a device to get the water out. You can make your own or purchase something commercially. I use the Well Waterboy bucket. I’m sure anyone could rig up some container to get to the water, just might take some engineering to figure it out. There is a great discussion here on building your own.
Read More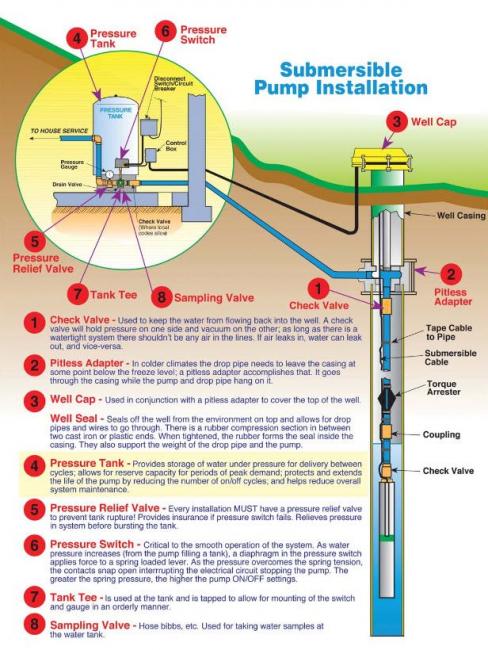
PrimeDay prepping deals
Hello all, I’m hesitant to start this thread because I’m not particularily a big fan of Amazon or consumerism in general, but there are some good deals on prepping gear associated with Prime Day. One that caught my eye was the highly rated BigBlue 28W Solar Charger on sale at at 25% discount: https://www.amazon.com/dp/B01EXWCPLC/?tag=thewire06-20&linkCode=xm2&ascsubtag=AwEAAAAAAAAAAXxZ
If anyone bumps into any other great deals please share!
Read MoreAre you doing something extra to prepare for this winter, because of Covid or else?
There’s a good chance that this winter we’ll go into a second lockdown because of Covid (paired with flu). So I am taking extra steps now in preparation for this winter, something that in normal circumstances I would have not felt the urgent need to do right now.
This is what I’m doing before the winter:
Changing my car’s tires. They’re not awful right now but they’re getting to the point that they need to be replaced. In normal circumstances I would have waited until next spring/summer, but in the event that something actually happens to them while we’re into a second lockdown and shops are closed I am doing that now. Winters are also snowy and icy in here so I don’t want to take any chances. Bloodwork. I have avoided doing tests (routine or otherwise) or go to the dentist throughout the summer, but I am taking advantage of this window where infections are lower to keep on top of my health. My GP herself suggested I’d wait on all of the other stuff, but she’s of the opinion that I could at least do some quick bloodwork now. It should be quick, in and out. Let’s call it a calculated risk. CCW permit. Ok, the reason why I feel compelled to that that now rather than later, is more political than infection-related. Although this is not the place to open that can of worms, I always hope for the best and prepare for the worst. Yup, I’m taking my CCW permit in case shtf in Nov.Are you doing something extra now to prepare for this winter?
Read MoreGuide to buying an AR-15?
After reading Armed Neighborhood Groups Form In The Absence Of Police Protection (https://www.npr.org/2020/06/03/868464167/armed-neighborhood-groups-form-in-the-absence-of-police-protection), I find myself highly motivated to buy an AR-15.
Ideally I would read a non-yet-extant article on the The Prepared with background information, reviews, and recommendations. In absence of this can anyone point me to the next best thing?
Read MoreBasic Medical Guide
Does anyone have a “step by step” or “how to” guide regarding the most common injuries we should expect in a bug out scenario? Obviously I know how to treat a cut or small burn, but I’d love a guide in my pack that would walk me through some of the most common injuries and procedures up to or including gunshot wounds, heavy burns, breaks/sprains, etc. I know it won’t be an exact guide but I’d like to at least have something to go by if someone ingests something toxic, gets shot, breaks a bone, etc rather than me being left to myself trying to fumbile through these scenarios in the wild. What do y’all have?!
Read MoreWeird pandemic coping mechanisms?
I have this new thing I do when I get nervous about the future and start to stress out about the pandemic: I buy boardgames.
This is totally random and irrational. I’ve only played like four of the new games I’ve bought in the past two months, but I have this thing where I’m like: “Crap, if it gets real bad I may not be able to buy this game I’ve been eyeing…. I should just pull the trigger now.”
I guess there are worse coping mechanisms I can think of, so even though it can get a little expensive it’s mostly harmless. Plus, boardgames don’t really get obsolete and can be enjoyed for decades, and they don’t require power or other critical infrastructure, so they’re sort of prepper-friendly.
A lot of my friends have gotten into bread baking. I have a yeast allergy, so that’s not an option for me.
Anyone else have any weird pandemic coping things they’ve picked up? As in, something that’s kind of quirky and doesn’t exactly make a ton of sense, but it’s just how you deal?
Read MoreAn example of why ham radio is important
In wildfire-stricken areas, the fires are taking down cell towers and sometimes even Internet access, and people in those areas struggle to find out when they need to evacuate. There was a particularly heartbreaking story out of Oregon where a couple was very badly burned and their child died because they were entirely off-grid and had no other means of getting information from the outside world.
Sadly, that entire situation could have been prevented if they had the skills and equipment to stay in touch off-grid, even a simple shortwave receiver. Get your comms up!
Read MoreForum discount code for our new video course on blade/knife sharpening
To say thanks for being in the forum, use code FORUM33 before October 16th 2020 to get 33% off the first video course: https://theprepared.com/courses
That’s only $10 for 5 hours of content, lifetime access, and free course upgrades. The course is equivalent to what you’d get at an in-person weekend course, but specifically geared towards modern preppers.
Trailer, lesson plan, and instructor info on the course details page: https://theprepared.com/courses/knife-sharpening-maintenance/
Read MoreStill confused after reading the 2019 air gun review
What is the best choice for best chance of killing or incapacitating an intruder with an air gun? I figure it needs to be able to fire multiple rounds and those rounds should deliver as much energy as possible through a combination of weight or velocity in a weapon small enough to manuever in a small space like a bedroom. I saw something called Drozd Blackbird. With that high rate of fire, would those pellets do anything?
Read MoreHave the wildfires made you rethink your plans?
Hello everyone, long time reader, first time poster. Let me start by thanking everyone responsible for this invaluable resource.
I, like so many other preppers, have long imagined, and have been actively working towards, a dream of moving out to the forest to create secluded and sustainable compound. It’s the ultimate prepper dream, one that many have already realized. But the wild fires of the past few years really have me rethinking this strategedy. There is no doubt that these fires have been a total SHTF event for many people, and there is a cruel irony imaging it happening to those who moved to remote regions to avoid catastrophy – only to realize they inadvertantly placed themselves right in catastrophy’s way.
I’m curious if people are re-thinking this long held prepper blueprint. It’s not like these fires are going to stop if there is some larger societal breakdown, in fact without active fire-fightening agencies the fires will only be worse and more severe. I’m also curious to hear from those of you who are currently living in remote locations and wondering if wildfire response has become part of your preperations.
I look forward to hearing your thoughts!
Read MoreGetting started in gardening
Developing a successful garden requires some preparation and basic knowledge, but no complex skills. It’s fun – especially if you love cooking or have kids – and it’s pretty cheap, especially if you focus on growing things from seed instead of buying plants from a nursery and if you compost instead of buying fertilizer. Even if you have no tools at all, you can get started for less than $100 (assuming you don’t buy a wheelbarrow). If you own the basic tools, you can get started for $25 or less. A small garden won’t make you food self-sufficient, but it will add variety to your table and it will give you the skills you need to expand your garden rapidly if you do want or need to grow more of your own food at home.
I’m writing this post in mid-July, when many people might think they’ve missed the window to start. Good news: you haven’t. There is a fall gardening season starting in a few weeks. Start preparing now and you’ll be ready.
I’m writing this post as a Quick Start-style guide. I’ll give you the major points and some details on why they are important and how to do them. I may update and expand it or add supplemental guides as I have time and as the seasons change. Other experienced gardeners should feel free to chime in with their advice. Novices should feel free to post questions.
Here are the main steps, each of which are explained in detail below:
1) Pick a sunny spot big enough for two 4×8 foot beds
2) Order your seeds
3) Prepare your soil using double dig or hugelkultur methods
4) Plant seeds
5) Water frequently until seeds sprout, then less often
6) Mulch heavily
7) Thin seedlings as necessary
8) Manage your weeds
9) Harvest or prepare crops for overwintering in the ground
10) Put your beds to rest for the winter
11) Compost
Obviously, these are my personal opinions, based on my experiences and reading. I make no claims of professional expertise. Use at your own risk.
Quick Start Guide to Gardening
1) Pick a spot in your yard that is sunny all day long and convenient to check on. It should be big enough for two 4×8 foot beds with a 3 foot row between them.
Too many people (including myself when I started) assume that the garden will be unsightly or will somehow offend the neighbors, so they try to tuck it into some far corner of the yard where no one will notice. Don’t do this.
You need to pick a spot that gets as much sunlight as possible each day. Go out at 7am, 10am, noon, 3pm, and 5pm and look at how the shadows move across your yard. Find the spot or spots that get maximum sunlight. Gardening guides talk about a minimum of 7 hours, but you don’t need to count. Just find the spots that get the most sun.
Also, your garden will do best if you visit it every day. Some plants, like peas, actually bear more heavily if they are picked often. Some vegetables, like okra, get tough and inedible if left on the plant too long. So when choosing among your sunny spots, try to put your garden someplace where you will see it and walk by it every day.
If you don’t live somewhere with a strict HOA, consider a front yard garden. Most front yards have fewer trees and so more sun, and you’ll see it whenever you open your front door, get the mail, or get out of your car (assuming you’re driving anywhere these days). Yes, the garden can get unruly, especially in summer, but the flowering plants are often beautiful and kids absolutely love a garden, especially if you plant things like sorrel or snow peas that they can pick and eat. It’s a like a treasure hunt for edibles. It will become a conversation starter with neighbors, and may inspire some of them to start gardening too.
You may also consider drainage. Being toward the bottom of a hill, where the soil is continually moist, can be good, but don’t pick anyplace that is constantly muddy or gets big flows of water during rainstorms.
Select at least two rectangular patches of about 4×8 feet. If they’re side by side, leave at least 3 feet between them to walk and kneel. If you are very ambitious, you can add a third patch, but I would suggest starting modestly and adding beds over time because preparing beds is a lot of work.
2) Order seed. Focus on fall vegetables like carrots, beets, turnips, kale, collards, radishes, mizuna, and green onions.
I put seed ordering second on this list because you need to make sure that you actually have a suitable space to garden before you order seed and you may choose to order more if you decide on a bigger garden.
As a very rough rule of thumb, a typical packet of seed will fill at least half of one of your 4×8 beds. (We’ll talk more about plant spacing below.) You’ll also want some variety, so with these things in mind I would suggest buying 4-5 packets of seeds for two beds.
The key things to consider here are your frost date and time to maturity. You want plants that will produce food before the first frost in your area (you can look this up online ‘first frost in [zip code]’). When you start browsing seed, you will find in the seller’s description (if shopping online) or the seed packet (if you are in a store) a ‘time to maturity’. For most root crops and greens, this is the typical time from planting the seeds until the plant is ready to eat. Pick things that can be ready at least a week or two before your expected frost.
A word of caution: things get more complicated if you are growing crops where you eat the fruit of the plant – things like tomatoes or okra. Then date to maturity means the date when the plant starts to produce food. If you want a good harvest, you’ll want another 2-6 weeks or even more to regularly harvest the produce. Also, some plants, like tomatoes and peppers, are typically started in a greenhouse or indoors under grow lamps. (Often the description/packet will mention something about starting indoors.) In that case, ‘time to maturity’ begins from when the juvenile plant is brought outside and planted in the garden. For your first fall garden, I don’t suggest trying anything you need to start indoors, and you will save money if you don’t buy whole plants from a nursery.
What to plant? I suggest things like carrots, beets, turnips, radishes, mizuna, kale, collards, or green onions. All of these are fairly simple to grow and come in multiple interesting varieties. I suggest having some fun and picking things you don’t always see at the grocery store (at least where I live): Chioggia beets, Lacinato kale, French breakfast radishes, red carrots, etc.
Some people grow legumes as a fall crop, but you may need to build a trellis, so I don’t recommend it for your first garden. You might try garlic, especially if you want to eat the immature green garlic in the spring, but I won’t cover the details here, so you’ll need to find a guide online. Choose hardneck varieties so that you can eat the garlic scapes.
Where to buy seeds? You can order from a big nursery company, like Burgess or Gurney. Buying seed packets from your local nursery or big box store is fine too. But far and away, I have had the best results with ordering from Seed Savers Exchange (SSE), which sells heirloom, organic varieties. Their shipping and handling can be higher, but their seed prices are reasonable.
3) Prepare your soil using the double dig method, which will create frameless raised beds.
There are many, many ways to prepare garden beds. I like the double dig method because it’s effective, it uses simple hand tools, and it creates raised beds without having to build framing. You can find out more about its benefits here: http://www.growbiointensive.org/FAQ/FAQ_DoubleDigging.html It does require some sweat and effort, but you don’t have to do it all at once. You can do part of the project every day until it is done.
I’ve also included a note about hügelkultur (building sharply raised beds over dead tree trunks or branches) below.
If you are physically unable to dig or have contaminated soil (e.g., you live in an urban neighborhood where the houses were painted with lead), you can look into bag gardening and straw bale gardening as easy ways to get started without the expense of building framed beds and filling them with clean soil. I don’t recommend using a rototiller. It breaks up the soil structure and doesn’t get deep enough.
The double dig method works like this:
1) Read this list all the way through. If you are going to skip step 7, mow your grass really short on the selected patches. If these instructions are unclear, see if you can get a copy of How to Grow More Vegetables by John Jeavons – your library probably has a copy. It has illustrations.
2) If you don’t have them, buy:
a. D-handled, square bottomed spade (basically a square-tipped shovel)
b. D-handled spading fork (looks like a pitchfork, but isn’t)
c. Large plastic watering can (cheap and durable) or a sprinkler and hose
d. Optional: Tape measure (you can get by using string or a garden hose or a ruler)
e. Optional: Hard rake (bow rake or level rake, not a leaf rake)
3) Water thoroughly the space you have selected for your beds or wait for rain. You want moist soil (moist like a good cake), not mud. If you pour water on the spot and any standing water is not absorbed into the soil within 2 seconds, stop watering.
4) Wait a day, so the water can soak in
5) Use the spade to cut the edges of your rectangle. Go all the way around your 4×8 foot bed, just driving the blade in and taking it out. You can use a tape measure to make sure the dimensions are correct, but I wouldn’t too much worry if it is exactly square; the edges won’t be perfect anyway if you’re not building a frame. (If you really do want it square, you’ll need 4 stakes – scrape wood or sticks work fine – and some string. Use a measuring tape and your eye to get a 4×8 shape (make sure you have two 8’ sides and two 4’ sides), tying the string around each stake so that the lengths of the sides can’t change. Then measure corner-to-corner, diagonally across the bed. Adjust the stakes until the diagonals are equal. Now your bed should be square.)
6) Use the spading fork to break up the top layer of soil. Start about 12” from the short side of the bed, touching one long side. Step on the fork to drive the tines all the way in, and then pull backwards on the top of the handle until the tines come almost out of the ground. Then lift low on the shaft, just above the tines, to pull the head out of the soil.
Work sideways until you have gone all the way across, then step back 12” and repeat. Work backwards until you have forked all of the bed. You always work backwards to avoid compressing the soil. Note that you are just loosening up the soil, not ‘turning it over.’
7) Pull up all of the grass clumps. (Truthfully, I don’t always bother. Sometimes I just cut the grass really short with the mower before I start and leave it there. You may have to deal with more weeds later (grass in the garden = weed) but it saves time and effort at the start.) Set aside the clumps to compost.
8) Dig the bed. Start again at the short side of the rectangle:
a. With your spade, dig out one 4 foot row of soil, putting it some buckets or wheelbarrow.
b. Take your fork and stand in the trench you have created. Fork over the soil at the bottom of the trench. The goal here is to loosen it up to make it easier for plant roots to penetrate. Don’t worry if it’s still a bit chunky.
c. Move over 12” and start again. Shovel the dirt from this new row into the trench from the first row. Don’t turn over the soil. Just let it slide off your shovel in way that helps it break up and fluff up a bit. Once you have an open trench again, fork the bottom.
d. Repeat until you get to the end of the bed. After you fork the bottom of the last trench, fill it in with the soil from your bucket or wheelbarrow.
9) Use a hard rake to level the top and shape the sides of the bed. All of that forking and shoveling will have added air to the soil (which is good), and raised the soil level 3-6”. Also, if you skipped step 7, raking may let you get out some clumps of grass.
10) Water the soil lightly and let it settle for a day before planting.
Alternative method: Hügelkultur
Hügelkultur involves using dead wood (preferably green) as a source of nutrients and moisture retention for your vegetables. It can work well anywhere, but I think it is especially good on gently sloping ground, where it can make de facto terraces. Be aware that these are much less attractive than traditional garden beds, especially if you are doing a front yard garden. Here are your steps:
1) Use a spade to outline a space about 2×8 feet. On a hill, make this perpendicular to the slope. You can even make the shape a very gentle ‘U’ or arc, so that water running downhill will be caught in the belly of the U.
2) Dig out the trench about 12” deep. Try to keep the top grass layer together. You might try cutting the grass out and putting it on one side of the trench and digging the soil and putting it on the other.
3) Fill the trench with green wood from recently cut trees, until the wood is slightly higher than the surrounding soil. Whole tree trunks are great – they don’t need to be split. Branches with leaves still on them are great too. The wood acts as a nutrient source for the plants and a sponge that soaks up and releases water. You can use woodchips, but they will decompose faster, so you’ll lose the special properties of a hügelkultur bed after a couple seasons.
4) Put the grass upside down on top of the wood.
5) Put all the extra soil on top of the upside-down grass
6) Dig out a shallow trench (about 6” deep) on the uphill side and dump the dirt from that on top too. The trench will help catch water, especially if you built your bed in that gentle arc.
7) When you are done, your bed will have a tall, almost pointy shape, like a miniature mountain range. The dirt will have probably run down the sides, making the bed closer 3×8 or 4×8.
8) Give the soil a day or two to settle before planting. You can plant on the peak of the bed and along each side, especially near the top.
4) Plant seeds. Time your planting so that the plants will mature at least 2 weeks before frost. Use the ‘space between plants’ directions for your seeds for the space between plants AND the space between rows. Don’t walk on your beds.
How late you can plant your fall garden depends on your climate zone. Find your frost date and then use the time to maturity information on your seeds to figure out how early you need to plant. Hedge your bets by adding 1-2 weeks to the time to maturity.
Plant your bed while kneeling on the path next it. Don’t walk on the bed. It will undo your hard work in the double-digging. If you absolutely must walk on the bed for some reason, put down a board and stand on it to distribute your weight.
The instructions that come with your seeds (or are found on the website where you ordered them) will give instructions for space between plants and space between rows. The spacing between rows assumes that you are growing a large, conventional garden rather than a densely planted raised bed. Ignore than number, and instead space your rows just as far apart as you space your individual plants. This will make better use of your garden bed space and, as your plants grow up, their leaves will help shade out weeds and trap moist air close to the soil. For plants with wider spacings, stagger the rows to make better use of space.
You can make spacing easier by finding a piece of scrap wood and marking common planting spacings on each edge. Adjust where you start the markings on the second edge, to create staggered rows. Another option is to make a cardboard triangle with each side the length of the desired distance between plants. If you put a seed on both bottom edges and the top point, you’ll get two staggered rows as you move it along.
Plant seeds at the depth specified on the package. If you are working with very small seeds, you can try making a little chute out of a folded scrap of stiff paper, putting some seeds in it, and then shaking them off the end one at a time. If you get too many seeds in your row, don’t worry. You can thin later.
Not every seed you plant will germinate, so many plants suggest a dense planting (e.g., every 2”) followed by a thinning (e.g., thin to 4”). For the best harvest possible, you should follow this. However, if thinning sounds like a tedious chore (and it can be), you can plant seeds at the thinned spacing (e.g., every 4”) and just accept that you will have a smaller harvest if 20-30% of your seeds don’t germinate.
5) Water. Water as soon as your seeds are in the ground. Water frequently (at least every other day, unless it rains) until your seeds germinate. Soil should be moist, not muddy. Then water less often but monitor soil moisture regularly.
Once your seeds are in, water gently. A watering can or sprinkler will work.
To know if you have given enough water, spray or pour out a bit of water and count how long it takes for the soil to absorb it. If the standing water is gone quickly, keep watering. If it is not absorbed after 2 seconds, stop watering.
Keep the surface of the soil moist until your seeds sprout. Moist means like the inside of a good cake, not mud. Feel the soil with your hands; don’t just look.
Once your seeds have sprouted, they will still need regular watering or rain. To know if your soil needs water, push your fingers into the soil about 2”. If the soil is getting dry 2” down, it’s time to water.
Aim for fewer, more thorough waterings. This encourages root development.
6) Mulch. Mulch is the key to efficient gardening. It suppresses weeds, adds nutrients to the soil, and traps moisture.
Mulch is almost any organic, weed-free medium that you can spread over your soil. You can use leaves, grass clippings (preferably mixed with leaves), or wheat straw [see Josh’s post below, however, about buying these things]. My favorite is partially decomposed compost.
Mulch keeps weed seeds from reaching the soil, reducing the amount of weeding you need to do. It also traps moisture and keeps the soil from drying out. This reduces the need for watering and also makes your soil a friendlier place for helpful creatures like earthworms. The mulch will break down over time and the worms will incorporate it into the soil, making it healthier.
When you have seedlings, spread your mulch between the rows. After you thin your plants (if you are doing that) you can spread your mulch further so that it surrounds every plant. It can touch the plants – that’s fine. Just make sure that it is lower than the lowest leaves.
As your plants grow, deepen your mulch. 3-6 inches deep is ideal, but you’ll get plenty of benefit out of just 1-2”. Make sure to add more as your mulch decomposes.
7) Thin seedlings. If you planted anything that needs thinning, use scissors to snip off unwanted seedlings just above the soil. If the mature plant has edible greens, put the thinnings in a salad.
8) Weeding and pest management. Weed as necessary. Don’t let weeds take over your garden. You probably don’t need pesticides.
Weeds compete with your plants for sun and nutrients. With close plant spacing, you will have fewer weeds once your plants mature. Mulch will help too. But do take the time every few days to pull whatever weeds you find. A hoe can be helpful, especially if you have trouble bending over, but you can also pull weeds by hand. If you have neglected things and need to remove a lot of weeds, a hand cultivator (looks like a large, bent fork) or similar tool will make things faster.
Pest control is tricky to advise on, since things vary by region. Research organic solutions online if you’re having a serious problem. I use almost no chemicals in the garden and rarely have problems (I’ve used neem oil a few times). Cool fall weather means fewer bugs and the larger crops you’re planting mean that a little damage is more tolerable than if slugs eat one of the only 3 pepper plants in your garden.
9) Harvest. Research which of your crops can overwinter in the ground. Research best ways to store. Use all of what you harvest.
If you are checking on your garden regularly, you’ll get a sense for when things are close to being ready to harvest. Don’t worry if things seem to start small or grow slowly. Your plants will grow faster as they get larger and develop more leaves and roots.
You can check your root crops by brushing away some mulch and soil and checking the diameter of the top of the bulb. Cover it back up if it’s too small, although recognize that your garden vegetables won’t always be as big as what you’re used to at the supermarket (especially conventional produce grown with fertilizer).
Not every plant will be ready at the same time, and you can also start using some things when they are on the young side, to have a continual flow of fresh produce into your kitchen.
Not all crops needs to be pulled when they are mature. Some plants will overwinter in the garden depending on your climate. Kale can overwinter in some places. Carrots can stay in the ground even in some cold climates, if you mulch them really heavily so that the ground doesn’t freeze around them. Research your crops and your climate.
You’ll also need to do research on storage techniques. Many greens freeze well if blanched in boiling water first. Many root crops store well in the fridge (or even outside it, if you have cool, dark space). Perhaps someone else can create a guide and forum on food storage to provide help.
Lastly, make sure to research how to use all of what you harvest. Radishes can be roasted and pickled, not just eaten in salads. Radish greens are edible and beet greens and turnip greens are delicious. You don’t often see them attached to the roots at the store, but don’t reduce your crops to their supermarket brethren. Use all of what you get. A little online searching will yield numerous recipes.
10) Put your beds to rest. Any beds without overwinter crops should be heavily mulched.
Clean any plants or weeds out of your beds (including the roots of any greens you have harvested) and then put down a thick layer of mulch. This will protect your soil until spring. This can be as simple as blowing the leaves from your yard over your garden bed.
11) Compost. Collect your kitchen scraps and yard waste to enrich your garden in the spring. You don’t need a special bin, but you do need to alternate layers of ‘green’ waste (fresh grass, weeds, or kitchen scraps) with ‘brown’ waste (leaves, straw, or dry grass).
Compost is just decomposing organic matter that breaks down, over time, into a rich humus. Added to your garden, it will restore nutrients, loosen up your soil, and introduce beneficial organisms. It is far, far better for your soil and plant health than chemical fertilizer, and you can make it at home for free.
If you layer your compost properly, it will, well, compost instead of rotting and will not be particularly smelly.
A lot of science has gone into studying how to get the most soil nutrients out of your compost pile. It is worth reading some of that information, but a lot of that literature assumes you are building a whole compose pile at once, and so can layer it in a fairly scientific way. Most people don’t have enough waste on hand to do that. Here is what you can do instead:
1) Pick a good spot (most people go for someplace out of the way, but others like to put the pile right in their garden, so that it enriches the soil underneath it).
2) Loosen the soil under the pile with a spading for and then put down a 1-2 inch layer of brown material about 3 feet in diameter – leaves, straw, dry grass, old corn stalks, etc. Basically anything from your yard that looks brown and dry and isn’t a twig. If you blow your leaves, blow them into a pile next to where you compost pile is to have on hand. You can buy a bale of straw from your garden center if necessary [but see Josh’s caution in his post below] and use a few handfuls from that if you have no brown waste in your yard.
3) Get a compost bucket for your kitchen. You don’t need to spend any money. Go to the bakery at your grocery store (if you are still going into stores) and ask them if they have any old frosting buckets. Get a bucket with a lid. I find that a smaller one (about 1.5 gallon size) can hold a week of kitchen waste. It’s better (less smelly) if you empty it more often, but you may not have the time.
4) Put in your compost bucket everything that is not oily, meat, or dairy. Some people skip egg shells out of fear that they’ll attract rats, but I’ve never had that problem. Collect vegetable scraps, coffee grounds (with the filter), tea bags and leaves, white napkins, etc.
5) When your bucket is getting full or you have the time, take it to your compost pile. Dump it out (may be quite smelly if it has been a while since you last emptied it) and use a stick to spread it into a layer (more or less, no need to be precise). Throw leaves or other brown material over the top to get at least a 1-inch layer. Tip: if your bucket is really smelly, rinse it out and then pour a half-inch of white vinegar in the bottom. No need to empty it; just start collecting your next batch of waste on top of the vinegar.
6) If you do weeding or mow the lawn and bag the grass, put that on the compost pile too. If it is a large amount, break it into several layers 3-6 inches thick, depending on how dense the green waste is, with brown waste between them.
7) When your pile gets to be about 4 feet in diameter at the base and 3-4 feet tall, start a new pile. Take a spading fork and mix around the old pile, to mix up the layers and add some air.
8) Wait a month or two and you can use it as mulch. Wait 3-6 months and it will decompose noticeably and you can add it to your soil like fertilizer in the spring.
12) Resources. The Prepared will be updating the Best Survival and Prepper Books page soon to include a good selection of gardening books. Watch for the revised list. In the meantime, start with How to Grow More Vegetables by John Jeavons if you want to learn more.
Read MorePortable propane grill recommendation
Hi all,
We’ve been re-evaluating our preparedness supplies, and we’ve decided that we’d like to purchase a portable propane grill. We’re looking for something that would be used primarily at home with the option to place it into a car for transport. Camp Chef is pretty widely recommended, but we’d prefer not to buy a product made in China (we will if that’s truly the best option). Any suggestions?
Thanks in advance.
Read MoreHow Climate Migration Will Reshape America (NY Times)
“Millions will be displaced. Where will they go?”
I listened to this today and thought it would be of benefit to all my fellow preppers. Be well. Be safe. Be healthy.
How Climate Migration Will Reshape America (stream/podcast episode)
Synopsis:
In August, Abrahm Lustgarten, who reports on the environment, watched fires burn just 12 miles from his home in Marin County, Calif.
For two years, he had been studying the impact of the changing climate on global migration around the world.
Suddenly, with fires raging so close to home, he had to ask himself the question he had been asking other people: Was it time to move?
This week on The Sunday Read, Abrahm explores a nation on the cusp of transformation.
If you’d rather read, here’s the NY Times article: How Climate Migration Will Reshape America
If you’d like to avoid ads, trackers, etc. or cannot access the article, HERE is the Internet Archive back-up.
Read MoreCarrying extra shoes when bugging out
This is a very specific question, but… I have my walking shoes sitting next to my BOB. I am planning to grab them if I have to bug out. The reason I might not be wearing them is that I prefer to wear a much more comfortable pair of sturdy sandals. I can walk longer in the sandals without foot pain, but I realize I might have to change into more protective shoes if I’m evacuating in a SHTF scenario. I am wondering what the best way to carry shoes is in a grab and run situation. Is there gear I can use to attach the shoes to my BOB maybe?
Read MoreNot Sure What to Do Next
I’ve been reading theprepared for a while and was fortunate enough to find the website before the pandemic. I was putting my finishing touches on my go-bags in Janurary once I started hearing about what was going on in China and this website, I felt, gave me a “healthy” level of paranoia.
One challenge I’m having now is to not spiral, and keep on getting more and more equipment until I build myself a bunker. It’s hard.
I feel like I’ve got a really good base of preparedness, so I would just like to list that out and get any feedback/input on areas to improve. And maybe ask the question – what should I consider next?
We are a family of 4 (2 adults, 2 kids under 3 years old) in a large metro area in the midwest. Thankfully we have family that live in rural areas and are just a few hours away by car, if it ever got that far. But so far, it hasn’t. Here’s what I’ve put together, in terms of preparedness:
– 2 “Level 3” go-bags, as detailed from this site, stored in the closet by the front door
– whole-house generator that can run on propane or gas, with enough fuel for 1 week
– 4 weeks of shelf-stable food and 72 gallons of stored water
– 12 month emergency fund in cash
– home medical supplies, as recommended by this site
– “get home bags” in each car, separate from the Level 3 bags above
– getting solar panels installed next month that can run all electric needs for our house in the summer months
When I write it all down it seems like a lot, but I still have anxiety that it’s not enough. Welcome to 2020, I guess. Do I just need to chill? Repeat the sane prepper mantra over and over again? 🙂
Read MoreFavorite Prepper YouTube channels?
Looking for something other than the guys who just review guns and gear. Anyone have a few favorites to recommend?
Read MoreCOVID Projections – what is going on in Sweden?
So it seems to me that the two most important things to understand when considering my prepping/general actions over the next 6 months are:
1. What is the rate and severity of long-term COVID complications across the age/comorbidity spectrum
2. What path is the virus likely to take in the fall
I’m going to avoid #1 for now because I have yet to find many good sources to contribute to the discussion. For #2 I’ve been thinking about Sweden (and to a lesser extent, New York) lately.
Both Sweden and New York saw very steep growth and very high mortality. Sweden is 5th in the world at 556 deaths per million, and New York is around 790 deaths per million. If I am doing my math right, NYC is nearly 2800 deaths per million.
Sweden: https://www.statista.com/statistics/1104709/coronavirus-deaths-worldwide-per-million-inhabitants/
New York/NYC: https://www.cdc.gov/covid-data-tracker/#cases
Both Sweden and New York have deaths that dropped off fairly precipitously and have remained low. Sweden’s case counts have bounced around a bit before returning to low levels, while NY has remained low for quite some time.
These cases have been in my mind recently as I have started to see more mainstream articles around cross-immunity and heterogenity driving herd immunity.
Here’s the Atlantic on heterogenity (most susceptible get it first): https://www.theatlantic.com/health/archive/2020/07/herd-immunity-coronavirus/614035/
And Vox on the different components of Morbidity (linking to numerous other places):
https://www.vox.com/2020/7/22/21324729/getting-covid-19-twice-immunity-antibodies-vaccine-herd-immunity
(sidenote: do we have access to html [url = ][/url] and that sort of thing? That and a preview button would be nice)
Those theories represent a possible explanation for both Sweden and New York’s drop. One problem is that Sweden sero studies have returned prevalence roughly half that of New York – ~10% vs ~20-25%. Sweden is a fairly obese country from what I can tell, so I’m not sure population health covers it either. And obviously Sweden has been hit much harder than its Nordic neighbors.
So I guess my main questions are:
1. Do you think there is anything to Herd Immunity coming at a much lower threshold?
2. Is there another explanation for Sweden’s drop? I have not found good sources for what is happening on the ground regarding voluntary social distancing, mask wearing, closing of indoor dining/bars. Google mobility data seems to indicate movement is back to normal levels?
3. If New York or Sweden are indeed at some high proportion of herd immunity, should that change anything I plan for/do? I think if they are it should not impact me decisions too much in the short term – NYC/Lombardy/Wuhan still got very very bad. It might influence my more long-term decisions on how best to allocate prepping resources though.
Looking forward to hearing your thoughts!
Read MoreGMRS vs Ham
I am a licensed GMRS operator and studying for my HAM Technician license. Would like everyones input on the GMRS and ham
Read MoreHAM: Just got my tech license. Which radio to buy?
Just got my license, looking to see what transciever to buy. I’m a buy-once-cry-once type, and I’m not likely to set up a shack with multiple radios, antennas, etc. One and done. Thinking ICOM IC7300 (alternative: YAESU FT-450D) with a HUSTLER 6-BTV, ground mounted. Yes? No?
Read MoreLooking for a heavy duty folder knife
I am looking for a heavy duty folder to use as a field knife in place of a fixed blade knife. What do you recommend? In case you are wondering “why not a fixed blade knife?” I live in California where keeping a fixed balde knife ‘concealed’ in a backpack is a misdomeanor and can be a felony depending on the whim of the prosecutor.
Perhaps this could be an item for The Prepared to do a review on?
Read MoreToilet when there’s no water?
Here’s something I’ve been wondering about for a while when thinking about prepping. What happens in a scenario where we lose water at home as far as toileting needs are concerned?
Read MoreWhat documents to carry in your go bags?
I’m wondering what documents folks are putting in their BOB and Get Home bags. Here are my thoughts of what I’ve seen so far. Starting from a list I found in the BOB section of this website, with my comments:
A list of important people and their contact/location information — check
Birth certificate — my birth certificate is in Russian, so I doubt it would be useful
SSN card — really? We should carry our original SSN card? What if it gets lost?
Passport — I carry an expired one, so my current one is available for other things. Is that okay?
State ID — check: it’s always in my wallet.
List of financial accounts and credit card numbers — don’t forget the expiration and CVV codes as well as the phone numbers for your providers — Really? Is it a good idea to carry all your account numbers with you? What if someone sees them or steals them?
Titles/deeds — what kinds of titles or deeds?
Anything proving parental relationships, especially if adopted or different last names — not really applicable to me.
Pictures of important people, both for morale and to give to others for recovery/reconnection — are we talking about people we live with, or important people in general?
Health, homeowners, auto, life, and other major insurance policy numbers and phone numbers — check
Important medical history, medication (with dosage), and allergies
Living will or Do Not Resuscitate instructions — check
…..
Are there other kinds of information? What about pet-related info?
Read MoreBroadcastify – listen to police and emergency scanners
A seperate thread about emergency notifications reminded me how useful Broadcastify.com can be. For those unfamiliar, it’s a website that streams police and emergency scanners. It doesn’t always work great, but I often tune in when I hear sirens in my neighborhood. I doubt it’s as good or reliable as an actual police scanner, but it’s free and can be accessed with a smartphone. It’s an information source that is worth bookmarking…
https://www.broadcastify.com/
Read More