Share your knowledge & learn from experts
Because prepping and community go hand in hand
First Time Water Storage Questions
Hey everyone,
I am researching how to store water for emergencies and was wondering what recommendations you have for storing tap water. I purchased Scepter 5 Gallon Containers and was wondering if I have to santize these and if I need to do anything to treat the water.
Thanks for your help!
Read MoreNews for the week 2023-05-01
Make a top-level comment for a new story/topic. Discussions about the topic should be in the replies to the top-level comment. That way things stay organized and every main comment as you scroll down is a different piece of news.
Read MoreWhat do you keep in your BOB for menstruation?
This came up in a different thread about prepping resources for single women, https://theprepared.com/forum/thread/single-female-prepper-resources/
Wanted to start a separate thread to dig deeper into period prepping! 🙂 Everyone was so generous with suggestions on the other thread, thought we could continue and consolidate here.
These were the main ideas that came up so far
Menstrual cups are a good idea because they’re washable and reusable, though the learning curve can be steep and there might be hygiene issues Diva Cup seems popular but not all brands work for all people https://divacup.com/ Period underwear such as Thinx may be better for bags since they can be worn regularly and won’t add more weight https://www.shethinx.com/ Disposable paper products are cheap and can be used as a fire starter too, but you are limited to what you already carryOne person mentioned getting a UTI from her cup, so obviously everyone’s experience will be different. Whatever you choose, you should be sure to practice with it in real life. Don’t switch to a new method the same time you’re dealing with an emergency.
So… what do you keep in your bag? How do you think about prepping for periods when you’re not at home in an emergency? Has anyone gone through this, like at a shelter?
Read MoreThe new techniques and advice on how to save someone from choking
Has anyone ever saved someone from choking? What steps did you take to do so?
2500 people die from choking in the US each year. With Thanksgiving coming up this week and everyone stuffing more food into their mouths than they should I wanted to research and learn about the best techniques to save someone from choking.
Side note, did you know that Thankgiving is the deadliest holiday in regards to automobile accidents? Don’t drive drunk, and be careful when you travel.
If someone says they are choking, they probably aren’t too bad because they are able to talk. If they can breath and say things, than keep an eye on them and tell them to try and cough it up.
If they can’t speak, are having difficulty breathing, if their skin and lips are turning blue, or they lose consciousness then they do have a full on choking incident and you need to step in ASAP.
Have someone call 911.
The American Red Cross has changed their advice on choking techniques in 2006 to first start out with back blows. If that doesn’t work, then you switch to the abdominal thrusts (also known as the Heimlich Maneuver)
For abdominal thrusts, stand behind the person and place one foot between their two. Lean slightly back. You are setting up this position for the chance that they lose consciousness and fall. When you are in this position you can more easily support their weight and not fall over with them.
Wrap your arms around the waist, make a fist with one hand and aim the point of your thumb into the area between their belly button and under the sternum. Grasp your fist with your other hand and in sharp firm squeezes thrust upwards like you are trying to lift the person up.
Variations: For children you may have to kneel down to get to their level and instead of using both arms, just use your fist and with one hand thrust upwards if they are fairly small. For babies use 2-3 fingers when thrusting. See the above picture for positioning.
If you are related to Darth Vader and will be seeing him this Thanksgiving, try and avoid sensitive topics such as his deceased wife or sand. There’s not help saving you from that kind of choking.
Read More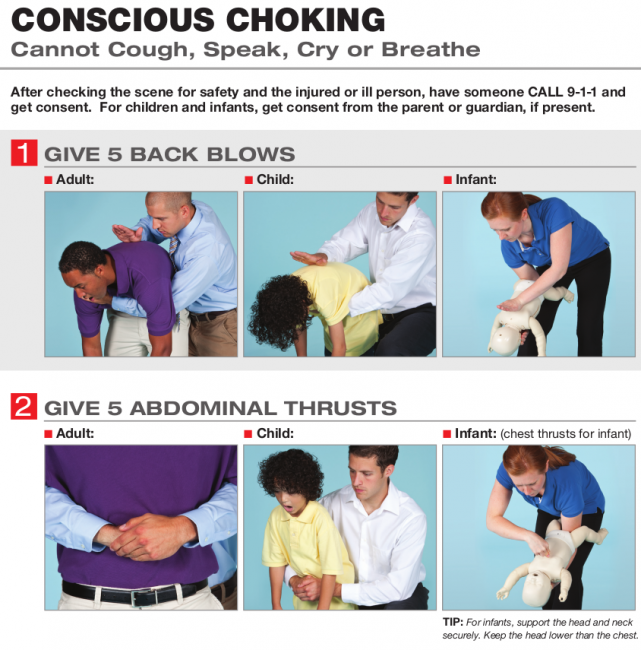
SCOTTeVEST: opinions?
Hello folks! Was reminded of an interesting clothing brand the other day and would like to ask for your opinions from a prepping standpoint.
That clothing line is SCOTTeVEST and their unique selling point is very simple: pockets, and lots of them. Back pockets, side pockets, front pockets, stash pockets, secret pockets. DeepPockets (TM), TopDrop (TM) pockets, Pocket in Pockets (TM). Pen pockets, document pockets, RFID blocking pockets. Dresses with pockets, t-shirts with pockets, hats with pockets, masks with pockets, gosh darn underwear with pockets.
It all seems very fun. But to what extent do you think this is useful? And can anyone speak from experience?
Looking forward to hearing your responses 🙂
Read MoreNews for the week 2023-04-24
Make a top-level comment for a new story/topic. Discussions about the topic should be in the replies to the top-level comment. That way things stay organized and every main comment as you scroll down is a different piece of news.
Read MoreGarden Pics
Anyone else started their garden yet? So far I am harvesting asparagus and will be soon picking collard greens. My tomatoes are in and growing fast and today I planted my sweet corn. The blackberries are leafing out now and should bloom pretty soon. Down in the orchard the blueberries have finished blooming and most apple trees are in bloom. The muscadines are just now waking up.
This winter I setup the mesh trellis and will grow my pole beans there. I’ll be planting them on those 3 rows soon. Once it gets a bit warmer, I’m gonna grow red noodle beans on the old wire trellis. I’ve never grown them but they are supposed to love very hot weather. As our planet warms, I’m experimenting with varieties that can handle temps that stay up near 100. These beans are actually related to cowpeas, such as black eyed peas and purple hull peas, but their pods, which can grow 2 -3 feet long, are edible and have no strings. They go by lots of names, such as yard long beans, asparagus beans, etc.
Read More
Best safety practices for handling fallen power lines obstructing roads following an outage (power off)
Standard advice (understandably) is never touch a power line, no matter the circumstances.
However, many people following big storms, like the ones in Northern California that downed a lot of lines just yesterday, do in fact handle dead lines to clear them from the road so they can get somewhere they need to go.
I imagine the best practice is to hold tight if possible and not attempt any handling, even if you feel certain the lines are dead.
But if there is an emergency, and a person did have to move/cut/etc dead (or live) power lines, are there any guides on best practices?
Both advice during outages where the lines are dead, as well as live wire situations, are welcome. Thanks.
Read MoreReminder – April 23rd 3pm (1500 local) Alert test by the UK government
Reminder – April 23rd 3pm (1500 local)
Alert test by the UK government
https://www.bbc.co.uk/newsround/65026368
https://www.gov.uk/alerts
Read MoreMilitary surplus: Favorite online sources and items
Question for the group:
While I recognize that there are limitations to military surplus items (tend to be heavier, can attract unwanted attention, govt purchases from the lowest bidder, etc.), I’ve been considering them for longer-term preparedness. In other words, I have my premium/lightweight items for bugging out and my heavier more durable items for bugging-in/homestead cache, etc.. Military surplus seems to be a good mix of durable, inexpensive, and quality enough for the military to use them.
Any particular favorite online surplus stores and/or items that you all have added to your stash (or milsurp items that you AVOID)?
Read MoreNews for the week 2023-04-17
Make a top-level comment for a new story/topic. Discussions about the topic should be in the replies to the top-level comment. That way things stay organized and every main comment as you scroll down is a different piece of news.
Read MoreNews for the week 2023-04-10
Make a top-level comment for a new story/topic. Discussions about the topic should be in the replies to the top-level comment. That way things stay organized and every main comment as you scroll down is a different piece of news.
Read MoreRealistic knife defense against 100% resistance.
https://www.youtube.com/watch?v=TxIyeFBmsOY
The video was approved and uploaded by the official Combat Sambo Federation:

News for week of 2023-04-03
Make a top-level comment for a new story/topic. Discussions about the topic should be in the replies to the top-level comment. That way things stay organized and every main comment as you scroll down is a different piece of news.
Read MoreShould I stay in the military to be more stable against an economic collapse?
Hello everyone.
Before I get to my question, a little bit about me for context.
I’m currently serving in the military, stationed in Colorado, and will separate from the Army pretty soon. I am a single soldier with no dependents living on base in the barracks.
I’m also a new prepper. I’ve been purchasing survival gear, 6 month supply of food, and a few tools for self defense. I’ve also been investing in gold, silver and bitcoin. What I’m prepping for is an economic collapse. I’m not very knowledgeable in the area of economics but for the past year I have been doing some research and consuming content of a few economic experts who have been watching the US economy’s path. Digesting all this information I’ve come to believe this crisis will happen some time this year or next year at the latest.
Which brings me to my question. Should I reenlist in the Army? I do want to go back to civilian life but I wonder if now would be a bad time to do so. Would it be easier to endure a crisis like this as a service member rather than a civilian? There are supposed to be systems in place for this kind of event and its seems there is a widespread belief is that things would start to get back to normal after 6 months of hardship. I have my doubts about it being so short and obviously “normal” is relative. Things wouldn’t be exactly as they were before. The Army always says it takes care of its soldiers and their families. I believe it, along with the government, would try but I have my doubts about that too. The coming crash is supposed to be REALLY bad. Will the government/military actually be able to pay/care for its service members during this time? I think back to what I know about the great depression. Before WW2 it had been going on for 10 years and had no end in sight due in large part the government trying to manage it but doing so poorly. I understand this isn’t the same country it was back them but it reminds of the saying “never underestimate how badly politicians can screw things up”.
So which would be better? Reenlist in the Army and rely on it to help me through or should I become a civilian and link up with the local prepper community for assistance? Thoughts?
Read MoreTest your gear and run scenarios in advance of a real emergency
I used the recent power outages as a dress rehearsal of sorts and it was a good thing. I have not yet had the proper electrical corrections installed for a direct hookup for the generator. Cost and time just hasn’t been there until now. So….I had to run extension cords to power the basic necessities. Ran into a couple of minor issues I’ll have to sort out but we had lights & refrigeration while most of my neighbors didn’t. For the new-to-prepping, don’t just assume that the stash of stuff in your basement/garage/shelter will do the trick when the time comes. PLAY WITH IT! Do those dry runs in advance. You may be surprised what you run into that hadn’t been considered during planning.
Read MoreChecking/refilling my 5-gallon jugs
Hey all. About ten months ago, I filled up a handful of 5-gallon Sceptor water jugs. This was my first foray into long-term water storage.
I was advised at the time that I should periodically empty and refill these jugs with fresh water. How often do you y’all do this? 6 months? A year?
Also, for the first time today, I tasted some of the water I’ve been storing. It has a very mild plastic-y flavor to it. Very drinkable otherwise. Is this normal? What should I be checking for to make sure that my first efforts to store water were “proper”? I’m trying to avoid a situation where the worst-case scenario happens and I only find out then that my preparations were bad.
If it’s helpful, here are the high-level steps I followed when I originally filled these last year:
– Rinsed them thoroughly inside with warm water and dish soap
– Filled each 5-gallon jug with water and about 1.5-2ml of bleach. Let sit for 15 minutes. Flip, let sit for 15 more.
– Dumped out the bleach water, rinsed it really good
– Filled with tap water
– Screwed on caps tightly. Stored in a cool, dark place
Would you recommend that when I empty the jugs to fill them fresh, I repeat all of the steps above? Or is a simpler process ok after the first time?
Read MoreCERT Training
I went through CERT training in early 2019, but seems like folks went their separate ways afterwards and the local EMA sponsor lost interest. There’s a number of CERT teams in our area according to the FEMA CERT website, but a random phone call to the numbers listed result in either “no longer in service” or “we don’t do that anymore.”
If you’ve been through CERT training, what was your experience afterwards? Is your group still active?
Read MoreHow often do you run your portable generator?
For those who have portable generators, how often do you run them?
I have 2 generators that I run for 30 minutes once a month that coincides with the monthly siren test on the first Saturday of the month. I also run one of the generators to power the whole house for 30 minutes twice a year. I have an interlock setup versus a transfer switch so I can select which circuits I want to power.
Read MoreSurvival movies
Set out on a quest today…to watch a whole list of “survival movies”….movies where the end of the world has come or is threatened and people are trying to survive. I’ve seen “Panic is year zero” many years ago, not bad, “The Road” which was shot here locally, “On the Beach”, “Red Dawn” and a few others. Today’s movie was “No blade of grass”, a completely terrible 1970 movie shot in Great Britain on budget of about $8. In its day, it was controversial because it had an explicit and long rape scene. What a stinker! Wish someone would make a movie out of “Alas Babylon”. What’s your favorite prepper movie?
Read More
Prepper Chat Night – Friday March 17
March prepper chat nights are Friday, March 3rd and 17th at 6pm PST/9pm EST.
And as a reminder, Prepper Chat Nights are on the first and third Friday of every month on Discord by video or voice chat with other members of the community.
Read More
Refrigerator / freezer alarm recommendations
I want to get a fridge/freezer alarm for the two units I have and to get some kind of warning if the power were to be out and temperatures were heating up. That way I could have a little notice to do something about it like hook it up to a generator or pack it in ice to save the food I have in there.
While browsing through Amazon for such a product, I quickly noticed that many have all these fangled settings, displays, functions, and phone apps. I want a simple alarm to go off if the temperature rises above a certain amount, not some 12″X12″ display on my wall that tells the weather and a daily joke.
This one was promising and simple but but reading the reviews it says that the alarm is not very loud and only chirps for a few seconds before turning off. This is a deal breaker for me because I want a constant loud alarm to get my attention as soon as I come home from work and not risk missing it.
Does anyone have an alarm that they recommend?
Read MoreMr. Heater to the rescue again!
Once again, an ice storm moved in this week and I lost power for most of the night. It was late enough that I decided to not run the generator but the house was getting cold. So I brought out my 30,000 BTU LP portable heater, and set it on the hearth. It is ventless and has a carbon monoxide sensor but to be extra safe, I cracked open the flue. Last year, I posted about using this heater and my generator at my mother-in-law’s house. This year it was my turn. It has a thermostat and set on 2 out of 5, it kept the center of the house toasty warm and ran for about 3-4 minutes every 15 minutes. This Mr. Heater is probably the best prepper investment I’ve ever made… and I’ve made a lot. 🙂
So typical of a prepper, I had my generator ready to run if needed. I had both Humless solar generators in use. One was just running a few LED lights and recharging other lights. The other was beside my recliner, keeping my phone fully charged and powering my CPAP. I’m one of those that can not sleep without a CPAP anymore. Without it, I start snoring as soon as I fall asleep and the snoring now wakes me up. So if I’m gonna sleep, I have to power the CPAP. Having solar generators allows me to use such equipment without running the generator. I prefer to not run the generator overnight, while I’m sleeping.
Took this pic from the recliner.
Read More