But it’s very unlikely you’ll be able to rub two random sticks together (it’s a lot harder than you think). And even though a BIC lighter is one of the best dollar-for-dollar and pound-for-pound survival products ever made — partly because it’s so dummy-proof — you should still put these 80-20 basics in the back of your mind for when you’re caught without one.
If you only watch one video:
Safety advice worth listening to
Too many wildfires and house fires are caused by people being dumb or making mistakes. Common-sense stuff you’d learn from an old timer:
- A fire is not out unless you can put your bare hand in it (not near it).
- Burying a fire is helpful, but that does not always put it out. Buried fires can keep smoldering for a long while, with the risk of wind re-exposing and spreading the embers.
- You need a safety buffer around outdoor fires to keep everything contained. Build rock rings, dig holes, push any possible fuels back at least a few feet away from the fire, be mindful of overhead fuel such as a dried tree limb hanging down, etc.
- Wind is often the factor that turns a handleable fire into a disaster, and wind will easily take even a barely-glowing ember downrange to reignite new fuel.
- When conditions are bad (eg. dry and windy), local leaders will enact fire bans that limit or prohibit building outdoor fires. Yes, gub’mint telling you that you can’t roast marshmallows is a bummer. But there’s honestly a good reason for the bans, so know before you go and respect the rules.
- If you get burned, run the affected area under cool clean water and then keep covered with a clean cloth until you can get it seen by a doctor.
- Know how to use a fire extinguisher.
Fire Triangle: Fire is the result of fuel, heat, and oxygen
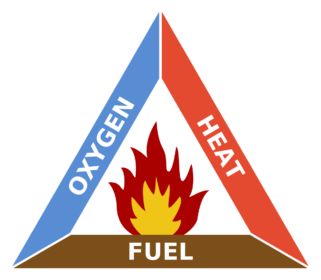
You gotta have all three in order to make fire — that’s why movies that show flames in the vacuum of space are silly.
Sometimes you’re working directly with heat, such as using a block of ice to focus the sun’s rays into a tiny spot, building up the heat until it reaches the tipping point.
On the other hand, when you strike a match or flick a lighter, you’re creating friction heat that ignites the dried fuel on the match head or the gas fuel coming from the container. So the ‘heat’ ignition step is very quick.
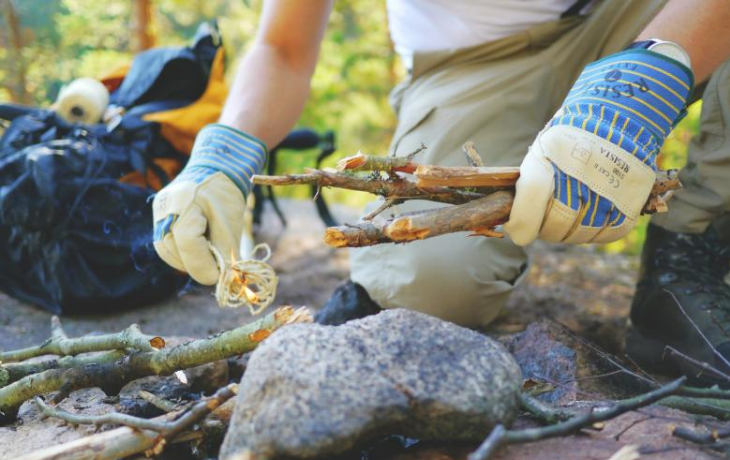
Start with tinder and build up from there
Tinder is the first step, only lasting about a minute or so before transferring to kindling.
If you’re doing something simple like using a match to directly spark a gas stove burner, you obviously don’t need a bunch of intermediary steps — in that case, the tinder is already built into the match via the wooden stick, which provides enough burn time to light the stove.
But if you’re building a fire, one of the core firecraft basics is to build up in stages. Even if your end goal is to make a big bonfire using mature logs, for example, you don’t just hold a lighter under the big logs and expect it to work.
That’s because the actual spark you create typically doesn’t last long, whether it’s by rubbing sticks, flicking a ferro rod, striking a match, etc. So you need something to quickly catch that spark and ignite, then burn long enough to transfer to something bigger.
Tinder examples
Because you want tinder that will easily ignite, look for dried-out wood, leaves, moss, and other “bird’s nest” vegetation with lots of little fibers, hairs, strands, etc. More strands means more surface area, more airflow, and more nooks and crannies that can physically catch a spark (like a small metal fragment flying off your ferro rod). Collect enough of it to create a loose bundle at least the size of a baseball or snowball.
Store-bought tinder such as TinderQuik is often designed to be frayed open before use, creating more spark-catching fibers and surface area.
Magnesium blocks are sometimes built into firemaking products because magnesium flakes catch fire and burn out very quickly. With this ferro rod, for example, you would use the back side of your knife blade to shave off bits of magnesium on top of your tinder pile — the magnesium flakes just give the tinder a little extra oomph.
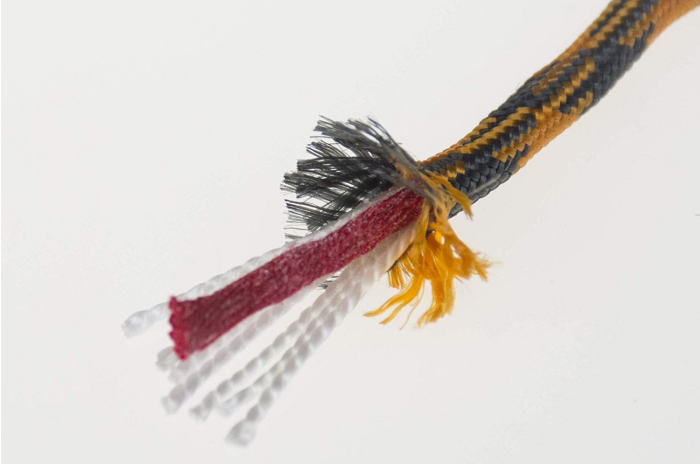
Jute twine can work, and some survival paracord can be split apart into sub components, one of which is a waxed jute line or similar tinder material.
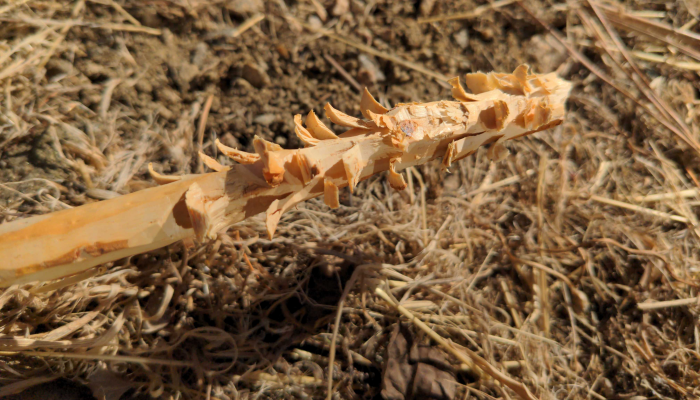
Feathersticks (pictured below) are twigs that you debark and fray apart with a knife/tool, creating more surface area and hairy strands. They can be used as tinder or first-level kindling.
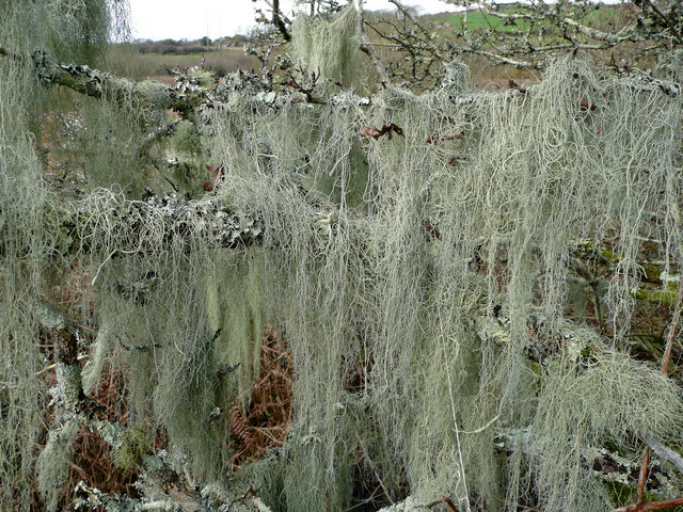
Old Man’s Beard (pictured below) is a perfect example of natural moss that makes great tinder. You can easily pick it by hand from ground level, it dries out quickly if damp, and the hairy fibers work great for spark catching.
Similar options are dried fungus, cattail fluff, cottonwood fluff, and dandelion fluff.
If you can’t easily find natural tinder, the below method breaks up layers of tree bark.
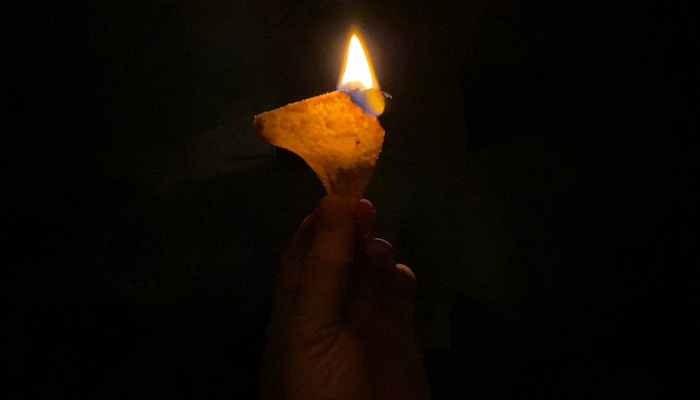
You can also get creative by using Doritos, Cheetos, and other dried snack foods high in fat.
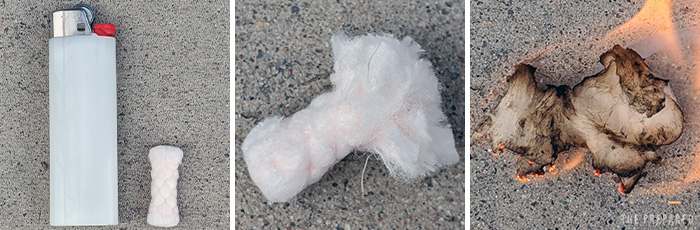
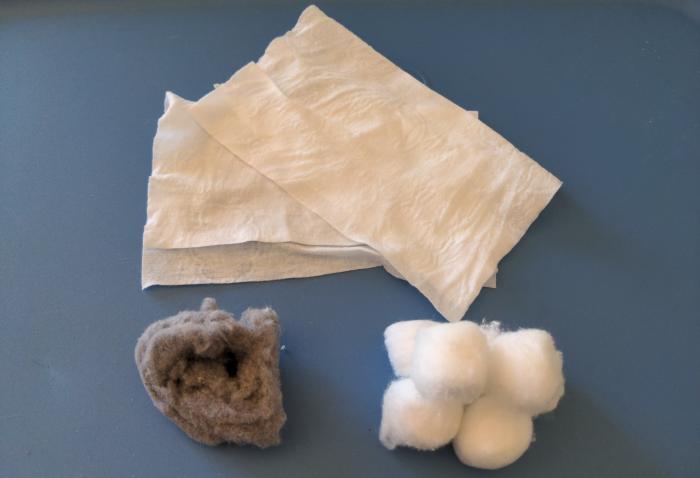
Charcloth, dryer lint, used wet wipes, or cotton balls (often upgraded with a coat of petroleum jelly) are popular DIY options.
Fatwood is just wood impregnated with flammable tree sap, either found organically in nature or bought ahead of time. Fatwood can be found in old and dead stumps or in joints of limbs of resinous trees such as pine. It will have a rich amber color and will smell like terpene. Fatwood burns hot even if wet or in windy conditions.
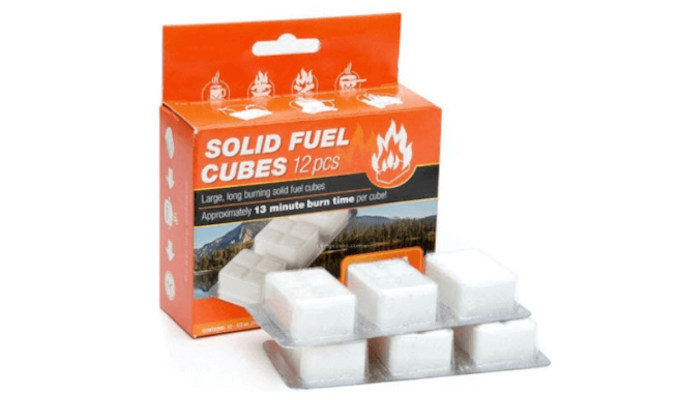
Hexamine cubes are compressed white blocks of methenamine mixed with wax. You have to hold the flame to it for several seconds. Trioxane bars are purple polymerized formaldehyde, which are easier to light than hexamine cubes (to the point you can even use a ferro rod.)
Lastly, you can of course use gasoline, crumpled newspaper, alcohol, and other common flammable materials.
Sizing and making kindling
You want to have your kindling nearby before sparking your tinder, that way you’re ready to transfer the flame in the short window before it dies.
Most people just look around for natural kindling that’s already broken/dead and dry, like branches, twigs, or even dry pine cones.

Your first batch of kindling should be pieces thinner than your pinky finger — if they’re too thick, they won’t ignite before the tinder burns out. Gather enough for a handful, or roughly enough to loosely cover a dinner plate.
If needed, the next level of kindling should be thinner than your wrist.
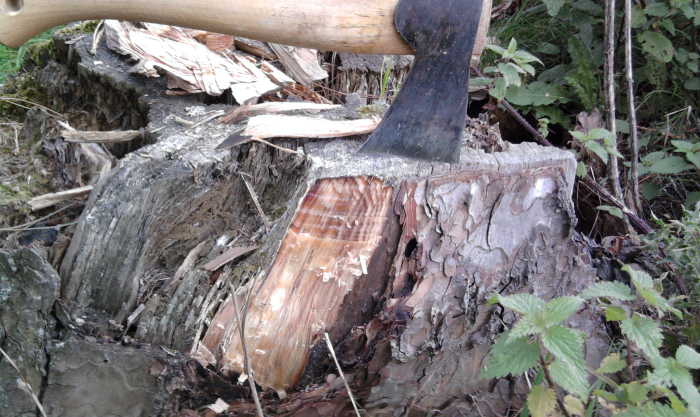
Tip: If you have trees and larger logs around, but can’t find the smaller twigs, you may need to create your own kindling with an axe, hatchet, or by ‘batoning’ with your field knife. How to baton wood:
Ranking the different ways to create a survival fire
You’ve got oxygen, fuel, and tinder/kindling ready to go. Now for the heat. There’s lots of ways you can go about this, which is great for adapting in an emergency, but some methods are much easier than others.
In rough order, starting with the best choice:
- Touch something already on fire
- Lighter
- Matches
- Ferro rods, where you rub two pieces of metal together to create sparks
- Fire piston
- Focused sunlight
- Electricity
- Rubbing two pieces of wood together, creating friction heat
- Chemical reagents
Matches
Matches are pretty self explanatory and everyone knows how to use them. But did you know if you slightly shave the shaft of the match, like you do with a feather stick, it will make it harder to blow out in windy conditions because of the additional surface area it has to burn?
Ferro rods
A ferro rod is one of the more common fire starting tools found in emergency kits and bug out bags. A ferro rod produces a much larger and reliable shower of sparks than hitting steel against a rock like flint, quartz, chert, obsidian, or agate. (But knowing how to identify those rocks can provide a good backup source of sparks if you found yourself without other options.)
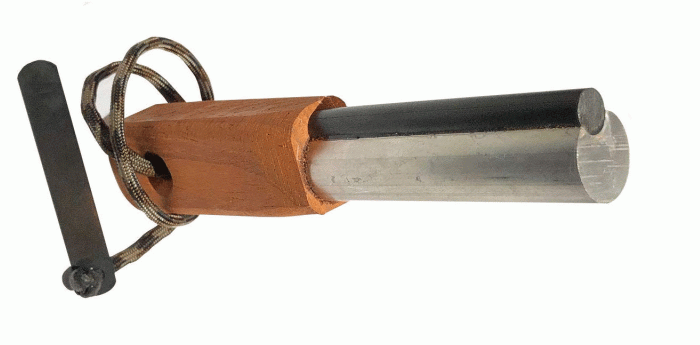
Fire pistons
There’s a unique device called a fire piston that quickly compresses air inside a contained space. It’s using some of the same science that results in your propane tank getting cold as it’s used — heat can be exchanged when gasses expand or contract.
Using the sun
- Get the focus point as narrow as possible.
- Focus the beams onto darker materials when possible, which will absorb more of the heat.
- If it’s not working well, adjust the relative angles and distances of the objects.
Can you start a fire with a compass magnifying glass?
Fresnel lens
Concave mirror
Water bottle
Ice lens
Using electricity
Steel wool and 9 volt battery
Gum wrapper and AA battery
Shorting out the terminals on a car battery
Rubbing wood together
It’s important to practice these methods before needing to rely on them, because they can be difficult to master.
- There are two main motions when creating a friction fire: spinning and pushing back and forth.
- For the methods that use a spinning motion, shoot for a harder wood for the spindle and a softer wood for the baseboard.
- To test if the wood choices you have selected will work, place your spindle in an electric drill and spin it on your baseboard. If you can’t even make a coal with that, then you won’t ever get one using your hands.
Basic hand drill
Advanced hand drill technique
Bow drill
Two man bow drill
Alternative two man bow drill
Pump drill
Fire plow
Fire saw
Rudiger roll
Chemical reagents
When certain chemicals are mixed, they create an exothermic reaction that gives off heat. You may already have some of these chemicals in your medical supplies, such as potassium permanganate and glycerin.
The many shapes and sizes of a campfire
Here are seven of the most common ways to physically build the fire:
- Tipi fire. Pros: Easy, fast, high heat, no tools required. Cons: High maintenance.
- Log cabin fire. Pros: High heat. Cons: Needs tools, long setup.
- Upside Down or Pyramid fire. Pros: Low maintenance, easy to light, works well on wet ground. Cons: Slow setup.
- Lean-to fire. Pros: Wind resistant, good for wet wood, easy setup. Cons: Burns fast, needs dry location.
- Star fire. Pros: Quick easy setup, long burn time. Cons: Low heat, needs dry location.
- Dakota fire pit. Pros: Smokeless, discreet, fuel efficient. Cons: Requires digging and prep work.
- Swedish fire torch. Pros: No maintenance, good for cooking, long burning, efficient. Cons: Long setup, need tools, hard to light.
Firecraft tips
- Shaving the bark from wood will reduce smoke.
- Place your “on deck” fuel/logs near an existing fire to help them dry out when damp.
- If tinder/kindling materials are damp, such as moss collected from a tree, try putting the material near your body (eg. in an armpit) while you work so it dries out from body heat.
- Cooking goes better over glowing coals, not raging flames.
Troubleshooting
When you just can’t seem to get your fire going, it means that there is one side of the fire triangle that is out of balance. Here are some common solutions to issues people run into:
Problems with heat:
- Most common heat problem is not having enough of it. Sparks from a ferro rod are extremely hot at 5000℉ but are created for only a second. If your tinder isn’t catching, use even finer tinder that will hold onto that spark.
- If unable to start a fire with the flame of the match, lighter, or existing flame, use finer tinder, use a larger flame, or hold onto the material you are lighting for longer.
- Avoid starting a fire on wet and cold ground. Place some logs or evergreen branches in between the fire and the ground to create a barrier.
Problems with Fuel:
- Wet wood will not light until it dries out. Even if the branch is dry to the touch, it may have been recently living and has moisture inside. Try snapping the branch in half, if it has a loud crack then it is dry, if it just bends and appears green under the bark then it is too fresh.
- Adding too much fuel too quickly will smother the fire and prevent it from getting the necessary oxygen it needs.
- Large and thick pieces of wood can absorb a lot of heat before it will start to burn, try using thinner and smaller pieces until more heat from a fire can be established.
- If the fuel is spread out too far the heat will not transfer properly to adjacent pieces. Heat also rises so if all your fuel is to the side or below the flame, it will also not be able to heat up properly.
Problems with Oxygen:
- Fire is often referred to as a living thing. And just like all living things, fire needs to breathe. Try blowing more air into the fire. Using a pocket bellows allows you to direct your air to the base of the fire without having to stick your head into the flames or smoke.
- If the wind is blowing from a certain direction, clear an opening on that side so the air will be channeled into the fire.
- You can dig a trench or adjust some of your retaining rocks to allow more airflow into the base of the fire.