Making cycling a part of your prepping
The average walking speed for an adult is about 3 to 4 miles per hour, or 1 mile in 15 to 20 minutes. Add on a 25 lb. backpack and chances are you’ll be moving even slower. Unless you’ve been training, in less than an hour, only 3 miles toward your destination, your shoulders and feet are going to be aching. Trust me, I know. Last summer I put on a 25 lb back pack and walked 3 miles several times a week. The first time was brutal. The second and third times weren’t much better. After a few weeks I was able to walk father, faster eventually hitting 12 miles in about 4 1/2 hours…but it still sucked. It REALLY sucked! My hands swelled, my shoulders ached and my feet were killing me! At that same fitness level, I was able to ride a very casual, easy 22 miles in less than 4 hours, and carry a much lighter bag but more gear. And this was on a $125 big box store bike.
Cycling is a great, low-impact workout to improve cardio, endurance, build leg strength, balance and coordination. With the right gear, you can carry far more than you could on your back. It’s environmentally friendly, quiet, requires no fuel and minimal maintenance and is a great way to meet people, hang out with friends and enjoy the outdoors. And honestly, it’s just fun. As more cities become bike friendly and gear more available, bikes and e-bikes as a part of prepping becomes a no-brainer.
But where do I start?
What kind of bike do I need for prepping?
How do I maintain and repair it?
What tools and accessories do I need?
These are all really good questions, and I’ll try to answer them as best as I can in this thread. But I also have a YouTube channel where I cover this topic and a lot more. Check out http://www.youtube.com/c/ReadyToDieFighting. I add videos every week and have a playlist dedicated to essential bike skills for preppers.
But where do I start?
If you have a bike, just start riding. It’s the fastest way to build your stamina and skill. You’ll also start figuring out what you like, need and want. Metroparks often have great trails to ride, but riding through the neighborhood or riding to run errands is a lot of fun and great exercise too. We often even bring the dog and people always stop and watch as she jogs alongside the boy on his bike. It’s adorable!
While riding, be on the lookout for shortcuts and paths you may need or want to take while bugging out. Make note of potential obstacles and areas or roads you may want to avoid. Build up your endurance until you can bike to your bugout location, then work on your time. get there faster. Find alternate routes. Learn how to efficiently go up and down curbs, bunny hop over obstacles and most importantly, safely navigate through traffic.
Look up the bike laws for your state and city. I found a pamphlet for my state called What Every Michigan Bicyclist Must Know. There is probably something like that for your state as well. Find it.
https://www.lmb.org/bike-mi/what-every-michigan-bicyclist-must-know/
Make friends with your local bike shop. Or even better, find a bike co-op. They often offer classes on bike repair, sell used bikes and gear and may even fix your bike for free. You may also meet cool people and learn about events, trails and other bike related stuff. I learned almost everything I know about fixing bikes from the cool guys and gals at the local bike co-op. Time well spent.
If you don’t have a bike, start shopping around. There are so many options, you should take your time and test ride several before making a purchase. Go to bike shops and see what’s available, read reviews online and consult friends who have been cycling for a while.
What kind of bike do I need for prepping?
TL;DR: A mid-range gravel, trail, or hybrid bike.
The best bike is the one you already have. Especially this year. New bikes are hard to come by thanks to Covid-19. But, you can probably find some nice used bikes. But, for simplicity’s sake, let’s say you can find some new bikes. What kind should you get? You have a lot of choices, but lets break it down into a few categories: road bikes, mountain bikes, commuter bikes, e-bikes, cruiser bikes, and lets group the others into specialty bikes.
But which is best for prepping? And what’s the difference?
REI does a great job at providing an overview of the different types of bikes you can read here: https://www.rei.com/learn/expert-advice/bicycle.html
I don’t think I can pick one for everyone. It definitely depends on your needs, skills, terrain and fitness level and budget. But here are some things you should look for:
- The most important thing to look for, is to make sure it fits you. Buying from someplace like Wal-Mart, you don’t typically get much choice in sizing. But if you go to a bike shop, or surprisingly Dick’s, you can get a bike that is actually the correct size for you. This is based on the actual frame of the bike. Tire size can also make a big difference. I wanted a bike with 29″ wheels for myself because bigger wheels offer a smoother, more efficient ride. But I’m too short, to safely and comfortably ride 29″wheels. So I had to get 27.5″. Best way to know that is to go to a bike shop and try it out.
- Look for name brand components, especially with the drivetrain. Look at the shifters, Shimano or Sram are your two choices here. Some people prefer one over the other due to feel, but they are equals in quality and reliability. Shimano seems a bit more common especially on entry/midrange models. There are other brands, but chances are they are not going to very good quality. Which doesn’t mean that you shouldn’t buy the bike, but be aware of what you’re getting. My last bike had off-brand components and I rode it for a season without issue. But, had I needed to replace parts, they may have been difficult to find. And it was only $125. Don’t pay more than that for off-brand components.
- Make sure you test ride it. Ask lots of questions about the features and how things works. Make sure it’s comfortable and that it fits you. Make sure all the parts are tight and well lubricated and there’s no weird noises or clunkiness. Change the gears, slam the breaks. Hop up and down a curb or two. If anything feels off, find out what it is. It could be a really simple fix or sign of future problems (especially if buying used).
- Color! You wanna look good don’t you?
Things you should NOT worry about: grips, pedal, seat and seatpost. These are all relatively cheap and easy to replace. They are also very personal items. These are your contact points with the bike, so I would argue that you should replace them to get what is most comfortable to you regardless of which bike you get. If the seat is too high or low, the seatpost can be cut or replaced for around $20. Pedals can get really pricey, but you can get some really nice ones in the $50 range. Keep in mind, mid-level and higher bikes typically don’t come with pedals. Seats vary in price quite a bit and it is probably a better investment to buy padded biking shorts than spend too much on a seat, but that’s up to you. And locking grips can also be had for around $25, which will be much nicer than what come on most entry level bikes.
So what did I get for myself?
I bought my son a $200 Nishiki Pueblo trail bike (type of mountain bike) from Dick’s Sporting Goods in spring of 2019. We had 3 several color options, and even more sizes to choose from. It was easy to find one that fit my son perfectly. It had Shimano drive train, 26″ knobby tires, his favorite color and it’s very easy to work on. The sales person also did repairs in the store and gave the bike a checkup before we left with it. We’ve easily put hundreds of miles on it, gone on mountain biking trails, bike camping, and a lot of falls and crashes. With a few minor upgrades and regular maintenance/repairs, it’s held up remarkably well. The only issue we have is sometimes the handlebars loosen or chain slips, especially after a crash. But it’s an easy fix and is to be expected for the price of the bike. I definitely recommend it for people on a budget, who aren’t afraid to work on their bike.
We immediately bought him a kickstand (many bikes don’t come with them), upgraded his shifters from the twisting style grip shifters to smoother and more accurate trigger shifters. Here is where getting name brand components is a benefit, upgrades like this are easily and inexpensively done without having to worry about compatibility. Then I got him some nice lock on grips, far superior to the slide on grips that can scrunch and slide when wet or dirty. This year I added some reflective stripes as we’ve been doing more road biking and head and tail lights. If he were pickier, I would get him some nicer pedals, but he doesn’t seem to care, so I’ve left them as is. With about $100 worth of upgrades, this bike went from being decent to pretty nice. I rode it recently and was really impressed with the feel and control.
You can find it here: https://www.dickssportinggoods.com/p/nishiki-mens-pueblo-26-mountain-bike-15nisanshkpbl14xxrmb/15nisanshkpbl14xxrmb
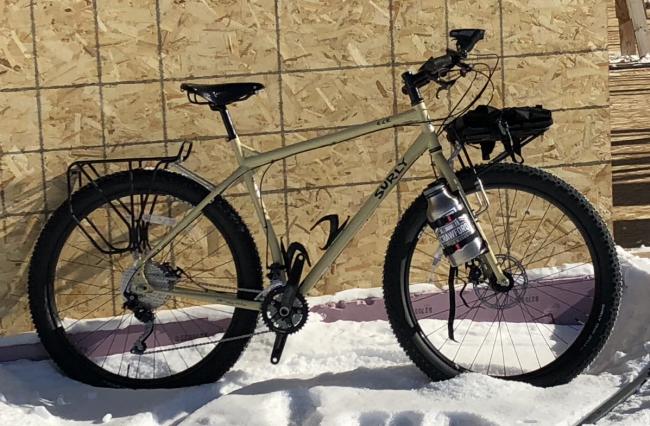
For myself I found a clearanced Haro Subvert HT5 from 2017, brand new. I fell in love with it immediately. It had all the features I’d been looking for in a bike for a fraction of the price: plus sized tires for sand and snow, hydraulic disc brakes for effortless stopping, thru-axles, quality name brand components and my favorite color. I haven’t had it long enough to speak on the durability or what upgrades I may make. But so far, I am happy with my purchase, though I don’t think I would recommend it for prepping purposes. The bike is fun to ride, and definitely looks cool. But it is inefficient on flat pavement. This bike was built for the mountains, but I live in Michigan. Most of our biking is on flat pavement, or slight inclines. That means I’m working harder to go the same distance and speed as others. This became painfully obvious when I went on a ride with a friend on a road bike. She effortless floated over the pavement with her thin, smooth tires while I pedaled twice as hard to keep up worth her. The tables turned however when we went onto a gravel road. My fat knobby tires and suspension allowed me to ride on loose gravel as easily and with as much control as I had on concrete. My friend, however became slow, shaky and eventually got off and walked her bike until we got back on pavement.
Check it out here: https://archive.harobikes.com/mtb/2017-mtb/subvert-ht5-2017
My son’s bike, an inexpensive almost mountain bike performs really well on smooth roads. But he can also follow me just fine on dirt paths, gravel and even winding mountain bike trails over roots and rocks, pump tracks and little jumps. His suspension can’t handle anything too crazy, but it’s enough to give him a nice ride on bumpy roads. And I’ve loaded him up with gear when we went bikepacking. The little trail bike is an all around winner. If you want something similar, check out gravel bikes, hybrid bikes and trail bikes between $200 – $750. There’s really no need to spend more than that unless you just want to. The benefits to the casual rider are minimal.
How do I maintain and repair it?
Your most common and likely repairs are going to be fixing flats, oiling/changing chains and changing brake and shifting cables. These are all pretty easy and there are a ton of YouTube videos that explain how to do this, including my channel. If there’s interest, I’ll follow up this post with step by step instructions on how to perform some of these tasks.
What tools and accessories do I need?
- Helmet
- Bike lock
- Chain oil
- Tire levers
- Spare inner tubes
- Tube patches or tire plugs if tubeless
- Tire pump
- Lights
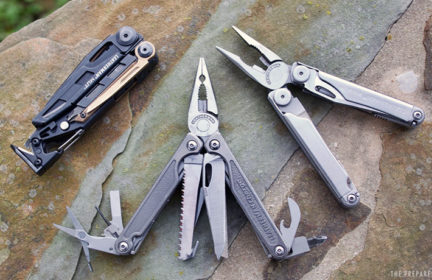
- Multi-tool
- Water
** UPDATE **
Here’s the kit I usually take with me. I own all but 1 of these products (KMC 3 in 1 Tool , but I’m ordering one) and have tested them out either at home or on the side of the road/trail. So far, I’ve been happy with them all.
That’s it for now. Get out there and ride!
-
Best Replies
-
Comments (36)
-