Note: This post shows killing animals.
If you keep livestock, the sad reality is that you need to be willing to slaughter them when the time comes, whether to euthanize them or to harvest them for food. That’s especially true with chickens, even if you aren’t specifically raising them for meat.
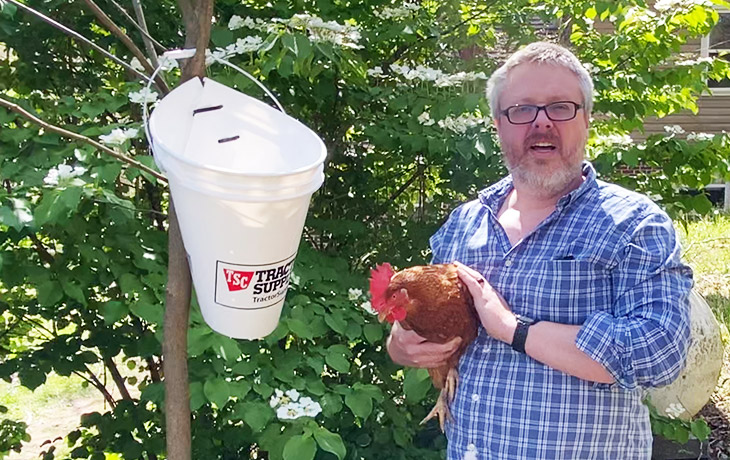
The thing about chickens is that they don’t stop moving just because they’re dead. The cliche “running around like a chicken with its head cut off” is very true. I’ve slaughtered a few chickens, and after a bad experience with the hatchet method, I decided to make a killing cone.
A “killing cone” is a device that holds the chicken in place as you slaughter it and — at least in theory — keeps the chicken from moving about as it dies.
There are a lot of videos showing how to make chicken killing cones, but not many that show them being used after construction. So I decided to not only make the cone but put it to use to see how it worked.
Unfortunately, my chicken cone experiment ended in an epic fail. It’s never easy broadcasting your losses, but I hope you can learn from my mistakes.
Important bits:
- Pre-made killing cones cost around $30-50 but can be made from a cheap five-gallon bucket.
- Recommended tools are a Dremel with a cutting wheel, drill, measuring tape, clamps, and good zip-ties.
- Don’t make the bottom opening any wider than four inches or the chicken may slip out.
- You need a razor-sharp knife to dispatch the chicken in the cone.
- It’s a good idea to have multiple cone sizes ready in case your chicken doesn’t fit in the first one you choose.
- If you’re unsure about cone sizes, buy commercial cones in multiple sizes.
If you’re going to slaughter your own animals, sharp knives and hatchets are essential for clean, humane kills. Check out our knife sharpening and maintenance course to learn how to make your tools razor sharp.
Why kill chickens?
A friend once asked, “After your chickens are done laying, can’t you just send them to an old chicken home?” Unfortunately, that just doesn’t mesh well with reality.
Excess roosters need to be culled for the safety of the entire flock. One rooster is plenty for every 10-20 hens. If you have too many roosters, they’ll fight and hurt each other, and possibly rough up the hens.
Retired layers should also be culled, as they cost you in feed while offering nothing in return. And the truth is, they’ll die eventually, either from natural causes or from a predator attack. Chickens are prey animals, and pretty much everything wants to eat them: dogs, raccoons, weasels, and of course, other humans. You don’t want to see what a raccoon does to a chicken. It’s not pretty.
I actually tried to sell the chicken I slaughtered for this article, for next to nothing, to a lady who said she only wanted one as a pet. But the reality is, people just don’t want retired laying hens.
Evaluating chicken-killing methods
You need a way to slaughter chickens that is as clean and humane as possible. Traditionally, that’s meant a sharp hatchet, a stump, and maybe a couple of nails to hold the head in place. Or it’s meant “wringing” the chicken’s neck, which isn’t really wringing so much as using enough force to break its neck.
You can also use a broomstick or a shovel to hold the chicken’s neck in place.
I’ve never felt confident enough to try to snap a chicken’s neck, but for my first few kills, I used a hatchet and a stump. That worked pretty well until the last rooster I culled.
The rooster flinched, I didn’t cleanly take the neck in a single swing, so I had to sloppily hack its head off. Chickens don’t stop moving just because they’re dead, and this rooster was especially strong. Its convulsions knocked over the bucket I dumped the carcass in, and I was left holding onto the back legs of a flapping headless chicken as it sprayed blood all over me.
I decided to try a different approach. Many chicken-tending friends had recommended a killing cone, which is a large cone you hang from a stand, fence post, or stump. You put the chicken in it so that the head (and nothing else) hangs out of the smaller opening of the cone. You then either slit the chicken’s throat or remove its head to kill it. Once the chicken is dead and the blood has drained out, you can pluck and gut it to prepare for eating.
The problem is these killing cones are a bit expensive, usually between $30-50. While that isn’t a huge investment, when I asked a local chicken group which cone they used, they all told me they make their own from five-gallon buckets. I love buckets and keep a bunch around, so that seemed like a good idea.
How to make a killing cone from a five-gallon bucket
There are many, many guides and videos showing how to turn a five-gallon bucket into a killing cone. The tools and techniques change, but the process is always the same:
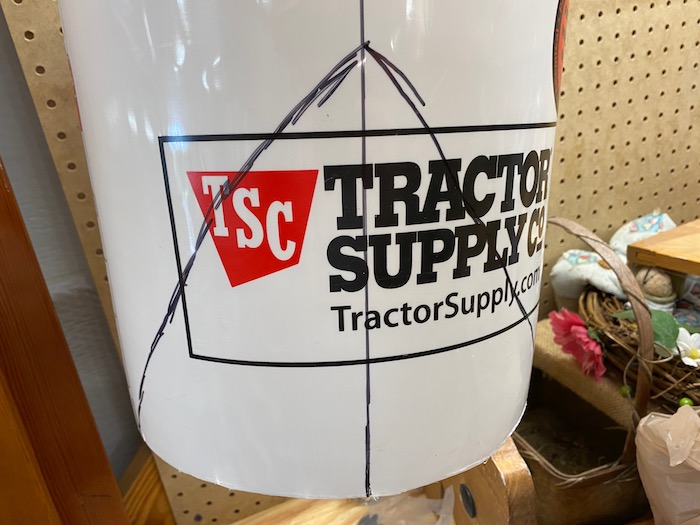
- Find the center point of the bucket. If you plan to hang the cone from the bucket’s bail, you should hang up the bucket and mark the center, near the bottom, while it’s hanging.
- Draw a line straight up from the center mark.
- Measure six inches from each side of the center mark and make marks.
- Draw a triangle by drawing a diagonal line from each six-inch mark up to meet the center line.
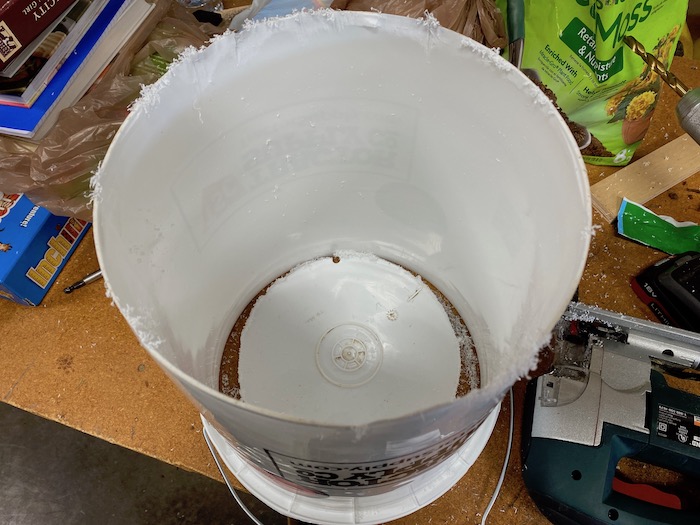
- Cut off the bottom of the bucket.
- Cut along the diagonal lines to cut a triangle out of the bucket.
- Cut straight up from the apex of the triangle through the top of the bucket.
- Bend the bucket into a cone shape.
- Drill holes into each flap and tie the two sides together with zip ties.
Mistakes during construction
I decided to cut the bottom of the bucket off first and then mark out my lines. It didn’t make much sense to make the marks and then cut off the bottom.
There are two ways to accomplish this: either turn the bucket upside down and cut around the rim to remove the bottom or cut into the side of the bucket to remove the bottom. I chose the former, but wish I had done the latter instead.
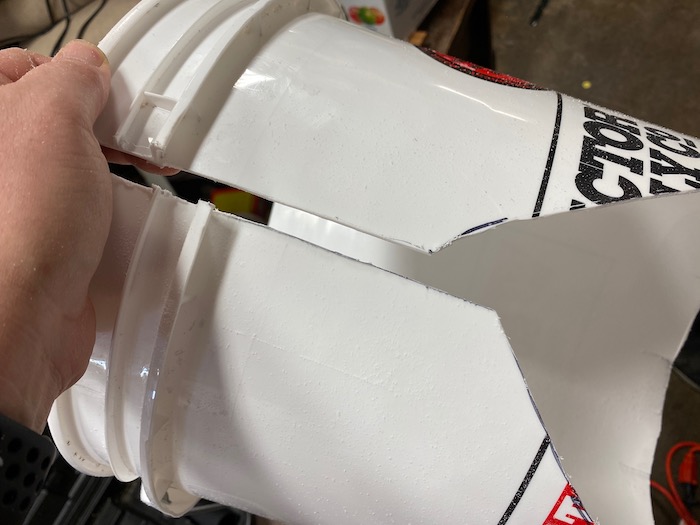
Next, you have to decide how to cut the bucket. My first choice was a jigsaw.
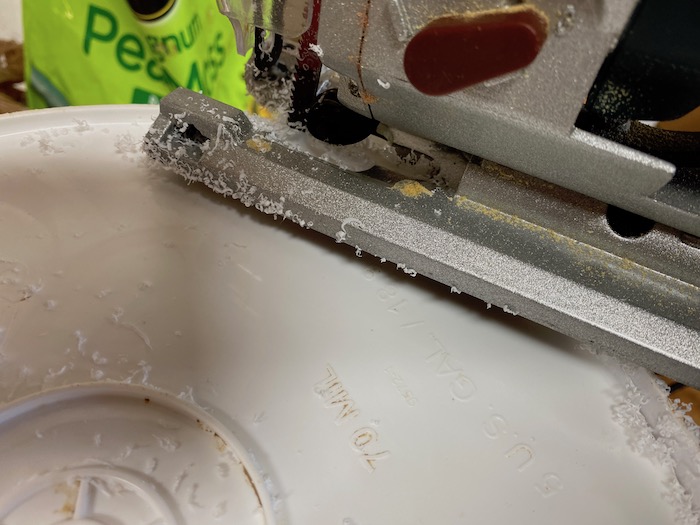
That turned out to be a mistake, because the jigsaw shook so much it was hard to make clean cuts, and I ended up cutting into the material in the side of the bucket, thinning it out and causing the plastic to split. It also made rough edges.
I switched to a Dremel tool with a cutting wheel to cut away the split and jagged edges. The Dremel made for a cleaner cut and was easier to control. If I ever make another, I’ll use a cutting wheel and cut into the side to remove the entire bottom. Lesson learned.
Marking the center and six-inch lines was simple enough. Use a Sharpie to make a clear line and a straight edge for a straight line up the middle. Measuring six inches out from the center will be easier if you have a cloth tape measure since it’s more flexible, but I made do with a regular metal one. I drew the triangle freehanded, which worked fine. It doesn’t have to be perfectly straight.
The cutting wheel made quick and neat work out of cutting the triangle, and for the final straight cut up to separate the two halves of the bucket.
You might as well remove the bucket’s bail at this point if your bucket has one. It’ll just get in the way and it’ll probably fall out anyway. You can add it back when you’re done.
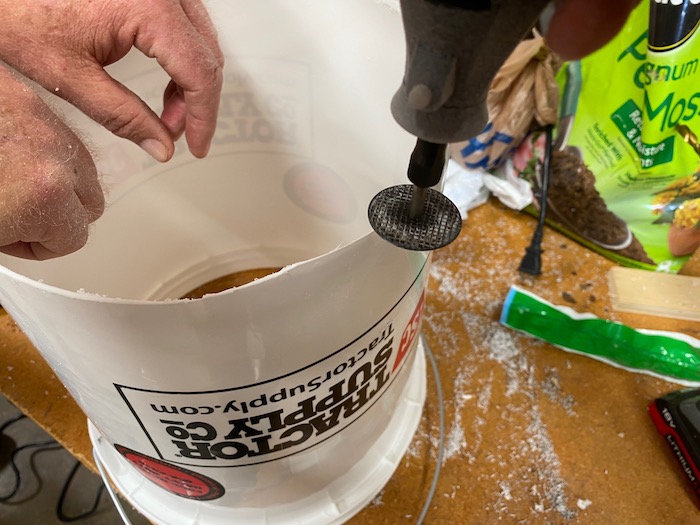
Next is the formation of the cone itself. In some videos, they try to slice away extra material around the bucket to make the cone fit more smoothly, but I did not find this necessary. Also, in many videos, you’ll see people bear-hugging the cone to hold it together while they drill holes in it, usually with the drill pointed straight at their chest. I used clamps. Specifically, I used spring clamps at the top and bottom to hold the shape, but any kind of clamp should do. If you have tools, you need clamps. They’re cheap and are going to save you a lot of frustration.
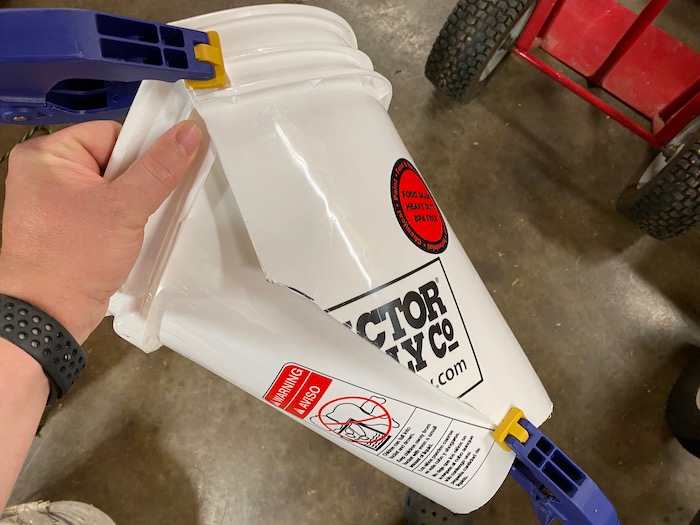
The clamps let you experiment with how to fit the two halves of the bucket together. You can adjust the size of the bottom hole to make it as wide or narrow as you want. You want it larger for big birds and smaller for smaller ones.
I did a bit of research to see how the cone should come together. Some videos said a 4-inch hole on the bottom, but one video I watched had the cone come together at the corners at the top and bottom. I went with that since it made for a neater cone, but that would prove to be a mistake. The bottom hole was about 5 inches in diameter, which turned out to be way too wide.
Finally, you drill holes in each half to fit a zip-tie. I used large UV-resistant zip-ties. Make sure your drill bit is large enough to make holes the zip-ties can fit through. Start with holes on the top and bottom and add more in the middle as needed. I also threaded my zip-ties so that the buckle ended up on the outside of the cone to reduce the chance of snags.
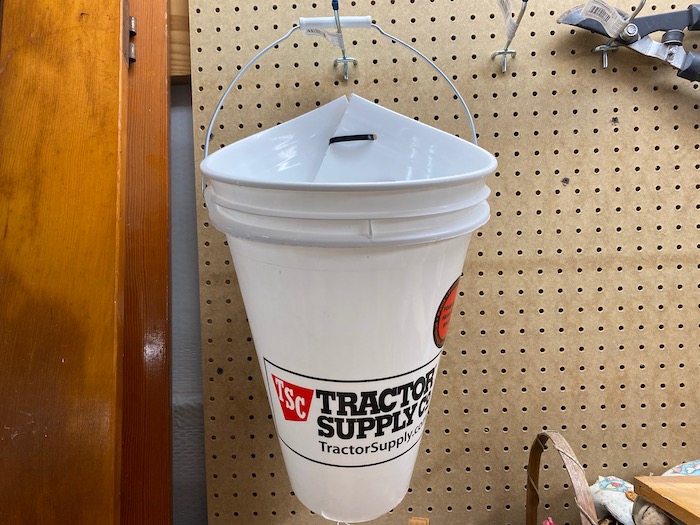
Despite some initial mistakes, the end product looked quite good. I reinserted the bail so I can hang it from a tree or hook when I’m doing my chicken business.
A chicken that deserved better
I couldn’t write an article about how to make a chicken killing cone without actually putting it to use. I had two candidates: an old layer near the end of her natural life and a big, mean rooster that needs to be culled. I opted for the old layer, figuring that if something went wrong, at least the old hen wouldn’t rip my face off.
She was the last of my first flock, so I wanted to give her the cleanest sendoff possible. Unfortunately, I completely and utterly failed her.
I coaxed her out of her chicken tractor, took her into my arms, and led her to her death. I had hung the cone from a sapling, so I carried her over and slipped her head-first into what used to be a perfectly good bucket.
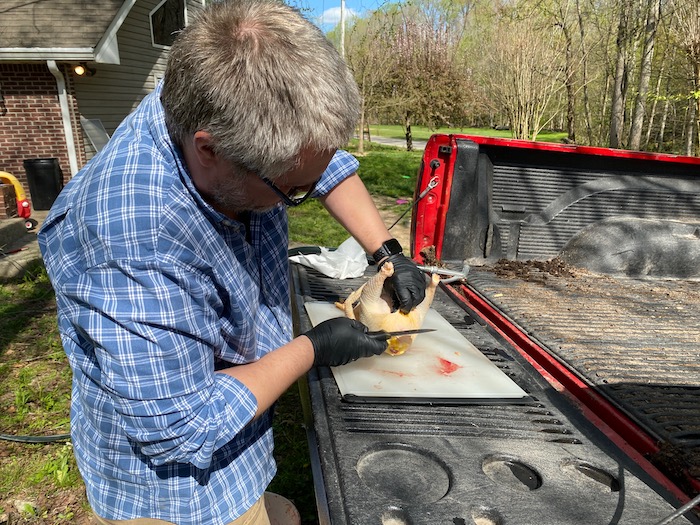
The first sign of trouble was when her front legs popped out of the bottom of the cone along with her head. I waited a few seconds, but she didn’t seem to slip out any more. I figured it was too late to turn back, so I slit her throat. That part actually went well, because I had honed my Morakniv to razor sharpness beforehand.
And then she slipped out of the cone and fell on the ground.
At that point, I let out a string of profanities while I futilely put the bird back in the cone. She held for a minute, and then slipped out again, crawling along the ground gushing blood from her neck.
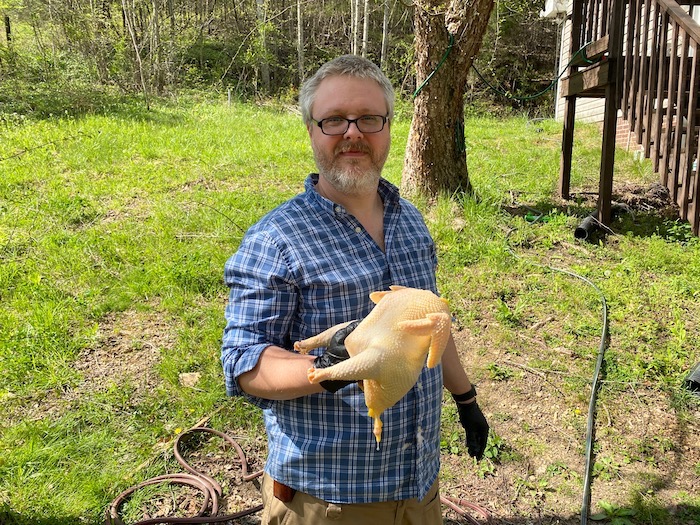
Eventually, the crawling stopped. What was done was done, and I had a responsibility. I took the carcass to my workspace, finished removing the head, dunked the bird in hot water, plucked the feathers, and removed the internal organs.
She was a sweet old hen I had raised from a chick, and I had butchered her horribly. But as the feathers came off, she looked more and more like any bird you’d pick up at the supermarket. Meanwhile, my wife was trying to comfort me, but I just tried to focus on the task at hand.
In the end, I wound up with a fine-looking hunk of meat, destined for a pot of chicken and dumplings, along with enough scraps for what I’m sure will be a productive melon pit.
 Lessons learned
 Lessons learned
I haven’t given up on the cone idea entirely. If the lower opening had been smaller, it would have worked beautifully, and slicing the throat was less stressful than precisely swinging a hatchet.
When I was first looking at buying a killing cone, I was flummoxed by which size to buy. Now I’m thinking: all of them. And then hang them up on a strip of lumber in a row. That way, if the first cone you pick is too big or too small, you can move the chicken to the appropriately sized cone.
I may try to readjust my existing cone, keeping the top opening wide for larger birds, but narrowing the bottom opening to 3-4 inches. But with my next slaughter being a big rooster, I may not want to take the chance. I also worry about how well the plastic will hold up over time. The first bucket I chose had dry-rotted and a big chunk broke off in my hand. If that happened during a kill I could be in big trouble.
In any case, I’m going to have a hatchet and stump on standby.
You are reporting the comment """ by on