Even if you’ve purchased the best survival field knife for emergency preparedness and have a proper sheath, you’re still not quite finished with this critical prep. Field knives are a workhorse meant to be used and abused in emergencies, so the time to practice using and caring for your knife is now — not after SHTF.
Good news: Although knives have a passionate community that often makes this topic seem daunting, there are simple 80-20 tips that are good enough for normal people. You can even sharpen a blade with easily-found materials like a car window, cardboard, or sandpaper.
If you’re not an advanced knife user (and don’t care to become one), the cheapest, quickest, smallest, lightest, and simplest field knife sharpening method is to use a pull-through sharpener. For under $10, these common tools are easy to throw in your go-bag, use without much practice, and are enough for most people’s field knives.
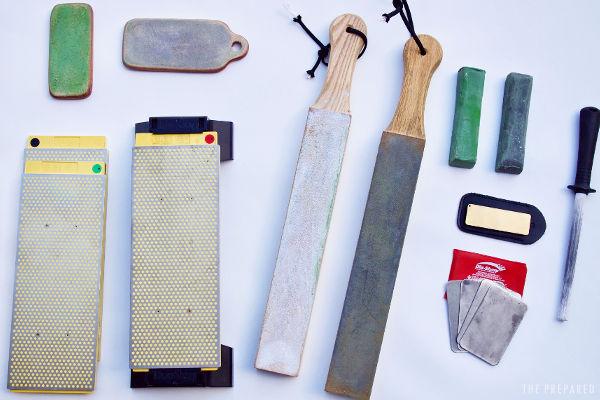
Reviews: Best pull-through sharpeners, sharpening stones, and strops and compounds
But there’s a meaningful jump in knife edge quality and lifespan when you use proper sharpening methods like stoning and stropping. An additional $20 of gear and some practice can make the difference between a workable edge (and a blade that lasts for years) versus a great edge (and a blade that lasts for decades) — which is why knife enthusiasts almost never use a pull-through.
Combined with cheap and basic tips for oiling and storage, a well-cared-for knife will serve you well when you need it most.
Summary:
- Practice using and caring for your knife before an emergency.
- Sharp knives are safer than dull ones because they require less force to cut and are less likely to dangerously skip and jump around.
- The easiest and cheapest sharpening method is a pull-through tool, but it has meaningful downsides.
- Stropping is the method our experts prefer, but it requires more materials and practice.
- There is much more to caring for and sharpening a knife than average people assume.
- But you don’t have to become a knife nerd — one or two cheap products and some basic practice is enough to cover the 80-20 for most people.
- Your goal is “good enough,” not perfect.
- Knives rust and corrode more easily than you might expect.
- Try not to store knives in sheaths — especially in sheaths made of materials like leather that can hold moisture and accelerate corrosion.
Be prepared. Don’t be a victim.
Want more great content and giveaways? Sign up for The Prepared’s free newsletter and get the best prepping content straight to your inbox. 1-2 emails a month, 0% spam.
- Knicks and safety
- Good enough is better than perfect
- Intro to sharpening methods
- Pull-through sharpeners are the easiest
- Which method is best for preppers?
- How to use a sharpening stone
- How to sharpen a Scandi grind
- How to strop a knife
- DIY sandpaper and mouse pad method
- Use oil for protection
- Removing corrosion
- How to improvise when SHTF
- Tips for testing your blade
Why you should trust me
I’m one of those knife nerds who keeps a stack of books about knife history and maintenance next to my dedicated workbench. I’ve loved knives for decades and spent way too much time and money on them. After becoming a prepper and professional knife and outdoor gear reviewer a few years ago, I’ve reviewed countless knives and have interviewed the industry’s top makers, elite soldiers and law enforcement, big game hunters, and leaders of online knife-enthusiast communities.
Knicks happen: Use your head with knife safety
From chefs to wood workers to hunters, every serious knife user has been cut many times in their life. It’s just part of using a knife. Getting a knick doesn’t mean you’ve failed, so keep a first aid kit nearby and use your head:
- Hand your knife to another person by grasping the spine of the blade and handing it over handle first.
- Cut away from your body, never toward it.
- Keep a firm grip on both what you’re cutting and your knife.
- A sharp knife is safer than a dull knife because it requires less force to use (so you’re less likely to fumble).
A “good enough” edge is better than “perfect”
You don’t need to learn how to put a screaming sharp edge on a blade that even Hattori Hanzo would respect.
Sharpening and other knife maintenance practices are important, but it’s definitely possible to obsess over them too much. A little bit of effort goes a long way with knife care.
We’ve encountered many serious bushcrafters and soldiers over the years — people who depend on their knives in the worst environments — who have never bothered to learn how to put a fine, mirror-polished edge on a knife. Yet these folks all manage to get by with a cheap diamond stone or a pull-through, a scuffed up blade, and a serviceable field edge.
In fact, there’s a point of diminishing returns when creating a sharp edge (especially at narrower edge angles). The sharper the edge, the thinner the material gets at the point, which means it will bend and chip faster than an edge that’s “good enough”.
For survival knife purposes, a good-enough edge is one that:
- Requires minimal removal of metal to maintain
- Is easy and forgiving to maintain
- Lasts a long time before having to be restored
- Performs well for a variety of tasks
All sharpening involves removing some metal from the knife. The more you remove, the faster you’ll reshape the blade and eventually ruin it. So for a knife that’s intended to last a lifetime, we want to remove as little metal as possible when sharpening.
You shouldn’t need complicated edge guides to help hold the blade at a picky angle while sharpening, nor should you need lubricants and other accoutrements that you won’t likely have in the field. It’s fine to use all this stuff for chef knives or shop knives, but you should be able to sharpen a survival knife with one tool, and without worrying about ruining your work if you make a stroke at the wrong angle.
Some edges wear away quickly, either because they’re too thin and they fold, or they’re too jagged and their microscopic “teeth” wear down. These edges are good in certain circumstances, but for a field knife we need to optimize for edge retention.
Jagged edges are better for cutting through flesh or fibers quickly, while smooth, polished edges are better for shaving, chopping, and carving. Given a survival knife is used for an unknown and wide range of needs, we recommend a polished edge to have that “jack of all trades, master of none” versatility.
Standard ways to sharpen a knife
Sharpening a blade means removing material from the metal to reshape it into a fine edge. When you run a blade over a sharpening tool, you’re essentially shaving it down to a point. The finer the point, the sharper the knife.
All of the different sharpening methods use that same principle, just accomplished in different ways and to different degrees of severity.
Pull-through sharpeners are commonly found in home kitchens. They’re simple, cheap, and often come with new kitchen knife purchases. A pull-through is essentially a V notch with a gritty material on each side of the V, so as you pull the knife through, its grinds both sides down equally to an apex.
Sharpening stones are blocks of hard material, sometimes with diamond, ceramic, or similarly-tough materials baked in. You can use them dry, but most modern knife stones use an oil or water to keep the surface slick and to collect the little metal shavings (called “swarf”) you create through sharpening.
Sharpening rods (a.k.a. ceramic or steel rod) are basically a stone in a rod shape. You mostly see steel rods in professional kitchens, where they’re used to straighten an edge that has folded over. Ceramic rods actually remove metal and are used for honing, usually on serrated edges where a regular flat hone isn’t a good fit.
Strops work similar to stones, but are made of a semi-flexible material combined with an abrasive compound. If you can imagine the leather straps used by old-timey barbers to sharpen a straight razor before a facial shave, that’s a strop.
Sandpaper is a cheap method that works better than you might expect. The grit of the sandpaper (a number like 400 or 800) determines how rough the paper is and how much metal material is removed. See the mousepad and sandpaper trick below.
Pull-throughs are the easy answer (but come with tradeoffs)
Pull-through sharpeners are easy to use and learn. So much so, they pass the “10 year old child” test, so if a kid or random person needed to sharpen their knife with your tools, they’d be able to figure it out pretty easily.
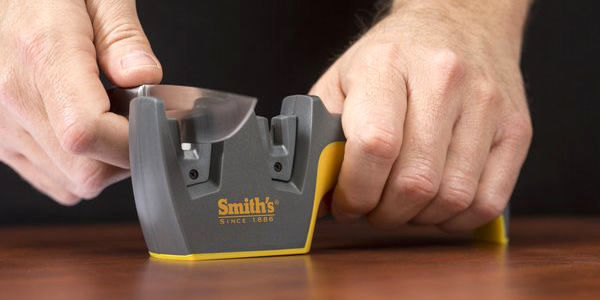
Pull-throughs are hard to screw up as long as you hold the blade at a simple 90 degree angle to the sharpener and don’t damage the edge by pressing down too hard.
This method is limited to simple V-shaped edges that are decent (and better than nothing), but not great. So if you use your knife often, it won’t perform super well and will require more frequent sharpening.
When you combine the need for frequent sharpening with the very high amount of metal loss inherent to pull-throughs, it means you’ll wear your blade down more quickly over a period of years instead of decades.
Which knife sharpening method is best for preppers?
Even when you ignore the navel-gazing internet debates, selecting a sharpening method is not an easy, black-and-white answer once you advance beyond the cheap and simple pull-through sharpeners.
For preppers who want to be able to properly sharpen a knife, especially for long-term post-collapse planning, making the decision between stoning and stropping involves thinking about the kind of edge grind you want (or are stuck with).
The best sharpening technique and tools for you depends on that edge shape:
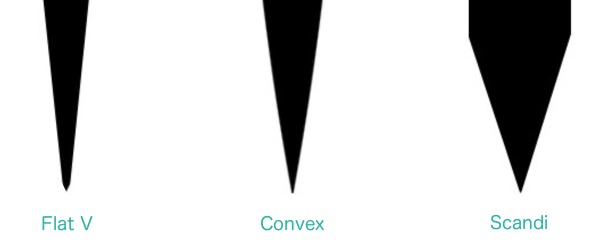 There are many edge shapes, but we only care about the plain or “flat” V, a rounded convex, or the special Scandi. The Flat V images are deceptive, because even though the whole blade is a flat V shape, what matters in this case is the smaller V at the very tip — that’s the sharpening angle that matters. Scandis have a big, bold, and simple edge grind to make stone sharpening easier. Convex edges are a subtle rounded shape that comes to a point.
Most knife users fall into one of three main “edge plus technique” camps:
V-shaped edge plus stone
When you free-hand sharpen a normal, V-shaped edge on a stone, you must hold the blade at a perfectly consistent angle on each stroke, like a robot. This requires either a ton of practice or a mechanical edge guide, as one off stroke on an aggressive diamond stone could undo much of your work.
This approach is traditional and popular, partly because it gives you control over how skinny or fat the V angle is.
But we don’t recommend it for most preppers because of the damage risk and that it requires more practice and/or extra equipment than the other two methods.
Stoning can also create sharp burrs or jagged teeth, which requires a strop or separate fine-grain stone to polish off. All but the finest grit stones leave a jagged edge that feels sharp to the touch — but that isn’t the kind of sharpness we want. This micro-serrated edge is initially an aggressive cutter (the jaggedness makes it work like a saw), but once the microscopic teeth you’ve engraved on the edge wear down with use, the blade will quickly dull.
However, if you already know how to properly stone free-hand, it’s fine to stick with this method.
Scandi grind plus stone
Scandi grind knives (like the TOPS BOB knife) are intentionally designed with a flat, wide bevel that you hold flat against the stone as you move. That design removes the need to be a perfect, free-hand angle-guessing robot.
This method’s simplicity and ease of use with smaller portable stones makes it incredibly popular in bushcraft circles.
The major downside, though, is that you’re limited to Scandi grind blades. You can’t easily turn a non-Scandi into a Scandi, or vice versa. So you typically buy a Scandi knife and keep it that way forever.
Convex edge plus strop
Our knife experts greatly prefer the convex edge shape because it cuts well and holds sharpness better than any other shape when used in the wide range of scenarios we plan for in emergencies. It’s also easy to maintain a convex edge, including with improvised materials you may find after SHTF.
Strops are great for convex edges — so much so that it’s hard to use a strop and not end up with a convex edge. Any knife can be converted to a convex edge just by stropping it enough.
Strops make the “hold a consistent angle” problem moot. When you strop one side of a convex edge by dragging it across a strop with some natural “give” in the material, you’re polishing a rounded surface, so as you naturally vary the angle a tiny bit on each stroke, you end up polishing the whole, curved surface until the edge is sharp. Consistency is important, but this method has a lot more wiggle room than stoning.
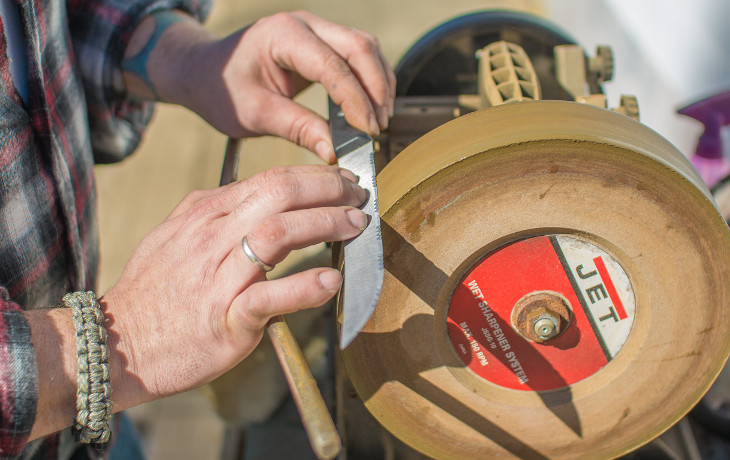
How to use a knife sharpening stone
Check out our choices for the best sharpening stones.
When you sharpen a normal, V-shaped edge with a stone, you drag the blade across the stone at a perfectly consistent angle, using a minimum of pressure.
Many of the best sharpening videos online are for kitchen knives, but the principles work the same for field knives — note that the angle for a field knife is generally wider at about 25 degrees or higher.
The highlights, roughly in order of importance:
- Know the angle you’re using, and keep it totally consistent on every stroke
- Use the same number of strokes on each side
- Use the same pressure on each stroke
- Pivot the blade up as you move toward the tip to maintain the correct angle
- Take your time
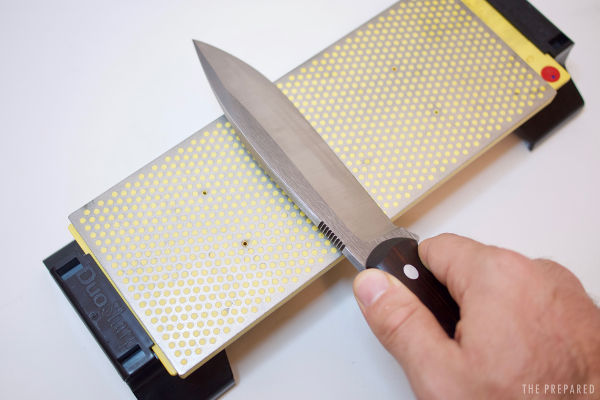
This video demonstrates sharpening a kitchen knife on a double-sided DMT DuoSharp 10 of the kind we recommend in our sharpening stone review.
If you’re sharpening using a small pocket stone, the technique is slightly different, as demonstrated in this video:
(Tip: Don’t waste your money on the lubricant they’re selling in the video. It’s not necessary on a diamond stone, and saliva or water will work fine if you want a little liquid anyway.)
It’s important to know that the tip of the blade needs special attention when you sharpen. After you’ve passed the straight part of the blade and move into the curve (or belly) of the blade, you’ll rotate the blade as you make your way toward the tip. When you do this, it should feel like you’re making the angle steeper as you go toward the top, but you aren’t. This video explains the phenomenon very well:
How to sharpen a Scandi grind
A Scandi grind is far easier to sharpen on a stone than other grinds, and this excellent video explains why by showing the theory behind it:
The following video is the clearest one we’ve found for sharpening a scandi grind. It’s a simple video for a simple concept and technique:
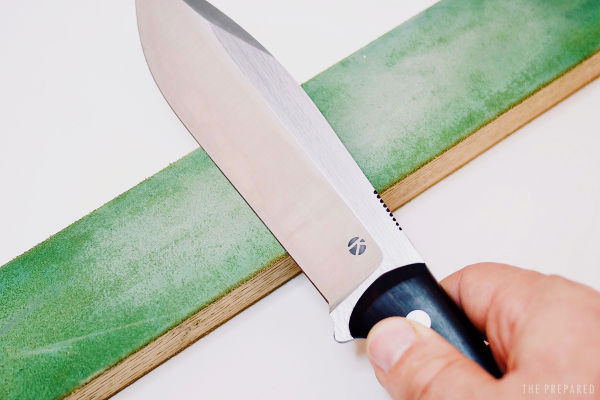
How to strop a knife
Stropping is similar to learning how to ride a bike — it takes a bit of (often frustrating) practice to get a feel for it, but once it clicks you’ll be set for the rest of your knife-using life.
So invest in some good tools (see our review of the best stropping gear), watch the videos, practice, test the edge often, and don’t get frustrated if what you’re doing isn’t working. Just change it up a bit until you start seeing progress.
Remember:
- Using too much pressure is counterproductive because the leather will fold up and over the edge, causing it to dull.
- Let the weight of the blade and gravity do the work.
- Load the suede side of the strop (and ignore videos that tell you otherwise).
- For prepper field knives, black compound is usually good enough.
- Pick a stroke — either tip-to-heel or heel-to-tip — and practice with it consistently.
- Stop once in a while to test your edge on a sheet of paper.
- If you’re not making progress, change up the angle (it may be too low or too high) and be absolutely sure you’re not putting pressure on the blade.
Before you get started, it’s important that you load the strop with compound the right way. We use a heat gun or blow dryer, but this video recommends heating up the leather briefly in an oven:
For field knives, we load and use the suede side of the leather. If we go to the smooth side at all, it’s for very fine, final finishing.
Once the strop is ready, you can begin:
This series of older videos from KnivesShipFree is very good, and we recommend you watch the installments covering convex edges, beginning here:
You’ll notice that most stropping videos start the stropping stroke at the bottom, or “heel” of the blade and move up the edge toward the tip. If you do this, then you must take care to keep in mind the note about changing the angle of the blade that we mentioned in the section above on sharpening with a stone.
One alternate stropping stroke that seems to work for many folks is starting the stroke at the top and working down to the heel:
The key is to experiment and find out what works for you.
It’s important to stop stropping periodically and test your edge on some paper. Testing is the only way you can know if you’ve got the correct combination of angle and pressure, or if you’re off somehow and just wasting your time.
Stropping isn’t the kind of thing you can do while watching TV or otherwise zoning out — you’ll need to pay attention as you strop. However, we’ve found stropping to be a relaxing, almost meditative activity that’s enjoyable in its own right.
Once you get good at stropping, you’ll spend far less time on it if you make it a point to maintain your edge by touching up your blade in between uses. Regular stropping makes for a quick, low-hassle edge maintenance routine.
Prepper tip: the sandpaper and mouse pad method
One stropping method many knife users use with great success is the “sandpaper and mousepad” hack. Instead of a strip of leather loaded with stropping compound, you place a piece of the 3M Wet or Dry sandpaper over a mouse pad.
This method gives you precise control over the amount of grit you’re using and the aggressiveness of the strop. So you can start out reworking a badly damaged edge with, say, 400 grit (smaller number = rougher paper), then move to 600 for sharpening, and gradually work your way up to 1200 grit or higher for an ultra-fine edge.
The primary drawback to sandpaper stropping is that the sandpaper wears down quickly, and loses its bite. If you do a lot of stropping then you’ll go through a lot of this stuff, so it’s cheaper in the long run to buy proper stropping compound.
We actually prefer mousepad and sandpaper to leather strops with black compound for turning a regular V edge into a convex edge for the first time. You can get good results quickly with it, and you can use a large, square sheet that’s much easier to work with than a narrow leather strip.
Oiling a knife
A modern field knife already comes with an anti-corrosion coating or uses a metal that’s inherently resistant. Although a good knife will survive without additional protection, adding a tiny bit of oil can help keep your knife looking and working like it’s brand new.
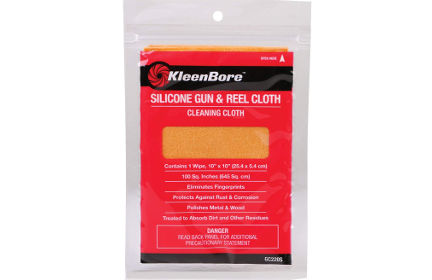
The easiest method is to wipe the blade down with a silicone-impregnated cloth. A field or hunting knife will often be used to cut food, so we like to use a non-toxic corrosion protectant.
Best bang for the buck:
Kleen-Bore Silicone Gun and Reel Cloth
Keep your handles clean:
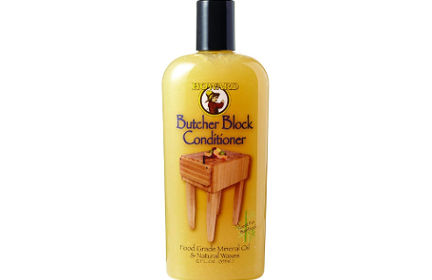
Howard Butcher Block Conditioner
Most gun and knife enthusiasts like the $7 per sheet Kleen-Bore Silicone Gun and Reel Cloth because of the size, price, and ample amount of silicone in the cloth. The Birchwood Casey and Hoppes No. 9 cloths are also popular and slightly cheaper than our recommended pick.
A silicone cloth works fine for both the blade and the handle, but there’s another good trick for spiffing up a canvas Micarta handle (our favorite handle material): butcher’s block conditioner. Howard Butcher Block Conditioner is a food-grade mix of oils and beeswax, and it will make scuffed, dull Micarta handle look better than the day you got it out of the box. This stuff is also recommended for wood-handled knives.
Removing rust and corrosion
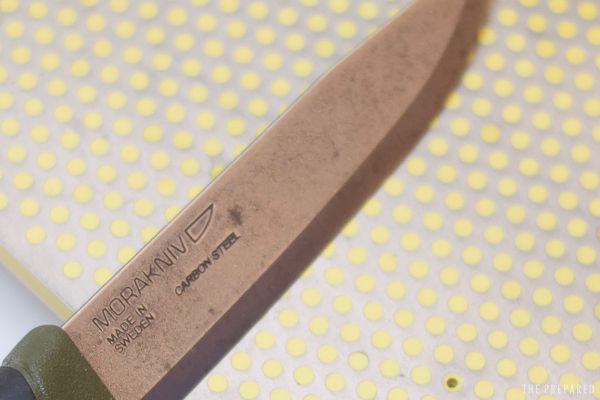
Field knives, especially those with carbon steel blades, will get light rust spots on them from time to time. It happens more often than people expect. But this is nothing to panic over; simply remove the rust with a mild chemical.
We recommend Break Free CLP, a compound that’s popular with gun enthusiasts and that works just as well on knives for removing rust and corrosion without marring the blade’s finish.
Apply a little bit to the blade, let it sit for a few minutes, then wipe it down with a paper towel.
In the field we’ve used the fine sand from a flowing riverbed to get rust off. We’ve also used Chore Boy Copper Scouring Pads, and various plastic scouring pads for cleaning cookware, although any abrasive pad will scuff a satin-finish blade.
In cases where you’ve wrecked an uncoated blade’s finish, either by letting the rust get too bad or by scuffing it up with an abrasive, you may have to bust out the Flitz Polish Paste to restore the factory shine.
Regular stropping will also remove reasonable rust buildup on the edge of the blade. It’s important to know that electron micrographs have shown that rust can build up on a blade’s edge and begin to degrade it, even when that edge looks bright and shiny to the naked eye. So if you have a carbon steel blade, keep it clean, dry, and coated.
Sharpening and caring for a knife after SHTF
Thankfully, if you understand the basics of how stoning and stropping work, you can service a blade in a pinch without proper materials. After all, your badass grandfather didn’t need colored stropping compounds to maintain his straight razor.
If you’re caught in a total grid-down scenario or just don’t have your gear, remember the basic mechanics:
- Polishing and shaping is better than chiseling and grinding
- Rough, gritty, uneven surfaces are bad
- Fine-grained surfaces are good
- Whatever you use should allow for even, long, consistent strokes
Examples of things you can use to sharpen that you might find laying around:
- Leather belt
- Nylon backpack straps
- Neoprene
- Seat belts
- Nail file
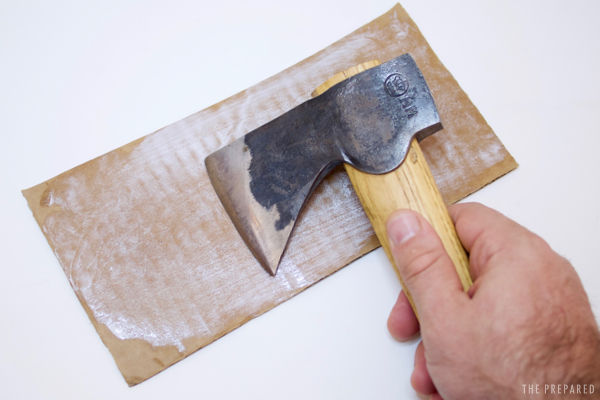
- Cardboard
- Newsprint
- Smooth river stones
- Base of a ceramic mug
- Car window
- Spine of another knife
We’ve even heard of green paint used as a stropping compound because it contains chromium oxide, which is what gives stropping compounds their grit. And we’ve personally used toothpaste to great effect.
These hacky methods are of course less ideal. You can run a blade over an old leather belt, and it will work to a degree, but it will take a lot longer than a proper strop and compound.
Testing the edge and practicing with your knife
You are not prepared if you are relying on gear or skills you’ve never used. The time to find out if your knife is a fake Chinese knock-off or if your sharpening technique is working is before an emergency — not during or after.
Do’s and don’ts for knife testing:
- DO cut a variety of materials, from hard and soft wood types to rope to food, and see how well the edge holds up. If the edge is getting dull too quickly, then you’ve got a bad heat treatment and you’ll need to replace the knife.
- DO chop into some downed limbs or other dead wood with the knife to get a feel for how comfortable the handle is and how well the edge holds up.
- DO open a can of food with your knife, and see if you’ve wrecked the edge or the point. Although that’s not a normal use for knives, any good prepping knife should be able to crudely open a can without more than cosmetic damage; if you damage the edge, see the remarks on heat treatment above.
- DO carefully drill into some wood with the tip. Technically, this is knife abuse, but you’ll want to know if your knife can handle being used to drill out a crude hole or pocket in some downed wood. Be sure to pick wood that’s on the softer side, and take as much care as you can not to damage the tip while still getting the work done.
- DO make something with the knife: fire, shelter, pointy stick, or a small carved item.
- DO shave some hair off your body (carefully!), and/or cut paper with the blade periodically as you test your knife, in order to gauge how quickly the edge is dulling.
- DON’T do a tip strength test by jamming the tip in and working the blade side-to-side. You’ll likely break the tip, even on some of the best knives.
- DON’T throw the knife. You’re not going to throw the knife in a survival situation, so don’t bother doing it as a test.
- DON’T try really hard to break the knife, because you may well succeed. Any knife can be broken if you subject it to enough abuse and lateral stress, so don’t throw your money away by doing this.