
Portable battery power stations like those from Jackery are a useful addition to your power outage kit, especially when paired with a solar panel for off-grid charging. But you can easily build your own, customizing it for your own needs and learning about electronics in the process.
The project is simple enough: you add batteries, a solar charge controller, and various ports to a waterproof ammo box so that you can charge and power small electronics like phones, tablets, laptops, lamps, and fans. And you don’t have to be an electronics whiz or have any soldering skills in order to make it. It is cheap and can help make future power outages more bearable.
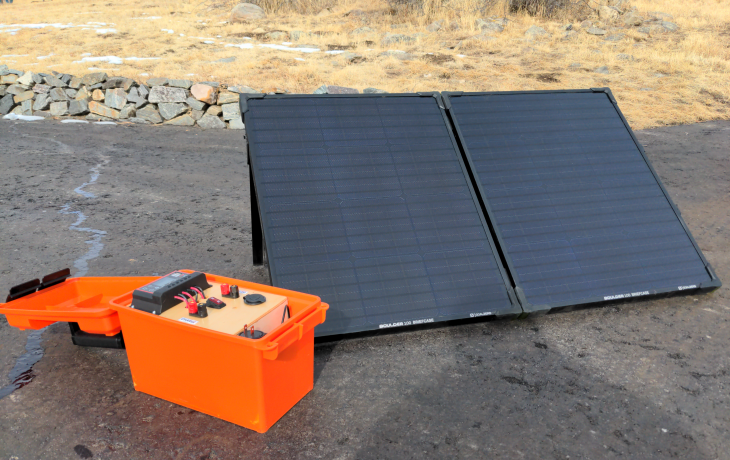
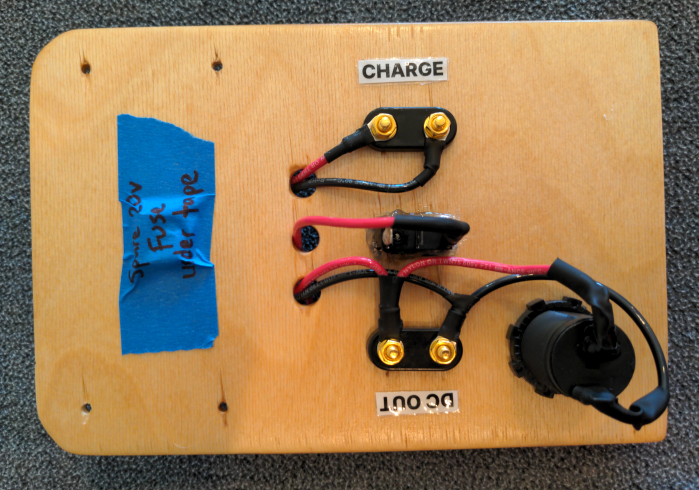
How the finished product looks:
How does this compare to similar commercial products?
This project cost around $180 for 198 usable watts hours of power in a ~22 pound package. At the time of writing:
- The Joyzis 296Wh station costs $170. It is lighter with it’s better lithium ion batteries but only can power 100W devices and has one AC port.
- The Jackery 240 has 42 more watt hours, costs $200, only has one AC port, and two fewer USB ports.
- The Baldr 173Wh station is going for $150 and has less battery capacity than our model with only one AC port and two fewer USB ports but does give you USB-C charging and the same 200W output to devices.
- The Anker 256Wh station looks to be a superior option than all of the above. At $200 you are getting 200W output, 2 AC ports, 2 USB-A ports, 1 USB-C port, and superior LiFePo4 batteries. The one downside to their model is that it is not waterproof and can’t be easily fixed or upgraded like this DIY option can.
Gathering the parts
This project is very customizable according to budget and desired use case. Learn the basics on how to build one and then make it your own.
The build
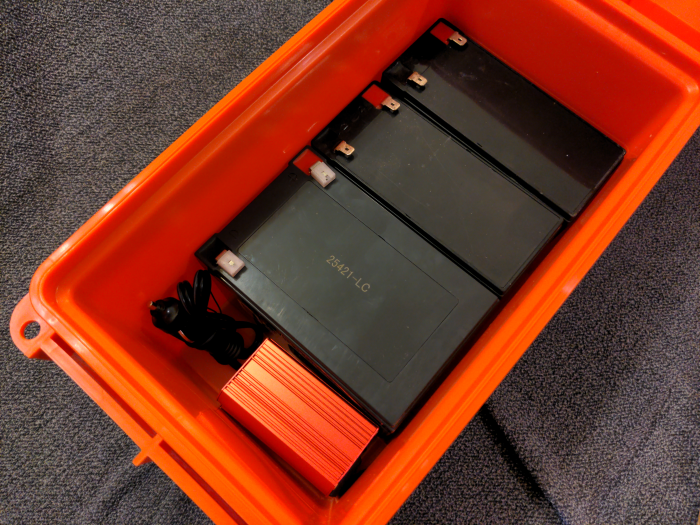
Before final assembly, you want to test fit the components to see how they’ll all fit together.
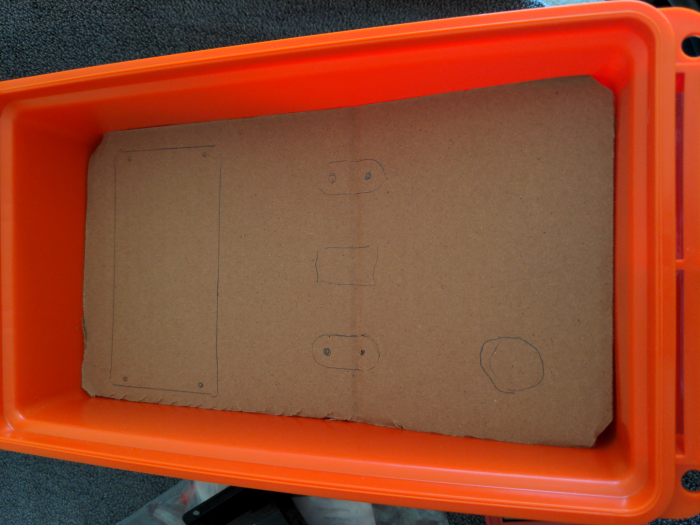
Start by placing the batteries in the bottom and cutting a piece of cardboard the size of the inside of the ammo can to represent the panel that the components will eventually be mounted to. You could have things loose in the ammo can but the panel keeps everything protected and looking cleaner. Lay the components on top of the temporary cardboard panel and trace their outline to visualize how they would all sit together.
Doing this rough fitting taught me a couple things. If I pushed all the batteries together I was able to fit the power inverter and charging cable in a space near the front. I originally wanted the panel to cover the entire inside, but decided to trim off enough room for easy access to the parts in the storage compartment. I had to trim up the cardboard template and squeeze the components closer together, but the additional room made for better accessibility.
Some variations you can make here:
- If you want your project to be cheaper — at the sacrifice of less battery capacity — you can go with a single 15Ah battery.
- You can buy four 9Ah batteries if you want to maximize the amount of juice in your power station at the expense of more weight and less storage for the power inverter.
- You could also make your panel out of plexiglass instead of wood to give a see-through design (which would be cool to see all the guts of your power station), or opt out of having everything mounted to a panel and just be loose in the case.
- Many people who build similar projects cut holes into the sides of the can and mount ports to the outside, but I opted for keeping all the connections inside the waterproof container.
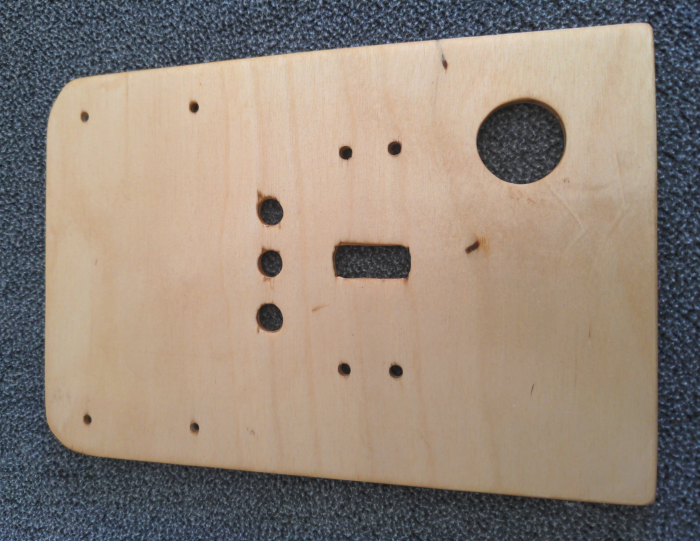
The next step is to transfer your panel layout from the cardboard to the piece of plywood and start cutting the panel. I used a basic hand saw, power drill, and sandpaper to cut mine. A jigsaw would have made it easier.
For reference here are the drill bit sizes I used:
- Solar charger controller holes 5/32”
- Banana jacks holes 3/16”
- Wire feed holes in front of the charge controller ⅜”
- Cigarette jack hole 1 ¼”
I had some leftover wood stain from another project so I applied two coats of that to the plywood which helps with water resistance and durability, and makes things look nicer. If you plan to stain the wood, make the holes slightly larger or be prepared to sand inside the holes because applying stain will add some thickness to the inside of the holes.
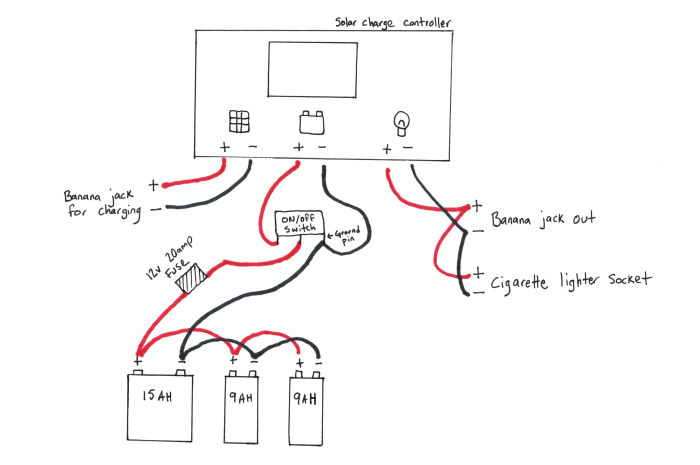
Now comes the wiring. Start by drawing all of the components and how they will interact and connect to each other. This will help you to know how long wires are to be cut to keep your project clean looking. You can also test components by holding a bare wire from the battery terminals to the solar charge controller and make sure it works before you hook everything up.
When it came time to do the actual wiring I planned on using a soldering iron to attach wire directly to each component. But that quickly turned out to be a big mess and I realized that I wasn’t very good at soldering. Plus, soldered components aren’t easy to swap out.
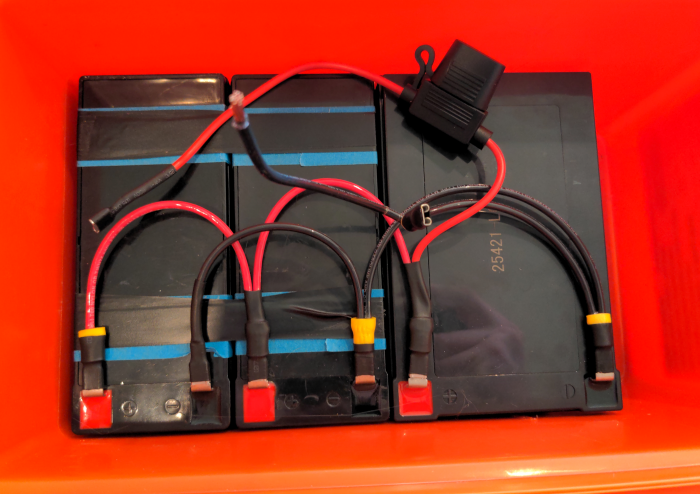
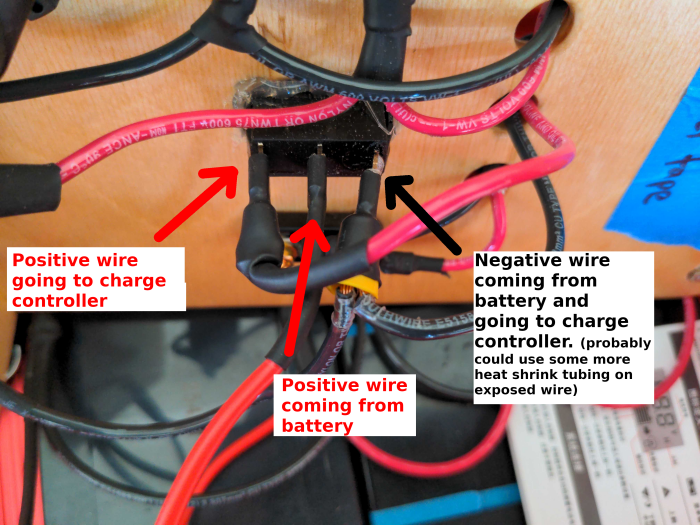
So I went back to the hardware store and bought some terminal connectors — spade connectors for the battery ends and ring connectors for the banana jacks. I highly recommend these, because they are easy to work with and no soldering required. Just trim the wire to the length that you want, strip the end of the wire to expose the copper, slip on some heat shrink tubing, put the wire inside of the terminal, and crimp the terminal with some pliers. Use a lighter or heat gun to shrink the tubing into place and insulate the terminals to prevent shorts.
While building this project, I accidentally let the positive and negative wires touch and it blew the 20 amp fuse. Keep a few spare fuses in your ammo can.
Now that the battery is connected, connect the two terminals that you have made to the switch. The switch will have three prongs, usually one is gold and the other two are silver. The gold prong is the ground and you will connect this to your negative battery terminals. You can skip this prong entirely and go straight into the negative port of the charge controller if your switch doesn’t have an LED indicator light or you don’t want that to glow when it is turned on. The positive battery terminal will connect to the middle prong on the switch. Make a third cable and connect it to the prong furthest away from the gold colored one and that will go into the positive port of the solar charge controller.
For this project, I decided on using banana jack ports to be the way to plug in a power adapter or solar panel into the project. Banana jacks are versatile. In addition to plugging in male banana plugs, you can unscrew the banana jacks to attach ring terminals or even bare wires. You can use many various ports and may want one specific to what your solar panel already has. Use ring terminals and a short length of wire to connect the charging banana jack ports to the solar input ports on the charge controller.
I added in another pair of banana jack ports to the load ports of the charge controller to be a DC out port for future expansion, like connecting a DC light bulb or fan. Daisy chained to this DC out port is a cigarette lighter socket that powers various automotive devices like a 200W power inverter that can run small AC-powered appliances.
The power station can be charged with a solar panel, but a wall adapter is nice for convenience or if there is bad weather outside. Buy or scrounge an old 18V power adapter, snip off the ends, and connect banana jack terminals to the end. I used hot glue inside of the terminals to securely hold the wires in place.

If the two banana jacks touch, you will get a small spark, so you want to avoid using the adapter if there’s the possibility of a gas leak, like after an earthquake or tornado. To avoid any shocks or sparks, plug the terminals into the charging ports before you plug the adapter into the wall. A safer option would be to install an Anderson Powerpole receptacle and use Powerpole connectors on bare wires. Many solar panels already use these as their default adapter port as well.
Charge controller settings
Before you start using or charging the power station, it is good to take a minute and change some settings in the solar charge controller to extend the life of your batteries. The included user manual is confusing and poorly translated.
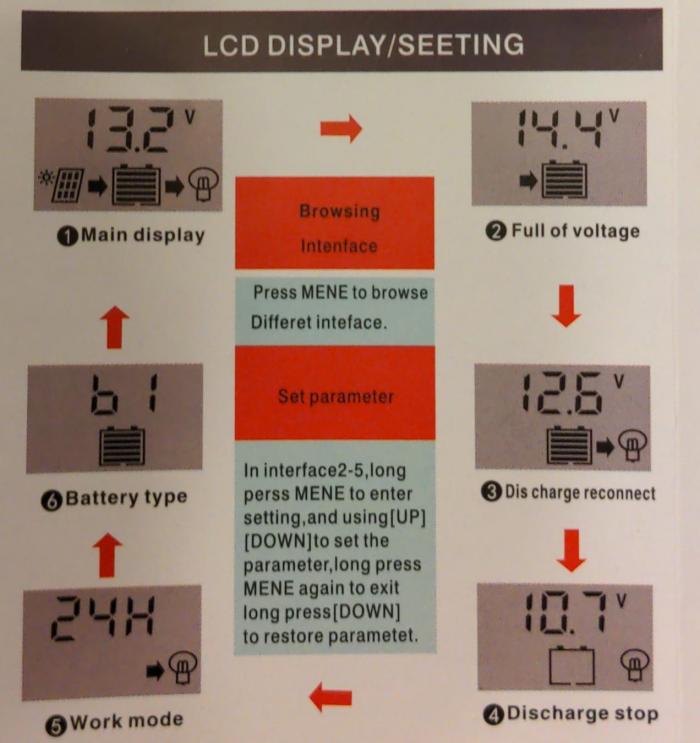
Using this YouTube video, I was able to figure out the basics on how this works. Here are the different screens and my charge controller settings. Reference these steps to the above user manual picture:
- Main display: Will show current voltage, if the unit is being charged, battery level, and if power is going to the load.
- Full of voltage: I have the maximum voltage set to 14.0V to prevent overcharging.
- Discharge reconnect: 12.5V. If the battery drops below the amount set in setting #4 it will disconnect power to the load until the batteries are charged back up to this voltage.
- Discharge stop: 11.5V. Once this voltage is reached power to the load will be cut off until it is charged back to the voltage set in setting #3. I have this set to the highest amount possible to prevent over-discharge of the batteries.
- Work mode: You can set a timer of how long power will be given to the load. I left this on the 24H setting because I will always be around the power station and turn off the box manually when I don’t need it.
- Battery type: Leave this at b1 because we are using lead-acid sealed batteries. If you use gel batteries change to b2, and change to b3 if using a flood battery.
Charge the system and start using it. With the way we have everything wired up, you will need to toggle the power on when you are charging the system.
How does it perform?
This power station isn’t going to power a fridge, a large TV, or a space heater, but for small devices it’s not too bad. It can power:
- 60-watt light bulb for about 3 hours
- 150-watt heating pad for an hour and fifteen minutes
- 45-watt laptop for over 4 hours
To get an idea of how long the power station will power any given device, you need to know how many watts it will draw, which you can find by checking the power adapter or connecting it to a Kill-A-Watt.
In this power station we used two 9 amp hour (Ah) batteries which converts to 216 watt hours (Wh) and one 15Ah battery which is 180Whs. In total, that means we have 33Ah which is also 396Wh. With lead acid batteries like this we never want to allow them to drop below ½ full to preserve the batteries so in actuality we have 198 watt hours of usable power. So if a device consumes 20 watts, the power station can power it for 9.9 hours.
The 200W power inverter does a lot of the heavy lifting because it lets you plug in AC appliances, and it’s super quiet. I was charging and working on my laptop, checked on the battery status of the power station, and only then realized a small hum from the fan of the inverter. While it is nice to have the AC inverter, try and connect directly to the USB ports on the solar charge controller or use a device with the cigarette plug when possible. By not using the inverter you are able to get more juice out of your power station because there is no loss through the DC to AC power conversion.
This project can be scaled up with a larger charge controller, inverter, and more battery capacity. Many people have built similar projects in large rolling totes, or stationary units in a shed to power lights and tools.
One thing you will not want to power with this DIY option is a CPAP machine or other device that is powered by a motor since we are using a 200W modified sine wave inverter. Medical devices are more sensitive and require cleaner pure sine wave power. If that is something you want to use with your station, you will have to spend a bit more money on a pure sine wave inverter or you can use a cigarette lighter adapter if your device supports that and not need to go through an inverter.
Variations of this project
This YouTube video by Benjamin Nelson inspired this project. Here are some of the differences my system has compared to his:
- He used this four-in-one panel which gives a voltmeter, two USB sockets, a switch, and a cigarette port. I saved $11 dollars and had a lot less wiring by just going with the single cigarette port. The solar charge controller already has a voltmeter and two 2.5A USB ports, plus the power inverter has two additional 2.1A USB ports. I didn’t need two more beyond that.
- In the above video he uses the switch to power off the load to the four-in-one panel, and to disconnect the power to the charge controller he lifts up the panel and manually disconnects the battery. In another video he changes the wiring to be more like the one made here where the switch is the main killswitch to the entire system. If you like the ability to turn off power to the load while still having the system on, like when charging, you can hit the ‘-’ button on the solar charge controller and it will disconnect power to the load.
- Benjamin brought all of his negative terminals together to one central point. I used the daisy chain method because it used less wire, was less bulky, and kept things cleaner looking.
- He only used one 15Ah battery, I used one 15Ah, and two 9Ah batteries for a total of 33Ah.
- He laser cut and engraved his panel, this one was made by hand.
You are reporting the comment """ by on