A lot of people try gardening by putting seeds in the ground and waiting. When nothing comes up, or plants barely grow, they chalk it up to being bad at gardening or not having a green thumb. In reality, their soil probably just doesn’t have the nutrients plants need.
Soil testing is your chief weapon in taking the mystery out of gardening. Professional soil tests are best, but they can be expensive, hard to read, and it takes time to get results. Rapitest soil test kits are readily available, relatively inexpensive at $17, easy to use, and help you quickly correct common deficiencies in your soil.
I made a video demonstrating how to use the Rapitest kit.
Important bits:
- At-home soil-testing kits won’t give you the data a professional test will, but it’s fine for most people to figure out if there’s a common 80-20 problem. So instead of a lab test that says X parts per million, the simple tests just tell you “the soil needs more X.”
- You need to test the soil in each garden bed to make sure it has enough nutrients for plants to grow.
- Use distilled water for the best results.
- The at-home tests are based on color, so use natural light, and if you’re color blind, get a second opinion from a friend.
- The most important nutrients are nitrogen, phosphorus, and potassium, abbreviated as NPK.
- Fertilizers are designated by their NPK percentages, like 10-10-10 or 12-0-0.
What plants crave

Plants need a large swath of nutrients to produce nutritious food, but there are three macronutrients that are the most important:
- N (Nitrogen): Arguably the most important nutrient since it fuels leaf growth
- P (Phosphorus): Used by plants to form roots, flowers, seeds, and fruit
- K (Potassium or Potash): Helps plants stay healthy and resist disease and stress
These are often abbreviated as NPK, each being the chemical symbol of the respective element. That abbreviation is important to know because fertilizers are labeled with the percentages of each element like so: 10-10-10, which means that fertilizer has 10% N, 10% P, and 10% K. For example, blood meal is usually 12-0-0, which means it’s loaded with nitrogen but nothing else and bone meal is usually 3.5-17-0, which means it primarily provides phosphorus and a little nitrogen, but no potassium.
So if you need a lot of nitrogen but you’re good on phosphorus and potassium, blood meal is what you want. And if you need phosphorus, bone meal is the way to go. Wood ashes are a good source of potassium, though how much you get depends on the wood.
There are numerous micronutrients that plants need as well. One of the advantages of organic fertilizers is that they often contain at least some of those. If you want a thorough treatise on soil nutrition, read Steve Solomon’s The Intelligent Gardener. Brett Markham’s The Mini Farming Bible offers simpler (and much cheaper) advice, though it’s nowhere near as thorough.
The other key thing to know about soil is the pH level, which tells you how acidic or alkaline your soil is. Some prefer acidic soils while others prefer alkaline soil, but most plants want a pH between 6.0 and 7.0.
Why test soil at home?
Nothing beats a professional soil test performed in a lab, especially a comprehensive lab like Logan Labs that can tell you not only the macronutrient, but also the micronutrient levels in your soil, which helps you mineralize your soil to produce the most nutritious vegetables possible.
Put simply: lab tests will give you more fine-grained information.
However, those tests aren’t cheap at >$30 per bed. If you need to test several beds, possibly with different soil compositions and nutrient levels, that can add up quickly, especially when you factor in needing to retest beds after amending them. Whereas a Rapitest kit with 10 tests for pH, N, P, and K costs less than $17.
I can’t emphasize enough how these home tests aren’t a substitute for real-deal lab results. But in some ways, I like the home tests more. Instead of confusing numbers, nutrient levels are presented on a scale from depleted to surplus, which quickly gives you a sense of just how poor (or rich) your soil is.
A good plan is to get at least one bed professionally tested every season and then do several at-home tests to keep tabs on the major nutrients.
How to use a Rapitest kit
Rapitest isn’t the only at-home kit on the market, and I’m not sure if it’s the best, but it certainly seems to be the most common. They offer both pH and NPK kits. Whether you buy the one that combines both, or buy both separately, you want to test each. They have a digital test as well, but I doubt it’s worth the extra money (it’s probably like pregnancy tests that have a sensor that reads the strip for you).
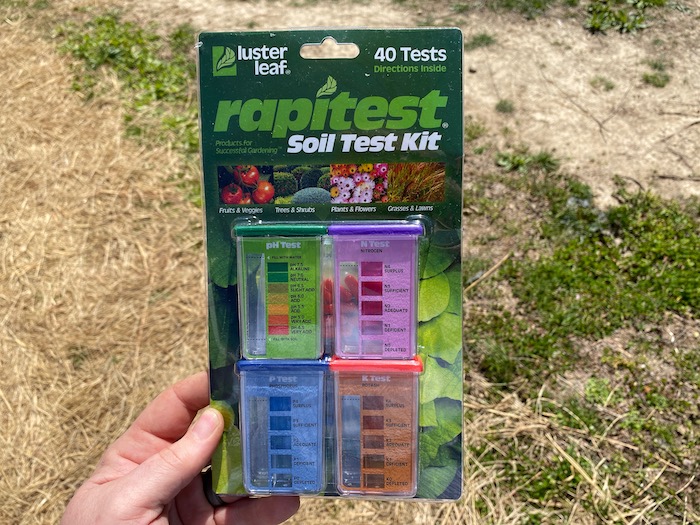
The kit includes:
- 40 color-coded pills. Each pill contains the reagents needed for a single test of its type.
- 4 color-coded plastic vials called comparators. Each comparator has two chambers: a narrow test chamber where the actual testing occurs and a wide reference chamber.
- Each of the comparators has a semi-transparent color film with different colored squares that you use to evaluate the test results.
- A plastic dropper to add water or soil solution to the comparators.
The tests work by mixing soil, water, and a reagent in the comparator’s test chamber. The reagent will cause the soil and water solution to change color. You then compare that color to the color squares on the color film to determine your soil’s condition.
You first need a soil sample. The instructions are slightly different for pH and NPK tests. In the former, you mix soil and water in the test chamber, while in the latter mix them outside of the comparator and then add the solution to the comparator. The NPK test calls for one cup of soil, so you want to collect that much and then add in an extra teaspoon or so for the pH test.
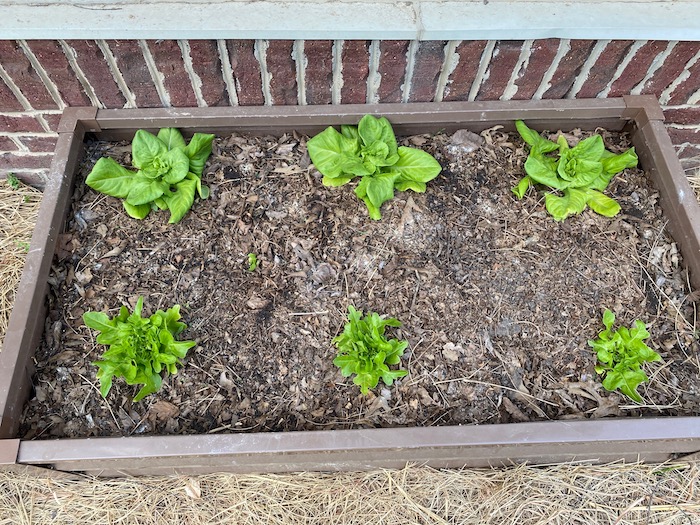
I decided to test a raised bed near my house. Typically, you want to test beds well before planting, but this bed is already growing lettuce that’s growing slowly. So I carefully gathered a sample from an empty spot.
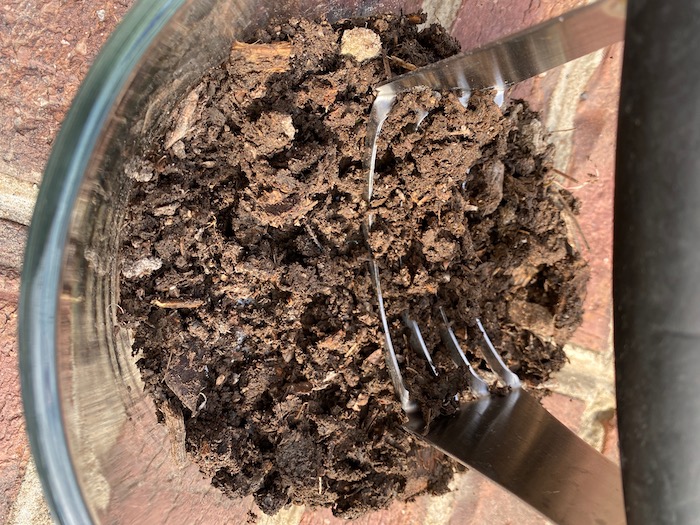
When collecting soil, try to avoid touching the soil so as to not contaminate it. For annual garden beds, you want to collect soil from about 2-3 inches deep. I also recommend a glass container, because for the NPK test you need to see if the soil has settled first.
If the soil is moist, it’s a good idea to sit in the sun and dry a bit. If it’s clumped up, you’ll need to break it down. A potato masher or pastry blender would be good tools to do so.
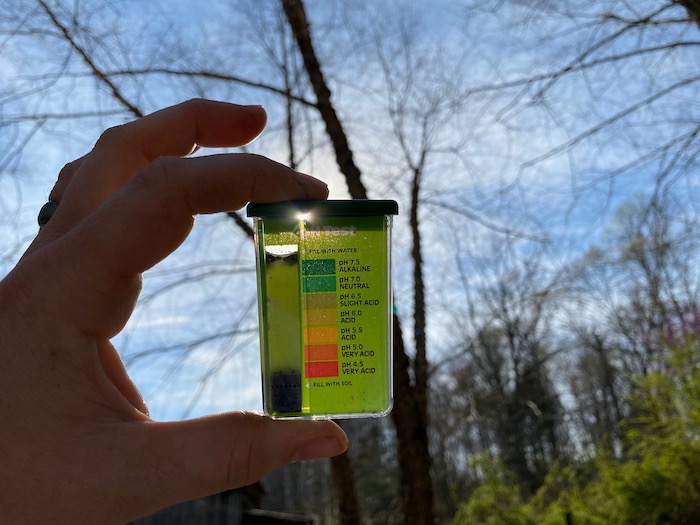
Testing pH
The easiest test is the pH test. You use the green-colored comparator and one of the green pills included in the kit. Spoon a small amount of soil into the left-hand chamber, up to the lower line. Then use the included dropper to fill the rest of the chamber up to the upper line. You want to use distilled or bottled water for this. I used water from my St. Paul Mercantile water filter, though I’ll probably use distilled in the future.
You then need to open the pill and pour the powder into the test chamber. You can do that by pulling both halves of the pill apart, but I’ve found that it’s much better to snip the end off with scissors so the powder spills out of one opening instead of two.
Pour in the powder, cap the comparator, shake it up, and then look at the color the solution turns into. You want to do this outdoors, as the tint of indoor lights can screw with the color. You also want to stay out of direct sunlight. Green indicators alkalinity, red acidity, and yellow is in the middle. Based on the olive-green color of the solution, I estimate the soil in my raised bed to about about 6.5, which is just right for general-purpose growing.
Testing NPK
NPK testing works similarly, but it’s slightly more fussy. Instead of adding soil directly to the comparator, you mix in five cups of pure water to your cup of soil and shake or stir thoroughly. You’re only testing the water that has mixed with the soil, so you need to wait for the soil to settle at the bottom, which could take minutes or an entire day, depending on your soil composition.
I let mine sit overnight to be sure. You then use the included dropper to suck water out of the middle of the soil solution, being careful to not suck or stir up the soil at the bottom. Unlike the pH test in which you only filled the test chamber, you fill up both chambers of all three NPK comparators. That’s because the cloudy water alters the final color, so the color filters need the same cloudy water added to compensate.
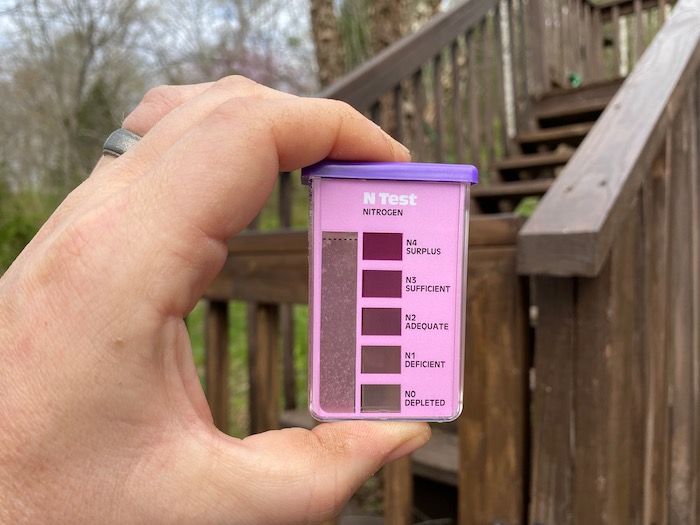
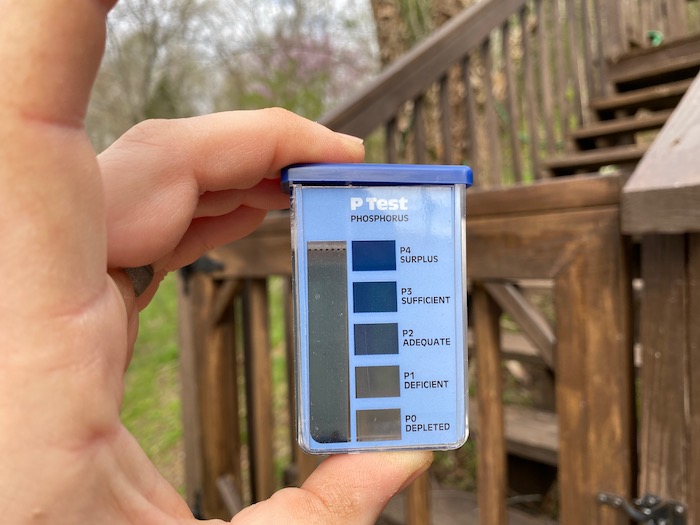
Once both chambers are filled, you need to cut open each corresponding pill, add the contents to the test chamber (NOT the control chamber!), and shake it up. The comparators and pills are color-coded to keep them straight:
- Purple = Nitrogen
- Blue = Phosphorus
- Orange = Potassium
You then need to wait exactly 10 minutes for the color to develop. The longer the solutions sit, the darker the color gets, so if you check too soon or too later the results will be skewed.
Here’s another tricky bit. The instructions say that if the blue crystals to detect phosphorus settle on the bottom of that comparator, you need to shake it up while the color is developing, but you should not re-shake the other containers. Here is an easy mnemonic to remember this: Bottom blue? Shake!
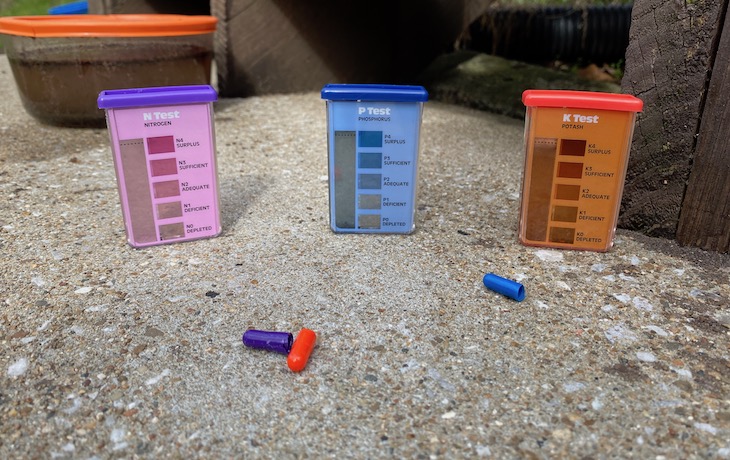
After 10 minutes, I checked my results. The nitrogen sample seemed to be almost entirely depleted…
…as did the phosphorus.
However, the potassium sample had a nice orange color, so my levels there seemed at least adequate.
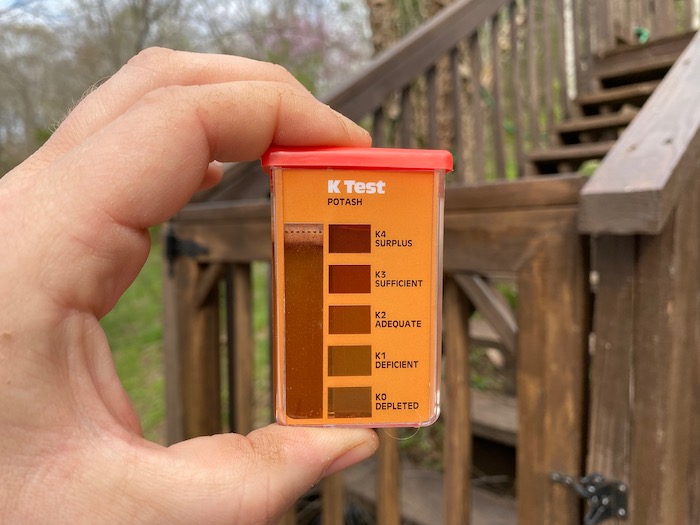
Reading the results is straightforward, if not exactly precise: the deeper the color, the more of that nutrient you have.
What to do with the results
There are two ways to respond:
- Plant things that enjoy those conditions
- Amend the soil to correct the levels
If your soil is acidic, you can add lime to bring the pH up. If it’s alkaline (much less common), add sulfur or peat moss. Wait a few weeks before retesting, because that process takes time. The included instructions give specific amounts for every 100 square feet to apply based on your test. You’ll need to scale those numbers up or down to your bed size.
For example, if the instructions say to add 5 pounds of lime, assuming a 100-square-foot bed, and your bed is 4-by-8, then multiple 4 and 8, which gives you 32. 32% of 5 pounds is 1.6 pounds, or 1 pound, 9.6 ounces (you could round down to 1.5 pounds to make things easier).
If you can’t get your soil adjusted in time, work around it by planting alkaline- or acid-loving plants, depending on your soil’s pH. For example, tomatoes love acid, while brassicas like broccoli prefer alkaline soil. You should research whatever crop you intend to plant to see what conditions it prefers.
The same goes for nutrient levels. Low nitrogen isn’t always a bad thing: if potatoes have too much nitrogen they’ll produce too many stems and leaves and not enough tubers. But if you want to plant leafy greens like lettuce, you’ll want to add something like blood meal or cottonseed meal to boost the nitrogen level. If you have an excess of nitrogen, nitrogen-loving plants like corn will gobble it up.
Bone meal can increase phosphorus levels, and wood ashes can boost potassium, though wood ashes can also increase pH, so apply sparingly.
That’s just scratching the surface of soil amendments, but hopefully that gives you a start on boosting your garden’s productivity.
You are reporting the comment """ by on