Maps and compasses are deceptively powerful tools. But they aren’t as confusing or complicated as you might think, and using this simple guide to learn the basics might save your life in a wide range of survival scenarios.
More: Review of the best compasses
This one page guide covers the basics you would learn in a weekend navigation course. We’ll focus on the techniques of using a map and compass in four examples: how to orient a map to True North, how to plot a course, how to walk that course (“shoot a bearing”), and how to figure out where you are on the map (“angulation”).
Why you should trust us
In 1991, I began my training as a US Air Force S.E.R.E. Specialist (Survival, Evasion, Resistance, Escape). After becoming an instructor, I taught air crews how to survive if they became trapped behind enemy lines. That often involved navigating in unknown terrain with limited resources or assistance.
I’m now the head instructor at a survival training school and have taught countless beginners how to navigate in survival situations. On the side, I’m also a consultant for survival TV shows like Science Channel’s Hacking the Wild.


Why you should learn how to use a map and compass
The grid goes down, your batteries die, your car gets stuck, and now you’re stuck in the wilderness. In my work as a survival instructor in the military and civilian world, I’ve heard lots of stories of people getting lost and dying — and sometimes their bodies are found pretty close to a trail.
Sometimes GPS can lead you down a path that is technically correct but a very bad idea — rescue workers call this “death by GPS”, and it’s the cause of a growing number of emergencies.
For example, in the summer of 2009 a nurse and her six year old son were driving through Death Valley National Park. Their GPS took them down a little used dirt road. The rangers found them a week later, but unfortunately the child died.
Or the family that went down the wrong road and was stuck in the snow for two days in Bryce Canyon National Park. Or the couple driving from Canada to Las Vegas who took a GPS shortcut in the dark, yet after a three week rescue effort were declared dead.
Even if armed with only a compass, a lot can be accomplished if you keep a cool head. Most people can figure out the basic NSEW directions in the daytime, and if you’re lost in a generally familiar area like your favorite park, having and using your compass can make a real difference in how well (or if) you survive.
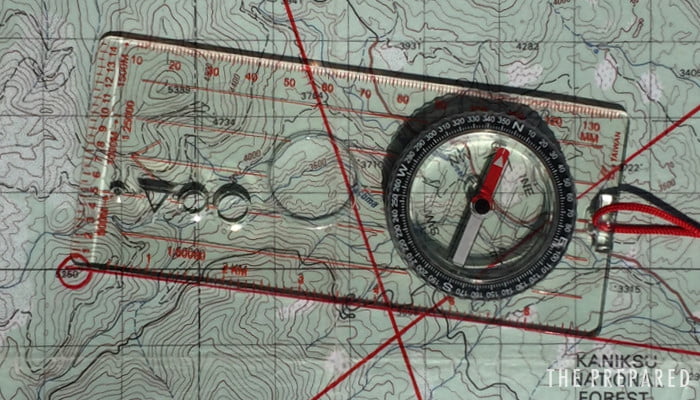
Compass basics
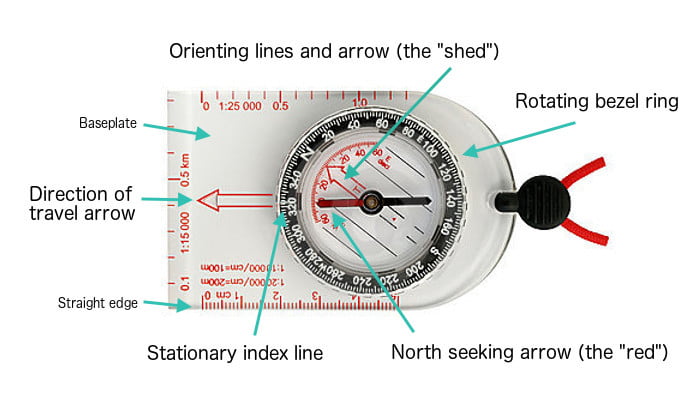
- Magnetic North seeking arrow. This is the main arrow you’re all familiar with. It spins around to find Magnetic North. The tip is usually red, which we use later with the “red in the shed” method.
- Direction of travel arrow / lines. This is a fixed line or arrow that sits outside the spinning compass compartment. It points in the same direction the physical front of the compass is pointing.
- Stationary index line. This is a thin line that points in the same direction as the direction of travel line. It doesn’t spin, but it is in or near the spinning compartment.
- Rotating bezel ring. The rotating ring around the Magnetic North seeking arrow that has the degree numbers from 0 to 360.
- Orienting arrow / lines. Built into the face of the compass so that it points to 360 degrees on the rotating bezel ring. The orienting arrow and lines will point wherever you spin the bezel. The space inside the arrow is the “shed”.
- Base plate and straight edge. Whether it folds or not, a good compass can lay flat and has a long straight edge so you can create lines and take measurements on your map.
Magnetic North vs. True North and how the difference affects navigation
You may already know that a compass doesn’t point to True North (the North Pole) and instead points to the Magnetic North Pole. But does this matter for simple survival?
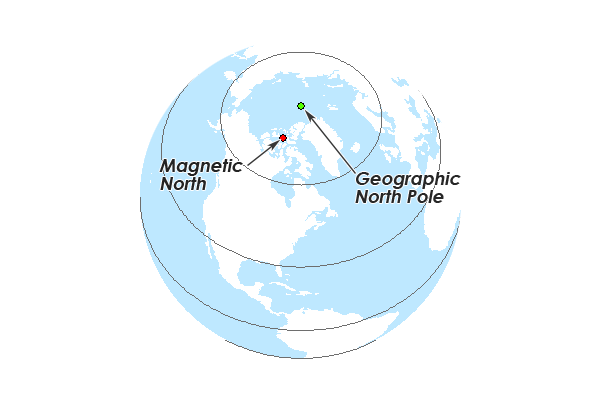 What really matters for navigation is the angle of difference between the two poles from where you’re physically standing.
If you drew two lines from your position to both poles, the degree of difference between those two lines is called the magnetic variation, a.k.a. magnetic declination.
For most of America the difference is around 5 degrees. On the west coast and in Alaska, the difference can be 12-15 degrees. If you travel just a few miles, even small differences of a few degrees between True and Magnetic can take you way off course.
Because the Earth is a large magnet with a complex magnetic field, these forces are moving all the time. The two poles are about 800 km (~500 miles) apart. The magnetic pole has moved about 1,000 kilometers (621 miles) north in the last 150 years, and it’s accelerating.
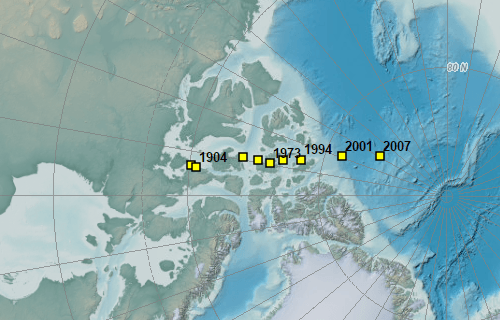
This animation shows the difference in degrees at various parts around the world and how they’ve changed over time:
Because of those variations, maps are drawn to True North, not Magnetic North. So you have to reconcile for this difference when using a compass and map together, depending on where you are.
You should look up your declination on NOAA’s website. Some example results around the US:
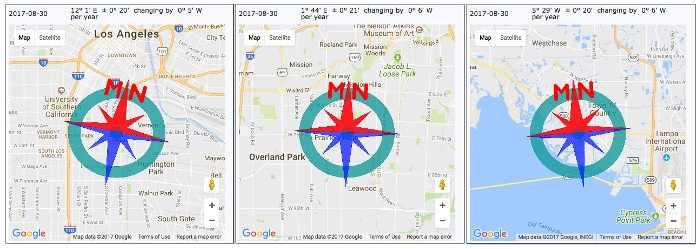
Another way to visualize this: imagine you’re looking directly at the North Pole from where you’re standing. From that point of view, the Magnetic Pole is going to be on either the west or east side of your line of sight to True North.
The declination reading is more than just a number — for example, the NOAA reading for Los Angeles says “12 degrees east” and Tampa says “5 degrees west.”
That means that when you’re in LA, Magnetic North is 12 degrees to the east (or right) of True North. For Tampa, it’s 5 degrees to the west (or left).
You’ll need to add or subtract the declination number from 0/360 degrees (same thing) on your compass. If your declination is east, you subtract the number. If west, add.
A simple trick we used in the military to remember whether to add or subtract was the saying, “East is Least and West is Best.” If you need to look east to see the magnetic pole you subtract the number. If you look west, add the number.
Imagine you want to walk from Los Angeles to the True North Pole. The compass would be trying to take you 12 degrees in the wrong direction to the east/right. So you would actually want to follow 348 degrees on your compass.
We know this can be a little tricky to read, so visualize it a few times. It’ll sink in.
Map basics
We have an amazing gift in modern maps. There is a huge wealth of information baked into them, so let’s learn the basics.
Scale
Maps obviously come in different shapes and sizes. Two different maps on the same sized sheet of paper might only cover your town or the whole state. Imagine you’re in a hot air balloon looking down — the higher you go, the more you can see but the less detailed things get.
The scale is one of the first things I look at when I pick up a map. The scale tells you two very important things with one set of numbers: about how much area does the map show, and how much detail of that area will it show?

The numbers are set up like a ratio. 1:50,000 is considered a “large” scale because things look large, as if your hot air balloon was only a few hundred feet above the ground. A ratio of 1:200,000 is “small” because things on the ground would look small, as if you’re looking down from an airplane.
Map scale is important in survival scenarios. If you’re traveling quickly in a car, you don’t care much about the details of the little creeks you drive over. But if you’re on foot or you have to leave the main roads in an emergency, those larger scale maps come in very handy.
You’ll have to use personal judgement when buying the map(s) that make sense for you. If you want to err on the side of caution, get multiple large scale (i.e. detailed) maps that cumulatively cover where you’re most likely to go.
Legend
Every decent map should have some kind of legend. The legend explains everything you need to know about how the map was built, like what the different symbols, colors, and textures mean.
Legends also note the map’s scale, which explains how much land area is covered in the map.
If the map has grid lines or topographic contour lines, the measurements will be explained in the legend. For example, it might specify that one of the grid blocks overlaid on the map is equal to one mile and that the elevation contour lines are for every 100 feet.
If you’re buying a map, look at how detailed the legend is. Does it give you the right information, like map scale, symbol charts, and magnetic declination? Was it published in 1984 and likely inaccurate today?
Topographic maps
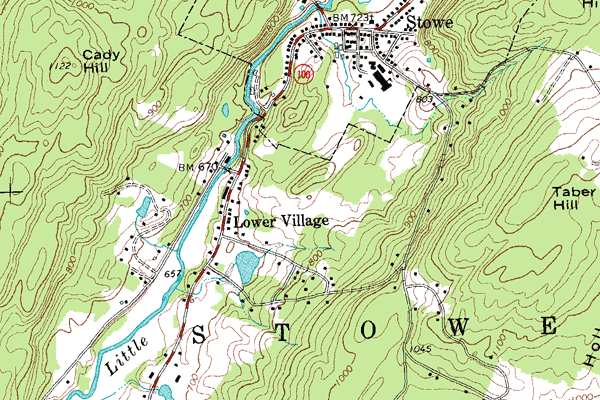
Topographic maps are typically more useful than plain road maps because they show the lay of the land and other geographical features in addition to the normal manmade features and roads.
They do this by turning a two dimensional map into a three dimensional one, typically by using contour lines to show terrain features. A contour line is a line of equal elevation, meaning everywhere a single contour line touches is the same elevation. The little numbers in the lines, like the 800, 900, and 1000 shown shown above, are the elevation at that line.
Imagine sitting in a bathtub and slowly bringing your closed fist up out of the water, knuckles up. Let’s say when the topmost knuckle is a quarter inch above the waterline, you use a pen to draw a circle around your knuckle wherever the air and water meet. Then you lift your fist another quarter inch and make another line right wherever water and air meet. Do this several times until your fist is out of the water. Your fist now has multiple parallel lines each a quarter inch from the other.
Now open your hand and lay it flat, palm down. You’ve just taken something 3-D (your fist) and made it 2-D (the flat image on the back of your hand).
A map with contour lines will have a “contour interval” listed somewhere in the map legend. On very large scale maps (1:30,000) that show a lot of detail, this interval may be anywhere from 20 to 80 feet. On small scale maps (1:150,000) that give a high bird’s eye view, it may be 80 to 200 feet.
Every fifth contour line is called an “index line” that is a little thicker than the others. It acts the same as any other contour line, but gives you a way to count up elevation quickly. Like old school hash marks in groups of five.
These lines help you visualize features and steepness. In the bathtub fist example, the first circle you drew around the tip of your knuckles would look like a closed circle when you lay your hand flat. That closed circle shows you that it’s the peak of a hill or mountain.
When contour lines are very close to each other, that means the elevation is changing quickly in a small amount of horizontal space. If it takes three miles to go from 2,000 to 4,500 feet, that’s a pretty easy hike. But if it only takes half a mile to go from 2,000 to 4,500 feet, you’re in for a steep climb.
Nautical maps
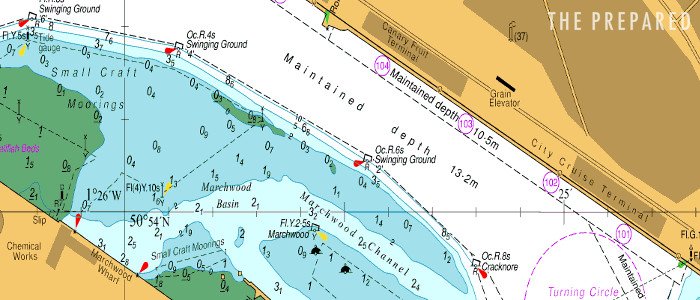
If you live near water, and especially if a boat is part of your emergency planning, be sure to have a good nautical map. It shows water depth, currents, hazards, ports, docking areas, distances, and a whole slew of other information. Think of them like a topographical map for large bodies of water.
Latitude and Longitude coordinates
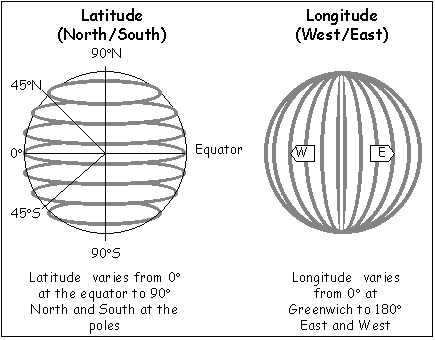
We don’t use coordinates in this lesson, but we do reference things like Longitudinal lines. A lot of people have a hard time remembering how latitude and longitude coordinates work. Some tips:
- Think of a ladder. Ladders are about the rungs you step on to climb. Ladder sounds kind of like latitude. Latitude = ladder steps = horizontal lines.
- The more steps you take up the ladder, the higher you are going in latitude. Because you climb up the ladder, if you were halfway between the equator (0 degrees) and the North Pole (90 degrees), you would be at a latitude of 45 degrees North.
- Longitude is the long part of the ladder. It’s a long way from pole to pole. Those lines run vertically from pole to pole.
- In football, a lateral is when you throw the ball to the side, or horizontally. Horizontal lines. Lateral = latitude.
- If weightlifting, a lateral pulldown is a horizontal bar you pull down with your hands.
1. How to orient a map using a compass
Whenever you’re using a map, it’s very helpful to start by orienting the map so it fits the land. It just makes things neater and easier to figure out. This also accounts for magnetic declination, so any readings you take afterward are already corrected.
To get the map as accurately oriented as possible, you’ll use the compass to turn the map until the NSEW directions on the paper map line up with the actual NSEW directions from where you’re standing.
Some advanced compasses have a built-in magnetic declination adjustment, so you can set it once for your location and then forget about it. We’re ignoring that feature for this guide since many compasses don’t have it. So you’ll need to know the declination number for your area, either from your map or from NOAA.
- Start by eyeballing it. Look around for any easy landmarks, like a lake or tower, and roughly rotate your map to fit your point of view.
- Rotate the compass bezel ring so that the stationary index line is matched with your True North bearing. In our video, the map is for an area of Washington State, where the current declination is around 15 degrees east. Which means True North is at 345 degrees.
- Align the left straight edge of the compass with the left (west) border of the map. The direction of travel arrow on the compass should be pointing to the north end of the map.
- Hold the compass and map together in a way that keeps these edges lined up for the next step.
- Rotate the entire map and compass together until the North seeking arrow lines up with the Orienting arrow. This is often called putting “red in the shed.” Red is the North seeking arrow (because it’s usually a red color) and the shed is usually the space between two main orienting lines inside the bezel ring.
- It’s helpful to put something heavy on the map corners to keep it from moving.
2. How to plot a course
Sometimes it’s good enough to know “I need to go east to get to the lake” — but sometimes you need a more precise heading.
In the military, we teach a six point checklist. Even after 25 years of off-trail hiking, I still use some form of it in my head or on paper. I might skip step #5 because I’m enjoying the journey and don’t care about time.
- Find the direction, called a heading or bearing, from the starting point to the destination.
- Determine course distance.
- Evaluate the terrain and path.
- Estimate the pace count.
- Estimate time of arrival (ETA).
- Know what the goal looks like.
Step 1: Find the bearing
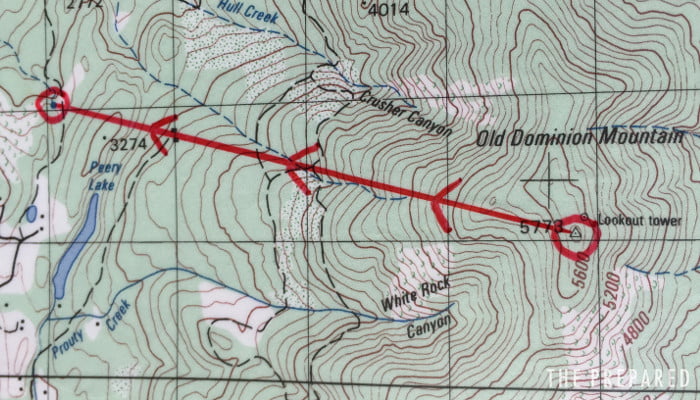
Let’s plot a course on this Washington State map from the campground on top of Old Dominion Mountain to a nearby spring.
At this location, the magnetic variation is 15 degrees East, which means True North is at 345 degrees. I double check that my map is correctly oriented.
To find my heading from the campground to the spring, I place the straight edge of the compass along that line.
The destination should be towards the front of the compass, so the direction of travel arrow is pointing in the direction you want to go. If the distance is so long that the edge of your compass only covers a portion of the length between the two points, consider breaking your course up into waypoints.
I move the bezel ring until the orienting arrow exactly outlines the Magnetic North seeking arrow (red in the shed). Then I read the heading from the stationary index line. In this case it reads 271 degrees. That means my destination is 271 degrees from my current location.
Step 2: Determine course distance
The map legend tells me that each grid square is 1 kilometer. Using the measurement ticks on my straight edge, I can tell this straight line course is 3.9 km (2.4 miles). I even made little arrow marks with the red marker at each kilometer.
Another trick is to use something small, like a blade of grass that you tear to the proper length based on the scale in the map’s legend. If the blade of grass equals 1 mile, that makes figuring out the course distance much easier.
Step 3: Evaluate the terrain
What will you see as you walk? Will you be going uphill or downhill? Will you cross a stream? Passing something expected (like a lake or town) halfway through your journey can remove a lot of anxiety.
It looks like my campground starting point is at the top of a hill. Which makes sense since it’s called Lookout Tower.
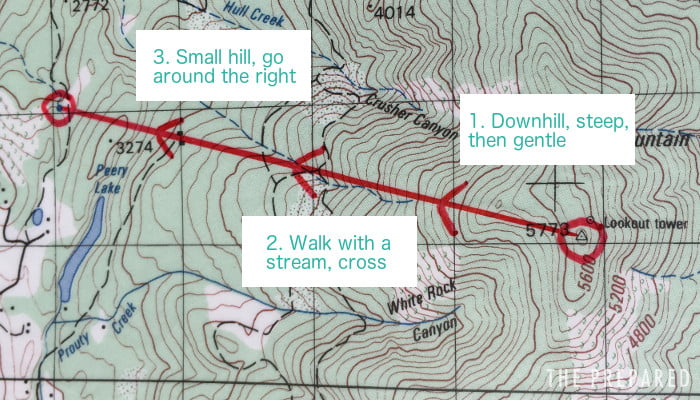
As I follow along the path, it seem like the beginning will be pretty steep downhill. Over time it will flatten out, but I’ll be going downhill almost the whole way. There might be a small stream along the way. Towards the end of the path, there is a small finger ridge that goes up a few hundred feet and then down again to my destination.
Step 4: Estimate pace count
A pace is two steps. Every time the same foot hits the ground again, that’s a pace. There’s a reason the military uses paces — they’re easy to count while walking and can help if the terrain is featureless or you can’t see well.
Most people carrying a pack will count 600-800 paces for a kilometer on flat terrain with little vegetation to negotiate; 800-1,000 on moderate terrain; and up to about 1,200 for really steep or thickly vegetated terrain.
If you want to get serious, measure your personal pace count. Measure out 1/10th of a kilometer (about 328 feet) or 1/20th of a mile (about 264 feet), whichever is more familiar and comfortable to you. Now walk it out counting your paces. Try it with and without a pack on, uphill and downhill, walking fast and slow, hyped up or relaxed, etc.
Even though the path will be mostly downhill, because there are some steep parts and probably some vegetation, I estimate about 950 paces per kilometer. Which means the whole trip will be about 3,800 paces.
Pro tip: experienced navigators use a bracelet of little beads or some other small physical thing to keep track of paces. You move the beads to keep track of how far you’ve gone, so you don’t have to worry about counting large numbers or forgetting along the way.
Step 5: ETA
There are some rules of thumb to calculate how long a hike will take depending on distance and terrain. The popular Naismith’s rule estimates 1 hour for every 3 miles of horizontal distance, plus 1 hour for every 2,000 feet of ascent.
Based on that rule and my personal experience, I estimate this course will take 80 minutes.
Step 6: Know your goal
What does your destination look like? How will you know you’re there? How will you know if you passed/missed it?
I can see that my destination has a spring in a shallow drainage in the southwest corner of a small narrow meadow and some hills to the East. There may be a jeep trail running North-South just before the goal. If I miss it, the terrain will become less steep for a few hundred meters and then drop off very steeply until I hit some power lines along a creek and a major road a few hundred meters beyond them.
3. How to use a compass to walk in the right direction
Continuing the example from plotting a course, I know that I need to walk with a bearing of 271 degrees. To do that, I rotate the bezel ring until 271 is over the stationary index line.
Holding the compass with the direction of travel arrow pointing straight ahead of me, I’ll turn my whole body with the compass until red sits neatly in the shed. That means everything is lined up and I can follow the direction of travel arrow.
The best thing to do is look where the travel arrow points and pick an easy to see object in its path. That way you can let the compass dangle and keep your head up while walking. When you reach that object, pick up the compass and do it again. This is called “point to point” navigation.
You might be wondering if you need to readjust for magnetic declination now that you’ve taken the bearing off the map and are traveling. The good news is no, it’s simple and already baked in. That’s the value of orienting the map to the terrain. Any math you did after that orientation is already corrected.
4. How to find your location on a map
Plotting a course is easy when you know where you are and where you want to go. But what if you don’t know where you are at the beginning or get lost along the way?
Using an advanced skill called angulation (which you might have already heard of via the word “triangulation”), you can use the compass and visible landmarks to figure out where you are with more accuracy than just eyeballing it.
- Try to shrink the area on the map of where you might be. It’s easier to figure out where you are if the possible area is only the size of your fist on the map. Think about where you’ve come from. Did you cross any roads? Go past a big mountain?
- Assuming your map is oriented to the land and True North, anchor it so it doesn’t move.
- Look around you for unique landmarks, like an obvious hill or tower. Can you correlate them with what you see on your map? The points you reference with your compass in the next steps need to be the same points you reference on the map. If you need to, find a better position and look for more unique landmarks.
- Next, find the bearing between you and that landmark. Hold the compass in front of you and point the direction of travel arrow at a very distinct part of the chosen landmark, like the very top of the mountain.
- Hold the compass steady and rotate the bezel ring (and thus the “shed” inside it) until the north seeking arrow fits inside the orienting line/arrows (red is in the shed). Be as precise as you can.
- Read the number over the stationary index line and remember it. Let’s imagine it says 254 degrees. That means the bearing from you to the landmark is at 254 degrees.
- Go back to the map. Put a point on the straight edge near the front of the compass over your landmark point. That corner is a pivot point, and you lift and rotate the whole compass around it until red is back in the shed.
- The straight edge of the compass has now made a line extending from the landmark through all the possible areas that would show a 254 degree bearing from that point to the landmark.
- If possible, use a pencil to trace that line.
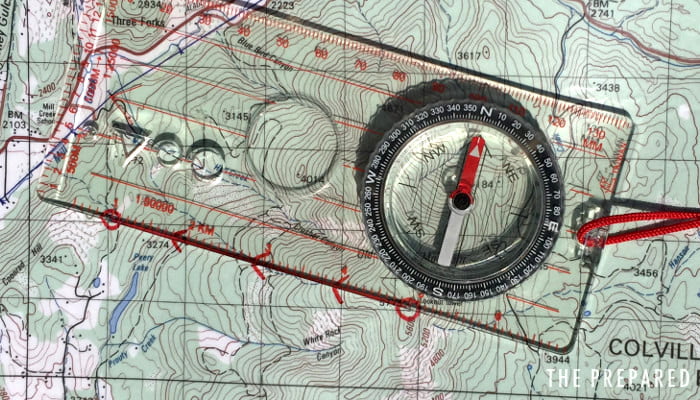
This is what it looks like when I use my compass on the oriented map to draw the line from the landmark (the circle on the left):
I knew that I needed to find the line that shows 254 degrees to the landmark, so I rotated the bezel ring until 254 was under the index line. I put the corner of the baseplate on top of the landmark, creating a pivot point, then I physically rotated the whole baseplate around that pivot point until red was in the shed.
X marks the spot! Whether you have two lines or five, wherever they intersect is your general location.

The more landmarks you do this with, the more accurate your position becomes. Two lines is biangulation, three is triangulation, etc. When picking second and third landmarks to use, try to pick points that are around 60 degrees away from the other. That way, your X is more substantial and accurate.
If you use three or more points, and the triangle shape created is larger than the tip of your pinky, you probably made a mistake when translating the landmark in real life to the landmark on the map. In other words, the mountain you thought you were looking at is not the same mountain you drew the line from on the map.