Winter and extreme cold present unique survival challenges. Taking a little bit of time to learn things like how to drive in snow, what to do if you fall through ice, and how to create shelter if your home loses heat are valuable skills that can save your life.
This guide teaches you the basic survival skills in cold situations. Check out our guide on winter emergency survival kits so you can get your home, car, clothing, and bug out bags prepared ahead of time.
We don’t like specific checklists and acronyms that you’ll never actually remember in the moment you need them.
The point isn’t to memorize this article. The point is to understand why these are the best steps to take in the example situations, so that you can make better decisions on the fly no matter what scenario you face.
That’s why we put it on all one page — so the common foundation across situations can sink in.
Top winter survival and cold weather tips
- Prepare! Follow our winter survival kit checklist for tips on proper clothing, winter car kits, home supplies, and more.
- Hypothermia and frostbite are the real dangers. Even in 50 F temperatures, you’re at risk of losing too much core and limb heat.
- Protect your body heat. Protect it, trap it, and treat it like the precious resource it is.
- Keep covered. Wind and exposure are the enemy. Exposed skin accelerates heat loss, especially through wind.
- Dress in layers. The air trapped between each layer holds your body heat, like your own personal hot tub. Plus, layers give you better control over regulating body heat so you can avoid dangerous sweating.
- Avoid sweating and stay dry. Besides moisture loss, sweating is bad because water on your skin makes you colder. That’s why we sweat to begin with — it’s the body’s air conditioning system.
- Snow is an insulator. Don’t be afraid to use it for shelter.
- Avoid eating snow. You lose a lot of core heat by melting snow inside your body. Melt it outside your body instead.
- Alcohol does not warm you. Sorry, Russia!
- Hydrate. Severe cold can be just as dangerous as severe heat. Stay hydrated.
- Don’t travel unless you have to. Conserve energy. Stay where you’re most likely to be found. Especially if you’re in a nasty storm where navigation and shelter is difficult.
- Why you should trust us
- Be prepared ahead of time
- Heat is the most important part of surviving severe cold
- Exposure, wind, and water are the major winter dangers
- Hypothermia
- Frostbite
- What to do if your home loses heat
- How to drive on snow and ice
- What to do if you skid while driving
- How to get your car unstuck from snow
- How to shelter in a stranded car
- Surviving on foot in winter emergencies
- How to walk safely in snow
- How to walk on ice and survive if you fall through
- How to survive falling into cold water
- Winter shelters and snow caves
- Winter sleeping tips
- How to start a fire in snow
- Water in winter
- Survival food in winter
- Signaling for help
- Survive an avalanche
Why you should trust us
We spent over 35 hours on research for this article. The writers have spent a combined 40 years living and prepping in urban and rural areas where winters are harsh (Ohio and Minnesota).
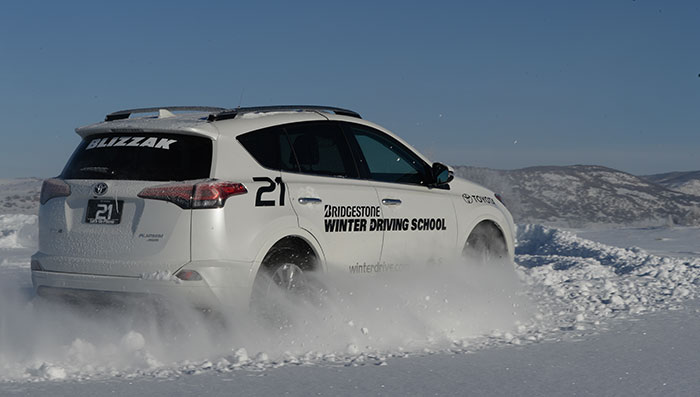
We consulted with professional cold-weather survival instructors, emergency medical professionals, academics who specialize in how cold conditions affect human physiology, outdoor recreation experts, the Coast Guard, and the Bridgestone Winter Driving School in Colorado.
We researched stories of extreme winter survival, consulted Army and Marine winter survival guides, and distilled the best survival tips from FEMA to Reddit. We reference the US Marine Corps Winter Survival Handbook and the University of Alaska’s Remote Travel Safety Guide for many of these tips.


Winter survival is much easier when you’re ready beforehand
A little bit of preparation ahead of time makes a world of difference later. If you’re totally new to prepping, start with our beginner prepper checklist. It covers the basics, like a Get Home Bag you might keep in the trunk of your car.
We spent 30 hours putting together a winter survival kit checklist and tips on how to winterize your home and car. It builds on the basic foundation, including a winter emergency car kit.
For this guide, we assume you have the right gear and organization, but try to point out how to handle things when you don’t.
Heat is the key to surviving winter emergencies
The biggest winter-specific risks in these situations are first and foremost hypothermia (the leading killer in these situations), then frostbite, dehydration, and getting lost.
In almost any situation you face, if the temperature is below even 50 F, one of your primary concerns must be heat. Depending on conditions, you can become hypothermic in as little as a few minutes.
Body heat is one of your most important assets
You are a walking space heater. One of the most important things you can remember in any cold survival situation is to take advantage of your body heat — keep it trapped against your body so it can’t escape, and protect it from the outside cold that’s trying to steal that precious thermal energy.
This is why clothing layers are so important. They trap your body heat in the air beneath the clothing layers and protect it from being stolen by the outside.
The value of multiple layers and insulation isn’t the material itself. The real value is trapped air pockets between those layers and around your body that warm up and keep you comfortable.
Exposure, wind, and water are the major winter dangers
Since heat is so important, things that reduce your heat are the most threatening — namely, exposure to the elements, wind, and skin contact with water (including sweat).
Almost everything that touches you is trying to take your heat. The difference comes down to how conductive each thing is, which determines how rapidly it can steal your heat.
A cold metal floor will steal your heat faster than wet socks, and wet socks will steal heat faster than dry socks, and wind will steal heat faster than calm air.
Almost every winter survival tip is based around those concepts.
You wear a moisture-wicking base layer to keep perspiration away from your skin. You cover as much skin as possible to block air from whisking heat away.
You put insulating layers between you and the ground while sleeping to keep the frozen earth from trying to warm itself with your heat.
You make a shelter out of snow, if nothing else is available, because a closed pocket of snow with some sticks on the ground is better than being exposed to chilly wind all night.
What is hypothermia and how do you treat it?
Hypothermia is when your body’s core temperature drops below 95 F, which causes your vital systems to shut down. This happens when your body loses heat faster than it’s produced.
According to the Centers for Disease Control and Prevention, exposure to severe cold causes your body to use up stored energy so it can maintain the right internal temperature. Which is why you’re OK for short amounts of time. But it’s a losing battle and eventually your core temperature will drop.
Hypothermia is most likely at freezing temperatures, but it can happen in cool temperatures up to 50 F, especially if you get chilled from sweat, rain, or submersion in cold water.
Hypothermia can even happen in the desert. Low nighttime temperatures take people by surprise. Wet clothing from exertion in the heat makes things worse. Sadly, illegal immigrants crossing the Mexico-US border are among the most vulnerable to cold in the desert. It’s not uncommon for the Border Patrol to treat migrants for hypothermia upon detainment — if they don’t die altogether.
To find out how quickly hypothermia sets in, we talked with Gordon Giesbrecht, PhD, a physiology professor and hypothermia expert at the University of Manitoba in Winnipeg.
He said it depends on three factors: body size and build, what the person is wearing, and what the person is exposed to (air vs. water, temperature, and wind).
For example, in ice water, you can get mildly hypothermic in minutes, and can expect to survive for no more than an hour. That’s even if you’ve got a life jacket keeping your head above water.
If you’re clothed in 40 F temperatures, hypothermia could take 10 or more hours to set in. That might seem like a long time, but if you have to spend the night in your stuck car, the hours add up fast. Drop below freezing and the process accelerates.
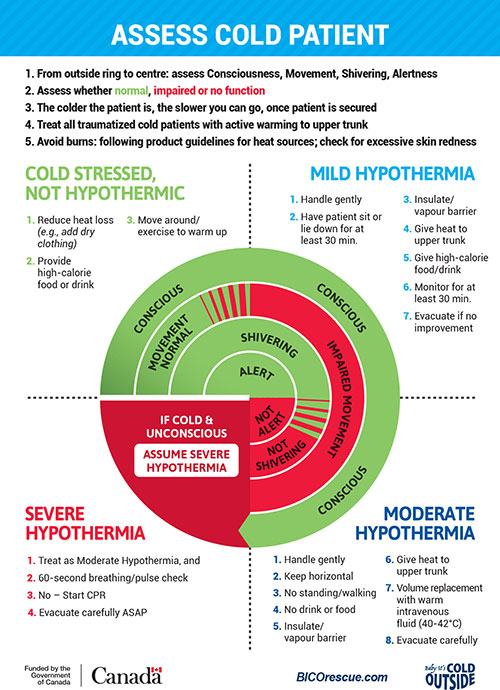
Diagnosing hypothermia symptoms
One of the scariest things about hypothermia is that it’s difficult to self-diagnose. The line between simply being cold and hypothermic depends on things like mental clarity. If you’re starting to lose it, you might not know it.
Hypothermia symptoms:
- uncontrollable shivering, or worse, a complete lack of shivering impulse
- drowsiness, lethargy, shallow breathing, weak pulse
- poor coordination, stumbling, can’t do basic hand gestures
- confusion, incoherence, slurred speech, irrational thoughts and behavior
- change in attitude and unreasonably irritable behavior
Your body shivers to create warmth. Normally you can override that impulse with your willpower, but once you can’t stop it anymore, that’s your body’s way of telling you something is super wrong.
Treating hypothermia without medical help
“The lowest I have personally seen recover was a core temp of around 72 F, though people become confused around 90 F and fatal heart arrhythmias starts to occur in the low 80 F,” said Dr. Lance Orr, director of emergency services at Barton Health in South Lake Tahoe, California.
Surviving hypothermia:
- Obviously prevent any further heat loss by getting out of the wind, water, and removing wet clothing.
- Be delicate. Organs are in a more fragile state.
- Focus on warming the core (chest, neck, head, and groin) with fire, warm water, warm stones, blankets, layers, other people’s body heat — anything to turn the tide.
- Be still. This may seem counterintuitive, but at this point pumping more blood will just lose heat through the limbs, and cold blood from the limbs can shock the core (aka “after drop”).
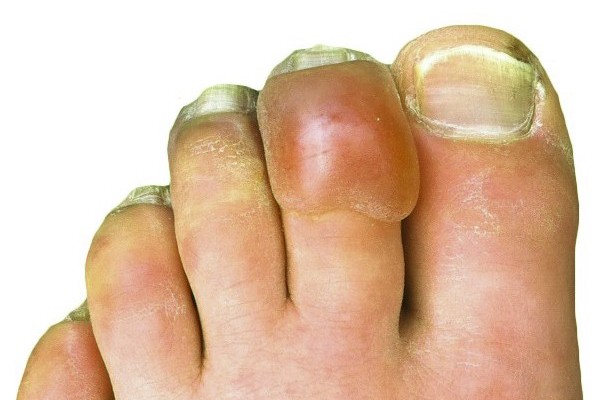
What is frostbite? How do you treat frostbite?
Where hypothermia is about your internal temperature dropping, frostbite is more about your external cells.
Frostbite occurs when skin or body tissue is damaged from freezing. Ice crystals form in and around cells, and if it gets bad enough, those parts of your body will die and might need to be amputated. Similar to crops that die from a sudden freeze.
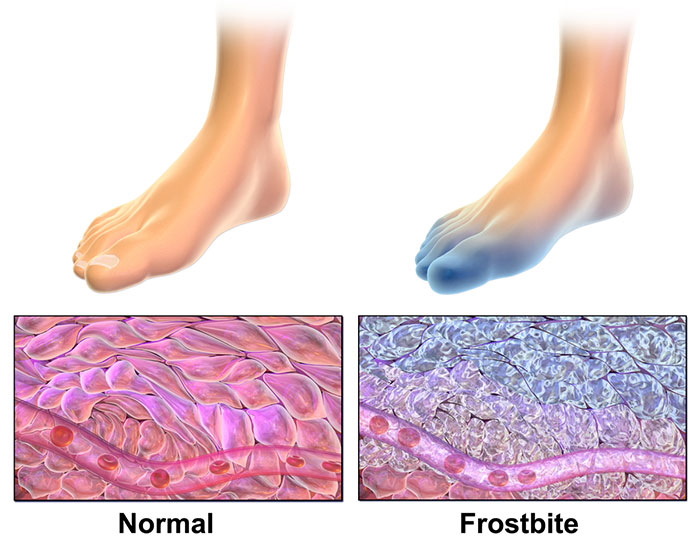
That’s why frostbite is most likely to happen in body parts that are furthest away from your heart, like your fingers, toes, cheeks, ears, and nose.
The further from your heart, the less internal warmth those cells get from pumped blood. Partly due to distance, and partly because your body will protect its core organs by constricting blood vessels further away.
Without the internal heat to fight back against the external cold, the cells lose the battle.
A 0 F temperature with light winds can cause frostbite in just 30 minutes.
Frostbite symptoms
- numbness
- a feeling of pins and needles
- hardening of exposed skin
- redness (mild frostbite)
- pale or waxy color and feel (more severe frostbite)
- swelling
- blisters or scabs
- pain
“Never accept numbness: if your fingers are numb the temperature is close to freezing and you are at risk of frostbite,” said Giesbrecht, the physiology professor at the University of Manitoba.
How to treat frostbite
Beyond the basics, it’s important not to yo-yo back and forth with frostbite. You can cause even worse damage if you warm a frozen area and then let it freeze again.
The Cleveland Clinic recommends these steps to thaw frostbitten tissue:
- Remove wet clothing.
- Elevate slightly the injured area.
- Start warming by soaking the area in warm water, and stop when the skin becomes soft.
- Cover area with sterile medical cloth if possible. If frostbite has affected fingers and or toes, wrap each digit individually. Keep them separated.
- Try not to move or use the damaged area at all.
- Do not rub frostbitten areas because rubbing could cause tissue damage.
What to do if your home loses heat
It’s extremely cold outside and your primary home heating just failed. It could be days or weeks until it’s back online.
If you live in an area that has severe winters, you really should invest in a backup heating source and fuel, such as a pellet-fired stove. It doesn’t need to be complicated or heat the whole house.
Don’t forget to turn on your faucets to a light drip so that the pipes don’t freeze and burst.
Shrink your living space
It’s easier to heat a smaller space than a big one, so shrink down your living/eating/sleeping space as much as possible into one area. Close off any rooms you can live without and do whatever you can to avoid going in and out.
Review: Best tarps
Tips on which rooms to use:
- Smaller spaces are better than larger ones.
- Living rooms are usually good because they have enough usable floor space for everyone and are typically close to the kitchen.
- Minimize the number of exterior walls, doors, and windows. The more solid barriers between the room and the cold outside, the better.
- If you can’t avoid windows, favor south-facing windows since they capture more sun.
Favor rooms with fireplaces or other heating methods (even computers). - Avoid rooms with high ceilings to keep the heat closer to you.
- Carpet is better than hard surfaces.
Have a camping tent? Don’t be afraid to set it up inside — it’s a quick way to create even smaller pockets of warmth.
This is why, in the time before central heating, older beds had corner posts and drapes. Closing the canopy around the bed trapped your body heat and blocked drafts.
If you’re on a cold floor surface, lay down blankets. Especially under any sleeping bags or air mattresses.
If you have extra Mylar emergency blankets, you can use them as heat-reflecting barriers. You can even hang Mylar, regular sheets, or shower curtains around your warm area to create a heat-trapping fort 🙂
Draw all the curtains, except for southern-facing ones in the daytime. Let sunshine in.
Plug any drafts around doors and windows. Use towels, blankets, duct tape, magazines — anything is better than nothing.
Bundle up
Many winter preparedness guides or home energy companies recommend you keep the house about 68 F in normal circumstances anyway, relying on clothing and blankets to keep you warm.
Extend that advice in an emergency situation. The goal isn’t to get your shrunken living space to be comfortable enough to sit around in a T-shirt. That probably won’t happen, or it’d be a silly waste of fuel.
Review: Survival clothing beginner’s guide
Create alternative heat
With your heat conserved, focus your next efforts on producing heat.
Beyond running any fireplaces or space heaters (which you should be taking care of as part of winter prep!), think about other sources of heat in your home. Maybe your central heat is down, but you still have gas to run the stove. Turn it on for an hour or two, and leave the door cracked so the heat escapes the oven.
If you have stable electricity but no central heat, try running computers, gaming consoles, or other electronics that get warm. Even a battery-powered laptop can heat a small room when it’s under load.
Some newer fireplaces have an intermittent electrical pilot light (IPI). So if you don’t have electricity, you’ll need to create an alternative spark. Try crumpling up a piece of paper, light it on fire, set it in the fireplace, then turn on the gas.
Space heaters, like our recommended Mr. Heater Little Buddy, usually heat around 400 square feet. Be sure any space heater is rated for indoor use, keep them at least 3 feet away from anything they could ignite, and crack a window to prevent any carbon monoxide buildup.
Even a candle inside a coffee can is enough to improve the temperature a few degrees. The key isn’t the small flame itself, but rather heating up something around it, like the coffee can.
Be careful with indoor flames and fuel-based burners — home fires go way up in the winter because of the increased use of indoor heating.
Although it doesn’t create heat, if you have a humidifier, that extra moisture in the air can make things feel a little less bone-chilling. Similarly, you can run a hot shower and let the steam out.
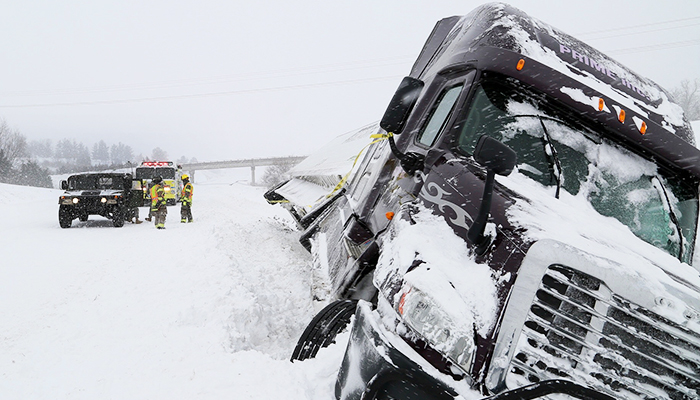
How to drive in snow and on ice
- Don’t travel if you can help it. Certainly don’t go out in nasty winter conditions if you don’t have the basic winter car kit supplies.
- Give yourself more time. Many accidents happen when people are careless or in a hurry.
- Drive more defensively. Assume other people are horrible drivers. Leave more space between cars.
- Look in your rear view mirrors when stopped, in case someone is going to slide into your rear.
- Keep your low beam lights on. Avoid high beams because they create glare.
- Brake sooner and more gradually, especially on slopes.
- If you have to go up a steep but straight hill, build controlled momentum at the base and try not to stop mid-way.
- If you feel like you’re slipping backwards down a scary hill, try to put the car sideways into the shoulder/ditch before you pick up too much speed.
- Don’t break while turning. Slow down before the turn, then turn.
- Accelerate gradually so you don’t spinout.
- Try to avoid complete stops. Don’t roll through stop signs, but do slow to a roll before the red light or stop sign so you can keep up the momentum.
- Driving a stick? Use the engine to help control your speed. Start from stops in second gear — your tires will move more slowly, which boosts traction.
- The reason some bridges have ice warning signs is because the underside of the bridge is exposed to the air, which makes the road colder and more likely to freeze.
- Do you know what to do if you witness a car accident?
Practice winter driving
When you actually need it, you won’t have time in the moment to think, “Hmm, what should I do?” You want to train your brain and muscles to do the right thing ahead of time.
Read the tips below about how to handle losing control. Then close your eyes and visualize you’re driving. You’re turning a corner and suddenly start skidding. Which way are you skidding? Think about resisting the urge to jerk the wheel. Try to picture your reaction in a controlled manner.
Once in a while, when you’re actually driving, think about what you’d do in that moment if you lost control.
If possible to do safely, go out to a large empty parking lot after fresh snow or ice. Get familiar with how your vehicle moves by hitting the brakes or inducing a skid. Just don’t crash into a light pole!
What to do if you lose control driving on ice or snow
It happens in a flash and you panic. How you react can make the difference between life and death.
The short answer: Steer the wheel towards the direction you want to go.
That sounds simple and silly, but a lot of people get it wrong in the moment. You’re essentially keeping the wheels in the right direction so that if your tires suddenly get some traction, you are ready to take advantage of it.
Two common types of skids, according to the Bridgestone Winter Driving School in Steamboat Springs, Colorado, are understeer and oversteer.
Correcting an understeer skid
Understeer skids happen when the front tires lose traction and your vehicle is unable to complete a turn. This usually happens when you’re going too fast around a corner.
To correct understeer, take your foot off the accelerator, gently apply the brakes and steer in the direction you want to go. This correction goes against natural instinct and takes considerable room to perform.
Correcting an oversteer skid
Oversteer skids happen when the rear tires lose grip, making the back end start to slide sideways. It’s called an oversteer because your nose has gone too far in the direction you were turning.
To correct oversteer, accelerate gently while steering in the direction you want to go. Smooth acceleration will cause a weight transfer to the rear wheels and help regain grip. In a rear wheel drive vehicle, oversteer can be caused by too much acceleration.
Don’t jerk the wheel or you might fishtail
A counterskid can happen when you don’t properly correct for oversteer. This is also known as fishtailing.
The key to recovering from a counterskid is to always use slight steering adjustments to keep your wheels pointed down the road in the direction of travel.
Learn how to brake properly while sliding
You’ve likely heard of anti-lock brakes, and most new cars have them. Brakes locking up during winter driving was a big hazard back in the day.
If you have ABS, apply firm, continuous pressure. This tells the car you want max braking power. You will probably feel a physical pulsing from the car. That’s OK, it’s the car pumping the brakes for you.
If you don’t have ABS, you pump the brakes (a technique called “cadence braking”) when you feel the wheels locking up. The rhythm is similar to that of a heartbeat.
If your car is stuck in snow
Getting a car unstuck from snow is mostly about improving traction and removing obstacles.
Your tires need something to grip onto, and oftentimes you only need to give just one of the powered tires more grip to get back on the road.
Start by turning the wheels as far side-to-side as you can. They might grab onto ground with more traction.
Rock the car by quickly shifting between forward and reverse. The idea is to drive an inch forward, two back, three forward, and so on, until you can build momentum to drive out.
Still stuck? Time to crack open the emergency kit and get out.
Clear snow from around your tires and under the chassis, bumpers, and other low-hanging parts (like the differential ‘pumpkin’ in the middle of the axles). The shovel or tools in your emergency kit will help.
Let a little air out of your tires to get more grip. This is why off-roading Jeeps “air down” before venturing out on trails, because the more of the tire’s surface area touching ground, the better. You can use your keys or other tools to gently push in the middle of the air valve.
Add traction under/near the tires however possible. The best options should already be in your survival kit: traction mats, sand, or kitty litter. Don’t have any? Try using your floor mats, small rocks, branches, or dirt.
Turn off traction control. Although it might sound counterintuitive, traction control helps you in slippery conditions on pavement, not when you’re stuck in snow. You’ll want drive tires turning if you’re trying to get unstuck.
Give it a little gas. Don’t try to floor it. Let the tires grab with as little acceleration as possible. In automatic transmissions, shift to your lowest gear. In manual transmissions, use second or third gear and use the clutch to spin up the wheels.
You should have tow straps in your winter car kit, which means any passerby can help. If not, make the tow truck call, bundle up, and conserve heat.
How to shelter in a stranded car
Thanks to the snow, hundreds spent a night stranded on the Pennsylvania Turnpike https://t.co/1nEvUOIP4T pic.twitter.com/sTsgX0GkQ2
— The Boston Globe (@BostonGlobe) January 24, 2016
In 2016, a snow storm left about 500 vehicles stranded on the Pennsylvania Turnpike. It took 24 hours for crews to start clearing the road, and many had to spend the night in their vehicle.
Hundreds were left stranded overnight in a winter traffic jam on Virginia’s I-95 in January of 2022.
Or the 50 hunters in a 1992 Colorado snowstorm that had to sleep in their cars for a full week before rescue.
This scenario is a perfect example of where a little bit of prep work goes a long way. We recommend everyone has a vehicle emergency kit (often called Vehicle Everyday Carry, or VEDC), and many people choose to keep their Get Home Bag in the trunk, too.
The most important issues are heat, water, and being found/helped.
Unless you are in very remote or dangerous areas, the best thing to do is stay with your vehicle. It’s a giant survival asset you don’t want to walk away from unless you have to.
Protect your heat. Minimize the number of times you have to go outside. For example, move any emergency supplies from your trunk/bed to inside the vehicle.
Bundle up and get out the emergency blankets. Take advantage of trapping and protecting your body heat.
Be creative when insulating yourself. If you’re sleeping in the back seat, use your floor mats to create extra insulation between your body and the cushions, which are mostly air. Or roll up the floor mat to use as an insulating pillow if you have to rest your head against the cold window.
If you’re in a larger vehicle, try shrinking the living space by taping or pinning Mylar blankets or any other material to the ceiling. Kind of like a car fort. It’s easier to heat small spaces.
Keep your feet off the floor. The footwells will be one of coldest parts of the vehicle.
Run the engine for a few minutes every hour. This ensures it will start after the storm, lets you generate some heat, and listen to weather reports. Clear snow from your tailpipe so dangerous fumes don’t build up inside.
Don’t ever fall asleep with the engine running.
Crack a window every once in a while, especially if you’re burning anything for heat. You’ll lose some heat, but it prevents carbon monoxide poisoning.
Make your vehicle noticeable. Turn your hazard lights on. Honk your horn. You can even use the shiny side of tarps and Mylar emergency blankets as a signal. Create a SOS or HELP aerial signal if rocks or branches are nearby. Many VEDC and GHB kits have signal flares — use them when you think you will be noticed.
Keep your cell phone in a pocket close to your body, because electronics and batteries perform poorly in cold weather.
Surviving on foot in extreme cold or winter storms
Focus on heat, basic survival necessities like shelter and water, and maximizing your chances of being found.
The special risk in this situation is getting lost or making things worse.
Deciding whether to shelter in place or move is one of the most important decisions in these situations. This is true in almost any on-foot-in-the-wilderness survival scenario.
According to Jessie Krebs, a retired military SERE instructor who now teaches civilians in the Rocky Mountains, “People, particularly men, have a habit of wanting to move and do something, to forge ahead and escape. But your default choice should always be to stay put.”
You should only override that if you have to. Legit reasons to move are lack of shelter (or the ability to make one), water, avoiding an imminent threat, or significantly increasing your chances of being found.
It’s easier than normal to get lost in winter situations. Heavy snow storms can cause whiteout conditions that limit your visibility to just a few feet. Which is just as dangerous as trying to find your way in total darkness.
Walking around, constantly looking at the bright light reflected off of snow can cause snow blindness — literally a sunburn on your eye’s cornea.
Heavy snow can make it harder to identify landmarks, terrain features and risks, and hiking paths or roads that would normally lead you to safety. There are stories of people lost in the winter walking right over a main road, without even knowing it, only to die somewhere on the other side.
If you must move:
- Move during the day.
- Protect your eyes.
- Be very careful where you step.
- If you get lost or disoriented, stop and regroup, don’t make it worse.
- Hydrate more than you think you should.
- Don’t be afraid to go back to your starting point if you’re not getting the rewards of moving (better shelter, easier to be discovered).
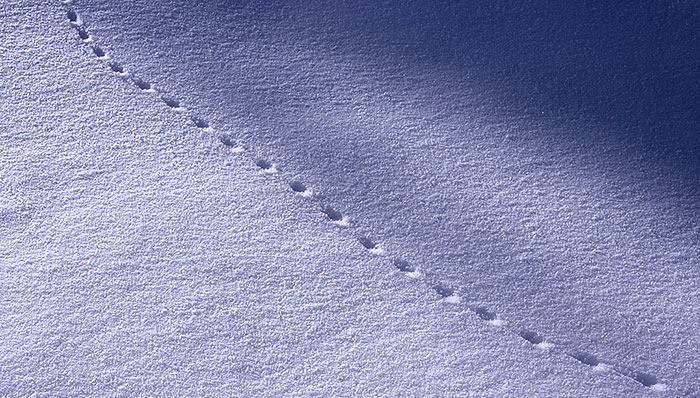
- Use the snow to your advantage when navigating — pay attention to tracks, or even build markers in the snow so you can find your way back or see where you’ve been.
How to walk safely in snow
Take it slowly, be deliberate, and be careful about where you walk. Use a long pole or stick to poke the ground in front of you so you don’t post-hole.
“Post-holing” occurs when you take a step and your leg plunges through deep snowpack. It’s not impossible that you could sink your hole body below the snowline.
It can be arduous to pull yourself out from each step, resulting in slow forward progress, exhaustion, sweat, and dehydration.
On this section of the Appalachian Trail, it’s easy to think the existing footprints indicate the snow is less than a foot deep. Yet he still post holes:
Avoid tree wells. The leaves and branches of a tree will prevent snowfall from building up around the base of the trunk. Which makes it seem like a safer place since it might be shallower than the snow around it. But this hollow space of loose snow can create a trap, where the snow around it caves in and buries you.
A writer identifying himself as a US Forest Service rescuer posted an account of a man who perished after falling into a tree well:
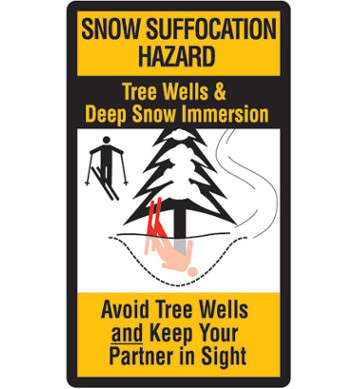
“My best guess is that this young man was hiking and got tired, or maybe a cramp from walking in the deep snow. He went to go sit at the base of the tree, not knowing that there was a tree well, and fell in. He got stuck with his feet up, and the surrounding snow caved in around him. Unable to free himself, he suffocated. It’s called snow immersion suffocation, and it doesn’t usually happen except in really deep snow. But if you get stuck in a weird position, like this guy did, even six feet of snow can be lethal. What scared me the most was imagining how he must have struggled. Upside down, in the freezing cold, he didn’t die quickly.”
Whether in a tree well or just through post-holing into super deep snow, do whatever you can to keep your head above the snow. If you end up buried, stay calm, create space in front of your face to breathe, and try to dig upward without struggling too much or causing more cave ins.
How to walk on ice and survive if you fall through
When in doubt, don’t! There’s a lot of risk with ice, and you probably won’t have the equipment with you to take a depth measurement.
Tips for walking on ice:
- Waddle like a penguin with short, flat-footed steps.
- Keep your arms out (like a penguin), so that if you suddenly fall, your arms have a chance to catch the ice around you to keep you from going under and gulping water when your body involuntarily gasps for air.
- Use a pole, stick, branch, anything to continuously poke the path ahead of you. Tap the surface and listen for cracks or hollow sounds.
- Obviously watch for any cracks, but also watch for footprints. Repeated use weakens ice.
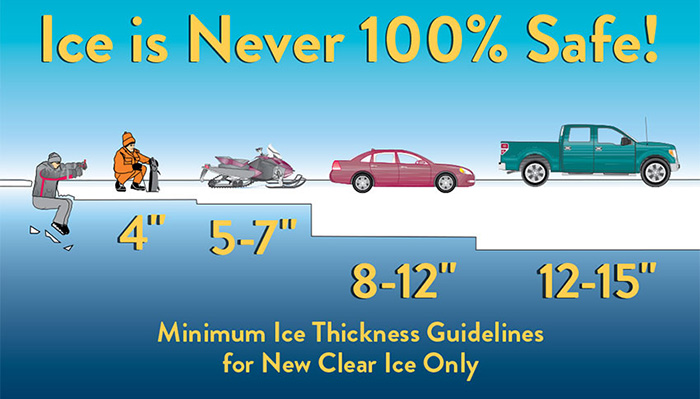
- New, clear ice is stronger than old, cloudy ice.
- Four inches of clear, freshly formed ice may support one person, while 12 inches of old, partially thawed ice might not.
- Smooth ice is better than rough or clumpy ice, because smooth ice likely means it’s a pond or lake, while rough ice could mean the water underneath is a flowing river. Ice on top of flowing water is always more dangerous.
- Don’t walk on ice if the air temperature is or has been recently higher than 20 F (-6 C).
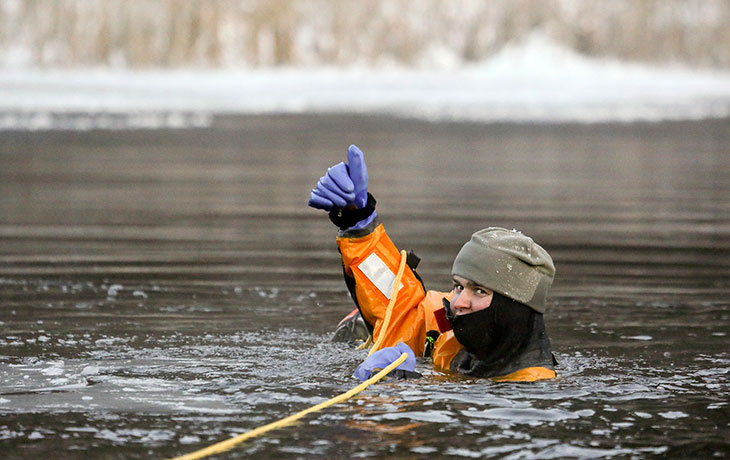
How to self-rescue if you fall through ice
Think about how you’d get out of a pool. You put your hands on the lip and do a kind of pushup motion, pushing straight down through your palms while lifting yourself straight up.
Getting out of ice is the opposite. Mainly because you don’t want to put all that force straight down through your palms onto the ice, because it’ll just break and make things worse.
Instead, use your legs to kick out behind you, becoming almost flat to the surface. Kick yourself up onto the ice, then wiggle, keeping your weight as evenly distributed as possible.
How to survive falling into cold water
Water steals heat from you 25 times faster than air. So you don’t have much time until hypothermia sets in. Stay calm, but act fast. The following table is via the University of Minnesota.
| Water Temp F (C) | Time Until Exhaustion or Unconsciousness | Expected Time of Survival |
|---|---|---|
| 32.5 (0.3) | <15 minutes | 45 minutes |
| 32.5–40 (0.3–4.4) | 15 – 30 minutes | 30 – 90 minutes |
| 40–50 (3.3–10) | 30 – 60 minutes | 1 – 3 hours |
| 50–60 (10–15.6) | 1 – 2 hours | 1 – 6 hours |
| 60–70 (15.6–21.1) | 2 – 7 hours | 2 – 40 hours |
| 70–80 (21.1–26.7) | 3 – 12 hours | 3 hours – indefinite |
| 80 F (26.7 C) | Indefinite | Indefinite |
When you’re still in the water
These tips come from the Coast Guard’s 9th District, based in Cleveland, Ohio:
- Stay calm and conserve energy. The more you flail, the faster you’ll lose heat. A cold-shock response is normal, but you can mentally choose to turn it off or ignore it. Try practicing the next time you’re outside in the cold and shivering. Just turn it off.
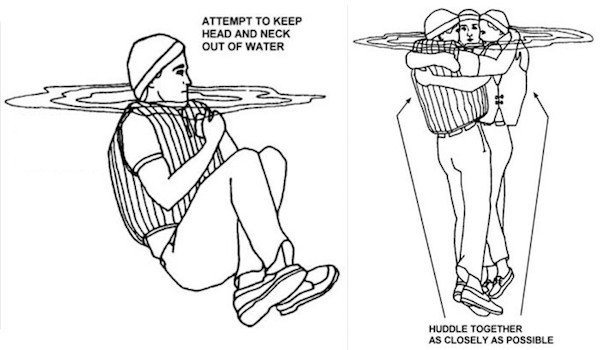
- Protect your core body heat by curling into a fetal position, with your knees into your chest, arms wrapped around your shins and calves.
- If you can get any part of your core out of the water, perhaps by curling over a log, do it. Think of Rose in Titanic. She survived and Jack didn’t because her body was out of the water.
- Keep your clothes on. Try to turn your clothes into a heat-trapping wetsuit by closing all of your collars and cuffs.
- Don’t try to swim. Yes, you want to get out of the water, but don’t try to swim unless it is within reach or very nearby. Swimming disrupts the layer of warm water between your clothing and your body and sends warmer blood to your extremities. This cuts your survival time by as much as half.
- If you’re with other people, huddle together for warmth and support. It also makes you more visible to rescuers.
Once you’re out of the water
Movies have trained people to think the right answer is to always immediately strip off all the wet clothes. The real answer depends on what is wet, how much, and what you have around you (fire, tent, people who like you, etc.)
The main problem is that wet clothing doesn’t dry very well on its own in the cold. It needs a heat source, which is usually fire or body heat.
If you’ve merely stepped in some shallow water or soaked your socks with sweat, remove the damp items and dry them.
Make your job easier by removing wet clothing and wringing out any water before putting it back on. It can even make sense to let clothes freeze so you can beat them against a rock to smash away the ice. Every little bit helps.
If one person is wet but another is dry, you could swap clothes. The dry person can handle it better than the person who just got out of the water, and their body will dry the clothes more quickly.
If you have a fire, removing everything and get it dry quickly. It’s better to sit naked in the cold air for 20 minutes than to keep the wet clothes around you.
But it’s likely you won’t have a fire. So it’s usually better to keep the wet clothes on, because the clothes won’t just dry themselves in the cold air — that would take way too long while you’re sitting naked.
Navy SEALs are taught this method, called the Rewarming Drill, during their winter training.
Your goal is to let your body heat do its job. Which means you need to trap and protect your body heat so it can raise your internal temperature and slowly dry the clothing.
Do what you can to get to shelter, or at least out of the wind, so that you’re not making things worse. Wind on wet clothes is particularly awful.
If you happen to have something like a tarp or poncho, put it on over your wet clothes. This keeps the wind from making the damp feel worse and creates extra layers of air your body can heat to dry the clothes.
Winter shelter
We’re creating a big guide on building general wilderness shelters. But for now, what’s specifically important about winter shelter?
Protection from the elements is an even bigger deal than normal — to the point you would prioritize shelter over fire, food, and minor medical issues.
Moderate wind chill alone can make a 0 F day accelerate hypothermia and frostbite as if it were -22 F. In that scenario, frostbite happens in less than 30 minutes.
Shelters need not be pretty or complicated. A trash bag next to a fallen tree with some leaves on top is technically a shelter, and worth using if it’s the only option.
Any shelter needs to satisfy six basic criteria, according to the US Marine Corps:
- protection from the elements: sun, wind, snow, rain
- be free from natural hazards: avalanches, loose rocks, or broken tree limbs
- stable under stress from further severe weather
- ventilation, not only from your breathing, but burning fuel
- heat retention
- drying facility, to dry wet clothes
Winter conditions increase the risk of “widowmakers”, dead tree limbs or tops that fall out and crush whatever is below. They earned their nickname for a reason, so be careful about where you make camp.
Try not to be downhill from snow or melt. If you’re in mountainous terrain, be careful of taking shelter near the base of a slope or cliff in the event of an avalanche.
Without straying too far, find the best spot that is dry, flat, has natural wind protection, and is either visible or hidden depending on your goals.
Winter shelters should be smaller than you might normally make. The smaller the space, the easier it is to heat, build, and maintain.
You will also want to think about the orientation of your shelter and its relation to a fire. Air flows downhill during cold winter nights, for example, so you wouldn’t want that cold air coming in through the mouth of your shelter, trapping smoke from the fire where you’re sleeping.
But you do want the heat from a fire to radiate into your shelter bubble. So a fire is usually a few feet away from the opening side. This also makes it easier to stoke or add to the fire without crawling out into the cold night.
Natural winter shelters
Since you want to minimize the time you spend exposed to the cold, burning calories and working up a sweat, try to leverage natural shelters as much as possible.
According to the USMC winter survival guide, these are common places to look:
- Caves or rock overhangs. Modify them by adding walls of rocks, logs or branches across the open sides.
- Hollow logs or downed trees. Clean or dig them out, and bolster them with tarps, pine boughs or other material draped across openings.
- The space beneath pine boughs can create natural cavities where you can shelter from wind. Just be careful not to get trapped.
Be aware of risks with natural shelters, such as animals dwelling inside them (namely bears), lack of ventilation, and potential instability.
Existing man-made shelters
If you’re lucky enough to stumble upon a cabin or vehicle in the woods, use your best judgment if you decide to break in.
Most people would agree that breaking in is justified in a life-or-death survival situation.
In fact, places like Alaska legally permit you to break into a cabin for emergency survival. Alaska Sec. 11.46.340 says you won’t be punished if:
- “The entry, use, or occupancy of premises or use of personal property on the premises is for an emergency in the case of immediate and dire need; and
- “As soon as reasonably practical after the entry, use, or occupancy, the person contacts the owner of the premises, the owner’s agent or, if the owner is unknown, the nearest state or local police agency, and makes a report of the time of the entry, use, or occupancy and any damage to the premises or personal property, unless notice waiving necessity of the report is posted on the premises by the owner or the owner’s agent.”
How to build a survival snow shelter
You can make shelter with almost anything. Get creative. Use parts from the smoldering airplane crash you just survived. Skin an animal. Collect litter you find along the road.
Winter shelters can be tougher to make because of less natural resources laying around. Normally you would do things like gather leaves for bedding and use branches with leaves/foliage for roofing. That’s harder in winter, but do the best you can.
Snow might be your most abundant natural resource when making a winter shelter.
It seems counterintuitive, but using snow for shelter is much better than staying exposed to the wind and elements.
According to the National Snow and Ice Data Center in Boulder, Colorado, fresh snow is 90-95% air. Since that air is trapped, heat transfer is greatly reduced, and the snow becomes an insulator.
Ten inches of fresh snow is equivalent to a few inches of fiberglass insulation. Which means a shelter made purely of snow can be up to 15 degrees F warmer on the inside, purely from your body heat.
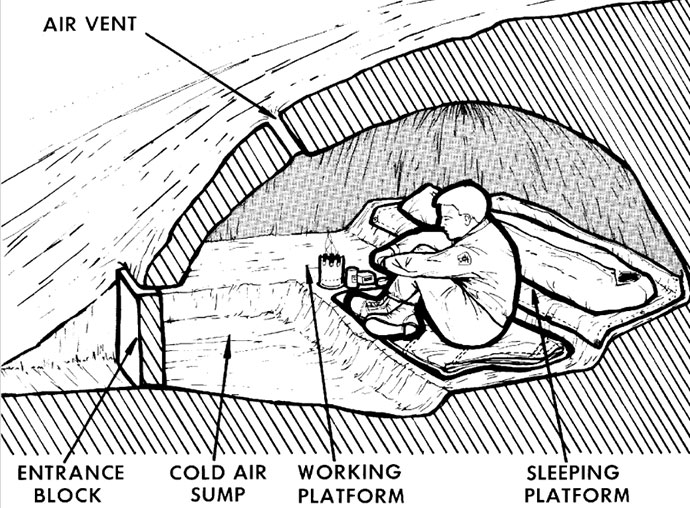
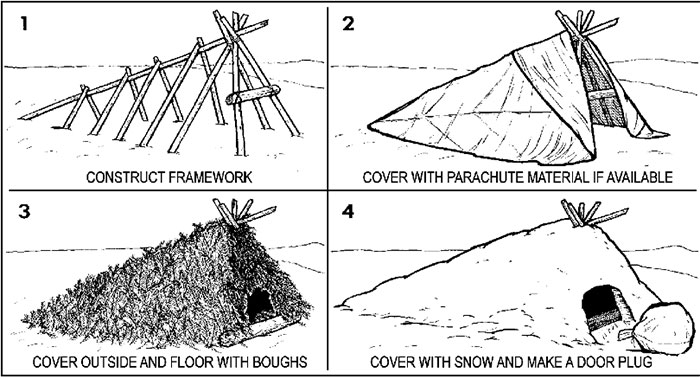
Snow caves and quinzees are great (but involved) options. The basic principle is to create a hole in a deep mound of snow. Create a sturdy roof with ventilation holes and an entrance you can partially block. Hopefully you can shape the entrance, floor, and sleeping area in such a way that cold air moves down and away from you (known as a cold sink).
No matter the snow shelter, keep your body from directly contacting the snow. Put foliage, pine boughs, or other material between you and the snow. Yes, it can insulate you, but snow is still frozen water.
You can even run candles and fires inside the snow shelter. But always make sure your air is ventilated and smoke can escape.
If you can’t make these more robust snow caves, try using snow to build walls or add insulating layers in whatever way you can.
As a backup or quicker option, dig a trench and cover it with branches, foliage, and snow. Think of it like a snow bivouac.
Make it big enough to fit your body (roughly shoulder width), then cover it with a tarp, jacket, leaved branches, or debris to keep off the snow and wind. It won’t be as warm as an enclosed shelter, but it will protect you from the wind and snow.
If there are no resources around to make a shelter or you’re just out of time/options, try to get as low as possible to get out of the wind.
Winter sleeping tips
From 2015 to 2016, explorers Dave and Amy Freeman spent 366 days in the Boundary Waters Canoe Area Wilderness of northern Minnesota to help protect the area from a proposed sulfide-ore copper mine. They told GearJunkie in 2016 four rules for dressing while sleeping:
- Make sure all your clothing is completely dry before going to bed.
- Wear breathable clothing in layers. You could wake up cold, wet, and clammy from perspiration — even in cold weather.
- Wear even layers across your body.
- Keep your head and neck covered, but don’t burrow inside your sleeping bag because your breath’s moisture can get trapped and chill you. Down doesn’t insulate when it’s wet.
Insulate yourself from the ground as much as possible because it will suck heat away from you. Even if you have to pile a whole bunch of pine boughs, leaves, and other debris, do what you can to stay off the ground.
If possible, go to bed with a full stomach and stay hydrated. It’ll help you stay warm through the night.
Pour heated water into a bottle and tuck it against you while you sleep. Try to wrap it in a sock or something similar.
If it won’t make the bag interior too wet, consider putting your boots inside your sleeping bag/area. Putting your feet inside frozen boots when you wake up will not only be miserable, but can lead to frostbite.
Consider using rocks warmed from a fire to heat you. Wrap a warm rock in fabric and put it near your feet, or even inside your sleeping bag.
Similarly, you can leave some rocks toasting by the fire, so if you get up during the night you can slide those ready-to-go hot rocks into your shelter for a quick temperature boost.
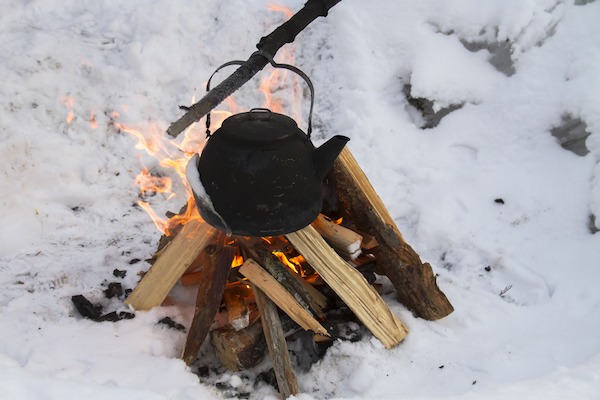
How to start a fire in snow
As with shelters, we’re putting together a standalone guide for fire starting in normal circumstances. But what’s unique about starting a fire in winter?
Look immediately above the fire. Will the rising heat melt snow that will then fall down onto the fire or your camp?
You want to be as efficient as possible with your heat, so think about how you can trap it rather than letting it float off. This is why many campfires are set against natural rock walls and overhangs in places like the American Southwest, where it can get quite cold in the nighttime desert and those land features are abundant. Not only does the rock trap the heat, the stone can even warm up a little bit to hold the energy.
Same story with stones around the fire. Not only will they help protect against wind, they’ll absorb some heat and can help dry clothing, create a shelf for cooking, or be slid inside your shelter as a natural space heater.
No natural reflectors? Consider using a Mylar emergency blanket, which is designed to reflect heat and is found in most good emergency kits (along with the paracord to string it up).
Because the ground immediately under and around the fire is more likely to become damp because of nearby snow, try elevating the fire off the ground with some short flat rocks, or even dry unfrozen dirt.
Protect your fire’s fuel. Raise it out of the snow to keep it as dry as possible.
Can’t create solid floors? At the minimum, stomp down the snow as compactly as possible or scoop it out down to dirt.
Finding fuel can be tough, especially since snow may make most or all of the nearby wood damp.
Look for fallen pine cones, dry moss, bark, and similar organic debris. Even if damp, if they’re small enough you may be able to dry them out by sandwiching them between your clothing layers.
If you have delusions of rubbing some sticks together, crush that now — this is why having fire starters is such a crucial part of any winter emergency kit.
Actually igniting the fire isn’t that much different in winter, although you might have harsher wind. Keep in mind that because the fuel is starting off colder than if it were summer, it will take more effort to bring the fuel temperature up high enough to ignite.
You can even use ice to start a fire, similar to using a magnifying glass or bottle. You want to try and shape the ice with your hands so the surface becomes smooth and slightly curved, again like a magnifying glass.
How to find and purify water in winter
Drinking water is just as important in winter as it is in summer. Yet many people make the mistake of hydrating less just because they’re cold or not sweating.
Also, sorry folks, but alcohol does not warm you up or hydrate you properly. It might feel tingly, but it ultimately drops your core temperature.
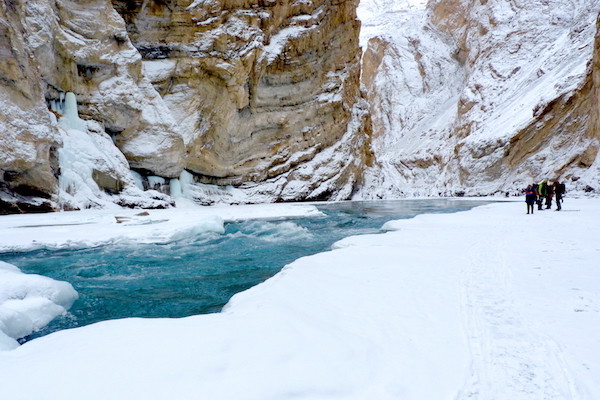
It’s obviously easier — and uses less fuel / wastes less heat — to find liquid water rather than melting snow. But getting to liquid water, like streams and lakes, introduces different risks. Better to not have a sip of water than to fall in and be drenched and freezing.
 Water freezes at the top. So if you have a bottle of water, carry it upside down so that if it does freeze or get slushy, the cap and spout still work fine.
In yet another example of why you need to know and practice with your gear before you truly need it: Water filters, like the popular Lifestraws or Sawyers, can freeze up or even break in cold temps.
Better to use filtration and boiling, tablets, or chemicals. The University of Alaska Remote Survival Guide indicates very cold or opaque water might require long water chemical treatment times, up to several hours or overnight.
Don’t eat snow, melt it first
Just like drinking salt water when stuck at sea, eating snow is a tempting trap that is one of the most dangerous mistakes you can make.
Because water expands when frozen and snow is mostly air, you’d have to eat almost 5 liters of snow to get the same amount of liquid in a normal 17 ounce bottled water.
Meanwhile, you’re spending core body heat you can’t afford to lose. It takes a lot more energy/heat to melt snow than it does to warm up cold water.
“I would not recommend using body heat to melt snow,” said Dr. Lance Orr, director of emergency services at Barton Health in South Lake Tahoe. “Eating snow will cool you down.”
This isn’t always black and white in practice. If it’s the middle of the day and you’re already generating body heat by moving about, then fine, use your judgment and eat snow. It might even keep you from overheating and sweating. And it’s certainly better than getting dehydrated.
Otherwise, do whatever you can to not melt snow inside you.
Ideally, use heat from the sun or a fire to melt snow in a separate container. Or use the ambient temperature in your shelter.
Get creative. For example, if you don’t have the ability to put contained snow close to a fire, bring heat to the snow by warming up small stones you can drop somewhere else.
If you must, try to use your body heat in a way that doesn’t lower your core temperature. Perhaps you fill a canteen, wrap it in a sock, then carry it between your mid and outer layers while walking. You could even use your pockets If you have a non absorbent jacket.
If you need to use more direct body heat, do it in a way that just gets the ball rolling, not melting the whole container. Use areas of your body that are closer to your core and less prone to frostbite.
Ice is denser than snow, so if you’re going to spend fuel or body heat, better to use the ice and reap more reward. But ice is likely more contaminated than fresh snow, so consider the risks and whether you can filter/purify it.
This goes for cold water, too. It might not be ice or snow, but it can still be darn cold and lower your body temp. Better to let it sit inside your shelter or canteen for a little while before drinking.
Survival food in winter
Although it’s generally harder to find food in winter, there are some ways to turn it into an advantage.
Snow can make tracking much easier. Pay attention to animal trails, droppings, and areas that look trampled down from sleeping.
Since there’s less standing, unfrozen water, animals might centralize around the few available ponds and rivers. Which makes hunting and trapping easier.
You’ve got built-in refrigeration if you happen to catch something. You skin and break down the meat like normal, although you might want to move more quickly while it’s still warm and flexible.
Depending on how brutal the winter is, you may still be able to forage for wild berries, vegetation, mushrooms, and so on. You can even put pine needles in your boiling water to make a flavorful and healthy tea.
Fishing is possible in many cold waters, but more difficult than normal.
Fish become less active as things get colder. They’re cold blooded, so their metabolism drops to a sort of mini-hibernation. That means fish are most active (and thus more likely to bite the bait) in winter when the sun is highest, between 10 a.m. and 4 p.m.
They like to find the warmest, calmest parts of the water so they can conserve energy. Warm water sinks in very cold temperatures, so fish will go deeper, and they’ll tend to pool into deep holes and coves.
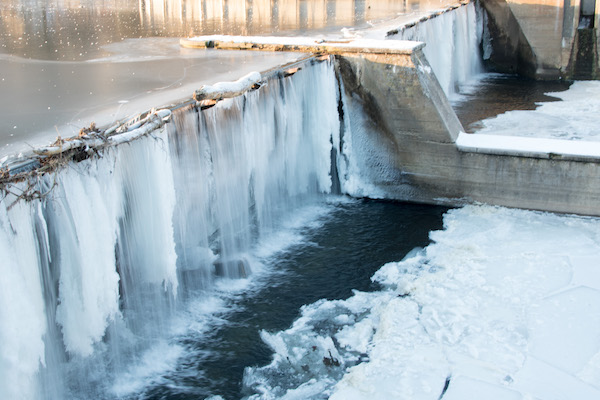
However, fish might aggregate around shallow moving water, like the area after a dam, if the movement creates a rare unfrozen pocket.
Without proper ice cutting equipment you’d have to fish through broken ice or unfrozen water, which means you’ll be staying on shore and less able to reach those ideal spots.
All of the above makes picking the right spots all the more important. Try to get some elevation over the water. If you can look down over a wide area, you might be able to tell which spots are deeper and calmer.
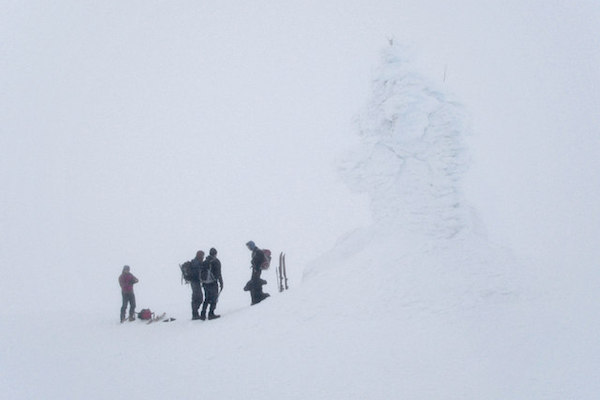
How to signal for help in winter
The best methods are the same year round: fires, flares, or things like large branches spelling out V or X in an open clearing.
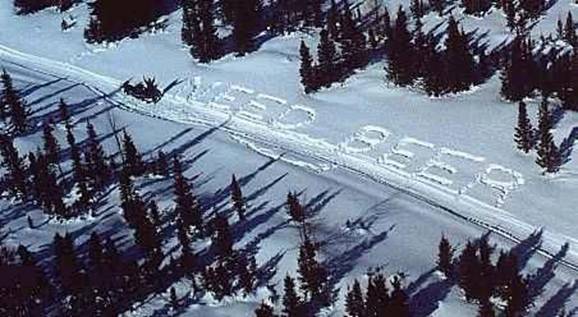
Snow can be useful, but isn’t as preferable. You can try stomping out a message in the snow, as these two mountain climbers did in a 2015 Alaska incident that lead to their rescue. Try to get down to dark earth and/or fill it with debris so the letters have a higher contrast against the snow. Or create snow mounds against darker color earth.
In the worst case scenario, you could position snow mounds in such a way that their midday shadows spell out SOS. In areas close to the equator, a north-south line makes a shadow anytime except noon. Areas further north or south of the equator require the use of an east-west line.
Review: Best signal mirror
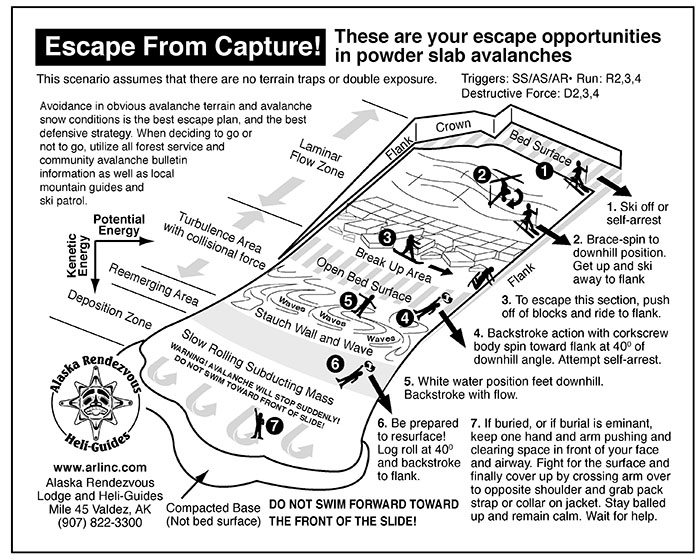
How to survive an avalanche
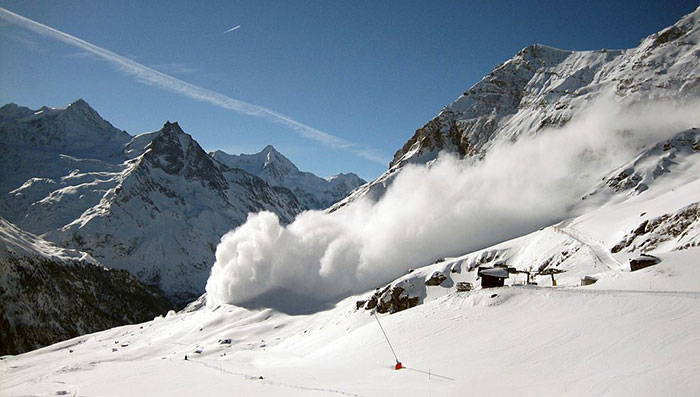
We almost didn’t include this section, because most of the official advice is: “Don’t be in the way to begin with.”
Karl Birkeland, director of the US Forest Service’s National Avalanche Center, simplified for The Prepared how to survive an avalanche:
- Try to get off the moving slab of snow. If you can’t get off it, try to arrest yourself on the bed surface of the avalanche.
- If you are caught and being carried, try to get rid of your gear. Swimming motions might help to keep you near the surface of the slide.
- As the avalanche comes to a stop, use one hand to create an air pocket in front of your face and push your other hand toward where you think the snow surface might be. Do this while you are still moving because once the snow stops you will not be able to move.
- Once you are buried, you now have to rely on your partners to find you. Hopefully you an have avalanche transceiver, probe and shovel, and have practiced with them.
For a more detailed look at how to escape an avalanche, the Alaska Rendezvous Lodge and Heli-Guides (which gives skiers rides in helicopters to mountaintops), offers this graphic: